GPU Gems 2
GPU Gems 2 is now available, right here, online. You can purchase a beautifully printed version of this book, and others in the series, at a 30% discount courtesy of InformIT and Addison-Wesley.
The CD content, including demos and content, is available on the web and for download.
Chapter 19. Generic Refraction Simulation
Tiago Sousa
Crytek
Refraction, the bending of light as it passes from a medium with one index of refraction to another (for example, from air to water, from air to glass, and so on), is challenging to achieve efficiently in real-time computer graphics. There are many well-known techniques for simulating light reflection (such as planar reflection maps and cubic environment maps), and these techniques work well in most situations. However, there aren't as many widely known and effective techniques for simulating refraction. This chapter describes an approach to refraction based on perturbing the texture coordinates used in a texture lookup of an image of the nonrefractive objects in the scene. This technique is very efficient and works well in many cases. The method presented here is an expansion of the techniques used in Far Cry for rendering water, heat haze, and the sniper-scope lens, among other effects.
There are several ways to simulate refraction: some are based on precomputing an environment map and then using it at runtime; others are based on computing the environment map on the fly. Drawbacks of these techniques are high texture memory usage and the performance penalty, especially if there are many refractive surfaces in the scene requiring different environment maps.
Another problem with current water refraction simulation techniques is that they require two rendering passes: one to generate the refraction map with geometry above the water plane clipped, and then another pass to render the water surface. This approach can also have poor performance, especially in complex rendering situations.
This chapter discusses a simple technique to overcome these problems. We start by introducing the basic technique, which is based on using the current back buffer as a refraction map and then adding displacement to the texture coordinates to simulate the refractive look. This basic approach can lead to artifacts, however, so we then discuss how to mask out geometry from the refraction map. Finally, we demonstrate some general techniques for rendering realistic water and glass using this refraction simulation technique. Figure 19-1 shows a simple example of refraction in a scene.
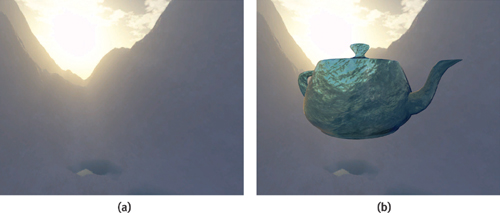
Figure 19-1 An Example of Refraction in a Scene
19.1 Basic Technique
The first step of the basic refraction technique is to render the scene geometry into a texture, skipping all refractive meshes. This texture can be used to determine which objects are visible behind the refractive objects that will be rendered in a subsequent pass. We denote this texture as S.
The second step is to render the refractive meshes, looking up values from the texture S with a perturbation applied to simulate the refractive look. The perturbation can be achieved using a normal map N, where the normal-map red and green (XY) components are used and scaled by some small value to add a displacement into the projected texture coordinates. This approach is straightforward to implement in a shader: (1) fetch the texture N, (2) use the XY components scaled by a small value (such as 0.05), and (3) add this displacement value into the projected texture coordinates for S. Listing 19-1 shows a shader that demonstrates this approach; Figure 19-2 illustrates the three steps.
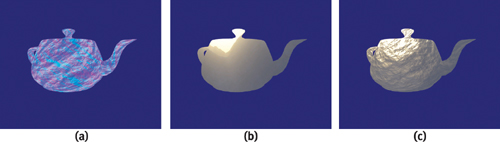
Figure 19-2 A Visualization of the Rendering Steps
Example 19-1. Shader for Basic Refraction Technique
half4 main(float2 bumpUV
           : TEXCOORD0, float4 screenPos
           : TEXCOORD1, uniform sampler2D tex0, uniform sampler2D tex1,
             uniform float4 vScale)
    : COLOR
{
  // fetch bump texture, unpack from [0..1] to [-1..1]
  half4 bumpTex = 2.0 * tex2D(tex0, bumpUV.xy) - 1.0;
  // displace texture coordinates
  half2 newUV = (screenPos.xy / screenPos.w) + bumpTex.xy * vScale.xy;
  // fetch refraction map
  return tex2D(tex1, newUV);
}
19.2 Refraction Mask
The basic technique presented in the previous section will work reasonably well in a variety of situations, but it can be prone to artifacts if a bump with a large enough scale is used for perturbation when a mesh is in front of a refractive mesh. Figure 19-3 illustrates the problem: the brown sphere is inaccurately rendered as in the refraction in the teapot, even though it is in front of the teapot, not behind it.
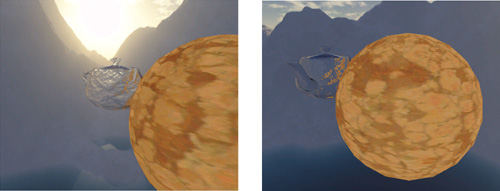
Figure 19-3 Artifacts Caused by the Technique
These artifacts are visible because the texture S has all the scene geometry rendered into it, including objects in front of the refractive mesh, and we are indiscriminately applying perturbation on every pixel. This leads to refraction "leakage" between objects in the scene. A straightforward solution is to decrease the amount of perturbation applied, until artifacts are reduced to an acceptable visual quality level. However, it is difficult to find a scale for the perturbation that works well in all circumstances, and this solution also has the negative side effect of capping how bumpy your refractive surfaces can be.
A better solution instead is to make sure that we actually don't add perturbation into the wrong pixels. To do so, we lay down a mask in the alpha channel of the S texture for all refractive meshes and use it to ensure that the perturbed coordinates are used only if they end up being inside a refractive object's area on the screen. See Figure 19-4 for an example.

Figure 19-4 The Alpha Channel in the Frame Buffer
For this approach to work, we need to change the rendering a bit: first we make sure that the alpha channel of texture S is cleared to white, and then we render refractive meshes as black only into texture S's alpha channel. When rendering the refractive meshes, we make use of the extra information stored in S's alpha channel, to discriminate which pixels will be processed. This is done by checking if alpha is white; if so, we do not add perturbation in that case. Only if alpha is black do we add perturbation. Thus, if perturbation would have included a pixel outside of the refractive object, we instead just use the original pixel, giving whatever geometry was directly behind the refractive object. Although this result is inaccurate—refraction may actually lead to objects that aren't directly behind the object becoming visible—it works well in practice and is quite efficient. Listing 19-2 shows the shader that implements this approach, and Figure 19-5 shows the results.
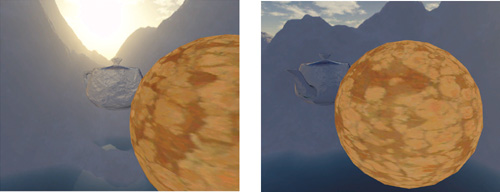
Figure 19-5 Artifacts Removed by Using the Refraction Mask
Example 19-2. Improved Shader That Uses the Refraction Mask to Avoid Including Pixels from Objects in Front of the Refractive Object
half4 main(float2 bumpUV
           : TEXCOORD0, float4 screenPos
           : TEXCOORD1 uniform sampler2D tex0, uniform sampler2D tex1,
             uniform float4 vScale)
    : COLOR
{
  // fetch bump texture
  half4 bumpTex = 2.0 * tex2D(tex0, bumpUV.xy) - 1.0;
  // compute projected texture coordinates
  half2 vProj = (screenPos.xy / screenPos.w);
  // fetch refraction map
  half4 vRefrA = tex2D(tex1, vProj.xy + bumpTex.xy * vScale.xy);
  half4 vRefrB = tex2D(tex1, vProj.xy);
  return vRefrB * vRefrA.w + vRefrA * (1 - vRefrA.w);
}
It's simple in this way to remove the artifacts, making it possible to use this refraction simulation technique on every mesh type. Although almost not noticeable, some artifacts may be visible, because we're replacing occluder pixel colors with the background color.
19.3 Examples
Many interesting effects can be achieved with the presented technique. For example, the normal map used may be an animated texture, or a transformation may be applied to its coordinates. In this section, we cover a few practical examples.
19.3.1 Water Simulation
Simulating refractive water is one of the applications in which the presented technique is particularly effective, as current methods use an extra pass to generate the refractive map, by rendering the scene again and clipping geometry above the water plane. With this technique, we can render water in just one pass, because the only extra work is to render the water plane into texture S's alpha channel for the refraction mask.
For Far Cry, we used an animated bump texture, which worked out really well. In later experiments, however, we achieved even better results by using multiple bump-map layers for animating water waves, then blending between reflection and refraction through a per-pixel Fresnel term. Figure 19-6 shows the rendering steps for water.
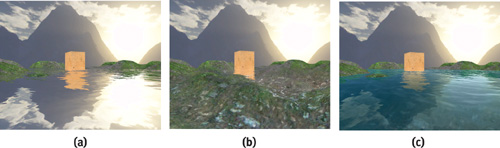
Figure 19-6 The Rendering Steps for Water
The water simulation rendering is done by rendering the scene as described in previous sections, with the water plane rendered into the back-buffer alpha for the refraction mask. Next we need to generate a water reflection map, by rendering the scene reflected through the water plane into the reflection map and clipping the geometry below the water surface. Finally, there's no need to do an extra rendering pass for the refraction map, because we can use texture S and its refraction mask on the alpha channel.
Once the main texture input has been generated, we must render the water itself. In this example, we use four bump layers. The texture coordinates of the bump layers are scaled in the vertex shader by an increasing value for each, so that we have a nice mix of low-frequency and high-frequency details on the water waves. A translation is also added to the texture coordinates to simulate the motion of waves in the water. Listings 19-3 and 19-4 show the implementation.
Example 19-3. Fresnel Approximation Computation for Water Rendering
half Fresnel(half NdotL, half fresnelBias, half fresnelPow)
{
  half facing = (1.0 - NdotL);
  return max(fresnelBias + (1.0 - fresnelBias) * pow(facing, fresnelPow), 0.0);
}
Example 19-4. The Fragment Program for Refractive/Reflective Water
half4 main(float3 Eye
           : TEXCOORD0, float4 Wave0
           : TEXCOORD1, float2 Wave1
           : TEXCOORD2, float2 Wave2
           : TEXCOORD3, float2 Wave3
           : TEXCOORD4, float4 ScreenPos
           : TEXCOORD5, uniform sampler2D tex0, uniform sampler2D tex1,
             uniform sampler2D tex2)
    : COLOR
{
  half3 vEye = normalize(Eye);
  // Get bump layers
  half3 vBumpTexA = tex2D(tex0, Wave0.xy).xyz;
  half3 vBumpTexB = tex2D(tex0, Wave1.xy).xyz;
  half3 vBumpTexC = tex2D(tex0, Wave2.xy).xyz;
  half3 vBumpTexD = tex2D(tex0, Wave3.xy).xyz;
  // Average bump layers
  half3 vBumpTex = normalize(
      2.0 * (vBumpTexA.xyz + vBumpTexB.xyz + vBumpTexC.xyz + vBumpTexD.xyz) -
      4.0);
  // Apply individual bump scale for refraction and reflection
  half3 vRefrBump = vBumpTex.xyz * half3(0.075, 0.075, 1.0);
  half3 vReflBump = vBumpTex.xyz * half3(0.02, 0.02, 1.0);
  // Compute projected coordinates
  half2 vProj = (ScreenPos.xy / ScreenPos.w);
  half4 vReflection = tex2D(tex2, vProj.xy + vReflBump.xy);
  half4 vRefrA = tex2D(tex1, vProj.xy + vRefrBump.xy);
  half4 vRefrB = tex2D(tex1, vProj.xy);
  // Mask occluders from refraction map
  half4 vRefraction = vRefrB * vRefrA.w + vRefrA * (1 - vRefrA.w);
  // Compute Fresnel term
  half NdotL = max(dot(vEye, vReflBump), 0);
  half facing = (1.0 - NdotL);
  half fresnel = Fresnel(NdotL, 0.2, 5.0);
  // Use distance to lerp between refraction and deep water color
  half fDistScale = saturate(10.0 / Wave0.w);
  half3 WaterDeepColor =
      (vRefraction.xyz * fDistScale + (1 - fDistScale) * half3(0, 0.15, 0.115));
  // Lerp between water color and deep water color
  half3 WaterColor = half3(0, 0.15, 0.115);
  half3 waterColor = (WaterColor * facing + WaterDeepColor * (1.0 - facing));
  half3 cReflect = fresnel * vReflection;
  // final water = reflection_color * fresnel + water_color
  return half4(cReflect + waterColor, 1);
}
19.3.2 Glass Simulation
Glass simulation is usually done using cube maps for both reflection and refraction, and then the results are blended using the Fresnel term. Some techniques go further and make refraction wavelength-dependent, to simulate chromatic aberration. In this example, we use only the texture S and a 2D reflection map to simulate the refraction and reflections on the glass. But this approach could be extended to include the previously mentioned techniques.
First we render the scene as usual to generate the S texture (with the refraction mask in alpha). The glass surface is then rendered by using environmental bump mapping blended with the refraction map using the per-pixel Fresnel term. The glass color comes from the diffuse texture modulated by the refraction. Figure 19-7 shows the three steps of this process.

Figure 19-7 The Rendering Steps for Stained Glass
By changing the bump texture, diffuse texture, and environment map, it's simple to simulate the appearance of different types of glass without having to change the fragment program itself. Figure 19-8 shows two examples, and the shader appears in Listing 19-5.
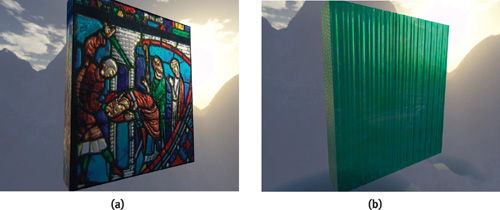
Figure 19-8 Different Glass Types
Example 19-5. Shader for Refractive/Reflective Glass Simulation
half4 main(float2 BaseUV
           : TEXCOORD0, float4 ScreenPos
           : TEXCOORD1, float3 Eye
           : TEXCOORD2, uniform sampler2D tex0, uniform sampler2D tex1,
             uniform sampler2D tex2, uniform sampler2D tex3)
    : COLOR
{
  half3 vEye = normalize(Eye.xyz);
  // Get bump and apply scale, then get diffuse
  half4 vBumpTex = 2.0 * tex2D(tex1, BaseUV.xy) - 1.0;
  half3 vBump = normalize(vBumpTex.xyz * half3(0.2, 0.2, 1.0));
  half4 vDiffuse = tex2D(tex0, BaseUV.xy);
  // Compute reflection vector
  half LdotN = dot(vBump.xyz, vEye.xyz);
  half3 vReflect = 2.0 * LdotN * vBump.xyz - vEye;
  // Reflection vector coordinates used for environmental mapping
  half4 vEnvMap = tex2D(tex3, (vReflect.xy + 1.0) * 0.5);
  // Compute projected coordinates and add perturbation
  half2 vProj = (ScreenPos.xy / ScreenPos.w);
  half4 vRefrA = tex2D(tex2, vProj.xy + vBump.xy);
  half4 vRefrB = tex2D(tex2, vProj.xy);
  // Mask occluders from refraction map
  half4 vFinal = vRefrB * vRefrA.w + vRefrA * (1 - vRefrA.w);
  // Compute Fresnel term
  half fresnel = Fresnel(LdotN, 0.4, 5.0);
  // Lerp between 1 and diffuse for glass transparency
  vDiffuse.xyz = saturate(0.1 + vDiffuse.xyz * 0.9);
  // Final output blends reflection and refraction using Fresnel term
  return vDiffuse * vFinal * (1 - fresnel) + vEnvMap * fresnel;
}
19.4 Conclusion
In this chapter we have presented a technique to simulate refraction. The technique, though not physically based, produces results with good visual quality and is extremely efficient. The examples presented are just a few of the diverse effects that can be achieved.
One limitation of this technique is that, when applied to different-colored refractive surfaces, it will yield incorrect results where the surfaces overlap. As long as the refractive surfaces have a similar color, the visuals will look correct. One possible solution would be to sort refractive meshes from back to front and update the refraction map every time a refractive mesh is rendered. Alternatively, a less accurate solution would be to sort the refractive meshes from back to front and use alpha blending while rendering them.
The technique is also applicable to a range of target hardware: even though it's not demonstrated in this chapter, the technique can easily be expanded so that it works on lower-end hardware using pixel shader versions 1.1 to 1.4.
19.5 References
Akenine-Möller, Tomas, and Eric Haines. 2002. "Planar Reflections." In Real-Time Rendering, 2nd ed., pp. 239–243. A K Peters.
Everitt, Cass. 2001."Projective Texture Mapping." NVIDIA Corporation. Available online at http://developer.nvidia.com/object/Projective_Texture_Mapping.html
Kilgard, Mark J. 2001."Chromatic Aberration." NVIDIA Corporation. Available online at http://developer.nvidia.com/object/chromatic_aberration.html
Oliveira, Gustavo. 2000. "Refractive Texture Mapping, Part One." On Gamasutra Web site. Available online at http://www.gamasutra.com/features/20001110/oliveira_01.htm
Vlachos, Alex, John Isidoro, and Chris Oat. 2002. "Rippling Reflective and Refractive Water." In ShaderX, edited by Wolfgang Engel. Wordware.
Wloka, Matthias. 2002. "Fresnel Reflection Technical Report." NVIDIA Corporation.
A special thanks to Martin Mittring and Carsten Wenzel for ideas and discussion about artifact minimization and to Márcio Martins for his model loader used in the chapter demos.
Copyright
Many of the designations used by manufacturers and sellers to distinguish their products are claimed as trademarks. Where those designations appear in this book, and Addison-Wesley was aware of a trademark claim, the designations have been printed with initial capital letters or in all capitals.
The authors and publisher have taken care in the preparation of this book, but make no expressed or implied warranty of any kind and assume no responsibility for errors or omissions. No liability is assumed for incidental or consequential damages in connection with or arising out of the use of the information or programs contained herein.
NVIDIA makes no warranty or representation that the techniques described herein are free from any Intellectual Property claims. The reader assumes all risk of any such claims based on his or her use of these techniques.
The publisher offers excellent discounts on this book when ordered in quantity for bulk purchases or special sales, which may include electronic versions and/or custom covers and content particular to your business, training goals, marketing focus, and branding interests. For more information, please contact:
U.S. Corporate and Government Sales
(800) 382-3419
corpsales@pearsontechgroup.com
For sales outside of the U.S., please contact:
International Sales
international@pearsoned.com
Visit Addison-Wesley on the Web: www.awprofessional.com
Library of Congress Cataloging-in-Publication Data
GPU gems 2 : programming techniques for high-performance graphics and general-purpose
computation / edited by Matt Pharr ; Randima Fernando, series editor.
p. cm.
Includes bibliographical references and index.
ISBN 0-321-33559-7 (hardcover : alk. paper)
1. Computer graphics. 2. Real-time programming. I. Pharr, Matt. II. Fernando, Randima.
T385.G688 2005
006.66—dc22
2004030181
GeForce™ and NVIDIA Quadro® are trademarks or registered trademarks of NVIDIA Corporation.
Nalu, Timbury, and Clear Sailing images © 2004 NVIDIA Corporation.
mental images and mental ray are trademarks or registered trademarks of mental images, GmbH.
Copyright © 2005 by NVIDIA Corporation.
All rights reserved. No part of this publication may be reproduced, stored in a retrieval system, or transmitted, in any form, or by any means, electronic, mechanical, photocopying, recording, or otherwise, without the prior consent of the publisher. Printed in the United States of America. Published simultaneously in Canada.
For information on obtaining permission for use of material from this work, please submit a written request to:
Pearson Education, Inc.
Rights and Contracts Department
One Lake Street
Upper Saddle River, NJ 07458
Text printed in the United States on recycled paper at Quebecor World Taunton in Taunton, Massachusetts.
Second printing, April 2005
Dedication
To everyone striving to make today's best computer graphics look primitive tomorrow
- Copyright
- Inside Back Cover
- Inside Front Cover
- Part I: Geometric Complexity
-
- Chapter 1. Toward Photorealism in Virtual Botany
- Chapter 2. Terrain Rendering Using GPU-Based Geometry Clipmaps
- Chapter 3. Inside Geometry Instancing
- Chapter 4. Segment Buffering
- Chapter 5. Optimizing Resource Management with Multistreaming
- Chapter 6. Hardware Occlusion Queries Made Useful
- Chapter 7. Adaptive Tessellation of Subdivision Surfaces with Displacement Mapping
- Chapter 8. Per-Pixel Displacement Mapping with Distance Functions
- Part II: Shading, Lighting, and Shadows
-
- Chapter 9. Deferred Shading in S.T.A.L.K.E.R.
- Chapter 10. Real-Time Computation of Dynamic Irradiance Environment Maps
- Chapter 11. Approximate Bidirectional Texture Functions
- Chapter 12. Tile-Based Texture Mapping
- Chapter 13. Implementing the mental images Phenomena Renderer on the GPU
- Chapter 14. Dynamic Ambient Occlusion and Indirect Lighting
- Chapter 15. Blueprint Rendering and "Sketchy Drawings"
- Chapter 16. Accurate Atmospheric Scattering
- Chapter 17. Efficient Soft-Edged Shadows Using Pixel Shader Branching
- Chapter 18. Using Vertex Texture Displacement for Realistic Water Rendering
- Chapter 19. Generic Refraction Simulation
- Part III: High-Quality Rendering
-
- Chapter 20. Fast Third-Order Texture Filtering
- Chapter 21. High-Quality Antialiased Rasterization
- Chapter 22. Fast Prefiltered Lines
- Chapter 23. Hair Animation and Rendering in the Nalu Demo
- Chapter 24. Using Lookup Tables to Accelerate Color Transformations
- Chapter 25. GPU Image Processing in Apple's Motion
- Chapter 26. Implementing Improved Perlin Noise
- Chapter 27. Advanced High-Quality Filtering
- Chapter 28. Mipmap-Level Measurement
- Part IV: General-Purpose Computation on GPUS: A Primer
-
- Chapter 29. Streaming Architectures and Technology Trends
- Chapter 30. The GeForce 6 Series GPU Architecture
- Chapter 31. Mapping Computational Concepts to GPUs
- Chapter 32. Taking the Plunge into GPU Computing
- Chapter 33. Implementing Efficient Parallel Data Structures on GPUs
- Chapter 34. GPU Flow-Control Idioms
- Chapter 35. GPU Program Optimization
- Chapter 36. Stream Reduction Operations for GPGPU Applications
- Part V: Image-Oriented Computing
-
- Chapter 37. Octree Textures on the GPU
- Chapter 38. High-Quality Global Illumination Rendering Using Rasterization
- Chapter 39. Global Illumination Using Progressive Refinement Radiosity
- Chapter 40. Computer Vision on the GPU
- Chapter 41. Deferred Filtering: Rendering from Difficult Data Formats
- Chapter 42. Conservative Rasterization
- Part VI: Simulation and Numerical Algorithms
-
- Chapter 43. GPU Computing for Protein Structure Prediction
- Chapter 44. A GPU Framework for Solving Systems of Linear Equations
- Chapter 45. Options Pricing on the GPU
- Chapter 46. Improved GPU Sorting
- Chapter 47. Flow Simulation with Complex Boundaries
- Chapter 48. Medical Image Reconstruction with the FFT