GPU Gems 2
GPU Gems 2 is now available, right here, online. You can purchase a beautifully printed version of this book, and others in the series, at a 30% discount courtesy of InformIT and Addison-Wesley.
The CD content, including demos and content, is available on the web and for download.
Chapter 1. Toward Photorealism in Virtual Botany
David Whatley
Simutronics Corporation
Rendering natural scenes in real time, while leaving enough CPU and GPU resources for other game-engine requirements, is a difficult proposition. Images of botany require a great deal of visual depth and detail to be convincing. This chapter describes strategies for rendering more photorealistic natural scenes in a manner that is friendly to real-time game engines. The methods presented here work together to create a convincing illusion of grassy fields teeming with plants and trees, while not overwhelming either the CPU or the GPU. These techniques are used in Simutronics' Hero's Journey, as shown in Figure 1-1.
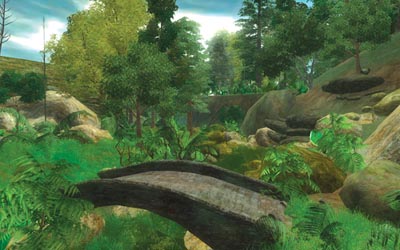
Figure 1-1 Babbling Brook: A Nature Scene from Hero's Journey
We begin by describing the foundation for managing scene data in large outdoor environments. Next, we provide details on how to maximize throughput of the GPU to achieve the required visual density in grass. Then we expand on these techniques to add ground clutter and larger-scale botany, such as trees. Finally, we tie the visuals together with shadowing and environmental effects.
1.1 Scene Management
Game engines must manage their rendering techniques to match the scope of the environment they hope to visualize. Game levels that feature nature scenes, made up of thousands of trees and bushes and perhaps millions of blades of grass, present significant data management problems that must be solved to allow rendering at interactive frame rates.
Rendering a virtual nature scene convincingly is both an artistic and a technical challenge. We can approach the rendering of nature much like a painter: break down the elements into layers and treat each layer independently to ultimately create a unified whole. For example, a layer of grass, a layer of ground clutter, a layer of trees, and so on. All these layers share some common properties, which we can leverage to compress our data representation.
Our goal is to travel the game camera over long distances of convincing outdoor scenes without having to dedicate excessive memory resources to managing the task. With guided deterministic random-number generation, we have an algorithm that can "plant" all of the elements of nature in a reasonable manner while achieving the same visual results each time we revisit the same spot on the map. In an online game, everyone would see the same thing right down to the placement of a blade of grass without this placement being permanently stored in memory.
1.1.1 The Planting Grid
We establish a world-space fixed grid around the camera to manage the planting data for each layer of plants and other natural objects. Each grid cell contains all of the data to render its layer in the physical space it occupies. In particular, the cell data structure stores the corresponding vertex and index buffers, along with material information to represent what is drawn.
For each layer of botany, we establish a distance from the camera that the layer needs to generate visuals; this determines the size of our virtual grid. As the camera moves, the virtual grids travel with it. When a grid cell is no longer in the virtual grid, we discard it and add new cells where needed to maintain our full grid structure. As each cell is added, a planting algorithm is used to fill in the layer with the appropriate data for rendering. See Figure 1-2.
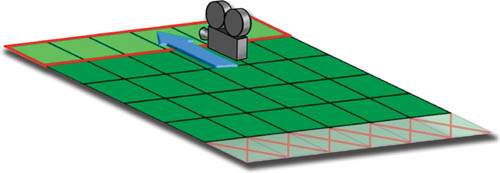
Figure 1-2 The Virtual Grid
1.1.2 Planting Strategy
For each cell that is filled with natural objects, we need to pick suitable spots on the ground where those objects are placed. The heuristic used to choose these spots depends on the type of object being placed. Generally, we would like to pick random spots, at some desired density, and then see if the corresponding points on the ground are acceptable for what we are planting. In our implementation, a ground polygon's material determines what layers are applicable.
The obvious approach is to randomly cast rays straight down at the ground within the volume of the cell. Each time we hit a polygon, we check to see if it is suitable (Can grass be planted here? Is the slope too severe?). If we succeed, then we have a planted point. We continue until we reach the proper density.
This approach yields good results but has significant problems. First, in grid cells where there are few suitable places to plant (for example, just the top of a polygon that is marked for grass), we can burn inordinate amounts of CPU time trying to randomly achieve our density requirement. So in the worst case, we must abandon our search if we reach some maximum limit of planting attempts. Second, we cannot handle overlapping terrain (such as a land bridge) with this approach.
A better approach is to collect all of the polygons that intersect the cell, discard all polygons inappropriate for planting, and then scan-convert them to find suitable spots for planting. This is similar to rasterizing a polygon for rendering, but instead each "pixel" of our traversal is a world-space potential planting point. We must be careful to keep the scan conversion rate appropriate to the density, while not exceeding the boundaries of the triangle. Further, at each planting point we select, it is important to offset along the plane of the polygon by some suitable random distance to eliminate repeating patterns. All of these values are adjustable coefficients that should be determined during design time. In our implementation, the designer can interactively tweak these values to achieve the desired result for the layer.
Finally, when scan-converting we also must take care to clip to the polygon edges (when offsetting) as well as to the cell's border, because the polygon may extend beyond it (and another cell is managing the planting there).
Planting in this manner can take place in real time or as part of offline level preprocessing. In the latter case, the grass planting spots should be stored in a highly compressed form; the data should be uncompressed at run time as each cell is added to the set of potentially visible cells by the moving camera.
1.1.3 Real-Time Optimization
If this planting operation is done in real time, care must be taken to ensure that planting is a fast operation. Collecting polygons in a grid cell can be done quickly by using an AABB tree or a similar data structure. Because many cells may need to be planted suddenly due to continuous camera movement, it is also effective to queue up this task so that we spend only a relatively fixed amount of CPU on the task for each frame. By extending the size of the grid, we can be reasonably sure that all the appropriate planting will take place before the contents of the cell come into view.
1.2 The Grass Layer
Achieving interactive frame rates for endless fields of grass requires a careful balance of GPU techniques and algorithms. The key challenge is to create a visual that has high apparent visual complexity at relatively low computational and rendering cost. Doing so creates a convincing volume of grass. Here we introduce a technique similar to the one presented by Pelzer (2004) in "Rendering Countless Blades of Waving Grass." Our technique yields higher-quality and more-robust results at a reduced GPU and CPU burden. Figure 1-3 shows a scene rendered with our technique.
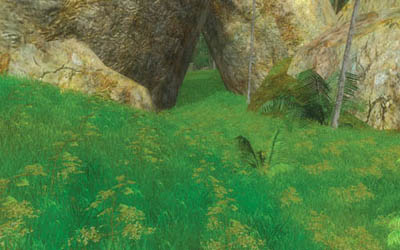
Figure 1-3 A Convincing Grass Layer
Obviously, drawing each grass blade is out of the question. But we can create such an illusion with clumps of grass, which are best represented by camera-facing quads with a suitable grass texture. Billboards of this nature create the illusion of volume at a minimal cost. However, a large field of grass can still require an excessive number of draw calls, so we must carefully structure our usage of the GPU to achieve sufficient volume and density.
GPUs work best when they are presented with large batch sizes to draw at once. Therefore, our goal is to figure out how to draw fields of grass with a relatively small number of draw calls to the API. The naive approach is to draw one billboard at a time. Instead, what we want is to draw as many as is practical in one draw call.
To achieve this, we use a technique whereby we create a vertex and an index buffer and fill it with a large number of grass billboards. We then draw all these billboards in one call. This algorithm is similar to speeding up a CPU loop by unrolling it.
For our purposes, each layer of grass—that is, all grass that uses the same texture and other parameters—is represented by a vertex and an index buffer pair per grid cell, as shown in Figure 1-4. For each clump of grass (or billboard) we plant, we write its positions into the vertex buffer and update the index buffer accordingly. We need four vertices and six indices per billboard. For each vertex, we set the position to the point where we have planted the grass clump. This means that all four vertices of a billboard have an identical position, but we offset this position in the vertex shader to create the proper camera-facing quad shape. Alternatively, if the grass texture fits within a triangular shape, we can save processing one vertex each. Even better, at this point, indices become unnecessary and can be skipped altogether without loss of performance; no vertex is ever reused out of the post-transformation-and-lighting cache when rendering this sort of triangle soup.
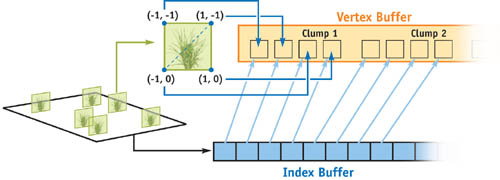
Figure 1-4 Structures for Drawing Each Grid Cell
Once the vertex buffer is created and sent to video memory, we can draw each grid cell's worth of botany with a single draw call. On the GPU, we use a vertex shader to offset each of the vertices so that they form a screen-aligned quad. Since each vertex moves in a different direction, we have to identify which vertex forms what corner of the quad. To do this, we augment our vertex data with two additional floats that contain -1, 0, or 1. The first float is for the x direction on the screen, and the second is for the y. We multiply this factor by our scale in x and y to offset as necessary. Additionally, we can randomly set all -1 and 1 values to slightly different values (such as 0.98 or -1.2) to add size variety to each grass clump.
Though we intend to move the vertex in screen space, we do all our work in world space so that we get the perspective effect for free. To do this, we provide our vertex shader with a vector that points to the right of the camera and another that points up from the camera. Simple math moves the vertex into the correct position:
// For each vertex, we pass a -1, 0, 1 value for x, y, which determines
// how it is moved by the right and up vectors of the camera. This
// we pass in as a texture coordinate (inTexCoord2).
Out.Pos = Input.inPos + (Input.inTexCoord2.x * RightVector) +
          (Input.inTexCoord2.y * UpVector);
Our approach differs from Pelzer's because we use camera-facing billboards instead of having three quads per clump and doing no screen alignment. The screen-facing billboards create a constant depth at all view angles (even when looking down), whereas the three-quad clump approach progressively breaks down as the camera looks more directly down at the grassy field. In a third-person camera view, typical of many types of games and simulations, this is not an uncommon camera angle.
1.2.1 Simulating Alpha Transparency via Dissolve
When rendering grass, we want to use transparency to improve the visual blending and fade out at a distance near the boundary of our virtual grid. However, alpha-based transparency is far from ideal because it requires sorting, which is slow. Although there are techniques that take advantage of the chaotic nature of grass to minimize some of the sorting (Pelzer 2004), we can actually eliminate it altogether.
To do this, we adopt a dissolve effect (also called the screen-door effect) instead of alpha blending to simulate translucency. We accomplish this by modulating the alpha channel of our grass texture with a noise texture. Then we use alpha test to eliminate pixels from rendering. By sliding the alpha test value from 0 to 1, the texture appears to dissolve. The process is shown in Figure 1-5. SpeedTreeRT, a commercial package for real-time foliage creation, was the first to use this technique to blend between levels of detail with alpha testing enabled. Simutronics has licensed IDV's SpeedTreeRT for Hero's Journey, and techniques drawn or adapted from this commercial foliage toolkit are noted as such in this chapter.
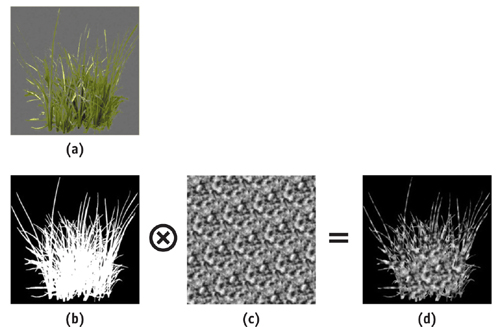
Figure 1-5 Components of the Grass Texture
The benefit of this technique is that the alpha test is a fast operation and order-independent. We no longer need to sort, yet grass appears to fade out at a distance. Although a dissolve does not look nearly as good as true alpha translucency under normal circumstances, we can exploit the fractal properties of nature to completely mask any visual artifacts of the screen-door technique. Experimentally, we have found that if we use a Perlin noise texture (Perlin 2002) rather than a random noise texture, the dissolve effect matches the environment well enough to be nearly as good as alpha translucency.
One problem we have, however, is that the alpha test value we select needs to be based on the distance of each billboard from the camera. However, we can only use exactly one alpha test value for each batch (each grid cell) even though the batch is filled with grass clumps at varying distances; this is because we are rendering the entire grid cell in one draw call. Because we want each grass billboard to fade out precisely based on its distance from the camera, we select a fixed alpha test value and instead manipulate the alpha channel in the shaders, linearly interpolating them toward full alpha based on the distance from the camera and the maximum range at which we want grass to start being visible. We do this by adjusting the alpha component of the output color of the vertex shader, which then attenuates the alpha of the texel in the pixel shader (this can also be done with the fixed-function pipeline).
An additional pass can be made over grid cells nearest the camera, drawing with alpha blending to feather the edges of the grass blades into the scene, thus eliminating any harsh edges from blades of grass close to the camera. This can achieve marginally better compositing at the expense of another pass. But because alpha test is still used, relatively few pixels are written to the back buffer (just the edges of the blades, at most). Alpha blending and alpha testing work well together; it is often a good idea to experiment with both to achieve the best illusion of depth and volume.
1.2.2 Variation
To increase the realism of our grass, we want to introduce as much variety as we can without impeding frame rate. One approach is to use a variety of images for grass, but our batching approach limits us to one texture per draw call. Fortunately, we can use a larger texture with different variations of grass arranged on them. During the vertex building, we can adjust the UV coordinates to select different subregions of the texture (that is, we can build a texture atlas; see NVIDIA 2004 for more on this technique). It is easy to have, for instance, four different grass clump variations on one texture. Plus, as we unroll grass quads into the vertex buffer, we can randomly flip the U coordinate to mirror the image. Be sure to allow space between your images so that mipmapping does not introduce texel-bleed artifacts.
Each billboard can also carry along color information. This is very useful for tinting a grayscale texture or doing subtle color shifting in the vertex shader, if you also establish a color for each cluster when planting. We have found that Perlin noise works here as well. It is easy, for example, to tint grass from a healthy green to a dying brown to impart broad color variations and break up the repetitiveness of the grass. See Figure 1-6.

Figure 1-6 Using RGB Information to Increase Realism
1.2.3 Lighting
Lighting plays an important role in how grass looks. For billboard grass, we want to make sure that our grass is lit like the ground underneath. Because the ground naturally undulates, and thus picks up different angles of sunlight, we want to simulate this by attenuating the brightness of the grass. To do so, we need to know the angle of the ground on which the grass is sitting. An easy solution is to pass along this information in the vertex definition as another vector. During planting, we determine the normal of the polygon on which we are planting grass and carry this along in our grass billboard definition. With this approach, the vertex shader can do the same lighting calculation as for the polygon underneath the grass and attenuate its color to match. On hilly terrain, this causes the grass to have the subtle angle-to-the-light cues that the ground has.
Unfortunately, this approach leads to a faceted shading of the grass even though the ground polygons are likely smooth shaded (such as with Gouraud shading). To get around this discrepancy, the normal that is passed through the vertex shader must itself be smoothly interpolated during the planting process.
If the sun angle is dynamic, a simplification is to assume that the ground normal is roughly straight up and then carry out the lighting based on this normal and the light angle. In this way, we do not have to compute or carry the ground polygon normal in the vertex definition. There is a quality trade-off here, but this approach was good enough for our application.
1.2.4 Wind
Grass comes alive when wind affects it. Offsetting the top two vertices of the grass quad each frame causes the quad to wave in the wind. We compute this offset by using a sum of sines approximation, similar to computing surface undulation for water (Finch 2004). The trick to this is to carry a blend weight in the vertex definition, where the top two vertices of the grass quad are set to 1 and the bottom two to 0. Then we multiply our wind scale factor by this value, so that the bottom vertices remain firmly planted in the ground. For additional variation, we can randomize the top two vertex weights somewhat during planting. This simulates some grass being more or less rigid.
Grass blades often change their orientation to the light as they wave in the wind, causing them to brighten and darken. We can use the wind term to augment the lighting to simulate this effect. This greatly improves the visual effect of the wind, even for grass clumps at a distance where the physical waving deformation becomes subpixel in size.
Note, however, that the wind factors should not be allowed to deform the grass quads too much. If they do, the resulting deformation will appear comical rather than realistic. Subtlety is the key.
1.3 The Ground Clutter Layer
Ground cover consists of more than just waving fields of grass. Twigs, small plants, rocks, and other debris complete the illusion of natural complexity. Some of these can be represented as billboards just as grass is, but the richness of the environment is enhanced when we mix in an assortment of geometric objects, as well.
Just as we did with grass billboards, we unroll our 3D mesh data into vertex and index buffers for each grid cell, which can then be drawn with a single call. We must group our ground clutter into layers that use the same textures and shaders. We can apply random transforms to vary their size and orientation as we pick our planting points, but the transforms must vary depending on the nature of the mesh: an upside-down rock is okay, but an upside-down bush is not. For additional variety, we can pass RGB information to tint the objects just as we did with the grass polygons.
The dissolve technique for handling order-independent transparency effects works exactly the same for 3D meshes as it does for billboards. We modulate the alpha channel of the texture by our Perlin noise texture and use our distance from the camera to attenuate. Then alpha test dissolves the 3D meshes the same way it did with the grass billboards.
Each vertex can be given a weighting value, which allows us to apply the same wind math to the 3D as we did with the billboards. Obviously, we want objects such as rocks and twigs to be rigid, but leafy plants can have artist-driven weights to achieve the proper effect. Figure 1-7 shows an example of a scene with ground clutter.
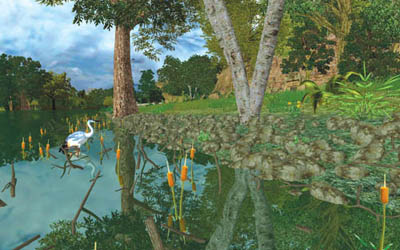
Figure 1-7 Using Ground Clutter to Add Dense Detail
1.4 The Tree and Shrub Layers
The trunk and primary branches of a tree should be modeled as 3D meshes. Secondary branches can be simulated with billboards to add visual complexity. For trees that are leafy, we can use techniques similar to the one we used for grass to create clumps of leaves from camera-facing billboards.
The following approach to rendering trees and shrubs is based on SpeedTreeRT, which provides all of the real-time rendering information for tree assets and includes SpeedTreeCAD for parametric authoring of trees (IDV 2004). The actual rendering of trees is still the responsibility of the game engine, which gives developers a lot of flexibility in implementation.
Because trees need to maintain their basic volume over long distances but are expensive to render in great detail, a level-of-detail (LOD) strategy must be employed. As a tree recedes into the distance, larger but fewer leaf clump billboards can be used. For the larger billboards, we use a different texture that shows more but smaller leaves.
For efficiency, all of the textures related to a tree should be consolidated into a single texture, as shown in Figure 1-8. In fact, it is even preferable to have multiple tree textures packed into one texture, so we can draw more of them in one call.
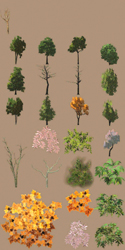
Figure 1-8 Storing Multiple Leaf Cluster Images in a Single Texture
At some suitable distance, we eventually want to represent a tree with a camera-facing billboard. This can be difficult when the tree's profile is asymmetrical. To get around the problem, we can produce tree images for the billboard at various angles and then blend between them based on the angle of the tree and the camera.
If trees are placed manually, we have found that it is best to give the level designer fine control over LOD transition points for each instance. In areas where trees are dense, you can get away with LOD transitions fairly near the camera. But in other places, with long lines of sight but fewer trees, it's easier to maintain their high detail and avoid visual artifacts.
Shrubs and fronds can be handled as just another type of tree using many of the same techniques. For example, a leafy bush is simply a tree with a small or nonexistent trunk. Further, you can turn a tree upside down, turn off the leaves, and get an elaborate exposed root system to marry up with a normal tree.
Trees can be authored in a standard modeling package, but artists need some mechanism to specify where leaf points and branch billboards go. This can complicate exporting. The actual rendering of the trees is still the responsibility of the game engine, which gives developers a lot of flexibility in implementation.
1.5 Shadowing
Because we pass an RGB tint for grass and ground clutter, we can choose a dark tint for areas in shadow. This requires us to know whether or not each planted item is in shadow. To be effective in natural environments, this sort of shadowing needs to only grossly approximate the correct shadowing. See Figure 1-9.
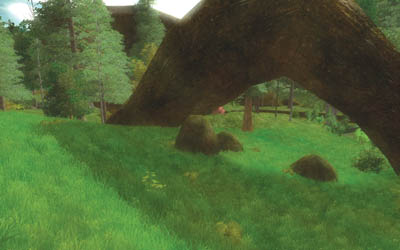
Figure 1-9 Grass Shadowed by a Tree Root
One approach is to make the shadow determination when the planting occurs. Simply cast a shadow feeler ray from the planting position toward the dominant light source (the sun) and see if there is an intersection. If so, adjust the RGB values toward the scene's ambient color. Remember that a shadow feeler ray cast is concerned only about any intersection (not just the closest) so it can be much more efficient than a standard collision ray cast.
Soft shadows (technically called antialiased shadows in this context) can be achieved by casting more than one shadow feeler. Figure 1-10 shows how this works. By offsetting each ray start position slightly, three or five ray casts from a given spot can be performed. The fraction of hits is used to attenuate the light between the diffuse sun lighting and the scene's ambient lighting. Widening the offsets increases the softness of the shadowing.
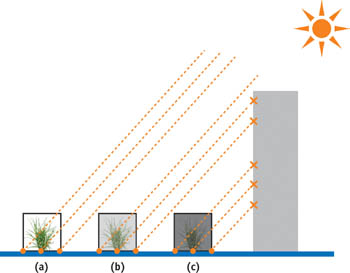
Figure 1-10 Visibility Testing Using Ray Casts
These sorts of shadows are not dynamic, but they can be recomputed fairly quickly at intervals for slow-moving light sources (such as the traveling sun). In general, they provide sufficient visual cues to cause the scenery to seem more lifelike.
Special approximation techniques can be used to cause shadow feeler hits when casting through the bulk of a tree. Instead of looking for intersections with individual leaves, simply collide with the spherical volume of the leafy part of the tree or the cylinder of the trunk. For the leafy part, use a random function to determine if rays intersect based on the density of the leaves. Although this shadowing technique is crude, accurate solutions are not visually distinct.
If planting is precomputed as an offline process, then shadow fidelity can be greatly enhanced. One possibility beyond shadow feelers is to look at the texel of a light map to determine shadowing. This can be difficult in real time if the light map is not in system memory.
1.6 Post-Processing
Natural environments react to sunlight in ways that are hard to simulate in real time. Like most interactive techniques, the goal is to find methods that achieve a reasonable, if not accurate, result. Using post-processing effects, we can tie the visuals together to achieve a superior environment.
Full-scene post-processing glow is useful for magical and high-tech effects in games, and extending this simple technique for natural effects has proven effective. Real-time glow techniques provide a way to simulate blooming—as well as create a natural softening effect (brought about by a Gaussian blur)(James and O'Rorke 2004). However, because glow is an additive effect, care must be taken to account for this when authoring textures. It is easy to get carried away and overbrighten a scene. As with all effects, just because a little is good, more isn't necessarily better.
1.6.1 Sky Dome Blooming
A textured sky dome provides a rich opportunity to use glow to our advantage. We can set aside the alpha channel of the sky dome for the artist to define areas that are more luminous. This allows the artist to have a lot of control over how the sun and the clouds interact. When rendering the sky dome, simply apply the alpha layer to the glow channel. Figure 1-11 shows an example.
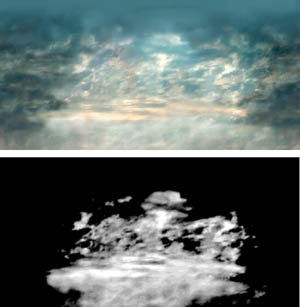
Figure 1-11 Sky Dome Diffuse Texture and Glow Component
A sky dome with a good amount of glow blooms around the delicate structure of tree leaves and branches. This yields a particularly realistic touch that is almost immediately noticeable, as shown in Figure 1-12. Because the sky glow is controlled by the artist, this technique is particularly effective and finely tuned at no additional cost.
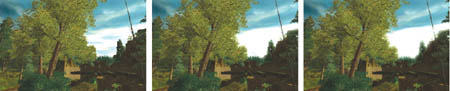
Figure 1-12 Varying Amounts of Sky Dome Glow
1.6.2 Full-Scene Glow
Cinematography of natural environments is often enhanced by a technique in which diffusing gauze (cheesecloth) is placed over the camera lens. If post-processing glow is being used, we can simply clear the glow channel to an adjustable, nonzero value to create a full-scene glow. Because the glow is a simulation based on a Gaussian blur, this causes the whole scene to appear to be diffused; also, bright areas bloom slightly without having to resort to more expensive HDR effects. For natural outdoor scenes, this approach can greatly mitigate the harsh computer-generated look of polygons for no extra GPU cost (because full-scene glow processing is already occurring). See Figure 1-13.

Figure 1-13 The Effect of Full-Scene Glow
1.7 Conclusion
Rendering nature in a convincing way always adds visual drama to a game. Figure 1-14 illustrates how these techniques can be very effective at conveying a sense of the inherent complexity and grandeur of natural scenery.
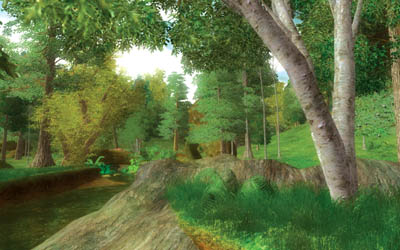
Figure 1-14 Creating the Illusion of a Lush Landscape
1.8 References
Finch, Mark. 2004. "Effective Water Simulation from Physical Models." In GPU Gems, edited by Randima Fernando, pp. 5–29. Addison-Wesley.
IDV. 2004. SpeedTreeRT API and SpeedTreeCAD Windows application. http://www.idvinc.com/html/speedtreert.htm
James, Greg, and John O'Rorke. 2004. "Real-Time Glow." In GPU Gems, edited by Randima Fernando, pp. 343–362. Addison-Wesley.
NVIDIA Corporation. 2004. "Improve Batching Using Texture Atlases." SDK white paper. http://download.nvidia.com/developer/NVTextureSuite/Atlas_Tools/Texture_Atlas_Whitepaper.pdf
Pelzer, Kurt. 2004. "Rendering Countless Blades of Waving Grass." In GPU Gems, edited by Randima Fernando, pp. 107–121. Addison-Wesley.
Perlin, Ken. 2002. "Improving Noise." ACM Transactions on Graphics (Proceedings of SIGGRAPH 2002) 21(3), pp. 681–682. http://mrl.nyu.edu/~perlin/paper445.pdf
I would like to thank the entire Simutronics Hero's Journey art and programming team for their invaluable contributions to this effort, especially 3D artists Richard Amsinger and Kyle Knight, whose work is featured in this chapter. Additionally, I would like to thank Dave Dean and Bryan Cool for their programming wizardry, which contributed a great deal to the techniques presented in this chapter. Last, I want to thank our art director, Tracy Butler, for providing the illustrations that help clarify many of the concepts in this chapter.
Copyright
Many of the designations used by manufacturers and sellers to distinguish their products are claimed as trademarks. Where those designations appear in this book, and Addison-Wesley was aware of a trademark claim, the designations have been printed with initial capital letters or in all capitals.
The authors and publisher have taken care in the preparation of this book, but make no expressed or implied warranty of any kind and assume no responsibility for errors or omissions. No liability is assumed for incidental or consequential damages in connection with or arising out of the use of the information or programs contained herein.
NVIDIA makes no warranty or representation that the techniques described herein are free from any Intellectual Property claims. The reader assumes all risk of any such claims based on his or her use of these techniques.
The publisher offers excellent discounts on this book when ordered in quantity for bulk purchases or special sales, which may include electronic versions and/or custom covers and content particular to your business, training goals, marketing focus, and branding interests. For more information, please contact:
U.S. Corporate and Government Sales
(800) 382-3419
corpsales@pearsontechgroup.com
For sales outside of the U.S., please contact:
International Sales
international@pearsoned.com
Visit Addison-Wesley on the Web: www.awprofessional.com
Library of Congress Cataloging-in-Publication Data
GPU gems 2 : programming techniques for high-performance graphics and general-purpose
computation / edited by Matt Pharr ; Randima Fernando, series editor.
p. cm.
Includes bibliographical references and index.
ISBN 0-321-33559-7 (hardcover : alk. paper)
1. Computer graphics. 2. Real-time programming. I. Pharr, Matt. II. Fernando, Randima.
T385.G688 2005
006.66—dc22
2004030181
GeForce™ and NVIDIA Quadro® are trademarks or registered trademarks of NVIDIA Corporation.
Nalu, Timbury, and Clear Sailing images © 2004 NVIDIA Corporation.
mental images and mental ray are trademarks or registered trademarks of mental images, GmbH.
Copyright © 2005 by NVIDIA Corporation.
All rights reserved. No part of this publication may be reproduced, stored in a retrieval system, or transmitted, in any form, or by any means, electronic, mechanical, photocopying, recording, or otherwise, without the prior consent of the publisher. Printed in the United States of America. Published simultaneously in Canada.
For information on obtaining permission for use of material from this work, please submit a written request to:
Pearson Education, Inc.
Rights and Contracts Department
One Lake Street
Upper Saddle River, NJ 07458
Text printed in the United States on recycled paper at Quebecor World Taunton in Taunton, Massachusetts.
Second printing, April 2005
Dedication
To everyone striving to make today's best computer graphics look primitive tomorrow
- Copyright
- Inside Back Cover
- Inside Front Cover
- Part I: Geometric Complexity
-
- Chapter 1. Toward Photorealism in Virtual Botany
- Chapter 2. Terrain Rendering Using GPU-Based Geometry Clipmaps
- Chapter 3. Inside Geometry Instancing
- Chapter 4. Segment Buffering
- Chapter 5. Optimizing Resource Management with Multistreaming
- Chapter 6. Hardware Occlusion Queries Made Useful
- Chapter 7. Adaptive Tessellation of Subdivision Surfaces with Displacement Mapping
- Chapter 8. Per-Pixel Displacement Mapping with Distance Functions
- Part II: Shading, Lighting, and Shadows
-
- Chapter 9. Deferred Shading in S.T.A.L.K.E.R.
- Chapter 10. Real-Time Computation of Dynamic Irradiance Environment Maps
- Chapter 11. Approximate Bidirectional Texture Functions
- Chapter 12. Tile-Based Texture Mapping
- Chapter 13. Implementing the mental images Phenomena Renderer on the GPU
- Chapter 14. Dynamic Ambient Occlusion and Indirect Lighting
- Chapter 15. Blueprint Rendering and "Sketchy Drawings"
- Chapter 16. Accurate Atmospheric Scattering
- Chapter 17. Efficient Soft-Edged Shadows Using Pixel Shader Branching
- Chapter 18. Using Vertex Texture Displacement for Realistic Water Rendering
- Chapter 19. Generic Refraction Simulation
- Part III: High-Quality Rendering
-
- Chapter 20. Fast Third-Order Texture Filtering
- Chapter 21. High-Quality Antialiased Rasterization
- Chapter 22. Fast Prefiltered Lines
- Chapter 23. Hair Animation and Rendering in the Nalu Demo
- Chapter 24. Using Lookup Tables to Accelerate Color Transformations
- Chapter 25. GPU Image Processing in Apple's Motion
- Chapter 26. Implementing Improved Perlin Noise
- Chapter 27. Advanced High-Quality Filtering
- Chapter 28. Mipmap-Level Measurement
- Part IV: General-Purpose Computation on GPUS: A Primer
-
- Chapter 29. Streaming Architectures and Technology Trends
- Chapter 30. The GeForce 6 Series GPU Architecture
- Chapter 31. Mapping Computational Concepts to GPUs
- Chapter 32. Taking the Plunge into GPU Computing
- Chapter 33. Implementing Efficient Parallel Data Structures on GPUs
- Chapter 34. GPU Flow-Control Idioms
- Chapter 35. GPU Program Optimization
- Chapter 36. Stream Reduction Operations for GPGPU Applications
- Part V: Image-Oriented Computing
-
- Chapter 37. Octree Textures on the GPU
- Chapter 38. High-Quality Global Illumination Rendering Using Rasterization
- Chapter 39. Global Illumination Using Progressive Refinement Radiosity
- Chapter 40. Computer Vision on the GPU
- Chapter 41. Deferred Filtering: Rendering from Difficult Data Formats
- Chapter 42. Conservative Rasterization
- Part VI: Simulation and Numerical Algorithms
-
- Chapter 43. GPU Computing for Protein Structure Prediction
- Chapter 44. A GPU Framework for Solving Systems of Linear Equations
- Chapter 45. Options Pricing on the GPU
- Chapter 46. Improved GPU Sorting
- Chapter 47. Flow Simulation with Complex Boundaries
- Chapter 48. Medical Image Reconstruction with the FFT