
GPU Gems
GPU Gems is now available, right here, online. You can purchase a beautifully printed version of this book, and others in the series, at a 30% discount courtesy of InformIT and Addison-Wesley.
The CD content, including demos and content, is available on the web and for download.
Chapter 36. Integrating Shaders into Applications
John O'Rorke
Monolith Productions
36.1 Introduction
This chapter addresses the issues associated with adding support for shaders into an application to improve its flexibility and ease its maintenance. This chapter does not cover individual APIs for dealing with shaders or shader languages. Instead, it takes a high-level view of the communication layer needed between the application and the shader to create a flexible and powerful, data-driven renderer. The motivation for this chapter is simple: When designing a shader-driven renderer, I found plenty of documentation for authoring shaders and for using the associated APIs. But nothing discussed what an application needs to provide to enable robust handling of different shaders. Many articles discussed how one can get variable names and annotations from an effect, but they never mentioned how an application should use that information to provide the necessary data to the shaders. A fair amount of work must be put into an application for it to support shaders in a flexible manner. This chapter attempts to identify each of these areas and provide suggestions for an efficient and powerful solution.
The techniques for managing shaders described here have come from trial-and-error personal experience, discussions with other engineers, and analysis of other applications that perform similar tasks. They are designed to act as the glue between an application's technical design and the selected shader API.
36.2 About Shaders
Let's examine the role of shaders before we integrate them into an application. The purpose of the shader is to specify a way to render a collection of geometry. If taken to the appropriate scale, shaders let us treat the rendering state as a resource. This is amazingly powerful, because it allows the renderer of an application to be almost entirely resource driven.
In the past, only external resource files were able to control aspects of rendering, such as textures and meshes. But now, with shaders, even the setup of the device that renders the actual geometry can be treated as an external resource. This technique has long benefited the film industry (with languages such as the RenderMan Shading Language), and it has dramatically increased the flexibility of real-time rendering. This shader-driven approach allows for more variety in rendering a scene because it doesn't require adding custom code to the application. Plus, it lets us easily add and maintain many more methods of rendering and allow for rapid prototyping of new effects and optimizations. In the future, as better tools are developed, this capability may even give complete control of the rendering to artists.
36.2.1 Shader Languages
Already there is a wide variety of real-time shader languages, and more languages are bound to appear in the future. These shader languages can be grouped into two categories: individual programs and effect files.
Individual Programs
The individual-program approach consists of a collection of files, each of which implements either a vertex shader or a pixel shader for a single pass of rendering. Examples are the Cg programming language and standard vertex and pixel shader files. In addition, many custom implementations of shader languages fall into this category, because of the simplicity of the implementation. However, a downside to this approach is that it becomes difficult to construct and manage a large number of complex effects in this manner, because each pass typically requires two source files: one for the vertex unit and another for the pixel unit.
The major problem with this approach, though, is that because other device states—such as fill mode or cull mode—are not tied to an individual vertex or pixel shader program, it is difficult to control this state using individual files. Picture an object that renders two passes: the first pass is a solid Gouraud fill, and the second pass is a flat wireframe color. This simple process requires up to four individual shaders: two for the vertex units and two for the pixel units. It also requires logic in the application to change the fill-mode state of the device to wireframe on the second rendering pass when using these shaders.
As you can see, it would be nice if all the programs for a particular rendering style could be neatly bundled into a single shader resource that could control the entire device state. This is where effect files come into play.
Effect Files: Why Use Them?
The most prevalent implementations of effect files are Microsoft's effect framework (Microsoft 2003) and NVIDIA's CgFX (NVIDIA 2003), which is a superset of the Microsoft effect framework. The effect-file approach allows individual pixel and vertex programs to be placed into a single file. These vertex and pixel shaders can then be grouped into passes and techniques. By introducing these concepts of techniques and passes, the effect files allow the device state to be specified per pass, thus resulting in a more manageable, more resource-driven, and ultimately more powerful approach over a collection of various vertex and pixel shader files. Listing 36-1 is an example of an effect file.
Example 36-1. A Sample Effect File
// Our vertex format
struct SVertex
{
  float3 Position : POSITION;
  float4 Color : COLOR0;
} ShaderVertex;
// Scene parameters
float4x4 CameraTrans : WorldViewProjection;
// Material parameters
float4 FillColor : MaterialParam<string desc = "object color">;
// Selected rendering technique
struct SVSOut
{
  float4 Position : POSITION;
  float4 Color : COLOR0;
};
SVSOut Selected_VS(MaterialVertex IN)
{
  SVSOut OUT;
  OUT.Position = mul(CameraTrans, float4(IN.Pos, 1.0f));
  OUT.Color = FillColor * IN.Color;
  return OUT;
}
struct SPSOut
{
  float4 Color : COLOR;
};
SPSOut Selected_PS(SVSOut IN)
{
  SPSOut OUT;
  OUT.Color = IN.Color;
  return OUT;
}
technique Selected
{
  pass p0
  {
    CullMode = CCW;
    BlendEnable = false;
    VertexShader = compile vs_1_1 Selected_VS();
    PixelShader = compile ps_1_1 Selected_PS();
  }
}
Throughout the remainder of this chapter, we will examine techniques for incorporating effect files into applications based upon the standards established by Microsoft and NVIDIA. The reason for using effect files in this chapter is that every feature that effect files provide—from coordinating which shaders must be used for each pass, to setting up the device state—needs to be supported in any robust shader system that is to be integrated into an application.
From personal experience, I recommend using these effect systems rather than trying to create a custom implementation. Used appropriately, they can be very efficient, very simple to work with, much faster for authoring shaders, and less prone to error. The APIs for using these shader languages are also very easy to work with, and they significantly reduce development time. In addition, using an external implementation helps future-proof your application, because it helps insulate the application from underlying platform-specific APIs. However, using an existing API may not be an option on certain platforms at present, so in these cases a custom approach must be implemented. Even in such a case, if a custom-made system is needed, effect-file standards should be carefully studied as a model foundation of a robust and flexible shader system.
36.3 The Anatomy of an Effect File
This section analyzes the parts of the effect file we will be using, and it examines each component that is relevant to communication between a shader and an application that we will be using later. It does not address the full syntax of the effect file format but simply identifies the relevant components.
Again, even systems not using the effect format can, and should, try to include equivalent constructs to allow integration into their applications.
36.3.1 Variables
Variables in an effect file serve the same role as variables in any other programming language. Each has a unique name and an associated value, and each can be one of many different types, including strings, structures, and multidimensional arrays. All variables in the global scope can be enumerated by the application and have their values read or written by the application. These global variables are the primary method of conveying data to shaders, such as which texture should be applied or what the current camera transform is.
An application can determine not only the values of global parameters, but also the type of each variable, so that the application can ensure type safety when writing data out to, or reading data in from, the shader. Global variables in an effect file have an associated tag—called a semantic—that is not found in other languages. A semantic is an additional textual symbol; this symbol can be associated with the variable to be queried by the application. The semantic can be used by the application for any purpose, but it often specifies how a variable is to be used or what data the variable needs. The following is an example of a variable with a semantic called LightRadius, which can then be read in by an application at runtime:
float Radius = 1.0 : LightRadius;36.3.2 Structures
Effect file structures are similar to C-style structures. They contain a collection of variables that will be instantiated once per instance of the structure. Each entry in the structure can contain a semantic as well, much like global parameters. Structures cannot be accessed directly by the application, however. Information about a structure must be gathered through an instance of the structure. So if a definition of a structure is important to an application, a variable instance of the structure must be defined within the shader, and that variable is then examined by the application.
36.3.3 Passes
A pass represents the device state for a single rendering pass of a shader. This includes the associated vertex and pixel pipeline setup. Each pass can have a unique name associated with it and can be accessed by the application. The pass serves as the atomic rendering unit. It is ultimately the source of the device state, and if an object is to be rendered, there must be an active pass to indicate how it is to be rendered.
36.3.4 Techniques
Rendering in a certain style often requires multiple passes, which therefore requires some means of grouping passes. This is the role played by the technique. A technique is a named wrapper for a collection of passes and serves as the atomic unit for device validation. This means that when the effect API checks for support on a device, each pass within a technique is checked to see if it can operate on the device. If any pass is not supported by the device, the entire technique is considered unsupported on the device. For this reason of validation, passes cannot exist outside a technique. At runtime, techniques also provide support for iterating through each contained pass and accessing information about each pass.
36.3.5 Annotations
Annotations are user data attached to the techniques, passes, and global variables of an effect file. Annotations let the shader author provide additional data that can be exported from the shader; they take the form type name = value; . The application can then query any technique, pass, or parameter for its annotations. At runtime, each annotation can be queried for its name, type, and value. These annotations are constant and can only be viewed by the applications as read-only. The following code is an example of annotation:
float Alpha = 1.0 < string Description = "Opacity of the object";
> ;
36.4 Types of Shader Data
We have identified the primitives that can be used for communication between the shader and the application, but we have not yet described the information that needs to be communicated. This section identifies the information itself; techniques for communicating the information to and from the shader will be discussed later. Figure 36-1 is a diagram that gives a high-level view of how the data interoperates between the application and the shader.
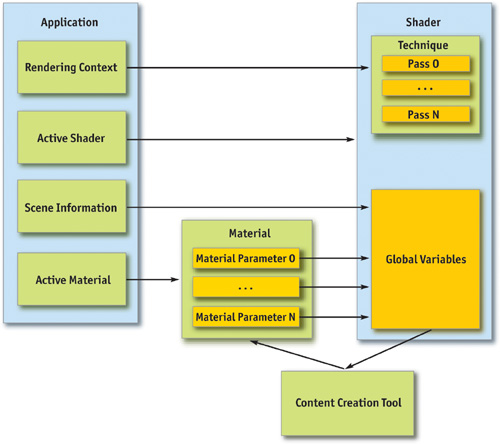
Figure 36-1 Communication Flow Between a Shader and an Application
36.4.1 Scene Information
The first set of data that must be communicated from the application to the shader is the scene information. The scene information contains any rendering state that is required for rendering a shader, effectively acting as a contract between the application and the shader. The shader must know that it can rely on the application to provide certain information through specific variables in order to perform its tasks. Without this scene information, the shader operates in a vacuum and cannot perform even the simplest operation.
Examples of scene information are object-space-to-clip-space transformations, skeletal transforms, camera positions, the current object color, and any other data the application maintains that would be relevant to shaders. This data is one-way, going from the application to the shader, and must be updated in the shader each time the scene information changes.
36.4.2 Materials
The scene information covers application-generated information, but it does not include a critical collection of data that lets the shaders be customized. This data includes any aspect of the shader that is parameterized to allow control by artists. Examples are textures that will be used by the shader, the specular power of a surface, or the speed of a panning texture. The communication of material data is more bidirectional than the scene information. This is because the shader defines the variables that can be supplied by the material, which must be read out by some application or tool. Then the material defines the values for the variables, which must be passed in to the shader.
Materials often fit into the content-creation and rendering pipeline in the following manner: A tool will examine a shader and determine which values should be provided to the shader as material parameters. Then it will allow a content creator to specify these parameters. At rendering time, when a material becomes active, it will fill in all the values that the artist entered into the shader. This flow allows for shaders that have unique and varied data, which can be directly and easily controlled by content creators.
36.4.3 Renderer Context
So far, all the information that has been passed to the shader has come from variables. However, sometimes the shader needs to perform tasks that cannot be data driven. To address this issue, the concept of a context is introduced.
The context allows the shader to apply different types of rendering for different situations. Picture an application that has a large collection of shaders in a scene. Each shader has a distinctive look and renders in a particular manner. However, the application needs an effect to play on any object the user selects, but it still must let each shader have its unique look. Therefore, the shader must have a concept of context, which in this case would be one of two states: "selected" or "unselected." The shader can then perform completely different rendering techniques, based on the current context.
36.4.4 Vertex Data
Another form of data the shader requires is, of course, the vertex data itself. Different shaders might require vastly different information, so a shader must be able to indicate which vertex components it needs. For example, a bump-mapping shader may require a full tangent space per vertex and one texture coordinate set, whereas another shader may require only a position, normal, and two texture-coordinate sets. If each shader can indicate which components it requires, the application can then generate only the necessary vertex components, which saves bandwidth and memory.
36.5 Communicating with the Shader
Now that we have identified the data that needs to be sent to and from the shader, as well as the facilities available for this communication, we now examine the process of setting up an application to allow shader support.
36.5.1 Scene Information
The first issue is how to send the scene information to the shader. A shader can't do anything if it doesn't have the correct transforms and other necessary data. This data will be passed to the shader through global variables because it's the only communication method available to the shader for providing values from the application. The trick is finding the variables in the shader that are expected to contain the desired scene information.
Use the Variable Name
The most straightforward approach to determine which variables should hold the scene information is to simply use the name and type of the global variables. For example, the application could enumerate the global variables within the shader, and when it finds a variable named CameraTransform that is a 4x4 matrix, it installs the camera transform matrix into that variable.
This approach forces consistency across all shaders, because the naming of variables must be consistent across all shaders used by the application for it to work properly. For a large shader library, this method is useful if different people work on or maintain the library.
Use Semantics or Annotations
A more flexible approach is to use the semantics or annotations associated with the global variables. For example, inside annotations could be a key/value pair similar to string Usage = "CameraTransform". Or the variable could have a specific semantic indicating the usage. This usage value could be read to determine the value that should be loaded into the variable at runtime.
This approach is more flexible because it lets shader authors name the variables whatever they like, as long as they correctly indicate the usage. The semantic approach is used by FX Composer, developed by NVIDIA. (See Chapter 31, "Using FX Composer.") The following sample variable declaration uses semantics that work with FX Composer and receive the camera transformation at runtime:
float4x4 wvp : WorldViewProjection;Optimizing Scene Communication
Resolving the mapping of a variable to its value can be costly because it can involve iterating through a large number of variables and performing numerous string operations. So, this mapping should be performed only once, when the shader is created. All current effect APIs support handles that allow direct access to variables, techniques, passes, and even annotations. However, these handles are not transferable between shaders, so a single handle cannot be created that refers to a specific variable across all shaders. Instead, a handle must be created for each variable in each shader. A simple implementation of this caching mechanism is to create a handle table per shader, where each entry in the table refers to a specific variable. Then, when a value in the scene information changes, the table of the active shader can be indexed directly, based on what variable is being set to find the appropriate handle, which can then be used to communicate the new data to the shader. In addition, when the active shader changes, all scene information has to be set up in the new shader. This can be done by running through the handle table and providing the scene data for each value of scene information.
36.5.2 Material Parameters
Like scene information parameters, material parameters are communicated to the shader; however, unlike scene information, this data typically comes from a material resource that has been set up by content creators. Therefore, a mechanism must exist to map this data from a resource into the global variables of a shader. For material parameters, using the name is not a very good solution, because the material parameters can vary widely across shaders and are often relevant to only a single shader.
Instead, annotations or a semantic indicating a material parameter can be used. Then any variable with a specific annotation or semantic set would be treated as a material parameter, allowing a value to be specified in the material.
Annotations can be adapted for many other purposes for material parameters. A string annotation can provide a description for tools to provide help for the parameter. Or a default value can be specified if no value exists. The information needed in the annotation depends on the functionality the application is intended to support, but generally it is best to have at least a default value and a description for each variable. The following example shows how a material parameter could be set up with semantics indicating that it is a material parameter; annotations provide information that can be used by either a material creation tool or the application at runtime.
float Specular = 4.0 : MaterialParam < float Default = 4.0;
string Desc = "Specular power of the surface";
float Min = 2.0;
float Max = 8.0;
> ;
36.5.3 Vertex Format
There are many different ways to determine what vertex data is needed by a particular shader. The first method is to name variables specifically to indicate different vertex components. For example, there could be a collection of predefined variable names, such as Vertex_Normal, Vertex_Position, and so on. Each shader would be checked to determine which variables it contains, and for each one, the appropriate vertex information would be included in any vertices the shader renders.
A more elegant approach is to create a structure that contains an entry for each vertex element that is needed. The names of these variables, or their associated semantics, can then be used to determine the necessary vertex components. This is probably the most intuitive method, because the concept of vertex data maps well to a structure, and most shaders use a structure of some sort to represent the incoming vertex data already. The one caveat is that structures cannot be examined directly; therefore, an instance of that structure must be defined. Here is an example:
struct SVertex
{
  float3 vPosition : Position;
  float3 vNormal : Normal;
};
SVertex VertexDecl;
Some other possibilities for specifying the necessary vertex data: have a string variable that contains a delimited list of components that can be parsed, or have a single variable and specify the components using annotations.
Using one of these methods, we can determine the information that needs to be provided for each vertex in any geometry the shader will be rendering. This data can be used at preprocessing time if the shader that will be bound to the geometry is known at that time, which allows us to generate and pack only those vertex components the shader needs. This approach can significantly reduce the amount of memory needed to store geometry for most shaders, while still allowing for shaders that require complex vertex information. However, if the shader is not known at preprocessing time, we need to use a vertex format that includes all possible vertex data. Or else we need runtime support for generating vertex information, neither of which are optimal solutions.
36.5.4 Context
The concept of a context maps directly to a technique. For each context the application requires, we need to place a corresponding technique in the shader. Let's use the original context example of an application that needs each shader to render in a different style when the object is selected. Inside the shader could be two different techniques: Selected and Unselected. When it's time for the object to be rendered, the appropriate technique is activated based on the state of the object, and then the object rendering proceeds using that technique. This allows each shader to implement an appropriate style of rendering for any context the application needs. Plus, it lets the application ensure that the shader can change the manner in which it operates to function appropriately for any situation needed. To make this work, though, a contract between the shader and the renderer must exist. It would function much like scene variables, in which the renderer calls each context in a specific situation to render in a certain manner, and in return, the shader is expected to work properly in each situation. However, this contract between the shaders and the renderer depends on each application, which makes this context-binding method very application-specific as well.
36.5.5 Techniques vs. Passes for Context
An argument can be made that passes, instead of techniques, should be used to represent context within a shader. The reason? Techniques are validated as a whole; therefore, they avoid a situation where one context may validate correctly while another context fails. This could cause objects to be visible in one context but invisible in another.
Using passes for contexts adds work and reduces clarity somewhat, but it can be implemented easily by using a naming convention for the pass name. The naming convention would indicate the context name and the pass number. The following code is an example of a technique that holds two contexts, with the Selected context requiring two passes:
technique SomeShader
{
  pass Selected_0{...} pass Selected_1{...} pass Unselected_0 { ... }
}
Then, when the application loads a shader, a valid technique would be found for the current device and the passes would be parsed. Parsing determines which passes need to be rendered, and in what order, when a certain context is used. This approach makes it easier to add support for fallbacks within the same shader file. We recommend this approach when supporting a wide range of hardware.
36.6 Extending the Effect File Format
We can integrate a full shader system into an application and create a very powerful and flexible renderer by using the approaches discussed in this chapter. However, we can add a few more extensions to the application and shaders to make shader development and management much easier.
36.6.1 Supporting the Preprocessor
An application that provides preprocessor support for shaders is invaluable. All current effect APIs allow support for the preprocessor if the application includes certain hooks for the include directive. These hooks let applications implement their own file system, and it's usually simple to add support for the hooks. An important consideration is the current working directory, which is defined as relative to the file that is currently being compiled.
Once preprocessor support is added to the application, a full utility library of standard definitions and functions can quickly be created. This helps reduce the size and complexity of individual shaders. For example, we can create a shader file that contains utility functions for skinning models. This file could be included in any shader requiring skinning, thus reducing the size of each shader and the amount of code that must be duplicated between shaders.
36.6.2 Supporting Shader Variations
With careful setup, the preprocessor can allow the same shader to be used for both rigid and skinned objects. The only difference between skinned and rigid meshes is the manner in which any geometry-related data—including the position and the tangent space of the vertex—is obtained. Therefore, with rigid meshes, the geometry data is used as specified in the vertex, but in skinned meshes, it must undergo a skinning process before the vertex data is used. Therefore, all accesses to the geometry information can be hidden behind code that can be conditionally compiled either to perform skinning of the vertex data or simply to return the vertex data as stored.
Also, bone weights data (and possibly bone indices data) is needed. This can be added using a macro that expands to nothing for rigid shaders and expands to the appropriate definitions needed for declaring the vertex data in skeletal shaders. If this is done, only a single shader needs to be developed. Compiling this shader with a different set of preprocessor definitions can change it to support either skinned meshes or rigid meshes, as shown in Listing 36-2.
Example 36-2. Using the Preprocessor to Support Skeletal Shader Variations
#ifdef SKELETAL
// Used in the vertex struct to indicate the weights of the vertex
#define DECLARE_SKELETAL_WEIGHTS float4 Weights : BLENDWEIGHT
// Used anywhere that point data is accessed from a vertex
#define SKIN_POINT(Point, Vert) SkinPoint(Point, Vert.Weights)
// Used anywhere that vector data is accessed from a vertex
#define SKIN_VECTOR(Vector, Vert) SkinVector(Vector, Vert.Weights) #else
// We aren't supporting skeletal animation
#define DECLARE_SKELETAL_WEIGHTS
#define SKIN_POINT(Point, Vert) (Point)
#define SKIN_VECTOR(Vector, Vert) (Vector) #endif
A similar approach can be taken with the number of lights being rendered. A macro can define the number of lights supported, and the shader can simply iterate through to the number specified by the macro. This allows for getting numerous light variations from only a single shader source file.
36.6.3 Adding Shader Inheritance
Another useful extension is the concept of inheritance. The idea is that if a shader cannot be properly validated, or if a cheaper shader needs to be used, a fallback shader can be substituted for the specified shader. This can be implemented at a global level with a string parameter that indicates the shader file to which the shader will fall back. It can also be implemented at a per-technique level, by specifying a fallback shader using the appropriate annotations. However, if a shader uses inheritance, the material parameters and vertex declarations must be determined as the union of all shaders from which the shader derives, in addition to its data, because it is not known in advance when the fallback shader may need to be used.
Implementation of inheritance is usually simple, and it dramatically improves hardware scalability and performance. In the future, this will be increasingly important, due to the inevitable wide range of hardware capabilities in the marketplace.
36.7 Conclusion
A fair amount of work goes into developing a communication layer that supports shaders. However, if you follow these guidelines, the task is straightforward and results in an amazingly flexible and powerful renderer.
Shaders are the future of real-time rendering. By integrating shaders into the rendering pipeline now, you'll allow applications to take the next step forward in power and flexibility. Doing so will not only allow the applications to be more competitive, but also simplify development of the renderer and accommodate a wide variety of effects.
36.8 References
Microsoft Corporation. 2003. "Effect Reference." MSDN Online. http://msdn.microsoft.com/library/default.asp?url=/library/en-us/directx9_c/directx/graphics/reference/EffectFileReference/EffectFileReference.asp
NVIDIA Corporation. 2003. "CgFX Overview." Available online at http://developer.nvidia.com/object/cg_users_manual.html
Copyright
Many of the designations used by manufacturers and sellers to distinguish their products are claimed as trademarks. Where those designations appear in this book, and Addison-Wesley was aware of a trademark claim, the designations have been printed with initial capital letters or in all capitals.
The authors and publisher have taken care in the preparation of this book, but make no expressed or implied warranty of any kind and assume no responsibility for errors or omissions. No liability is assumed for incidental or consequential damages in connection with or arising out of the use of the information or programs contained herein.
The publisher offers discounts on this book when ordered in quantity for bulk purchases and special sales. For more information, please contact:
U.S. Corporate and Government Sales
(800) 382-3419
corpsales@pearsontechgroup.com
For sales outside of the U.S., please contact:
International Sales
international@pearsoned.com
Visit Addison-Wesley on the Web: www.awprofessional.com
Library of Congress Control Number: 2004100582
GeForce™ and NVIDIA Quadro® are trademarks or registered trademarks of NVIDIA Corporation.
RenderMan® is a registered trademark of Pixar Animation Studios.
"Shadow Map Antialiasing" © 2003 NVIDIA Corporation and Pixar Animation Studios.
"Cinematic Lighting" © 2003 Pixar Animation Studios.
Dawn images © 2002 NVIDIA Corporation. Vulcan images © 2003 NVIDIA Corporation.
Copyright © 2004 by NVIDIA Corporation.
All rights reserved. No part of this publication may be reproduced, stored in a retrieval system, or transmitted, in any form, or by any means, electronic, mechanical, photocopying, recording, or otherwise, without the prior consent of the publisher. Printed in the United States of America. Published simultaneously in Canada.
For information on obtaining permission for use of material from this work, please submit a written request to:
Pearson Education, Inc.
Rights and Contracts Department
One Lake Street
Upper Saddle River, NJ 07458
Text printed on recycled and acid-free paper.
5 6 7 8 9 10 QWT 09 08 07
5th Printing September 2007
- Contributors
- Copyright
- Foreword
- Part I: Natural Effects
-
- Chapter 1. Effective Water Simulation from Physical Models
- Chapter 2. Rendering Water Caustics
- Chapter 3. Skin in the "Dawn" Demo
- Chapter 4. Animation in the "Dawn" Demo
- Chapter 5. Implementing Improved Perlin Noise
- Chapter 6. Fire in the "Vulcan" Demo
- Chapter 7. Rendering Countless Blades of Waving Grass
- Chapter 8. Simulating Diffraction
- Part II: Lighting and Shadows
-
- Chapter 9. Efficient Shadow Volume Rendering
- Chapter 10. Cinematic Lighting
- Chapter 11. Shadow Map Antialiasing
- Chapter 12. Omnidirectional Shadow Mapping
- Chapter 13. Generating Soft Shadows Using Occlusion Interval Maps
- Chapter 14. Perspective Shadow Maps: Care and Feeding
- Chapter 15. Managing Visibility for Per-Pixel Lighting
- Part III: Materials
- Part IV: Image Processing
- Part V: Performance and Practicalities
-
- Chapter 28. Graphics Pipeline Performance
- Chapter 29. Efficient Occlusion Culling
- Chapter 30. The Design of FX Composer
- Chapter 31. Using FX Composer
- Chapter 32. An Introduction to Shader Interfaces
- Chapter 33. Converting Production RenderMan Shaders to Real-Time
- Chapter 34. Integrating Hardware Shading into Cinema 4D
- Chapter 35. Leveraging High-Quality Software Rendering Effects in Real-Time Applications
- Chapter 36. Integrating Shaders into Applications
- Part VI: Beyond Triangles
- Preface