
GPU Gems
GPU Gems is now available, right here, online. You can purchase a beautifully printed version of this book, and others in the series, at a 30% discount courtesy of InformIT and Addison-Wesley.
The CD content, including demos and content, is available on the web and for download.
Chapter 29. Efficient Occlusion Culling
Dean Sekulic
Croteam
29.1 What Is Occlusion Culling?
Most graphics algorithms show us how to render something quickly, or how to make it look nice. Some techniques favor performance, while others aim for quality, but the challenge is how to strike a balance between the two.
Occlusion culling increases rendering performance simply by not rendering geometry that is outside the view frustum or hidden by objects closer to the camera. Two common types of occlusion culling are occlusion query and early-z rejection.
This chapter examines the occlusion query and how to use it properly, including two examples proving how efficient occlusion culling can be. Because one of the examples relies heavily on the usage of bounding boxes, these will also be covered, just to make things more understandable.
29.1.1 Occlusion Query
Starting with the GeForce3 GPU, all NVIDIA GPUs (and many from other vendors) have included the occlusion query feature, which lets us avoid rendering occluded objects. By skipping the entire rendering process for an occluded object, we can reduce the rendering load on the GPU.
29.1.2 Early-Z Rejection
Also supported in most GPUs since the GeForce3 is early-z rejection. In the rasterizer stage of the rendering process, early-z compares the depth value of a fragment to be rendered against the value currently stored in the z-buffer. If the fragment is not visible (because the depth test failed), rejection occurs without fetching the texture for the fragment or executing the fragment program. The result: memory bandwidth is saved at the per-fragment level.
There's a big difference between occlusion query and early-z rejection. Occlusion query rejects polygons at the geometry level, whereas early-z occurs at the rasterization level. Plus, culling geometry through occlusion query requires more control from the application.
Both approaches require a programmer to sort the objects from front to back. Note, however, that because the depth buffer and the stencil buffer are often stored together, using the stencil buffer may reduce early-z performance. (Also, early-z rejection tends to require more caveats, but these are not directly related to the subject of this chapter.) For early-z rejection, the programmer's work is done, and the GPU takes care of the rest.
But for occlusion query, there's still a long way to go....
29.2 How Does Occlusion Query Work?
In OpenGL, the ARB_occlusion_query extension (which is based on NVIDIA's NV_occlusion_query extension, a much-improved form of Hewlett-Packard's original HP_occlusion_test extension) implements the occlusion query idea on the GPU and fetches the query results. (See NVIDIA 2003 for more.) Microsoft has incorporated the same functionality in DirectX 9. (See Microsoft 2003 for more.)
An occlusion query is fundamentally simple. The GPU tells us how many pixels should have ended up visible on-screen. These pixels successfully passed various tests at the end of the pipeline—such as the frustum visibility test, the scissor test, the alpha test, the stencil test, and the depth test. Not an easy ride!
Here is how the process works:
- Create a query.
- Disable rendering to screen (set the color mask of all channels to False).
- Disable writing to depth buffer (just test against, but don't update, the depth buffer).
- Issue query begin (which resets the counter of visible pixels).
- "Render" the object's bounding box (it'll only do depth testing; pixels that pass depth testing will not be rendered on-screen because rendering and depth writing were disabled).
- End query (stop counting visible pixels).
- Enable rendering to screen.
- Enable depth writing (if required).
- Get query result (the number of "visible" pixels).
- If the number of visible pixels is greater than 0 (or some threshold),
- Render the complete object.
These steps allow us to substitute a geometrically complex object with a simple bounding box. This bounding box will determine whether we need to render the object itself. If the object's bounding box ends up occluded by other on-screen polygons, we can avoid the object entirely.
The catch? Be very careful not to update the color or depth buffer when testing the object's bounding box—that's why we disabled color and depth writing.
In the sections that follow, we begin with a naive attempt at using occlusion queries and proceed to refine our approach into a robust, real-world implementation.
29.3 Beginning to Use Occlusion Queries
The real problem is the GPU pipeline flush. Normally the CPU and GPU work in parallel: When the CPU issues a command to the GPU (for example, "render some triangles"), it doesn't wait for the GPU to finish. Instead, the CPU's driver feeds the commands and triangles to the GPU command queue, which lets the CPU continue with other tasks. When the GPU is ready to process the stored commands, the triangles are rendered on screen.
However, the rendering process differs for occlusion queries. The GPU needs to tell the CPU how many pixels were drawn on-screen, which means it must render them first. The problem? The CPU must wait until the GPU finishes rendering triangles used for the occlusion query—and not only those triangles, but all triangles given to the GPU before the occlusion test.
This is not good. Trying to "save" the GPU from rendering the occluded object doesn't speed up the rendering process. The truth is that even when most tested objects are occluded, rendering is much slower because the CPU and GPU no longer work in parallel.
It's clear that the naive approach isn't going to work very well. So, the real question is. . .
29.3.1 How to Use Occlusion Queries Properly
The good news is that both OpenGL and DirectX 9 support multiple outstanding queries. This means we can start several counters to count visible pixels and then query the counters later.
So now, the algorithm changes to the following:
- Create n queries.
- Disable rendering to screen.
- Disable writing to depth buffer.
- For each of n queries,
- Issue query begin.
- "Render" the object's bounding box.
- End query.
- Enable rendering to screen.
- Enable depth writing (if required).
- For each of n queries,
- Get the query result.
- If the number of visible pixels is greater than 0,
- Render the complete object.
Although this approach is much better than the original one, it still won't give enough time to the GPU to actually render all the geometry that the CPU has fed to it, which means that stall has not been completely eliminated.
And there's another issue...
29.3.2 Occluders vs. Occludees
The problem with the basic approach is that bounding boxes cannot write to the depth buffer, because there are some really weird cases when one bounding box completely occludes another bounding box, but the object inside the occluder's bounding box doesn't in fact occlude the object inside the occludee's bounding box, as shown in Figure 29-1.
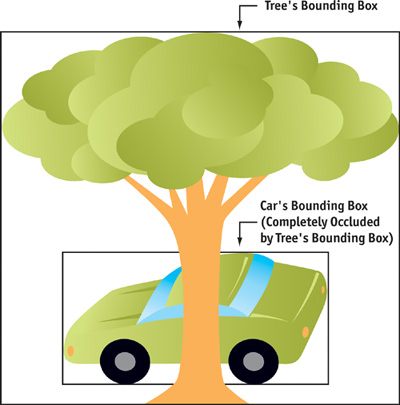
Figure 29-1 An Inaccurate Occlusion Query Result
So, some scene geometry needs to be rendered in front, without occlusion culling. This geometry will act as an occluder, so it should be something that ends up being large on screen. (A tall wall or a big building is a good example.) After these objects have been rendered, occlusion query for smaller objects can begin.
However, all this tends to complicate things a bit, and it makes occlusion culling less effective (even a big object itself can sometimes be completely occluded). Therefore, we need a different approach.
29.4 One Step Further
To be on the safe side and to make sure that the GPU has rendered everything we've asked, we'll do something really radical: We'll check the occlusion query in the next frame!
The game loop now looks something like this (for the sake of simplicity, we show just one query):
- Create the query.
- Game loop:
- Do AI.
- Do physics.
- Rendering:
- Check the query result from the previous frame.
-
Issue query begin:
- If the object was visible in the last frame:
- Enable rendering to screen.
- Enable or disable writing to depth buffer (depends on whether the object is translucent or opaque).
- Render the object itself.
- If the object wasn't visible in the last frame:
- Disable rendering to screen.
- Disable writing to depth buffer.
- "Render" the object's bounding box.
(End query)
(Repeat for every object in scene.)
- If the object was visible in the last frame:
- Swap buffers.
It's not important to check frequently whether the object is still visible, so let's safely assume that any object that was visible in the previous frame remains visible in the current frame. However, there is a drawback to this approach: geometry that is no longer visible can be shipped to the GPU. In addition, we can add another optimization: checking the invisibility of an object every few frames. This way, we'll have fewer outstanding occlusion queries at any given time. But testing of occluded (invisible) objects needs to be done in every frame! We cannot assume that the object is still occluded in the current frame because this might introduce excessive "rendering" errors (that is, objects appearing out of thin air).
All in all, the problem of lagging one frame behind and culling the visible objects ("what you see is not exactly what you get") is not that serious. Not seeing an object in one frame is not that important if you see it in the next one, especially when the frame rate exceeds 30 frames per second. It's just a little "now you don't see me, now you do" syndrome, so this popping-in shouldn't be that noticeable.
Sometimes even testing the next frame induces a stall, because some drivers let the GPU render two or three frames behind by actually queuing the SwapBuffers request. This could be an issue, but the performance loss is normally less than 10 percent, which is acceptable, considering the speed-up that occlusion queries offer.
As you may already have noticed, testing the occlusion of an object that was visible in the last frame is done on the object itself, while testing the occlusion of an object that was previously invisible is done on the object's bounding box. Apart from being just an optimization (no need to render both the object and its bounding box!), this method is essential to determining which objects are potential occluders and which are occludees.
29.4.1 Sorting Things Out
This advanced approach automatically eliminates the need to actually separate potential occluders from occludees (as stated in Section 29.3.2), because every object that has been rendered as visible acts as an occluder just by being written to the depth buffer. Therefore, we don't need to have the occluders (objects without occlusion testing) rendered before the occludees. However, to help the algorithm a bit, we need to sort the objects by distance.
Once we have all the objects that need to be rendered in the current scene (that is, the ones that passed frustum culling), we need to separate them into two groups: opaque objects and translucent objects. Because we can see through translucent objects (and they cannot be written to the depth buffer!), these can act only as occludees and not occluders. On the other hand, opaque objects can be both occluders and occludees, which means that they should be sorted from front to back and rendered before translucent objects. After that, translucent objects are sorted back to front and rendered on-screen as well.
This approach nicely exploits the occlusion query feature, because potential occluders are rendered first, which makes many other objects potential occludees, and the rendering of those can be culled by occlusion tests. Once all opaque objects are rendered, they automatically begin to act as potential occluders of all translucent objects.
29.4.2 A Small Caveat
Sometimes, from certain viewpoints, an object is occluded but its bounding box is visible. This occurs when the bounding box is much bigger than the object. When this happens, the object will be rendered in every other frame: the bounding box will have a "visible" result, and so the object will need to be rendered in the next frame. However, the object rendered in the next frame will have an "invisible" result, which means we'll need to render the bounding box in the next frame, and so on. Although our method might introduce a little variation in frame rate, it's a good optimization because both the objects and the bounding boxes don't have to be drawn each frame.
29.5 A Word About Bounding Boxes
Bounding boxes, which can be static or animated, are often much larger than the objects they contain, so it's worth considering a few optimizations for them.
29.5.1 Static Objects
For a static object, the bounding box is usually not much larger than the object. However, in the classic example of the pyramid, we might want to use more than one box to efficiently represent its extents, as shown in Figure 29-2.
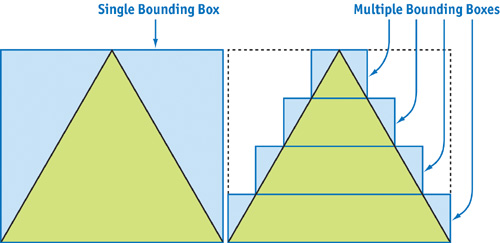
Figure 29-2 Bounding Boxes for a Pyramid (Cross Section)
One has to be careful when using these sub-bounding boxes, because testing them can introduce more overhead than testing just one big bounding box. Of course, this all depends on how complex the object's geometry is. The pyramid case is just an example to make things more obvious, because it certainly isn't optimal to use several bounding boxes to represent five polygons of a pyramid.
29.5.2 Animated Objects
Animated objects are more complex. What's a good way to calculate the bounding box of an animated object? There are many approaches; here are a few.
-
Calculate the bounding box for each frame of each animation.
This can get complex and CPU-intensive, especially if the object's skeletal animation system is incorporated into the GPU vertex shader. The overhead introduced by animating this object with the CPU (to calculate its bounding box) can be much higher than rendering the object.
-
Store one bounding box for all frames of each animation.
This is the simplest and fastest approach. However, results can be inaccurate because the bounding box can be significantly larger than the object, indicating that the object is visible when it's actually occluded.
We can reduce the bounding box a bit by animating an object "in place"—in other words, translating the object via animation routine instead of in animation itself. For example, if we shoot an enemy, he'll fly through the air and land a couple of meters away. If we use an animation to transport the enemy through the air, we'll end up with a huge bounding box. On the other hand, if we animate the enemy's flight in one place (not translating him), we'll have a small bounding box and can do actual translation through animation code when the animation triggers. See Figure 29-3.
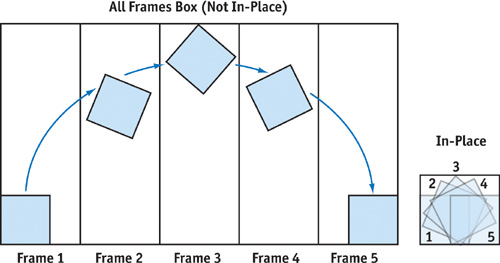
Figure 29-3 Per-Frame Bounding Boxes vs. In-Place Bounding Boxes
-
Store one bounding box for each animation.
This is the best solution, but it introduces a small problem: when blending several animations, we'll need to calculate the union of bounding boxes for each animation. Not a big deal, considering the effort we save because the bounding box of one animation is often much smaller than the bounding box of all animations.
The best approach is to combine the second and third methods and see which is optimal for a particular object.
In some cases, if we need to render multiple passes for an object and the first pass is fairly simple, we can use that first pass (instead of a bounding box) for testing visibility. However, we still need to be careful about the number of polygons in that single pass; remember, it's geometry throughput we're trying to spare.
29.6 Other Issues
29.6.1 CPU Overhead Too High
We need to account for the CPU overhead incurred when we send rendering requests to the GPU. If an object is easy to render, then it may be cheaper to simply render it than to draw the bounding box and perform the occlusion test. For example, rendering 12 triangles (a bounding box) and rendering around 200 triangles (or more!) takes almost the same time on today's GPUs. The CPU is the one that takes most of the time just by preparing the objects for rendering.
However, testing the object's bounding box is sometimes a must, no matter how many polygons the actual object has. What if the rendered object has a very complex pixel shader and occupies a notable portion of the screen? In such a case, even though the bounding box has more pixels to be drawn, the pixels can be rendered much faster (especially because they are rendered only to the depth buffer!) than an object itself, which would tax the GPU with many operations per pixel.
29.6.2 Rendering at High Resolutions
Applications can become fill-rate limited when we render at high resolutions but with simple pixel shaders. Rendering the whole bounding box could require many more pixels than rendering only the object inside the box; the GPU would need to do more work at the per-pixel level.
The rule of thumb is that objects that are not fill-rate bound (that is, objects that don't use complex fragment programs, many texture layers, and so on) should not be tested for occlusion at higher resolutions. This is because there are more pixels to fill at a higher resolution, so it's likely the GPU will spend more time rendering the object's bounding box than the object itself. Keep in mind that if the object is occluded, the early-z rejection will do its work at the per-pixel level, so processing complex fragment programs will be avoided.
The fill-rate problem can get even worse, because sometimes a bounding box needs to be rendered from both sides, with front-facing and back-facing polygons! The catch is that when you test an object that is very close to the view origin, the viewer ends up inside the bounding box. That's why we need to render back faces also; otherwise, because of back-face culling, no pixels will be drawn on-screen, and we'll get a false result. To be safe, skip occlusion testing for models that are too near the viewer; it can really do more harm than good, and an object that close is definitely visible.
29.6.3 Fast Depth-Writing Performance
But it's not all bad news. When only depth testing or stencil writing is taking place, some new GPUs (such as the GeForce FX family) use a higher-performance rendering path. In the past, hardware didn't benefit much when the color buffer was switched off during testing for the visibility of a bounding box, because the circuits for color and depth value output were in the same pipeline. Now, however, on newer hardware, if the color-buffer output is switched off, the pipelines are used for depth testing and the bounding box testing is faster.
29.6.4 Frustum Culling
Even though occlusion testing can cull pixels that are out of the view frustum, it is not advisable to use it for doing frustum culling. Rendering the bounding box of an object can induce more overhead than simply testing that bounding box against frustum clip planes with the conventional approach on the CPU. Moreover, some bounding boxes can be easily replaced with bounding spheres, which make CPU-style frustum testing even faster.
One approach is first to test the bounding sphere against the frustum. If the sphere ends up completely inside, we go ahead and render the whole object (with occlusion culling, of course). If the sphere is completely outside the view frustum, this is a trivial rejection case, so we just proceed to the next object. However, if the sphere intersects the frustum (that is, intersects one or more clipping planes, to be more precise), we have to check whether the bounding box of the object has one dimension that is much larger than the other two. If that's the case, it means that the bounding sphere is much bigger than the object itself! Then it's best to also test the bounding box against the view frustum, because it might end up being culled. A good example is a tall pillar, as shown in Figure 29-4.
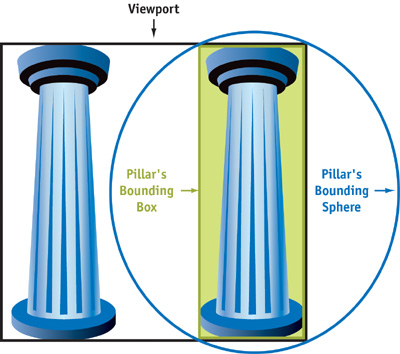
Figure 29-4 A Bounding Box Represents an Object More Closely Than a Bounding Sphere
29.7 A Little Reminder
Keep in mind that occlusion culling works best when objects have lots of polygons. An occlusion query won't accomplish much for objects of, say, 300 triangles, even if there are hundreds of them on-screen. Speed might improve moderately, but it depends on the CPU load and the speed ratio between the CPU and the GPU. A fast GPU, coupled with a slow CPU, makes an application CPU-bound, and occlusion testing won't help much.
On the other hand, if there are a lot of polygons per model (more than 1,000 is a good start), occlusion culling shows all its glory. Speed-ups can be more than double (depending on the scene, of course), plus it's almost free. And rendering is not noticeably slower—even if all the tested objects end up visible!
29.8 An Application: Lens Flares
Another useful application of the occlusion query technique is rendering lens flares. See Figures 29-5 and 29-6. Lens flares are great effects that help add realism to games, but it's easy to end up knee-deep in problems trying to render them accurately.
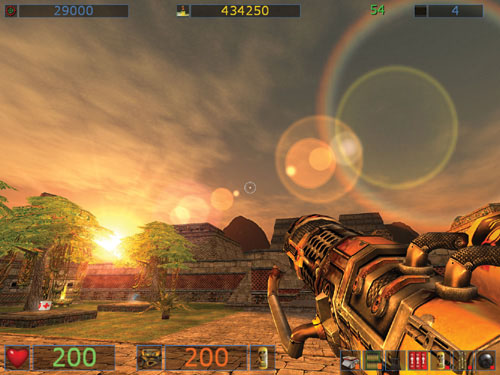
Figure 29-5 A Lens Flare from
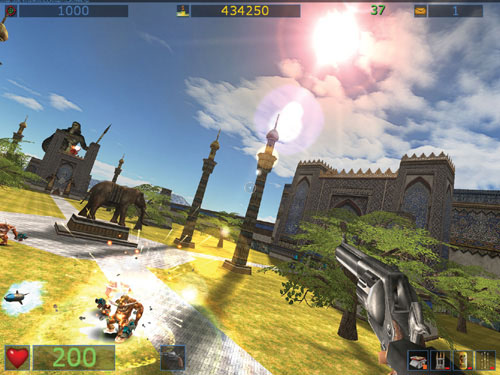
Figure 29-6 Another Lens Flare from
The catch is that lens flares aren't just nice light-halos around light sources: they are a camera's lens effect, which means they cannot be partially occluded by objects in a scene. Therefore, a lens flare is either completely visible or completely invisible, so lens flares must be overlaid on the previously rendered scene.
Rendering a lens flare isn't such a big deal: you need to render only one rectangle, properly filled with a nifty lens-flare glow or ring texture. However, the problem arises when it comes to determining the lens flare's visibility. In theory, it doesn't sound too bad, because "all" you need to do is render the whole scene and then check the depth value of each light source that holds a lens flare against the depth value stored in the depth buffer. If the light source's depth value is closer to the viewer, the flare is visible.
Unfortunately, checking the depth-buffer value requires reading from the depth buffer—and that's not very GPU-friendly. Another option is not to check the depth-buffer value but instead to cast a ray from each light source to the viewer. If the ray reaches the viewer, the lens flare is visible. Even this sounds relatively simple, but problems arise when you need to do a ray cast through a polygon that holds alpha-tested texture (for example, the leaves of a tree). Because alpha testing rejects pixels at places where the texture has an alpha-channel value lower than some threshold (usually 0.5), the texture will write the depth buffer only at certain places. To emulate this accurately with a ray cast, we would have to do a complete texture mapping in the CPU, which is a painfully slow operation.
So how do we efficiently test visibility for lens flares?
29.8.1 Rendering Lens Flares the Old Way
Without using occlusion queries, we definitely need access to the depth buffer to determine visibility. But reading from the depth buffer will inevitably induce a stall in the graphics pipeline, because the GPU needs to render all polygons in its queue to generate the correct depth-buffer image. To make things more difficult, the Direct3D API doesn't actually allow reading from the depth buffer in the first place (well, it does in some rare occasions, but that's completely unusable in practice). There's a way to get around this limitation, but it's really a weird workaround, and it's beyond the scope of this chapter. Well—looks like we ended up in a tight spot here.
OpenGL makes it easy to read from the depth buffer, so there's an opportunity for us to get around this GPU stall. We can batch all the readings from the depth buffer to the end of the frame, even after the actual rendering of the lens flares. This will make the lens flares' visibility result lag one frame behind, but that's perfectly acceptable in the context. Unfortunately, even though this optimization brings some speed improvements, it isn't much, and we'll have to get more radical. Again.
We can check depth-buffer values after the SwapBuffers call and right before the beginning of rendering the next frame. This will buy us some time, because the GPU might actually finish rendering the last frame, during which time the CPU will still be occupied with calculating AI and similar work for the current frame. So, the algorithm for rendering one frame looks something like this:
- Do AI, physics, and collision detection.
- Do other stuff, apart from rendering.
- Read the lens flares' depth values (these are from the last frame).
- Clear the depth buffer.
- Do the rendering.
- Render the lens flares.
- Swap buffers.
Even though this approach would eliminate a fair amount of GPU stall, there are still some problems. The overhead of a GPU stall depends on the ratio of GPU and CPU speeds. Ironically, this actually means that the cost of a stall is greater on faster GPUs. Another issue is even more serious: no one guarantees that the depth-buffer content will be intact after the SwapBuffers call! On all of today's GPUs, the depth-buffer content will survive the SwapBuffers call, but you can't count on that much, because things can change. To make matters worse, multisample antialiasing approaches can produce some nasty side effects when it comes to depth-buffer content after swap. Basically, this is a risky approach, which should be implemented only as a last resort.
Summing it all up: we definitely need occlusion query to come to the rescue!
29.8.2 Rendering Lens Flares the New Way
You can probably see where we're headed by now. We can use the occlusion query feature to test the visibility of a lens flare by "rendering" one pixel (with the depth test enabled, but with depth writes and color writes disabled) at the screen location and depth of the lens flare's light source. Next, we check to see how many pixels passed the occlusion test. If one pixel passed, the lens flare is visible. To minimize the effect of GPU stalls, we issue the occlusion query in this frame and read its result in the next one.
Why stop here? Due to its large performance hit, direct depth reading didn't give us much space to experiment, so reading multiple pixels per lens flare was out of the question. But with an occlusion query, we can find out how much of a lens flare is actually visible. Instead of checking only one pixel to get a yes-or-no answer, we can render a block of pixels (say, 16x16) and see what fraction of them actually got rendered. We can then use this fraction to modulate the lens flare's brightness. Now we can have smoother flares, and we don't have to bother with special fade-in and fade-out routines that prevent the lens flare from suddenly popping in and out of visibility. The number of pixels to test can easily be determined from the lens flare's size on-screen or the distance of the lens flare source from the viewer, or both.
This is nice ground for experimentation, but one thing is sure: the result will look great and won't hurt the GPU much at all.
29.9 Conclusion
At first sight, occlusion query looks like a really powerful tool—and it definitely is. However, like any other tool, it requires a certain degree of skill and knowledge to use effectively. You need to be able to recognize the situations in which it can be helpful.
In this chapter, we gave just two examples of how to use this technique efficiently. Of course, you don't have to stop here: there are many more things you can do with it. For example, occlusion query can be used for determining geometric level of detail based on the number of pixels occupied by an object. Or you can even use it in a visible-surface-determination algorithm.
Like any other technique, occlusion query will evolve. In the beginning, it will be used for rather simple tasks. But over time, we expect programmers to find amazing new applications for it as various obstacles are removed. With a little luck, this chapter has helped you to get started. Now the real exploration is up to you.
29.10 References
Maughan, Chris. 2001. "Texture Masking for Faster Lens Flare." In Game Programming Gems 2, edited by Mark DeLoura, pp. 474–480. Charles River Media.
Microsoft. 2003. Web site. http://msdn.microsoft.com/directx/default.asp
NVIDIA. 2003. Web site. http://developer.nvidia.com/view.asp?IO=nvidia_opengl_specs
Copyright
Many of the designations used by manufacturers and sellers to distinguish their products are claimed as trademarks. Where those designations appear in this book, and Addison-Wesley was aware of a trademark claim, the designations have been printed with initial capital letters or in all capitals.
The authors and publisher have taken care in the preparation of this book, but make no expressed or implied warranty of any kind and assume no responsibility for errors or omissions. No liability is assumed for incidental or consequential damages in connection with or arising out of the use of the information or programs contained herein.
The publisher offers discounts on this book when ordered in quantity for bulk purchases and special sales. For more information, please contact:
U.S. Corporate and Government Sales
(800) 382-3419
corpsales@pearsontechgroup.com
For sales outside of the U.S., please contact:
International Sales
international@pearsoned.com
Visit Addison-Wesley on the Web: www.awprofessional.com
Library of Congress Control Number: 2004100582
GeForce™ and NVIDIA Quadro® are trademarks or registered trademarks of NVIDIA Corporation.
RenderMan® is a registered trademark of Pixar Animation Studios.
"Shadow Map Antialiasing" © 2003 NVIDIA Corporation and Pixar Animation Studios.
"Cinematic Lighting" © 2003 Pixar Animation Studios.
Dawn images © 2002 NVIDIA Corporation. Vulcan images © 2003 NVIDIA Corporation.
Copyright © 2004 by NVIDIA Corporation.
All rights reserved. No part of this publication may be reproduced, stored in a retrieval system, or transmitted, in any form, or by any means, electronic, mechanical, photocopying, recording, or otherwise, without the prior consent of the publisher. Printed in the United States of America. Published simultaneously in Canada.
For information on obtaining permission for use of material from this work, please submit a written request to:
Pearson Education, Inc.
Rights and Contracts Department
One Lake Street
Upper Saddle River, NJ 07458
Text printed on recycled and acid-free paper.
5 6 7 8 9 10 QWT 09 08 07
5th Printing September 2007
- Contributors
- Copyright
- Foreword
- Part I: Natural Effects
-
- Chapter 1. Effective Water Simulation from Physical Models
- Chapter 2. Rendering Water Caustics
- Chapter 3. Skin in the "Dawn" Demo
- Chapter 4. Animation in the "Dawn" Demo
- Chapter 5. Implementing Improved Perlin Noise
- Chapter 6. Fire in the "Vulcan" Demo
- Chapter 7. Rendering Countless Blades of Waving Grass
- Chapter 8. Simulating Diffraction
- Part II: Lighting and Shadows
-
- Chapter 9. Efficient Shadow Volume Rendering
- Chapter 10. Cinematic Lighting
- Chapter 11. Shadow Map Antialiasing
- Chapter 12. Omnidirectional Shadow Mapping
- Chapter 13. Generating Soft Shadows Using Occlusion Interval Maps
- Chapter 14. Perspective Shadow Maps: Care and Feeding
- Chapter 15. Managing Visibility for Per-Pixel Lighting
- Part III: Materials
- Part IV: Image Processing
- Part V: Performance and Practicalities
-
- Chapter 28. Graphics Pipeline Performance
- Chapter 29. Efficient Occlusion Culling
- Chapter 30. The Design of FX Composer
- Chapter 31. Using FX Composer
- Chapter 32. An Introduction to Shader Interfaces
- Chapter 33. Converting Production RenderMan Shaders to Real-Time
- Chapter 34. Integrating Hardware Shading into Cinema 4D
- Chapter 35. Leveraging High-Quality Software Rendering Effects in Real-Time Applications
- Chapter 36. Integrating Shaders into Applications
- Part VI: Beyond Triangles
- Preface