
GPU Gems
GPU Gems is now available, right here, online. You can purchase a beautifully printed version of this book, and others in the series, at a 30% discount courtesy of InformIT and Addison-Wesley.
The CD content, including demos and content, is available on the web and for download.
Chapter 10. Cinematic Lighting
Fabio Pellacini
Pixar Animation Studios
Kiril Vidimce
Pixar Animation Studios
In this chapter, we present a simplified implementation of uberlight, a light shader that expresses the lighting model described by Ronen Barzel (1997, 1999). A superset of this model was developed over several years at Pixar Animation Studios and used for the production of animated movies such as the Walt Disney presentations of the Pixar Animation Studios films Toy Story, A Bug's Life, Monsters, Inc., and Finding Nemo.
Our Cg implementation is based on Barzel's original approach and on the RenderMan Shading Language implementation written by Larry Gritz (Barzel 1999). Further details about this lighting approach and its uses in movie production can be found in Apodaca and Gritz 1999 and Birn 2000.
10.1 Introduction
Lighting is an important aspect of computer cinematography, in which lights and shadows are used to convey mood and support storytelling (Calahan 1999). Although realism remains an important aspect of computer-generated imagery, lighting directors constantly cheat the physics of light to support the artistic depiction of animated movies. Performing these tricks on a real-world set is a daunting task that often requires hours of setup.
Freed of the limitations of real physics, developers of computer cinematography have been devising lighting models that let artists illuminate scenes intuitively. The lighting model presented in this chapter is an adaptation of the model developed over the last decade at Pixar Animation Studios and used in the production of most of our movies. See Figures 10-1, 10-2, and 10-3.
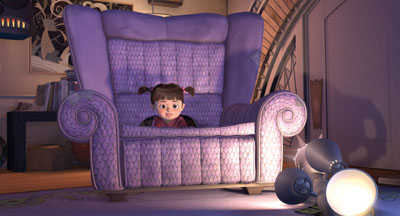
Figure 10-1 Barn Lights in .
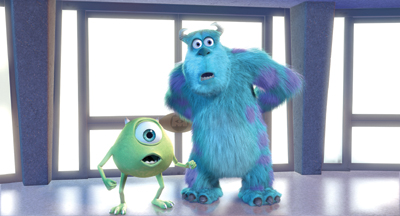
Figure 10-2 Cookies Contribute to a Window Effect in .
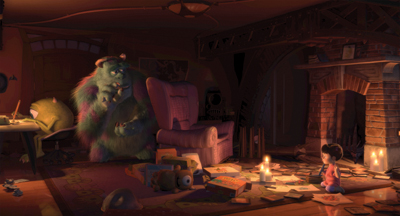
Figure 10-3 Lighting Conveys Mood in .
10.2 A Direct Lighting Illumination Model
The shader we present in this chapter models only the shaping and controls of the light sources that illuminate the scene; it doesn't cover the intricacies of how to model the surface details and the light reflection behavior. (Some examples of interesting surface behaviors can be found in Apodaca and Gritz 1999.)
In general, the illumination model used in our movie production performs two kinds of operations, similar to the pseudocode shown here.
color illuminationModel()
{
  Compute the surface characteristic For each light
  {
    Evaluate the light source Compute the surface response
  }
}
First, we compute the surface shading information by performing various texture lookups, interpolating values over the mesh, and computing procedural patterns. Then we loop over each light source that illuminates the object and compute its contribution. We do this by evaluating first the light color and then the surface response to the illumination of each light.
In this chapter, we present a simple shader that computes the contribution of only one light for a plastic reflection model. Extending it to a more general solution for multiple lights and better-looking surfaces is left as an exercise for the reader.
Our lighting model provides artists with control over various aspects of illumination: selection, color, shaping, shadowing, and texturing.
10.2.1 Selection
Each object in the scene can selectively respond to each individual light. This powerful characteristic of our lighting model lets the artist turn off lights on objects when additional light is creating an undesired effect. It also lets artists add extra lights that create a desired effect in a specific location without affecting the rest of the scene.
10.2.2 Color
A light's most noticeable properties are the color and the intensity that describe its emission. Similar to the OpenGL fixed-function lighting, our implementation provides separate weights for the ambient, diffuse, and specular illumination effects that artists can separately tweak. One of the most important aspects of our lighting model is that these terms can be freely changed per-object, letting the artist light entire sets with a small number of lights.
10.2.3 Shaping
To control regions of a scene that are illuminated by a light, real-world cinematographers commonly employ spotlights and rectangular lights (known as barn doors) to shape the light distribution. Our lighting model generalizes on these concepts by providing two types of shaping:
- Omni light: This light specifies a near and far truncation distance (the light shines with full intensity inside each) and two adjustable, smooth drop-off zones around these edges.
- Barn shaping: Barn shaping is a generalized truncated pyramid whose cross section is a superellipse
with adjustable soft edges. The width and height of each of the two superellipses can be controlled separately
to allow a wider range of shapes. The use of a superelliptical cross section lets us continuously vary the
shape of the light, from a circle to a square (and to even more exotic, star-like shapes). Furthermore, the
pyramid can be freely sheared to allow window and doorway effects. Variations of the shape of the cross
section of the pyramid are illustrated in Figures 10-4 and 10-5.
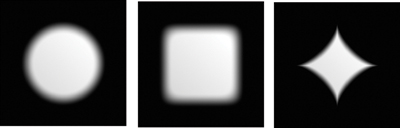
Figure 10-4 Barn Door Shapes
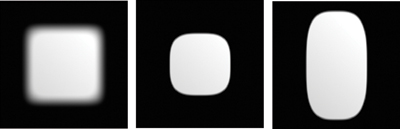
Figure 10-5 Barn Door Edge Sizes
10.2.4 Shadowing
Shadowing is an important aspect of our lighting model; shadows are probably the attributes that artists cheat most often. Shadows are tweaked not only for speed considerations, but also for the ability to control each little aspect of the shadow's look, which is so important in defining the overall mood of a movie. For example, compare the strong shadows in film noir movies with the almost invisible ones in musicals.
As for lighting intensity, artists decide which objects cast shadows and which ones receive them. Also, the lighting designer can cheat shadow positions by moving them in relationship to the light origin. For example, she can allow bright highlights in a character's eyes while making sure that the shadow does not cross the character's face.
Darkness
One of the biggest problems of a direct lighting model is that shadows tend to be too dark. This happens because most of the indirect illumination that naturally occurs in the environment is never computed. To mimic reality in our model, we've created lights that can be adjusted to change the density of shadows, by letting some light propagate through the objects in a scene. In our implementation, we use the diffuse contribution of the surface to color the shadow region. We believe this is better than using an ambient term, because our method lets us maintain those nice gradients that make the shadow believable. Later in the chapter, we elaborate on this topic.
Hue
The hue of a shadowed area in the real world is slightly different from that of a nearby unoccluded region—for example, notice the slight bluish tint of outdoor shadows on a bright, sunny day. To mimic this effect, we allow the artist to change the shadow color. Slight variations of the shadow hue can make the difference between a good-looking shadow and a fake-looking one. In practice, you should think of shadow casters "spraying" receivers with the shadow color, which is commonly black. See Figure 10-6 for images with different shadow colors.
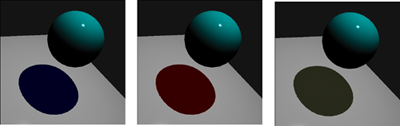
Figure 10-6 Variations in Shadow Colors
Reflection
One important caveat concerns highlights. When computing the surface contribution in the shadow area, we use only the diffuse response to obtain those nice gradients seen in outdoor environments, but we don't want to see highlights in the shadow region, because we are cheating diffuse interreflections. To achieve this effect, we simply switch off the specular contribution in the shadow regions. This little adjustment is just one example of how light changes the reflection behavior of surfaces. Tweaks like these are used widely in movie production to achieve that specific look we hope viewers will love.
Shadow Maps
Of the various techniques used to implement shadows, we use shadow maps in our model, for their simplicity and flexibility—and because we use them often in our movies. Although the shader in this chapter is based on such an algorithm, we encourage the reader to experiment with other shadow algorithms. The important aspect of the shader is not how we decide if a pixel is in shadow, it's how we use this information.
Shadow Blurring
The most important aspect missing from our implementation is shadow blurring. Artists often adjust the softness of shadow edges in order to cheat area lights or simply to get the particular look that the director wants. Blurring shadow edges is particularly hard to do efficiently. Various techniques are available, but presenting them is outside the scope of this chapter.
10.2.5 Texturing
Finally, we added projective texture support to allow a wide variety of effects, such as slide projectors and fake shadows from off-screen objects. These tricks are known in the movie production world as cookies; they are also used in game production, but less often. While game developers use texture projection for shape, coloring, and shadowing effects, movie creators tend to use soft cookies to enrich visual details and to add special effects, such as off-camera shadow casters or strangely shaped lights.
10.2.6 Results
Figures 10-7 and 10-8 illustrate the use of the uberlight to illuminate the head of a character from Pixar's short film Geri's Game. The surface of the model is flat and plastic-like, and we don't apply any material-related textures on it. By using a simpler surface model for the object, we can better emphasize the various effects we can obtain by using just the light shader with different parameters. The proper combination of light and surface modeling brings this character to life, as in the original Pixar short.
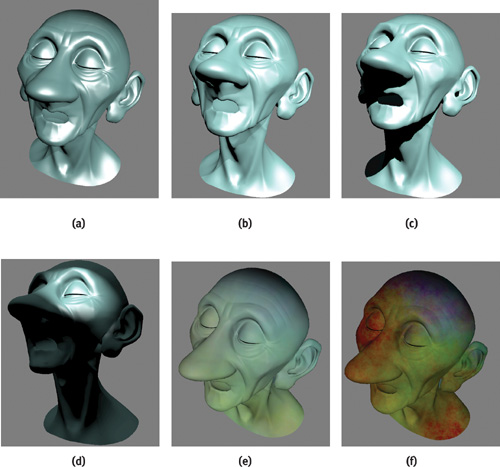
Figure 10-7 Lighting Geri
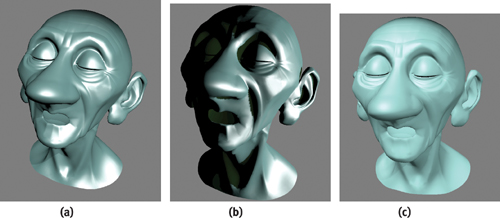
Figure 10-8 Lighting Styles
10.3 The Uberlight Shader
Listings 10-1 and 10-2 show the source code of the uberlight shader, based on the one by Larry Gritz in Barzel 1999.
Example 10-1. The Vertex Program for an Uberlight-Like Shader
void uberlight_vp(varying float4 Pobject
                  : POSITION, // Vertex position in object space
                    varying float3 Nobject
                  : NORMAL,
                    // Vertex normal in object space
                    varying float3 VertexColor
                  : COLOR0, // Vertex color
                    uniform float4x4 ModelViewProj,
                    // ModelViewProj matrix
                    uniform float4x4 ObjectToWorld,
                    // ObjectToWorld matrix
                    uniform float4x4 ObjectToWorldIT,
                    // Inverse transpose of the
                    // ObjectToWorld matrix
                    uniform float4x4 WorldToLight,
                    // Light space
                    uniform float4x4 WorldToLightIT,
                    // Inverse transpose of light
                    // space to transform normals
                    uniform float4x4
                        WorldToShadowProj, // Light space concatenated with
                    // the projection matrix used for
                    // the shadow. This defines
                    // shadow space.
                    uniform float3 CameraPosInWorld,
                    // Camera position
                    // in world space
                    uniform float ShadowBias,
                    // Shadow bias
                    out float4 HPosition
                  : POSITION,
                    // Rasterizer position
                    out float3 CameraPosInLight
                  : TEXCOORD0, // Camera position
                    // in light space
                    out float3 Plight
                  : TEXCOORD1,
                    // Interpolated position
                    // in light space
                    out float3 Nlight
                  : TEXCOORD2,
                    // Interpolated normal
                    // in light space
                    out float4 ShadowUV
                  : TEXCOORD3,
                    // Shadow UV
                    out float3 Color
                  : COLOR0)
// Surface color
{
  // Compute coordinates for the rasterizer
  HPosition = mul(ModelViewProj, Pobject);
  // Compute world space pos and normal
  float4 Pworld = mul(ObjectToWorld, Pobject);
  float3 Nworld = mul(ObjectToWorldIT, float4(Nobject, 0)).xyz;
  // Compute the position of the point in light space
  CameraPosInLight = mul(WorldToLight, float4(CameraPosInWorld, 1)).xyz;
  Plight = mul(WorldToLight, Pworld).xyz;
  Nlight = mul(WorldToLightIT, float4(Nworld, 0)).xyz;
  // Compute the U-V for the shadow and texture projection
  float4 shadowProj = mul(WorldToShadowProj, Pworld);
  // Rescale x, y to the range 0..1
  ShadowUV.xy = 0.5 * (shadowProj.xy + shadowProj.ww);
  // When transforming z, remember to apply the bias
  ShadowUV.z = 0.5 * (shadowProj.z + shadowProj.w - ShadowBias);
  ShadowUV.w = shadowProj.w;
  // Pass the color as is
  Color = VertexColor;
}
Example 10-2. The Fragment Program for an Uberlight-Like Shader
// SHADER PARAMETERS ================================================
// Superellipse params
struct SuperellipseShapingParams
{
  float width, height;
  float widthEdge, heightEdge;
  float round;
};
// Distance shaping params
struct DistanceShapingParams
{
  float near, far;
  float nearEdge, farEdge;
};
// Light params
struct LightParams
{
  float3 color;
  // light color
  float3 weights; // light weights (ambient, diffuse, specular)
};
struct SurfaceParams
{
  float3 weights;
  // surface weights (ambient, diffuse, specular)
  float roughness; // roughness
};
// BRDF/LIGHT INTERACTION ===========================================
// Compute the light direction
float3 computeLightDir(float3 Plight)
{
  // Spot only
  return -normalize(Plight);
}
// Ambient contribution of lit
float ambient(float3 litResult)
{
  return litResult.x;
} // Diffuse contribution of lit
float diffuse(float3 litResult) { return litResult.y; }
// Specular contribution of lit
float specular(float3 litResult) { return litResult.z; }
// SUPERELLIPSE =====================================================
float computeSuperellipseShaping(
    float3 Plight,
    // Point in light space
    bool barnShaping,
    // Barn shaping
    SuperellipseShapingParams params) // Superellipse shaping params
{
  if (!barnShaping)
  {
    return 1;
  }
  else
  {
    // Project the point onto the z == 1 plane
    float2 Pproj = Plight.xy / Plight.z;
    // Because we want to evaluate the superellipse
    // in the first quadrant, for simplicity, get the right values
    float a = params.width;
    float A = params.width + params.widthEdge;
    float b = params.height;
    float B = params.height + params.heightEdge;
    float2 pos = abs(Pproj);
    // Evaluate the superellipse in the first quadrant
    float exp1 = 2.0 / params.round;
    float exp2 = -params.round / 2.0;
    float inner =
        a * b * pow(pow(b * pos.x, exp1) + pow(a * pos.y, exp1), exp2);
    float outer =
        A * B * pow(pow(B * pos.x, exp1) + pow(A * pos.y, exp1), exp2);
    return 1 - smoothstep(inner, outer, 1);
  }
} // DISTANCE SHAPING =================================================
float computeDistanceShaping(
    float3 Plight,
    // Point in light space
    bool barnShaping,
    // Barn shaping
    DistanceShapingParams params) // Distance shaping params
{
  float depth;
  if (barnShaping)
  {
    depth = -Plight.z;
  }
  else
  {
    depth = length(Plight.z);
  }
  return smoothstep(params.near - params.nearEdge, params.near, depth) *
         (1 - smoothstep(params.far, params.far + params.farEdge, depth));
}
// MAIN =============================================================
float4 uberlight_fp(float3 CameraPosInLight
                    : TEXCOORD0, // Camera position in light space
                      float3 Plight
                    : TEXCOORD1,
                      // Interpolated position in light space
                      float3 Nlight
                    : TEXCOORD2,
                      // Interpolated normal in light space
                      float4 ShadowUV
                    : TEXCOORD3, // Shadow UV
                      // SURFACE PROPERTIES ------------------------
                      float3 SurfaceColor
                    : COLOR0,
                      // Surface color
                      uniform SurfaceParams Surface, // Other surface params
                      // (weights, roughness)
                      // LIGHT PROPERTIES --------------------------
                      uniform LightParams Light, // Light properties
                      // SHAPING -----------------------------------
                      // Choose between barn shaping (superelliptic pyramid)
                      // and omni shaping
                      uniform bool BarnShaping,
                      uniform SuperellipseShapingParams SuperellipseShaping,
                      // Superellipse
                      // shaping
                      uniform DistanceShapingParams DistanceShaping,
                      // Distance
                      // shaping
                      // DISTANCE FALLOFF --------------------------
                      // COOKIES AND SHADOWS -----------------------
                      uniform sampler2D Shadow,
                      // Shadow texture
                      uniform float3 ShadowColor,
                      // Shadow color
                      uniform sampler2D Cookie,
                      // Cookie texture
                      uniform float CookieDensity) // Cookie density
{
  // TRANSFORM VECTORS TO LIGHT SPACE ---------------------
  // Compute the normal in light space (normalize after vertex
  // interpolation)
  float3 N = normalize(Nlight);
  // Compute the light direction
  float3 L = computeLightDir(Plight);
  // Compute the view direction (vector from the point to the eye)
  float3 V = normalize(CameraPosInLight - Plight);
  // Compute the half-angle for the specular term
  float3 H = normalize(L + V);
  // COMPUTE THE TEXTURE PROJECTION - COOKIE
  float3 cookieColor = tex2Dproj(Cookie, ShadowUV).xyz;
  Light.color = lerp(Light.color, cookieColor, CookieDensity);
  // COMPUTE THE SHADOW EFFECT ---------------------------
  // Get the amount of shadow
  float shadow = tex2Dproj(Shadow, ShadowUV).x;
  // Modify the light color so that it blends with the shadow color
  // in the shadow areas
  float3 mixedLightColor = lerp(ShadowColor, Light.color, shadow);
  // COMPUTE THE ATTENUATION DUE TO SHAPING --------------
  float attenuation = 1;
  // Contribution from the superellipse shaping
  attenuation *=
      computeSuperellipseShaping(Plight, BarnShaping, SuperellipseShaping);
  // Contribution from the distance shaping
  attenuation *= computeDistanceShaping(Plight, BarnShaping, DistanceShaping);
  // APPLY TO SURFACE ------------------------------------
  // Here you should substitute other code for different
  // surface reflection models. This code computes the lighting
  // for a plastic-like surface.
  // Lighting computation
  float3 litResult = lit(dot(N, L), dot(N, H), Surface.roughness).xyz;
  // Multiply by the surface and light weights
  litResult *= Surface.weights * Light.weights;
  // Compute the ambient, diffuse, and specular final colors.
  // For the ambient term, use the color of the light as is
  float3 ambientColor = Light.color * SurfaceColor * ambient(litResult);
  // For the diffuse term, use the color of the light
  // mixed with the color in the shadow
  float3 diffuseColor = mixedLightColor * SurfaceColor * diffuse(litResult);
  // The specular color is simply the light color times the specular
  // term, because we want to obtain white highlights regardless of the
  // surface color. Our shadows won't be fully black, so we want to
  // make sure that the highlights do not appear in shadow.
  float3 specularColor = mixedLightColor * shadow * specular(litResult);
  // Compute the final diffuse color
  float3 color = attenuation * (ambientColor + diffuseColor + specularColor);
  // Compute the diffuse color
  return float4(color, 1);
}
10.4 Performance Concerns
10.4.1 Speed
We can easily speed up the uberlight shader by replacing certain analytic computations with texture lookups. The textures are generated by discretely sampling the functions of computations we want to avoid. As long as the textures have a high-enough resolution (potentially re-creating them based on the scene and camera parameters), the quality of the image can still be very good. Because of production and quality demands in the world of offline rendering, this kind of optimization is rarely performed.
10.4.2 Expense
The most expensive code in this shader is the computation of the light's shape-based attenuation. We can construct a texture map to evaluate the superelliptical shaping for a given set of barn parameters and then use the shadow texture coordinates to look up the barn map contribution in light space as a projective texture. The use of a barn map dramatically reduces the number of shader instructions. Plus, it can more than double the speed of shading (as measured on NVIDIA's Quadro FX 2000 board).
10.4.3 Optimization
When neither the camera nor the objects move in the scene, we can also optimize camera-dependent and scene-dependent shading components of the shader (such as the distance-based shaping). This is a typical usage scenario for a lighting artist who is modifying lighting parameters to light a frame in a given shot. When the artist replaces both the superellipse and the distance-based shaping with two texture lookups, the modified shader performs more than three times faster than the original one.
If you choose this approach to optimize your shaders, consider using a high-level language to create these maps on the fly. In our proprietary multipass interactive renderer, we define the creation of these maps as separate passes. Once created, the pass results are cached and constantly reused. Only when the parameters that affect these maps change are the passes marked as dirty, queued for reevaluation, and once again cached.
10.5 Conclusion
Our lighting model is a simple attempt to provide a comprehensive set of lighting controls that covers most effects used daily by lighting artists. Although our implementation covers a wide variety of effects, many more can be added (and are indeed added daily) to allow the artist more flexibility and expressiveness. Examples of such controls are found in Barzel 1999. Readers may extend our source code examples to cover these and other algorithms.
The lighting controls presented covered only part of the look for which the light source is responsible. When you are developing a full illumination model, be aware that the surface-reflection characteristic of a surface is also important; this property is what distinguishes the appearance of the materials in the scene.
10.6 References
Apodaca, Anthony A., and Larry Gritz, eds. 1999. Advanced RenderMan: Creating CGI for Motion Pictures. Morgan Kaufmann.
Barzel, Ronen. 1997. "Lighting Controls for Computer Cinematography." Journal of Graphics Tools 2(1), pp. 1–20. Available online at http://www.acm.org/jgt/papers/Barzel97
Barzel, Ronen. 1999. "Lighting Controls for Computer Cinematography." In Advanced RenderMan: Creating CGI for Motion Pictures, edited by Anthony A. Apodaca and Larry Gritz. Morgan Kaufmann. Code for the chapter was provided by Larry Gritz.
Birn, Jeremy. 2000. Digital Lighting and Rendering. New Riders Publishing.
Calahan, Sharon. 1999. "Storytelling through Lighting: A Computer Graphics Perspective." In Advanced RenderMan: Creating CGI for Motion Pictures, edited by Anthony A. Apodaca and Larry Gritz. Morgan Kaufmann.
Copyright
Many of the designations used by manufacturers and sellers to distinguish their products are claimed as trademarks. Where those designations appear in this book, and Addison-Wesley was aware of a trademark claim, the designations have been printed with initial capital letters or in all capitals.
The authors and publisher have taken care in the preparation of this book, but make no expressed or implied warranty of any kind and assume no responsibility for errors or omissions. No liability is assumed for incidental or consequential damages in connection with or arising out of the use of the information or programs contained herein.
The publisher offers discounts on this book when ordered in quantity for bulk purchases and special sales. For more information, please contact:
U.S. Corporate and Government Sales
(800) 382-3419
corpsales@pearsontechgroup.com
For sales outside of the U.S., please contact:
International Sales
international@pearsoned.com
Visit Addison-Wesley on the Web: www.awprofessional.com
Library of Congress Control Number: 2004100582
GeForce™ and NVIDIA Quadro® are trademarks or registered trademarks of NVIDIA Corporation.
RenderMan® is a registered trademark of Pixar Animation Studios.
"Shadow Map Antialiasing" © 2003 NVIDIA Corporation and Pixar Animation Studios.
"Cinematic Lighting" © 2003 Pixar Animation Studios.
Dawn images © 2002 NVIDIA Corporation. Vulcan images © 2003 NVIDIA Corporation.
Copyright © 2004 by NVIDIA Corporation.
All rights reserved. No part of this publication may be reproduced, stored in a retrieval system, or transmitted, in any form, or by any means, electronic, mechanical, photocopying, recording, or otherwise, without the prior consent of the publisher. Printed in the United States of America. Published simultaneously in Canada.
For information on obtaining permission for use of material from this work, please submit a written request to:
Pearson Education, Inc.
Rights and Contracts Department
One Lake Street
Upper Saddle River, NJ 07458
Text printed on recycled and acid-free paper.
5 6 7 8 9 10 QWT 09 08 07
5th Printing September 2007
- Contributors
- Copyright
- Foreword
- Part I: Natural Effects
-
- Chapter 1. Effective Water Simulation from Physical Models
- Chapter 2. Rendering Water Caustics
- Chapter 3. Skin in the "Dawn" Demo
- Chapter 4. Animation in the "Dawn" Demo
- Chapter 5. Implementing Improved Perlin Noise
- Chapter 6. Fire in the "Vulcan" Demo
- Chapter 7. Rendering Countless Blades of Waving Grass
- Chapter 8. Simulating Diffraction
- Part II: Lighting and Shadows
-
- Chapter 9. Efficient Shadow Volume Rendering
- Chapter 10. Cinematic Lighting
- Chapter 11. Shadow Map Antialiasing
- Chapter 12. Omnidirectional Shadow Mapping
- Chapter 13. Generating Soft Shadows Using Occlusion Interval Maps
- Chapter 14. Perspective Shadow Maps: Care and Feeding
- Chapter 15. Managing Visibility for Per-Pixel Lighting
- Part III: Materials
- Part IV: Image Processing
- Part V: Performance and Practicalities
-
- Chapter 28. Graphics Pipeline Performance
- Chapter 29. Efficient Occlusion Culling
- Chapter 30. The Design of FX Composer
- Chapter 31. Using FX Composer
- Chapter 32. An Introduction to Shader Interfaces
- Chapter 33. Converting Production RenderMan Shaders to Real-Time
- Chapter 34. Integrating Hardware Shading into Cinema 4D
- Chapter 35. Leveraging High-Quality Software Rendering Effects in Real-Time Applications
- Chapter 36. Integrating Shaders into Applications
- Part VI: Beyond Triangles
- Preface