
GPU Gems
GPU Gems is now available, right here, online. You can purchase a beautifully printed version of this book, and others in the series, at a 30% discount courtesy of InformIT and Addison-Wesley.
The CD content, including demos and content, is available on the web and for download.
Chapter 7. Rendering Countless Blades of Waving Grass
Kurt Pelzer
Piranha Bytes
7.1 Introduction
To simulate an idyllic nature scene in a realistic fashion, besides detailed trees and bushes, as well as a complex water and sky dome simulation, we need a high-quality grass effect. We must be able to cover large areas of the terrain with it, without monopolizing the GPU. The grass should look naturally grown and should wave realistically in the wind.
In the past, a high-quality grass simulation would have been considered too complex for real-time applications. The Codecreatures Benchmark (published by Codecult in 2002) disproved this pessimistic assertion. See Figure 7-1. In this chapter, we describe a flexible, widely applicable grass simulation based on the grass effect shown in the benchmark. Additionally, a special version of our Codecreatures Benchmark application is included in this book's accompanying material, which offers an interactive demo mode.

Figure 7-1 Screenshot of the Codecreatures Benchmark Application
7.2 Overview
First, we should realize that a detailed modeling of the individual blades of grass is not meaningful, because the number of polygons that would be required for larger meadows would be much too high. A scene with countless blades of polygonal grass would not be displayable in real time with the graphics hardware available today.
So we have to build a simple and useful alternative that meets the following conditions:
- Many blades of grass must be represented by few polygons.
- Grass must appear dense from different lines of sight.
In the next section, we build grass objects that meet these conditions.
Additionally, we must be able to animate the grass realistically. In Section 7.4, we discuss three different animation methods.
7.3 Preparation of the Grass Objects
As we just mentioned, many blades of grass must be represented by few polygons. We start by solving this problem. Independent of the camera position and direction, the appearance should be like that of an open countryside. Fortunately, the solution is not too difficult. In Section 7.3.1, we start by combining several blades of grass and displaying them in one texture. But this is not enough: some polygons that use this texture must be combined in such a way that the individual polygons are not noticeable (see Section 7.3.2). When the viewer moves around, we add or remove grass objects in the distance by blending them in or out. This ensures that the complete grass effect will have robust visual quality.
7.3.1 Grass Texture
Now let us see how to build a texture for the task we have to solve. The required texture has to cluster several blades of grass; otherwise, it will have large transparent areas. We obtain this simply by drawing solid grass stems in a transparent alpha channel. In the color channel, we should use different shades of green and yellow to get a better differentiation of single blades. We may want to simulate blades of grass in good and bad conditions, to represent differences in age or ripeness, and even to distinguish front and back faces of the blades.
A concrete example of a grass texture is shown in Figure 7-2.
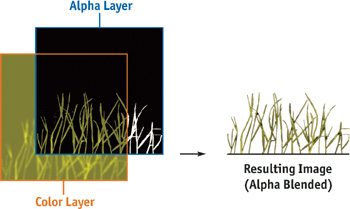
Figure 7-2 Schematic of a Grass Texture
7.3.2 Grass Objects
This section explains how to combine some polygons, mapped with the grass texture built in the previous section, in a way that the simulated grass appears dense, and without highlighting individual polygons. The technique also guarantees that the individual polygons are not visible.
Because the user can navigate freely through the scene, a construction similar to the one shown in Figure 7-3 would be insufficient to produce a convincing effect. A linear arrangement of the grass polygons would immediately make the structure recognizable if someone were to view the scene perpendicular relative to the direction of the polygons. Additionally, the grass would look very thin in this case. An arrangement like this one should be considered only with automatic camera navigation or unreachable, far-distant meadows.
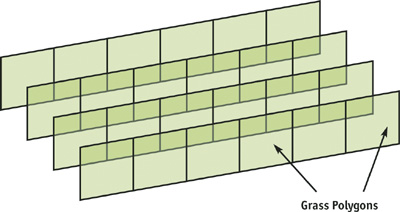
Figure 7-3 Linear Arrangement
To ensure good visual quality independent of the current line of sight, we have to cross the grass polygons. Using configurations that look like stars proves very worthwhile. Figure 7-4 presents two possible variants of "grass objects," consisting of three intersecting quads. We have to render the polygons with disabled back-face culling to achieve visibility on both sides. To attain proper illumination, we should orient the normal vectors of all vertices parallel to the polygons' vertical edges. This guarantees correct lighting for all grass objects situated on slopes, with no differences due to the brightness of the terrain.
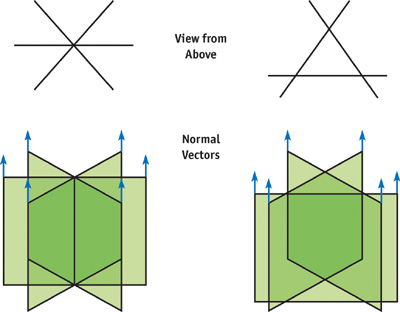
Figure 7-4 Grass Objects
If we set these grass objects quite close together in a large area, as shown in Figure 7-5, sort them back-to-front at runtime, use alpha blending, and enable z-testing/writing in the draw call, then the impression of a naturally and thickly grown meadow appears.
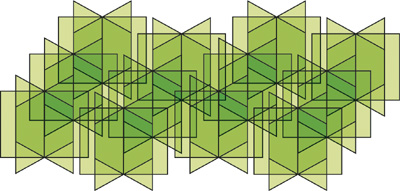
Figure 7-5 An Expanse of Grass
7.4 Animation
To continue with the next step, we want to realistically animate the grass of a complete meadow, built with "grass objects" like those presented in Figure 7-5. This section describes three different variants of animation. Each has its pros and cons. Section 7.4.1 presents the general idea of our animation methods. In Section 7.4.2, clusters of several grass objects standing close together are animated in the same way. In Section 7.4.3, each vertex gets its own translation vector. Finally, in Section 7.4.4, we try to find the golden mean: a different animation for each grass object.
7.4.1 The General Idea
In order to achieve a highly realistic animation, we are going to use a calculation based on trigonometric functions, especially sine and cosine. This calculation should take into account the position that has to be moved (whether it is a vertex or the center of an object or cluster) and the current time. Also, the direction and strength of the prevailing wind will be factors. Each of our techniques moves only the upper vertices of the grass objects. In a vertex shader it is easy to differentiate between these vertices and the lower ones by examining the texture coordinates. All upper vertices should have the same v coordinate for the grass texture: such as zero, or a value close to it. The framework in the vertex shader code, as shown in Listing 7-1, is the same in all three techniques; only the pure animation part differs. The animation code can be found in the following sections.
Example 7-1. Framework in the Vertex Shader
//
// Equal Cg / HLSL framework in the vertex shaders
// for Sections 7.4.2, 7.4.3, and 7.4.4
//
struct VS_INPUT
{
  float3 vPosition : POSITION;
  float3 vNormal : NORMAL;
  float2 TexCoords : TEXCOORD0;
  // This member is needed in Section 7.4.4
  float3 vObjectPosition : TEXCOORD1;
};
struct VS_OUTPUT
{
  float4 vPosition : POSITION;
  float4 vDiffuse : COLOR;
  float2 TexCoords : TEXCOORD0;
};
struct VS_TEMP
{
  float3 vPosition;
  float3 vNormal;
};
float4x4 mWorldViewProjMatrix;
float4 vLight;
float fObjectHeight;
VS_OUTPUT main(const VS_INPUT v)
{
  VS_OUTPUT out;
  VS_TEMP temp;
  // Animate the upper vertices and normals only
  if (v.TexCoords.y < = 0.1)
  {
    // Or:
    if (v.TexCoords.y >= 0.9)
    // A N I M A T I O N (to world space)
    // Insert the code for 7.4.2, 7.4.3, or 7.4.4
    // ...
    // <- Code for our different animation methods
  }
  // Output stuff
  out.vPosition = mul(float4(temp.vPosition, 1), mWorldViewProjMatrix);
  out.vDiffuse = dot(vLight, temp.vNormal);
  out.TexCoords = v.TexCoords;
  return out;
}
7.4.2 Animation per Cluster of Grass Objects
The following method was used in the Codecreatures Benchmark and produces a realistic look with gusting winds that constantly change strength and direction. Here, the shift of the upper polygon vertices happens uniformly for a group of nearby grass objects. To produce a natural-looking animation, we should select a cluster size that is not too large. See Figure 7-6.
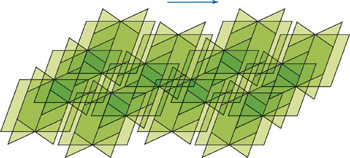
Figure 7-6 Animation per Cluster of Grass Objects
The translation vector for the animation is computed by the CPU and is handed over to the vertex shader as a constant parameter. Using a more expensive algorithm on the CPU allows us to take advantage of a very complex wind simulation. Because we supply each cluster of grass objects with its own translation vector, we have to change this constant parameter for each cluster. So we have to interrupt the rendering of a complete meadow quite often and use a separate draw call for each cluster.
Pros
- Complex animation calculations are made through CPU-based algorithms.
- There are no distortions, because of the constant distance of the upper vertices of a polygon.
Cons
- Many draw calls are required to display a complete meadow.
- Clusters may be apparent due to synchronized animation of all vertices of a complete object cluster.
Algorithm
- On the CPU, calculate the current translation vector for the next cluster using the position of the cluster's center.
- Set the translation vector as a constant for the vertex shader.
- Execute a draw call for the cluster.
- In the vertex shader, add the translation vector to the positions of the upper vertices. See Listing 7-2.
Example 7-2. Code for Animation per Cluster of Grass Objects
//
// Animation per Cluster of Grass Objects (7.4.2)
//
float3 vClusterTranslation; // Calculated on CPU
VS_OUTPUT main(const VS_INPUT v)
{
  // ...
  // A N I M A T I O N (to world space)
  // Here comes the code for 7.4.2
  temp.vPosition = v.vPosition + vClusterTranslation;
  temp.vNormal = normalize(v.vNormal * fObjectHeight + vClusterTranslation);
  // ...
}
7.4.3 Animation per Vertex
One of the main problems with the method discussed in Section 7.4.2 is poor performance because of the high number of draw calls, which individually render only a small number of polygons. It would be better if we could render a large area covered with grass by using a much lower number of draw calls. However, we have to relocate the complete animation computation into the vertex shader to be able to move each vertex separately, relative to its position. See Figure 7-7.
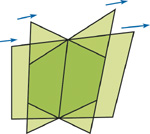
Figure 7-7 Animation per Vertex
Because the translations for each vertex are computed individually, the length of the edge between the upper vertices of the grass polygons is no longer constant, as shown in Figure 7-8. Therefore, visible distortions may appear because of the inconstant length and thickness of each blade of grass, but typically these artifacts will not be very noticeable.
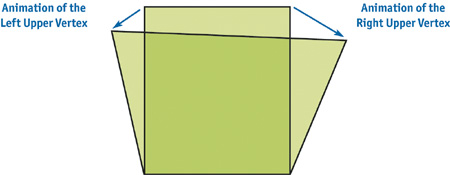
Figure 7-8 Texture Distortion
Additionally, the overall effect may seem more unnatural than in the previous method. Because the translation of all vertices in a nearby region is very similar, an absence of local chaos and a very homogeneous animation results. We are able to eliminate this disadvantage by using a pseudo-random function in the vertex shader to achieve more varied results.
Pros
- Only a few draw calls, perhaps even just one, are necessary to display a complete meadow.
- Varying the vertex position in the vertex shader allows for the continuity of a rippling wave of wind.
- The clusters are indistinguishable.
Cons
- Distortion appears, due to the variable distance of the upper vertices of a polygon.
- Animation may appear homogeneous due to a lack of local chaos.
- The complexity of the animation calculation is limited.
Algorithm
- Set constants, such as time stamp and the basic strength and direction of the wind, for the vertex shader.
- Execute one draw call for the complete meadow or large area of grass.
- Use the vertex shader to calculate animation based on vertex position. See Listing 7-3.
Example 7-3. Code for Animation per Vertex
//
// Animation per Vertex (7.4.3)
//
float fTimeStamp;
float3 vWindDirection;
float fWindStrength;
VS_OUTPUT main(const VS_INPUT v)
{
  // ...
  // A N I M A T I O N (to world space)
  // Here comes the code for 7.4.3
  float3 vVertexTranslation =
      CalcTranslation(v.vPosition, fTimeStamp, vWindDirection, fWindStrength);
  temp.vPosition = v.vPosition + vVertexTranslation;
  temp.vNormal = normalize(v.vNormal * fObjectHeight + vVertexTranslation);
  // ...
}
7.4.4 Animation per Grass Object
To increase the apparent visual complexity of the animation based on the methods presented in Sections 7.4.2 and 7.4.3, we combine an undistorted grass texture and a low number of draw calls with local chaos—and thereby gain the advantages of both methods. We are able to combine these methods because we do not compute the animation for each vertex based on its position; rather, we do it based on the center position of the grass object—each consisting of three intersecting quads (see Section 7.3.2). Because neighboring grass objects now have different animations, we can represent the desired local chaos, as shown in Figure 7-9. Additionally, the constant animation for each grass object prevents the horizontal texture distortions.
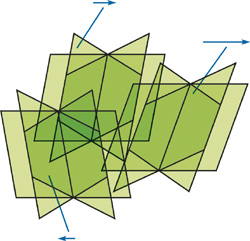
Figure 7-9 Animation per Grass Object
To make this possible, each vertex must know the center position of its object, either relative to its position or absolute in the world. The grass object position vector needed for this information must be in the vertex format (that is, stored in texture coordinates), because the vertex shader has to read this value.
Pros
- Only a few draw calls, perhaps even just one, are necessary to display a complete meadow.
- There are no distortions, because of the constant distance of the upper vertices of a polygon.
- Local variance creates a more natural look.
Cons
- Additional data is required in the vertex format, because each vertex also contains the center position value of its grass object.
- The complexity of the animation calculations is limited, in order to minimize shader cost.
Algorithm
- Set constants, such as time stamp and the basic strength and direction of the wind, for the vertex shader.
- Execute one draw call for the complete meadow or large area of grass.
- In the vertex shader, compute animation based on the center position of the grass object. See Listing 7-4.
Example 7-4. Code for Animation per Grass Object
//
// Animation per Grass Object (7.4.4)
//
float fTimeStamp;
float3 vWindDirection;
float fWindStrength;
VS_OUTPUT main(const VS_INPUT v)
{
  // ...
  // A N I M A T I O N (to world space)
  // Here comes the code for 7.4.4
  float3 vObjectTranslation = CalcTranslation(v.vObjectPosition, fTimeStamp,
                                              vWindDirection, fWindStrength);
  temp.vPosition = v.vPosition + vObjectTranslation;
  temp.vNormal = normalize(v.vNormal * fObjectHeight + vObjectTranslation);
  // ...
}
7.5 Conclusion
We have succeeded in building a realistic grass simulation that meets the three most important requirements:
- Extensive usability without overly stressing performance
- Natural appearance from all lines of sight
- Animation based on prevailing wind conditions (with three different variants)
A special version of the Codecreatures Benchmark application, offering an interactive demo mode as shown in Figure 7-10, can be found on the book's CD or Web site. In the application, you can navigate using a free camera and switch the render states. You are encouraged to examine this application and take a look behind the scenes!
Figure 7-10 Screenshot of the Codecreatures Benchmark
7.6 Further Reading
If you are interested in doing some more research on simulating animated grass, here are some resources that deal with this subject.
You can find articles that describe vertex shaders using a sine function to do the procedural animation of the grass geometry here:
NVIDIA Corporation. 2003. "Basic Profile Sample Shaders: Grass." In The Cg Toolkit User's Manual. Available online at http://developer.nvidia.com/object/cg_users_manual.html
Isidoro, J., and D. Card. 2002. "Animated Grass with Pixel and Vertex Shaders." In Direct3D ShaderX, edited by W. F. Engel. Wordware Publishing.
Other demos presenting grass effects are available on the following two Web sites. These two demos also use vertex shaders to calculate the waving motions of the grass geometry:
NVIDIA Web site: http://developer.nvidia.com/view.asp?IO=demo_grass
ATI Web site: http://www.ati.com/developer/Samples/Grass.html
I would like to thank my colleagues at Piranha Bytes and Codecult who contributed to the Codecreatures Benchmark, especially Horst Dworczak (Lead Artist), who had the idea to build and animate the grass objects in the way presented in the Benchmark; and Oliver Hoeller (Lead Programmer), who helped to integrate the complete effect into the engine.
Copyright
Many of the designations used by manufacturers and sellers to distinguish their products are claimed as trademarks. Where those designations appear in this book, and Addison-Wesley was aware of a trademark claim, the designations have been printed with initial capital letters or in all capitals.
The authors and publisher have taken care in the preparation of this book, but make no expressed or implied warranty of any kind and assume no responsibility for errors or omissions. No liability is assumed for incidental or consequential damages in connection with or arising out of the use of the information or programs contained herein.
The publisher offers discounts on this book when ordered in quantity for bulk purchases and special sales. For more information, please contact:
U.S. Corporate and Government Sales
(800) 382-3419
corpsales@pearsontechgroup.com
For sales outside of the U.S., please contact:
International Sales
international@pearsoned.com
Visit Addison-Wesley on the Web: www.awprofessional.com
Library of Congress Control Number: 2004100582
GeForce™ and NVIDIA Quadro® are trademarks or registered trademarks of NVIDIA Corporation.
RenderMan® is a registered trademark of Pixar Animation Studios.
"Shadow Map Antialiasing" © 2003 NVIDIA Corporation and Pixar Animation Studios.
"Cinematic Lighting" © 2003 Pixar Animation Studios.
Dawn images © 2002 NVIDIA Corporation. Vulcan images © 2003 NVIDIA Corporation.
Copyright © 2004 by NVIDIA Corporation.
All rights reserved. No part of this publication may be reproduced, stored in a retrieval system, or transmitted, in any form, or by any means, electronic, mechanical, photocopying, recording, or otherwise, without the prior consent of the publisher. Printed in the United States of America. Published simultaneously in Canada.
For information on obtaining permission for use of material from this work, please submit a written request to:
Pearson Education, Inc.
Rights and Contracts Department
One Lake Street
Upper Saddle River, NJ 07458
Text printed on recycled and acid-free paper.
5 6 7 8 9 10 QWT 09 08 07
5th Printing September 2007
- Contributors
- Copyright
- Foreword
- Part I: Natural Effects
-
- Chapter 1. Effective Water Simulation from Physical Models
- Chapter 2. Rendering Water Caustics
- Chapter 3. Skin in the "Dawn" Demo
- Chapter 4. Animation in the "Dawn" Demo
- Chapter 5. Implementing Improved Perlin Noise
- Chapter 6. Fire in the "Vulcan" Demo
- Chapter 7. Rendering Countless Blades of Waving Grass
- Chapter 8. Simulating Diffraction
- Part II: Lighting and Shadows
-
- Chapter 9. Efficient Shadow Volume Rendering
- Chapter 10. Cinematic Lighting
- Chapter 11. Shadow Map Antialiasing
- Chapter 12. Omnidirectional Shadow Mapping
- Chapter 13. Generating Soft Shadows Using Occlusion Interval Maps
- Chapter 14. Perspective Shadow Maps: Care and Feeding
- Chapter 15. Managing Visibility for Per-Pixel Lighting
- Part III: Materials
- Part IV: Image Processing
- Part V: Performance and Practicalities
-
- Chapter 28. Graphics Pipeline Performance
- Chapter 29. Efficient Occlusion Culling
- Chapter 30. The Design of FX Composer
- Chapter 31. Using FX Composer
- Chapter 32. An Introduction to Shader Interfaces
- Chapter 33. Converting Production RenderMan Shaders to Real-Time
- Chapter 34. Integrating Hardware Shading into Cinema 4D
- Chapter 35. Leveraging High-Quality Software Rendering Effects in Real-Time Applications
- Chapter 36. Integrating Shaders into Applications
- Part VI: Beyond Triangles
- Preface