
GPU Gems
GPU Gems is now available, right here, online. You can purchase a beautifully printed version of this book, and others in the series, at a 30% discount courtesy of InformIT and Addison-Wesley.
The CD content, including demos and content, is available on the web and for download.
Chapter 31. Using FX Composer
Christopher Maughan
NVIDIA
This chapter gives a basic introduction to FX Composer, which is included on this book's CD (and can also be found on the book's Web site). FX Composer enables you to create advanced shading effects using .fx files, which are text descriptions of the Direct3D graphics API state and which can be loaded by any Direct3D application using the D3DX effects framework. Effect files contain rendering state, texture state, vertex and pixel shaders, and parameters. FX Composer can be used to create these files and display them on imported models. Additional tools are available to make development with .fx files as productive as possible.
31.1 Getting Started
We recommend that you install the "2003 Summer Update" release of DirectX 9 to enable all the supplied .fx files to run. The FX Composer installer will install everything else that is needed, including many sample media files, which will be located in the "MEDIA" directory, beneath the main FX Composer install location. For best results, use a current graphics card supporting DirectX 9. Figure 31-1 shows FX Composer running with a loaded model and with materials applied.
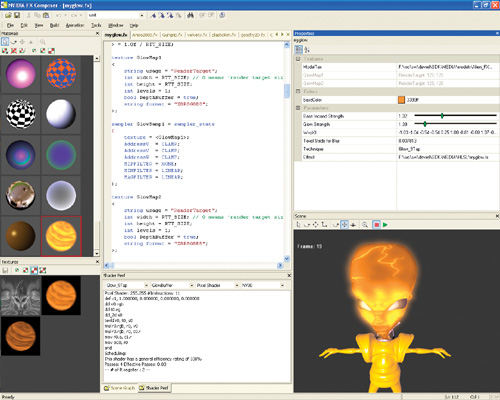
Figure 31-1 The Main FX Composer IDE
FX Composer has been designed from the ground up to be a useful shader development tool. The design is as flexible as possible, while offering several advanced features to enhance productivity. You can use FX Composer to view shader examples and projects, to develop your collection of .fx files, or to analyze and improve the performance of your shader libraries through the advanced chip profiling features. We hope that FX Composer will become a valuable part of your tool chain, and we have tried to ensure that the application is as extensible as possible, to match your needs. If you need to do more than simply create shaders, if you have special needs for geometry data, or if you want to use FX Composer to import your application data format, doing so won't be a problem. We intend to offer a full SDK to enable the creation of plug-ins that will have full access to all the features of the FX Composer engine. In fact, many functions of FX Composer, such as the scene importers, are themselves plug-ins.
What follows is a brief overview of the FX Composer IDE, version 1. We describe each component separately, to introduce all the program's features in a modular way. This kind of overview will help you get a feel for the capabilities of each component, before you dive in and start using FX Composer to build effects. At the end of the chapter, we load a simple project to show how the pieces hang together. Additionally, FX Composer ships with a full user guide for more in-depth information on usage.
31.1.1 The Materials Panel
Here you can load .fx files and preview them before applying them to parts of the scene. In fact, you may want to use the Materials panel, shown in Figure 31-2, as the shader development window: with the ability to change material sizes, it's a quick way to view your effects without applying them directly to scenes. Thus, the Materials panel is effectively a palette of materials. Each material represents an instance of an effect file, with a unique set of parameters. Multiple materials may refer to the same .fx file, but with different parameters; in this way, you can load multiple materials of the same type but modify their colors and textures to suit the model in the scene.
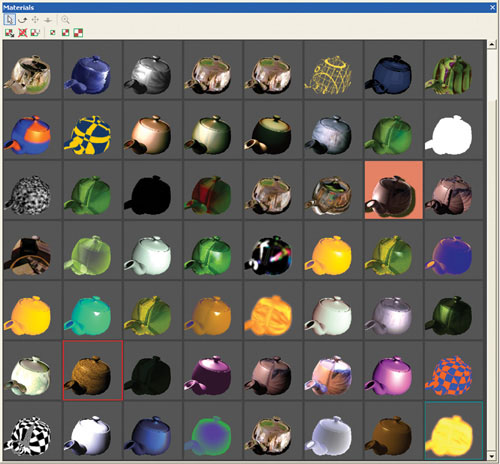
Figure 31-2 The Materials Panel
Initially, the Materials panel contains just one simple material: a basic lighting example. Note that you can select the material, rotate it, change its size, and more. Each material is really a miniature 3D view, giving a feel for the effect in a real situation. This may seem a little unusual at first, because many CAD applications show only static, 2D versions of materials; but effects often depend on lighting changes and bump maps, so our 3D versions make material viewing much easier.
To choose different preview shapes for the material objects, right-click on the material and select Objects on the pop-up menu. Currently, objects such as teapots, spheres, and cubes can be created. Anyone can write a shape plug-in, and the FX Composer engine can support any type of geometry here. Removing materials and creating new ones is easy; once a new material has been created, its assigned effect file can be changed from the Properties panel. A faster way to create a material, though, is to load it directly from an .fx file, by choosing File...Open Material.
Some materials may be displayed in red wireframe or in blue wireframe. These are special display modes: red indicates an invalid effect file, and blue indicates an effect that won't run on the graphics device. These display modes make it easy to click on broken materials and bring them up in the Editor for repair.
When a material is selected, a red outline appears around its preview in the Materials panel. When part of the current scene is selected, a blue outline appears around any materials associated with that part. In this way, it is easy to find materials in the panel from objects in the scene.
31.1.2 The Scene Graph Panel
The Scene Graph panel, shown in Figure 31-3, gives access to the current scene in a tree representation. Here you can see what objects are in the scene, view their properties, and select them. Most objects in FX Composer can be selected from the Scene Graph panel, and it is often a useful way to find objects in complex scenes. Using this panel and the Properties panel, you can manipulate any object in the scene. For example, in the scene represented by the Scene Graph panel shown in Figure 31-3, there is a single default spotlight. Navigating down the Scene Graph tree, you find the light object and then change its properties by right-clicking on it and choosing Properties. The Properties panel now shows the light's information, and you can change the light's color or any of its other parameters.
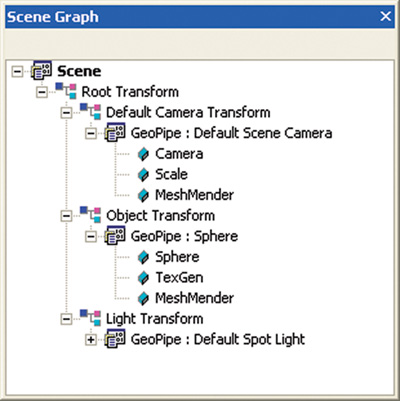
Figure 31-3 The Scene Graph Panel
Figure 31-3 also shows several GeoPipe objects. A GeoPipe is the node in FX Composer that holds geometry. You can see from the expanded GeoPipe in the figure that it contains the objects that build the geometry data for this node. The first item in the sphere's GeoPipe is the Sphere plug-in, which adds polygons to the pipeline to make up a sphere shape. Right-clicking and selecting the plug-in causes the Properties panel to display editable properties, such as the number of rings and the radius. These properties can be edited to alter the sphere. Another pipeline object is a MeshMender. This object is placed here to generate tangent-space vectors from the sphere. In a GeoPipe, data flows down the pipe until it reaches the end, where it is rendered. There are currently no editable parameters for the MeshMender. GeoPipes are built by importer plug-ins and by FX Composer in response to created shapes. They may contain various stages. Using the FX Composer SDK planned for the future, additional pipeline objects can be created.
31.1.3 The Editor Window
The Editor, shown in Figure 31-4, is used to modify and create .fx effect files. Syntax highlighting shows keywords in different colors, making the source for the shader easier to read. IntelliSense is built in for Direct3D device state, resulting in suggestions for keywords being presented while you edit the .fx file. For example, if you type the Direct3D render state fillmode into an .fx file, the Editor would suggest the following three options:
- Solid
- Wireframe
- Point
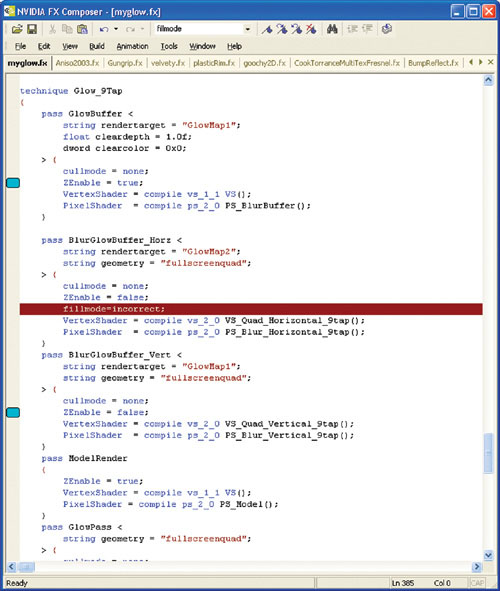
Figure 31-4 The Editor Window
These equate to D3DFILL_SOLID, D3DFILL_WIREFRAME, and D3DFILL_POINT, and they are set into the render state D3DRS_FILLMODE.
Bookmarks, Find, and Undo/Redo also feature in the Editor. Undo/Redo remembers all edits and allows you to undo all the way back to the point where you started editing the file. Bookmarks offer a quick way to jump to a key point in the shader, and using the Find box on the toolbar is an easy way to search for text strings in the current file.
Tabs along the top of the window allow fast switching between multiple .fx files. Selecting a new material in the Materials panel will automatically bring up the associated .fx file in the Editor. Any modifications you make to the file will update all the associated materials when you press the Compile button on the toolbar. All information about the build process is output to the Log and Tasks panels; you can click on errors in the Tasks panel to automatically highlight their file and location in the Editor. This makes it easy to target and fix syntax errors.
31.1.4 The Shader Perf Panel
It can often be useful to see the generated pixel and vertex shader assembly code from a given effect file. The Shader Perf panel, shown in Figure 31-5, displays the currently selected material shaders. Four drop-down boxes are provided. The first selects the technique to be interrogated, the second the pass, and the third the vertex or pixel shader for that pass. Once you are looking at a pixel shader, you can view scheduling information using the fourth drop-down box. Here you can see how the shader will perform on any of the supported GPU profiles. A list of chip-specific information is appended to the shader, and a summary of the efficiency is presented. In this way, it is possible to adjust the .fx file in question for optimum performance. Figure 31-5 shows an effect file being scheduled on the GeForce FX 5900 chip.
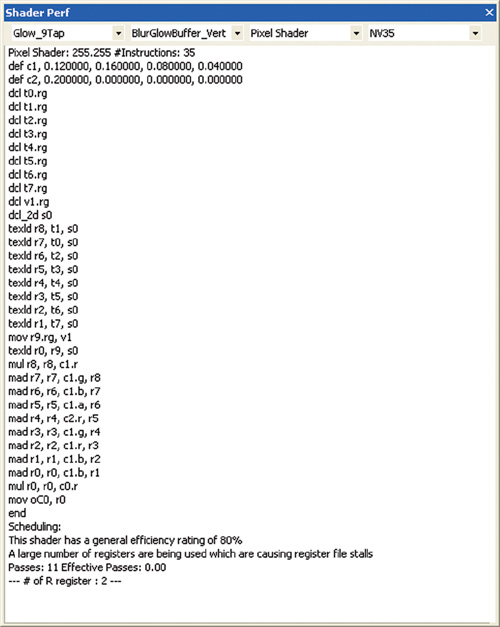
Figure 31-5 The Shader Perf Panel
In the future, we will add support for new devices on the Shader Perf panel, extending the usefulness of this tool for judging the performance of your shader code on all NVIDIA chips.
31.1.5 The Properties Panel
FX Composer's Properties panel, shown in Figure 31-6, enables users to tweak various parameters with an artist-friendly interface. When a material is selected, the Properties panel will show a list of parameters for the associated .fx file. These can be modified to change the look of an effect, perhaps by editing a color or a floating-point value. Figure 31-6 shows the properties for a material called "check3d". The Properties panel knows that the values should be displayed as colors because the author of the .fx file specified that the UIType of the parameters is color. The colors have human-readable names in the panel because the author also added annotations to indicate each color's UIName. These and other markup details for .fx files are covered in the FX Composer user guide.
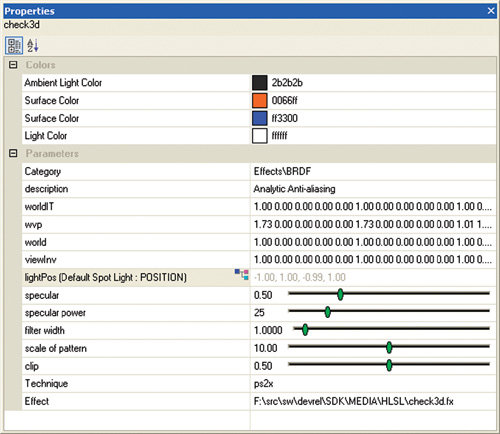
Figure 31-6 The Properties Panel
Note in Figure 31-6 that a small icon is attached to the lightPos property. Clicking on the icon brings up the Parameter dialog, shown in Figure 31-7, which lets you connect objects in the scene to properties. The dialog is available because of the annotation UIOBJECT = POINTLIGHT, supplied in the .fx file for this parameter. The Parameter dialog, shown in Figure 31-7, enables you to switch light options and gives detailed information about how the calculation for this parameter value is done, depending on the option selected. The current value is also displayed. We can see from the dialog that the light position is currently being calculated using a light called "Default Spot Light" inside the scene. You can also use this dialog to "disconnect" parameters from the scene and edit them manually.
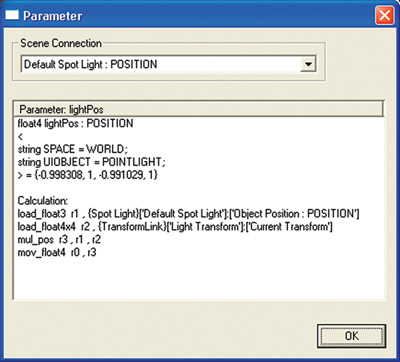
Figure 31-7 The Parameter Connection Dialog
In addition to the properties of materials, the Properties panel will display the properties of objects: if an object such as a sphere is selected, the panel will enable changes to the dimensions and tessellation of the sphere. As you edit the properties of the sphere, you can see it change size in the main display window. Similarly, selecting a texture will give information about that texture, but in general, textures cannot currently be modified from the Properties panel—they are set up from the effect file annotations. In addition to modifying values in the shader, you can also assign components of the current scene to properties in the panel. You might want to do this when you have a light, for example, where you need the shader to contain the current light position at all times.
The Properties panel is thus a context-dependent editor of FX Composer parameters; it is capable of editing color values, numbers, vectors, and matrices. For vectors and matrices, the Properties panel offers sliders and editors; other controls appear depending on the requirements of the edited property. Note that not all properties can be edited; those that cannot be edited are displayed in gray. The typical workflow in FX Composer involves selecting something to modify and then using the Properties panel to change it. Values are always modified at the current key frame, and they are interpolated across the scene's other key frames, if appropriate. The Properties panel is the key component for modifying information in FX Composer, and it is always live: when objects in the scene are moved, corresponding values in the panel change simultaneously.
31.1.6 The Scene Panel
The Scene panel contains the geometry and applied materials for the current scene. In this window, you can select sections of imported models and apply materials to them. The initial scene is a simple sphere with a single light source; the light is positioned at the top left. Controls are provided for adjusting the entire scene and individual objects. All these options are available in the right-click pop-up menu.
Figure 31-8 shows a sample Scene panel. Note that the bounds of geometry objects are shown in blue, the bounds of the scene are shown in red, and the selected shape is indicated by the small white markers. Additionally, we have turned on the "Show Transform" option, to enable visualization of object translations. In this scene, it results in a line from the center of the world to the light in the top left corner. In a scene with a skinned character, the lines represent bone translations.
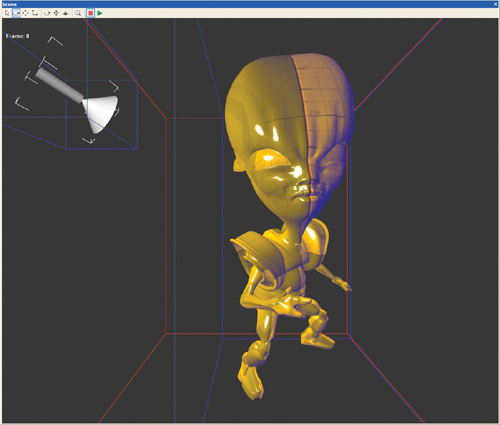
Figure 31-8 The Scene Panel
FX Composer supports simple shape plug-ins, enabling users to supply their own objects for display in simple test scenes; these objects can also be used in the Materials panel. The right mouse button always offers a quick way to build a scene from such shapes, allowing users quickly to test a shader on different types of geometry. Geometry data can also be imported using the supplied .x file and .nvb file import plug-ins. Developers can add their own import plug-ins for custom scene formats. The scene in Figure 31-8 was imported from an .nvb file.
Using the buttons at the top of the Scene window, users can manipulate the scene. There are buttons for camera movements (Pan/Dolly/Rotate) and object movements (Translate/Scale/Rotate), for selected objects in the scene. If the scene contains animation data, the Play button on the toolbar enables playback, and a counter in the window shows the current key frame of the running animation. To see the properties of individual scene objects, right-clicking on them and choosing Properties will often bring up useful controls in the Properties panel. Even the background of the scene has its own properties, enabling you to see scene extents and to modify options such as background colors. The right-click menu also enables you to select and delete scene items, as well as create objects such as point, spot, and directional lights, which can be connected to materials in the scene using the Properties panel.
31.1.7 The Textures Panel
When a material is selected, the Textures panel displays all the textures associated with that material. They may be textures loaded from files, procedurally generated textures from functions inside .fx files, or render targets. A render target example, with material from the glow.fx file, is shown in Figure 31-9. When loaded into the Materials panel and selected, the "blur" textures can be seen in the textures panel. Rotating the glow material in the Materials panel will then show the blur textures being updated in real time. Thus, you can easily see the texture that an effect is generating and debug the algorithm, if necessary. Clicking on the Save icon on the Textures panel toolbar saves a texture as a .dds file in the texture's native format. This feature enables you to create textures from effect file shaders. Other buttons on the toolbar change the viewing size of the texture, including "actual size," which can be large but is useful for checking pixel accuracy.
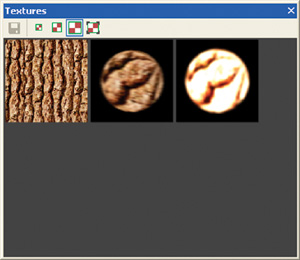
Figure 31-9 The Textures Panel
31.1.8 The Tasks Panel
The Tasks panel (which is hidden beneath the Log panel at startup) contains a list of current errors and warnings. See Figure 31-10. Errors can result from incorrect edits to .fx files and failure to load resources such as textures, for example. Warnings provide more-general guidance and may indicate, for example, that an effect cannot be used because the current graphics hardware cannot support it, or that suspicious syntax has been found in an .fx file, such as unrecognized semantics or annotations that could be typing errors.
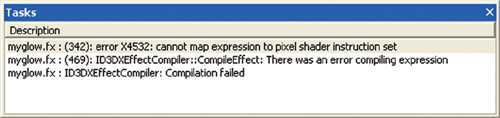
Figure 31-10 The Tasks Panel
When an error displayed in the Tasks panel results from a shader compilation problem, you can select the error with the mouse, and the FX Composer Editor will automatically load the appropriate .fx file and highlight the error in red. The first error in an .fx file after a compilation will automatically be highlighted in the Tasks panel for you.
31.1.9 The Log Panel
Details of informational events, such as project and material loading, are presented in the Log panel, as shown in Figure 31-11. Here you can track the progress of builds, the loading of models such as imported .x files, and information on what FX Composer is currently doing.
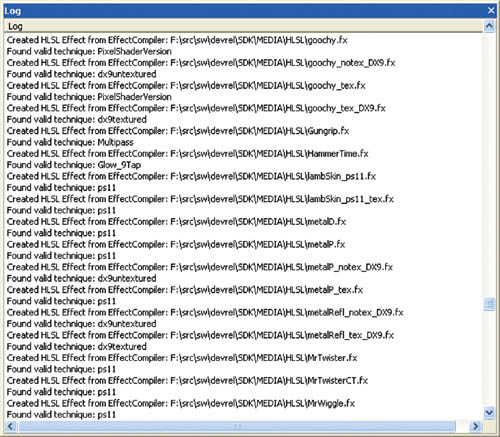
Figure 31-11 The Log Panel
31.2 Sample Project
Now that you are familiar with the basic panels and windows in FX Composer, try loading a sample project. Sample media are located under the FX Composer directory, in a folder called "MEDIA". Beneath MEDIA, you will find an "fxcomposer" directory containing sample projects. FX Composer project files have the .fxcomposer extension and contain geometry, materials, textures, and other elements—in other words, everything needed to load a scene into the application and view it with materials applied.
FX Composer ships with a sample project called "alien_gooch.fxcomposer". Choose File...Load Project to load it. A section of the loaded FX Composer application window is shown in Figure 31-12.
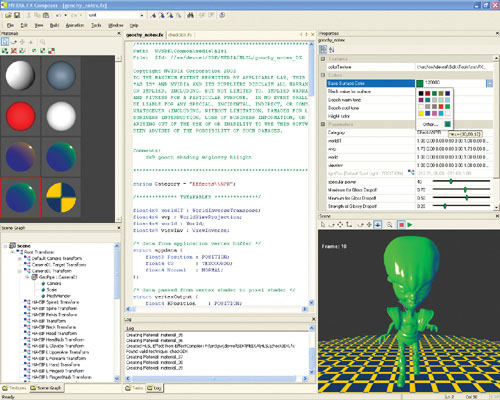
Figure 31-12 A Sample Project in the FX Composer IDE
Here we can see that the alien has an effect with a default yellow material, with a per-pixel specular highlight. In the Materials panel, we have selected the material and, using the Properties panel, changed the color to green. We have also played the animation as far as frame 10, and the alien is busy skulking across the floor.
To apply a different material to the alien, we can right-click on the Materials panel (or use the File menu) to open a new material. Once the material is open, we select the alien to apply the new effect and double-click our new material to apply it. Additional models can be imported independent of the .fxcomposer files, using the Import Scene command on the File menu. Currently, FX Composer can import .x and .nvb files. Once your scene is ready to send to another FX Composer user, you can choose File...Save Project to save the workspace exactly as you have it set up. Reloading this workspace will bring back the scene exactly as you last saved it.
31.3 Conclusion
This chapter was written using the first release of FX Composer, which is included on the book's CD (and available at the book's Web site). FX Composer is a growing application, and it is designed to satisfy the requirements for a powerful shader IDE. As they become available, updates will be posted at http://www.fxcomposer.com. To request a feature in FX Composer or to report a bug, please send e-mail to fxcomposer@nvidia.com.
We hope you enjoy using FX Composer!
Copyright
Many of the designations used by manufacturers and sellers to distinguish their products are claimed as trademarks. Where those designations appear in this book, and Addison-Wesley was aware of a trademark claim, the designations have been printed with initial capital letters or in all capitals.
The authors and publisher have taken care in the preparation of this book, but make no expressed or implied warranty of any kind and assume no responsibility for errors or omissions. No liability is assumed for incidental or consequential damages in connection with or arising out of the use of the information or programs contained herein.
The publisher offers discounts on this book when ordered in quantity for bulk purchases and special sales. For more information, please contact:
U.S. Corporate and Government Sales
(800) 382-3419
corpsales@pearsontechgroup.com
For sales outside of the U.S., please contact:
International Sales
international@pearsoned.com
Visit Addison-Wesley on the Web: www.awprofessional.com
Library of Congress Control Number: 2004100582
GeForce™ and NVIDIA Quadro® are trademarks or registered trademarks of NVIDIA Corporation.
RenderMan® is a registered trademark of Pixar Animation Studios.
"Shadow Map Antialiasing" © 2003 NVIDIA Corporation and Pixar Animation Studios.
"Cinematic Lighting" © 2003 Pixar Animation Studios.
Dawn images © 2002 NVIDIA Corporation. Vulcan images © 2003 NVIDIA Corporation.
Copyright © 2004 by NVIDIA Corporation.
All rights reserved. No part of this publication may be reproduced, stored in a retrieval system, or transmitted, in any form, or by any means, electronic, mechanical, photocopying, recording, or otherwise, without the prior consent of the publisher. Printed in the United States of America. Published simultaneously in Canada.
For information on obtaining permission for use of material from this work, please submit a written request to:
Pearson Education, Inc.
Rights and Contracts Department
One Lake Street
Upper Saddle River, NJ 07458
Text printed on recycled and acid-free paper.
5 6 7 8 9 10 QWT 09 08 07
5th Printing September 2007
- Contributors
- Copyright
- Foreword
- Part I: Natural Effects
-
- Chapter 1. Effective Water Simulation from Physical Models
- Chapter 2. Rendering Water Caustics
- Chapter 3. Skin in the "Dawn" Demo
- Chapter 4. Animation in the "Dawn" Demo
- Chapter 5. Implementing Improved Perlin Noise
- Chapter 6. Fire in the "Vulcan" Demo
- Chapter 7. Rendering Countless Blades of Waving Grass
- Chapter 8. Simulating Diffraction
- Part II: Lighting and Shadows
-
- Chapter 9. Efficient Shadow Volume Rendering
- Chapter 10. Cinematic Lighting
- Chapter 11. Shadow Map Antialiasing
- Chapter 12. Omnidirectional Shadow Mapping
- Chapter 13. Generating Soft Shadows Using Occlusion Interval Maps
- Chapter 14. Perspective Shadow Maps: Care and Feeding
- Chapter 15. Managing Visibility for Per-Pixel Lighting
- Part III: Materials
- Part IV: Image Processing
- Part V: Performance and Practicalities
-
- Chapter 28. Graphics Pipeline Performance
- Chapter 29. Efficient Occlusion Culling
- Chapter 30. The Design of FX Composer
- Chapter 31. Using FX Composer
- Chapter 32. An Introduction to Shader Interfaces
- Chapter 33. Converting Production RenderMan Shaders to Real-Time
- Chapter 34. Integrating Hardware Shading into Cinema 4D
- Chapter 35. Leveraging High-Quality Software Rendering Effects in Real-Time Applications
- Chapter 36. Integrating Shaders into Applications
- Part VI: Beyond Triangles
- Preface