
GPU Gems
GPU Gems is now available, right here, online. You can purchase a beautifully printed version of this book, and others in the series, at a 30% discount courtesy of InformIT and Addison-Wesley.
The CD content, including demos and content, is available on the web and for download.
Chapter 4. Animation in the "Dawn" Demo
Curtis Beeson
NVIDIA
4.1 Introduction
"Dawn" is a demonstration that was created by NVIDIA Corporation to introduce the GeForce FX product line and illustrate how a high-level language (such as HLSL or Cg) could be used to create a realistic human character. The vertex shaders deform a high-resolution mesh through indexed skinning and morph targets, and they provide setup for the lighting model used in the fragment shaders. The skin and wing fragment shaders offer both range and detail that could not have been achieved before the introduction of advanced programmable graphics hardware. See Figure 4-1.
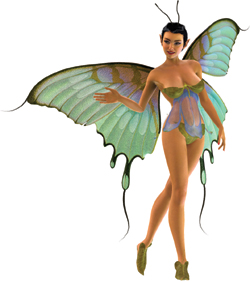
Figure 4-1 A Screen Capture of the Real-Time Dawn
This chapter discusses how programmable graphics hardware was used to accelerate the animation of the Dawn character in the demo.
4.2 Mesh Animation
Traditionally, mesh animation has been prohibitively expensive for complex meshes because it was performed on the CPU, which was already burdened with physical simulation, artificial intelligence, and other computations required by today's applications. Newer graphics hardware has replaced the traditional fixed-function pipeline with programmable vertex and fragment shaders, and it can now alleviate some of that burden from the CPU.
Sometimes it is still necessary to perform such operations on the CPU. Many stencil-based shadow volume techniques must traverse the transformed mesh in order to find the silhouette edges, and the generation of the dynamic shadow frustum is often best done on the CPU (see Chapter 9, "Efficient Shadow Volume Rendering"). In scenes where the character is drawn multiple times per frame into shadow buffers, glow buffers, and other such temporary surfaces, it may be better to perform the deformations on the CPU if the application becomes vertex-limited. Deciding whether to perform mesh deformations on the CPU or on the GPU should be done on a per-application or even on a per-object basis.
The modeling, texturing, and animation of the Dawn character were done primarily in Alias Systems' Maya package. We therefore based our mesh animation methods on the tool set the software provides. We have since created a similar demo ("Dusk," used to launch the GeForce FX 5900) in discreet's 3ds max package, using the same techniques; these methods are common to a variety of modeling packages and not tied to any single workflow. The methods used in these two demos are (indexed) skinning, where vertices are influenced by a weighted array of matrices, and weighted morph targets, used to drive the emotions on Dawn's face.
4.3 Morph Targets
Using morph targets is a common way to represent complex mesh deformation, and the NVIDIA demo team has created a variety of demos using this technique. The "Zoltar" demo and the "Yeah! The Movie" demo (content provided by Spellcraft Studio) started with 30 mesh interpolants per second, then removed mesh keys based on an accumulated error scheme. This allowed us to reduce the file size and the memory footprint—up to two-thirds of the original keys could be removed with little to no visible artifacts. In this type of mesh interpolation, there are only two interpolants active at any given time, and they are animated sequentially.
Alternatively, morph targets can be used in parallel. Dawn is a standard example of how this approach can be useful. Beginning with a neutral head (27,000 triangles), our artist created 50 copies of that head and modeled them into an array of morph targets, as shown in Figure 4-2. Approximately 30 of those heads corresponded to emotions (such as happy, sad, thoughtful, and so on), and 20 more were modifiers (such as left eyebrow up, right eyebrow up, smirk, and so on). In this style of animation, the morph target weights will probably not add to 1, because you may have (0.8 * happy + 1.0 * ear_wiggle), for example—Dawn is a fairy, after all.
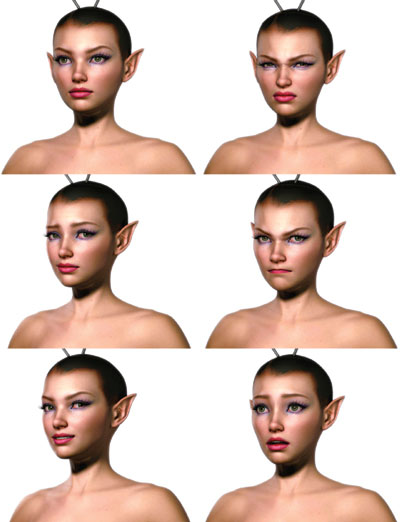
Figure 4-2 Emotional Blend Targets (Blend Shapes)
Although such complex emotional faces could have been made entirely of blends of more elemental modifiers, our artist found it more intuitive to model the face in the pose he desired, because it is hard to model an element such as an eyebrow creasing, without seeing how the eyes, cheeks, and mouth work together. This combination also helps with hardware register limitations, described later.
4.3.1 Morph Targets in a High-Level Language
Luckily, the implementation of morph targets in HLSL or Cg is simple. Assuming that vertexIn is our structure containing per-vertex data, applying morph targets in a linear or serial fashion is easy:
float4 position = (1.0f - interp) * vertexIn.prevPositionKey +
                  interp * vertexIn.nextPositionKey;
In this code, interp is a constant input parameter in the shader, but prevPositionKey and nextPositionKey are the positions at the prior time and next time, respectively. When applying morph targets in parallel, we find the spatial difference between the morph target and the neutral pose, which results in a difference vector. We then weight that difference vector by a scalar. The result is that a weight of 1.0 will apply the per-vertex offsets to achieve that morph target, but each morph target can be applied separately. The application of each morph target is just a single "multiply-add" instruction:
// vertexIn.positionDiffN = position morph target N - neutralPosition
float4 position = neutralPosition;
position += weight0 * vertexIn.positionDiff0;
position += weight1 * vertexIn.positionDiff1;
position += weight2 * vertexIn.positionDiff2;
// ...
4.3.2 Morph Target Implementation
We wanted our morph targets to influence both the vertex position and the basis (that is, the normal, binormal, and tangent) so that they might influence the lighting performed in the fragment shader. At first it would seem that one would just execute the previous lines for position, normal, binormal, and tangent, but it is easy to run out of vertex input registers. When we wrote the "Dawn" and "Dusk" demos, the GPU could map a maximum of 16 per-vertex input attributes. The mesh must begin with the neutral position, normal, binormal, texture coordinate, bone weights, and bone indices (described later), leaving 10 inputs open for morph targets. We might have mapped the tangent as well, but we opted to take the cross product of the normal and binormal in order to save one extra input.
Because each difference vector takes one input, we might have 10 blend shapes that influence position, five blend shapes that influence position and normal, three position-normal-binormal blend shapes, or two position-normal-binormal-tangent blend shapes. We ultimately chose to have our vertex shader apply five blend shapes that modified the position and normal. The vertex shader would then orthonormalize the neutral tangent against the new normal (that is, subtract the collinear elements of the new normal from the neutral tangent and then normalize) and take the cross product for the binormal. Orthonormalization is a reasonable approximation for meshes that do not twist around the surface normal:
// assumes normal is the post-morph-target result
// normalize only needed if not performed in fragment shader
float3 tangent =
    vertexIn.neutralTangent - dot(vertexIn.neutralTangent, normal) * normal;
tangent = normalize(tangent);
Thus, we had a data set with 50 morph targets, but only five could be active (that is, with weight greater than 0) at any given time. We did not wish to burden the CPU with copying data into the mesh every time a different blend shape became active, so we allocated a mesh with vertex channels for neutralPosition, neutralNormal, neutralBinormal, textureCoord, and 50 * (positionDiff, NormalDiff). On a per-frame basis, we merely changed the names of the vertex input attributes so that those that should be active became the valid inputs and those that were inactive were ignored. For each frame, we would find those five position and normal pairs and map those into the vertex shader, allowing all other vertex data to go unused.
Note that the .w components of the positionDiff and normalDiff were not really storing any useful interpolants. We took advantage of this fact and stored a scalar self-occlusion term in the .w of the neutralNormal and the occlusion difference in each of the normal targets. When extracting the resulting normal, we just used the .xyz modifier to the register, which allowed us to compute a dynamic occlusion term that changed based on whether Dawn's eyes and mouth were open or closed, without any additional instructions. This provided for a soft shadow used in the lighting of her skin (as described in detail in Chapter 3, "Skin in the 'Dawn' Demo").
On the content-creation side, our animator had no difficulty remaining within the limit of five active blend shapes, because he primarily animated between three or so emotional faces and then added the elemental modifiers for complexity. We separated the head mesh from the rest of the body mesh because we did not want the added work of doing the math or storing the zero difference that, say, the happy face would apply to Dawn's elbow. The result remained seamless—despite the fact that the head was doing morph targets and skinning while the body was doing just skinning—because the outermost vertices of the face mesh were untouched by any of the emotional blend shapes. They were still modified by the skinning described next, but the weights were identical to the matching vertices in the body mesh. This ensured that no visible artifact resulted.
4.4 Skinning
Skinning is a method of mesh deformation in which each vertex of that mesh is assigned an array of matrices that act upon it along with weights (that should add up to 1.0) that describe how bound to that matrix the vertex should be. For example, vertices on the bicep may be acted upon only by the shoulder joint, but a vertex on the elbow may be 50 percent shoulder joint and 50 percent elbow joint, becoming 100 percent elbow joint for vertices beyond the curve of the elbow.
Preparing a mesh for skinning usually involves creating a neutral state for the mesh, called a bind pose. This pose keeps the arms and legs somewhat separated and avoids creases as much as possible, as shown in Figure 4-3. First, we create a transform hierarchy that matches this mesh, and then we assign matrix influences based on distance—usually with the help of animation tools, which can do this reasonably well. Almost always, the result must be massaged to handle problems around shoulders, elbows, hips, and the like. This skeleton can then be animated through a variety of techniques. We used a combination of key-frame animation, inverse kinematics, and motion capture, as supported in our content-creation tool.
Figure 4-3 Dawn's Bind Pose
A skinned vertex is the weighted summation of that vertex being put through its active joints, or:

Conceptually, this equation takes the vertex from its neutral position into a weighted model space and back
into world space for each matrix and then blends the results. The concatenated
 matrices are stored as constant parameters, and the matrix indices and weights are passed as vertex properties.
The application of four-bone skinning looks like this:
matrices are stored as constant parameters, and the matrix indices and weights are passed as vertex properties.
The application of four-bone skinning looks like this:
float4 skin(float4x4 bones[98], float4 boneWeights0, float4 boneIndices0)
{
  float4 result = boneWeights0.x * mul(bones[boneIndices.x], position);
  result = result + boneWeights0.y * mul(bones[boneIndices.y], position);
  result = result + boneWeights0.z * mul(bones[boneIndices.z], position);
  result = result + boneWeights0.w * mul(bones[boneIndices.w], position);
  return result;
}
In the "Dawn" demo, we drive a mesh of more than 180,000 triangles with a skeleton of 98 bones. We found that four matrices per vertex was more than enough to drive the body and head, so each vertex had to have four bone indices and four bone weights stored as vertex input attributes (the last two of the 16 xyzw vertex registers mentioned in Section 4.3.2). We sorted bone weights and bone indices so that we could rewrite the vertex shader to artificially truncate the number of bones acting on the vertex if we required higher vertex performance. Note that if you do this, you must also rescale the active bone weights so that they continue to add up to 1.
4.4.1 Accumulated Matrix Skinning
When skinning, one must apply the matrix and its bind pose inverse not only to the position, but also to the normal, binormal, and tangent for lighting to be correct. If your hierarchy cannot assume that scales are the same across x, y, and z, then you must apply the inverse transpose of this concatenated matrix. If scales are uniform, then the inverse is the transpose, so the matrix remains unchanged. Nonuniform scales create problems in a variety of areas, so our engine does not permit them.
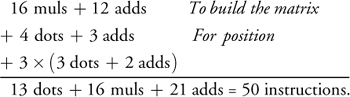
If we call the skin function from the previous code, we must call mul for each matrix for each vertex property. In current hardware, multiplying a point by a matrix is implemented as four dot products and three adds, and vector-multiply is three dot products and two adds. Thus, four-bone skinning of position, normal, binormal, and tangent results in:

An unintuitive technique that creates the sum of the weighted matrices can be trivially implemented in HLSL or Cg as follows:
float4x4 accumulate_skin(float4x4 bones[98], float4 boneWeights0,
                         float4 boneIndices0)
{
  float4x4 result = boneWeights0.x * bones[boneIndices0.x];
  result = result + boneWeights0.y * bones[boneIndices0.y];
  result = result + boneWeights0.z * bones[boneIndices0.z];
  result = result + boneWeights0.w * bones[boneIndices0.w];
  return result;
}
Although this technique does burn instructions to build the accumulated matrix (16 multiplies and 12 adds), it now takes only a single matrix multiply to skin a point or vector. Skinning the same properties as before costs:
4.5 Conclusion
It is almost always beneficial to offload mesh animation from the CPU and take advantage of the programmable vertex pipeline offered by modern graphics hardware. Having seen the implementation of skinning and morph targets using shaders, however, it is clear that the inner loops are quite easy to implement using Streaming SIMD Extensions (SSE) instructions and the like, and that in those few cases where it is desirable to remain on the CPU, these same techniques work well.
In the case of the "Dawn" demo, morph targets were used to drive only the expressions on the head. If we had had more time, we would have used morph targets all over the body to solve problems with simple skinning. Even a well-skinned mesh has the problem that elbows, knees, and other joints lose volume when rotated. This is because the mesh bends but the joint does not get "fatter" to compensate for the pressing of flesh against flesh. A morph target or other mesh deformation applied either before or after the skinning step could provide this soft, fleshy deformation and create a more realistic result. We have done some work on reproducing the variety of mesh deformers provided in digital content-creation tools, and we look forward to applying them in the future.
4.6 References
Alias Systems. Maya 5.0 Devkit. <installation_directory>/devkit/animEngine/
Alias Systems. Maya 5.0 Documentation.
Eberly, David H. 2001. 3D Game Engine Design, pp. 356–358. Academic Press.
Gritz, Larry, Tony Apodaca, Matt Pharr, Dan Goldman, Hayden Landis, Guido Quaroni, and Rob Bredow. 2002. "RenderMan in Production." Course 16, SIGGRAPH 2002.
Hagland, Torgeir. 2000. "A Fast and Simple Skinning Technique." In Game Programming Gems, edited by Mark DeLoura. Charles River Media.
Copyright
Many of the designations used by manufacturers and sellers to distinguish their products are claimed as trademarks. Where those designations appear in this book, and Addison-Wesley was aware of a trademark claim, the designations have been printed with initial capital letters or in all capitals.
The authors and publisher have taken care in the preparation of this book, but make no expressed or implied warranty of any kind and assume no responsibility for errors or omissions. No liability is assumed for incidental or consequential damages in connection with or arising out of the use of the information or programs contained herein.
The publisher offers discounts on this book when ordered in quantity for bulk purchases and special sales. For more information, please contact:
U.S. Corporate and Government Sales
(800) 382-3419
corpsales@pearsontechgroup.com
For sales outside of the U.S., please contact:
International Sales
international@pearsoned.com
Visit Addison-Wesley on the Web: www.awprofessional.com
Library of Congress Control Number: 2004100582
GeForce™ and NVIDIA Quadro® are trademarks or registered trademarks of NVIDIA Corporation.
RenderMan® is a registered trademark of Pixar Animation Studios.
"Shadow Map Antialiasing" © 2003 NVIDIA Corporation and Pixar Animation Studios.
"Cinematic Lighting" © 2003 Pixar Animation Studios.
Dawn images © 2002 NVIDIA Corporation. Vulcan images © 2003 NVIDIA Corporation.
Copyright © 2004 by NVIDIA Corporation.
All rights reserved. No part of this publication may be reproduced, stored in a retrieval system, or transmitted, in any form, or by any means, electronic, mechanical, photocopying, recording, or otherwise, without the prior consent of the publisher. Printed in the United States of America. Published simultaneously in Canada.
For information on obtaining permission for use of material from this work, please submit a written request to:
Pearson Education, Inc.
Rights and Contracts Department
One Lake Street
Upper Saddle River, NJ 07458
Text printed on recycled and acid-free paper.
5 6 7 8 9 10 QWT 09 08 07
5th Printing September 2007
- Contributors
- Copyright
- Foreword
- Part I: Natural Effects
-
- Chapter 1. Effective Water Simulation from Physical Models
- Chapter 2. Rendering Water Caustics
- Chapter 3. Skin in the "Dawn" Demo
- Chapter 4. Animation in the "Dawn" Demo
- Chapter 5. Implementing Improved Perlin Noise
- Chapter 6. Fire in the "Vulcan" Demo
- Chapter 7. Rendering Countless Blades of Waving Grass
- Chapter 8. Simulating Diffraction
- Part II: Lighting and Shadows
-
- Chapter 9. Efficient Shadow Volume Rendering
- Chapter 10. Cinematic Lighting
- Chapter 11. Shadow Map Antialiasing
- Chapter 12. Omnidirectional Shadow Mapping
- Chapter 13. Generating Soft Shadows Using Occlusion Interval Maps
- Chapter 14. Perspective Shadow Maps: Care and Feeding
- Chapter 15. Managing Visibility for Per-Pixel Lighting
- Part III: Materials
- Part IV: Image Processing
- Part V: Performance and Practicalities
-
- Chapter 28. Graphics Pipeline Performance
- Chapter 29. Efficient Occlusion Culling
- Chapter 30. The Design of FX Composer
- Chapter 31. Using FX Composer
- Chapter 32. An Introduction to Shader Interfaces
- Chapter 33. Converting Production RenderMan Shaders to Real-Time
- Chapter 34. Integrating Hardware Shading into Cinema 4D
- Chapter 35. Leveraging High-Quality Software Rendering Effects in Real-Time Applications
- Chapter 36. Integrating Shaders into Applications
- Part VI: Beyond Triangles
- Preface