
Imagine that you have just finished implementing an awesome, interactive, deep learning pipeline on your NVIDIA-accelerated data science workstation using OpenCV for capturing your webcam stream and rendering the output. A colleague of yours mentions that exploiting the novel TF32 compute mode of the Ampere microarchitecture third-generation Tensor Cores might significantly accelerate your application. So far so good, you have already figured out how to access an A100 GPU in the cloud but unfortunately you have no clue how to attach your webcam to a GPU instance running somewhere in the web.
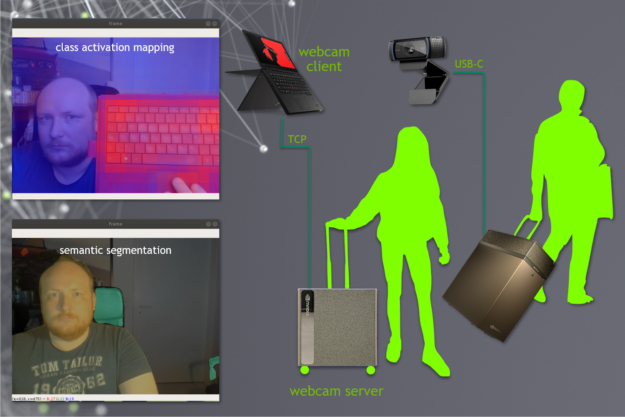
In general, the same problem arises whenever you must interactively access central compute facilities from a remote location: your company’s GPU cluster, your team’s shared workstation, or a GPU instance in the cloud. In many cases, you can’t take your DGX server with you when travelling by plane to a customer meeting, so you stick to showing unimpressive prerendered videos to your audience, which completely diminishes the interactive nature of your application.
Another problem arises from the fact that the production rate of your webcam is limited to a fixed value, for example, 30 frames per second (FPS). As a result, you cannot showcase any algorithmic improvement of your implementation resulting in a frame rate higher than 30 FPS as your inference loop incrementally blocks until the arrival of new data from the webcam.
NVIDIA Simple Streamer (NVSS) is a collection of convenient yet efficient streaming collectives written in the Python 3 programming language. It enables the following benefits:
- Interactive streaming of webcam input and rendered output using TCP sockets, significantly simplifying the forwarding of remote video devices.
- Zero-cost polling and submission of video frames from and to a non-blocking message queue. This effectively decouples the inference loop of your application from the limited capture rate of the webcam to demonstrate peak performance for IO-bound tasks.
NVSS is easy to use and can be downloaded free of charge from the NVIDIA DevZone portal. For more information, see NVIDIA Simple Streamer (NVSS) Download Page.
In this post, I discuss the basic usage of NVSS on your local machine. I also demonstrate how to build an interactive classification pipeline based on the Resnet50 topology trained on ImageNet, using a PyTorch Docker image from the NVIDIA NGC catalog.
NVSS basic usage
The following code example shows a standard OpenCV application that iteratively captures frames from a webcam, processes each frame, and renders the output:
import numpy as np
import cv2

def dummy_inference(x):
    """invert an image"""
    return 255-x

cap = cv2.VideoCapture(0)                 # your webcam

while True:                               # forever
    ret, frame_in = cap.read()            # 1. read frame
    frame_out = dummy_inference(frame_in) # 2. process frame
    cv2.imshow('frame', frame_out)        # 3. display frame
    # logic for conditional termination of the loop...
Let R, P, and D be the execution times in seconds needed to perform the previously mentioned steps in each iteration of the inference loop. Then, you can process 1s/(R+P+D) FPS. There are two corner cases.
Assume that you can process and display the data at infinite speed (P = D = 0s). The loop is then exclusively dominated by the time needed to read a frame at 30 FPS (R = 1/30s). The inference performance’s upper bound is the webcam’s capture rate (30 FPS), no matter how fast your inference step is.
The loop scales perfectly with the performance of your inference step (FPS = 1s/P) in case of zero-cost polling and the submission of frames from and to the webcam/display (R = D = 0s). This would be the case if you had an infinite collection of cached webcam images to read from in almost zero time. Of course, writing images to the display must be accomplished in asymptotically vanishing time, too.
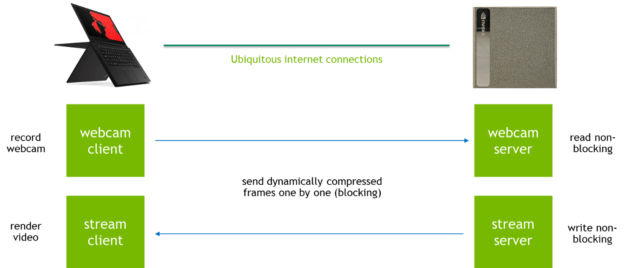
NVSS substitutes the OpenCV webcam mechanism with a WebCamServer object that internally maintains a non-blocking message queue storing the received video frames. The display is also realized with a StreamServer object based on non-blocking primitives. Both the receiving and sending of frames over the network is delegated to concurrent background processes that do not interfere with the inference loop.
You might wonder what happens if you attempt to read a frame in the case where the message queue of the WebCamServer object is empty. In this case, NVSS repeats the last received frame indefinitely until new data arrives. The success state of the read_nowait member function indicates whether the returned frame is a new one. Consequently, you only send processed frames to the virtual display StreamServer object if they are novel.
from StreamingTools import WebCamServer, StreamServer

def dummy_inference(x):
    """invert an image"""
    return 255-x

info = False                               # True for verbosity
webcam = WebCamServer(info=info)           # this is your webcam
stream = StreamServer(info=info, MBps=1.0) # this is your screen
while True:
    success, frame_in = webcam.read_nowait()
    frame_out = dummy_inference(frame_in)
    if success:
       stream.write_nowait(frame_out)
Both the WebCamServer and StreamServer classes exhibit manifold configuration parameters that can be passed as optional arguments during instantiation:
host—The network device of the server to be bound to [type: str].port—The TCP port of the server to be bound to [type: int].info—Whether the server shall be silent or verbose [type: bool].maxQ—The size of the non-blocking queue [type: int].
These can be left blank unless you have exotic network constraints with specific port requirements. You might have already spotted in the source code that the StreamServer class exposes an additional parameter, MBps [type: float], that can be used to fix the network bandwidth consumed by your virtual display to a certain value in megabytes per seconds. This is achieved by dynamically adjusting the image compression quality to meet the bandwidth requirements. This is useful in low-bandwidth environments. In default settings when the parameter is blank, the StreamServer class sends images with a constant image quality that might result in fluctuating network bandwidth usage.
The discussed code example with an additional FPS measurement mechanism is implemented in the file SimpleExample.py being bundled with NVSS. Execute the application by invoking the script on a command line (Linux or Windows):
localuser@localmachine:~/NVSS$ python3 SimpleExample.py
webcam server: waiting for connections
stream server: waiting for connections
If the script complains about missing dependencies, do not forget to install the Python library numpy and bindings for OpenCV. Both the WebCamServer and StreamServer objects are now waiting for their corresponding clients to connect in separate background processes. For the sake of simplicity, start the associated clients on the same machine in two separate shells. Initially, you connect the virtual display by launching the script StreamClient.py:
localuser@localmachine:~/NVSS$ python3 StreamClient.py
Connect the network webcam using the script WebcamClient.py:
localuser@localmachine:~/NVSS$ python3 WebcamClient.py
Voilà! You should see yourself in inverted colors on your desktop. Spooky!
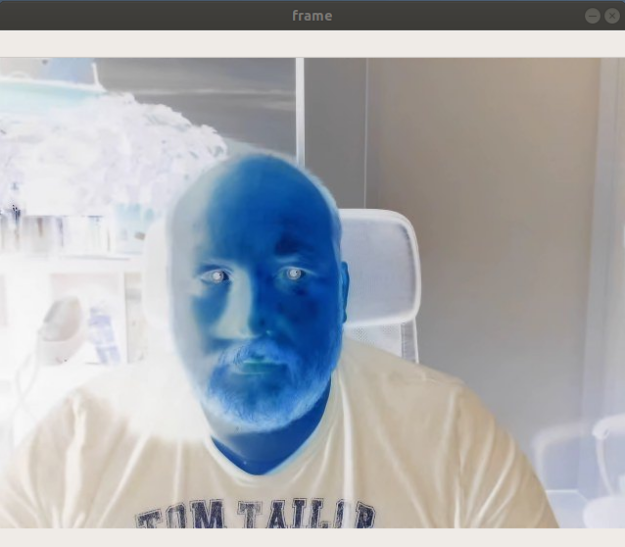
In the meantime, you can inspect the output of the SimpleExample.py script, which reports a stunning 10,000 FPS on an NVIDIA DGX Station. You process significantly more iterations per seconds than the webcam can capture frames. For the curious among you, if you completely remove the dummy_inference call that inverts the colors in between receiving and sending images, it results in an astonishing 80,000 FPS. As promised, the time for reading and dispatching frames is negligible compared to processing the data: a truly scalable solution to demonstrate peak performance in interactive applications.
Remote interactive classification using Docker
The simple example in the previous section exclusively uses the CPU for inverting the images. While this is a reasonable solution for a basic filter, you can further benefit from the massively parallel nature of NVIDIA GPUs to significantly accelerate more complex functional mappings such as a residual neural network (ResNet) for the classification of RGB images. Do not worry, you are not going to re-implement ResNet50 on your own. You use a pretrained PyTorch model from torch.hub. NVSS is not limited to PyTorch. You can use any other deep learning framework or none, as in the first example.
In the following section, you execute an inference pipeline in a GPU-enabled Docker container running on a remote GPU server. This adds another layer of complexity, as the application is running remotely while the webcam is attached to your local machine. The WebCamServer and StreamServer objects communicate in default settings with the TCP ports 8089 and 8090 that you now must forward to the remote GPU server. Use SSH to accomplish that for two reasons:
- By mapping the ports with SSH, you don’t need to adjust the server address in the client scripts.
- SSH encrypts the video stream to protect your privacy.
Forwarding ports with SSH is as easy as the following code example:
localuser@localmachine:~$ ssh -L 8089:localhost:8089 \
                              -L 8090:localhost:8090 \
                              remoteuser@remoteserver
You could directly run a PyTorch application or the simple example from the previous section on the GPU server, given that it provides a working CUDA-X AI installation using cuDNN, cuBLAS, cuFFT, NCCL, and so on. Modern compute environments, however, tend to bundle a curated list of software packages in so-called containers. When you launch a GPU-accelerated PyTorch container from NGC, the mapping of the working directory NVSS—as well as the forwarding of the TCP ports 8089 and 8090—is accomplished with the following command:
remoteuser@remoteserver:~$ docker run --gpus all -it --rm \
                         -v /home/remoteuser/NVSS:/workspace/NVSS \
                         -p 8089:8089 -p 8090:8090 \
                         nvcr.io/nvidia/pytorch:20.06-py3
To run the NGC image, you could alternatively use Singularity instead of Docker:
remoteuser@remoteserver:~$ singularity run --nv  \
                           docker://nvcr.io/nvidia/pytorch:20.06-py3
Using Singularity automatically maps your home folder and it has no explicit network isolation. You can be less specific on how to map resources into the container. Inside the container, Docker or Singularity, you can then launch the classification example:
root@randomname:~# python3 /workspace/NVSS/ClassificationExample.py Downloading: "https://github.com/pytorch/vision/archive/v0.5.0.zip" to /home/chundt/.cache/torch/hub/v0.5.0.zip
Downloading: "https://download.pytorch.org/models/resnet50-19c8e357.pth" to /root/.cache/torch/hub/checkpoints/resnet50-19c8e357.pth
100%|████████████████████████████████████████████████| 97.8M/97.8M [00:02<00:00, 38.0MB/s]
webcam server: waiting for connections
stream server: waiting for connections
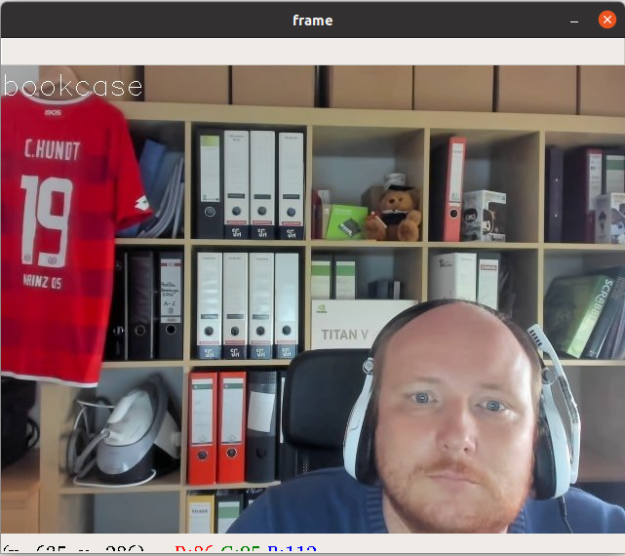
When you finally start the client scripts StreamClient.py and WebcamClient.py on your local machine, you see yourself with a classification label written to the upper left corner of the output. As I am indeed sitting in front of a bookcase, I am more than happy that the pretrained ResNet50 model agrees with that.
In default mode, the classification example performs batch inference using a batch size of eight frames stored in the half-precision floating-point format FP16. You can process up to 400 FPS on a Tesla V100 GPU using this configuration. An interesting experiment would be to measure the impact of the batch size and the use of mixed precision on the inference performance. You can achieve that by altering the variables batch_size and use_half in the file ClassificationExample.py. To save you some time, I have already determined the numbers for you on a Tesla V100 GPU (Table 1).
| batch_size | 1 | 2 | 4 | 8 | 16 | 32 |
| FP32 maxFPS | 59 | 115 | 169 | 165 | 158 | 171 |
| FP16 maxFPS | 73 | 146 | 280 | 400 | 380 | 384 |
The take-home message is clear: Inference is more efficient when performed in half-precision and performance increases monotonically with the batch size until you saturate the compute resources. The significant jump from batch size 4 to 8 in FP16 can be explained by the fact that Tensor Cores are most efficiently used for batch sizes that are multiples of 8.
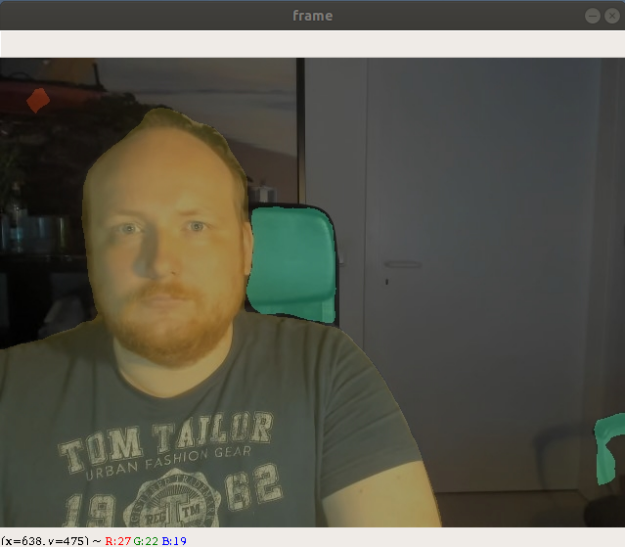
The possibilities are endless. Use NVSS to develop interactive demos for exhibitions, explore multi-GPU inference of 16K images using MPI, showcase your solution in a customer meeting on a laptop with integrated graphics, operate in low-bandwidth environments, or investigate the impact of code optimizations on the runtime. An NVIDIA TensorRT optimized variant of the aforementioned classification example processes a whopping 1,300 FPS in mixed precision, which is an additional 3x increase in inference performance. Build your own RTX greenscreen solution to rock the next web conference! A good starter is the script SegmentationExample.py bundled with NVSS (Figure 5).
Conclusion
Developing interactive applications running on remote compute resources can be cumbersome, especially when working from home. The NVSS library is an easy-to-use yet efficient solution to forward your webcam and virtual displays using TCP ports to any target destination: your local machine or a GPU-accelerated container running in the cloud. Furthermore, the non-blocking message queue used by NVSS measures the true performance of your inference pipeline excluding the time to receive and send the video stream.
Happy coding!
