

We’re excited to announce the NVIDIA Quantization-Aware Training (QAT) Toolkit for TensorFlow 2 with the goal of accelerating the quantized networks with NVIDIA TensorRT on NVIDIA GPUs. This toolkit provides you with an easy-to-use API to quantize networks in a way that is optimized for TensorRT inference with just a few additional lines of code.
This post is accompanied by the Toward INT8 Inference: An End-to-End Workflow for Deploying Quantization-Aware Trained Networks Using TensorRT GTC session. For the PyTorch quantization toolkit equivalent, see PyTorch Quantization.
Background
Accelerating deep neural networks (DNN) inference is an important step in realizing latency-critical deployment of real-world applications such as image classification, image segmentation, natural language processing, and so on.
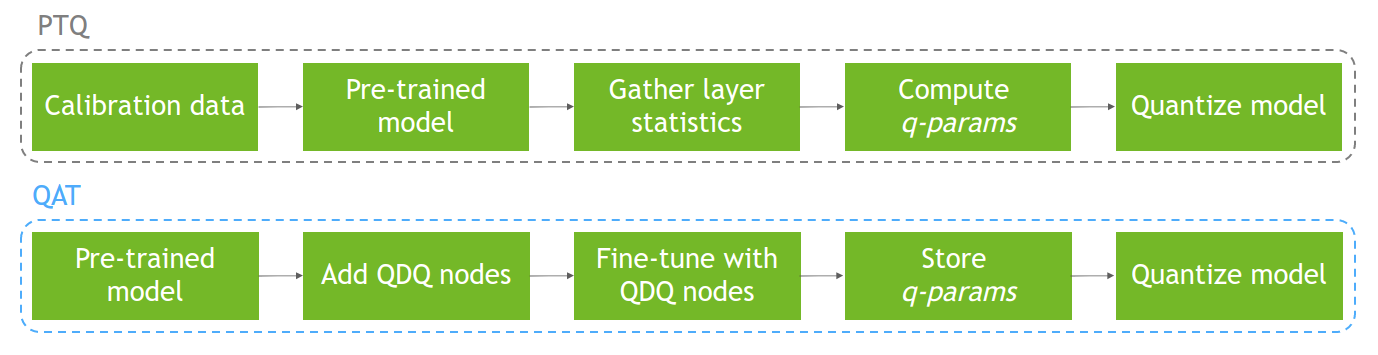
The need for improving DNN inference latency has sparked interest in running those models in lower precisions, such as FP16 and INT8. Running DNNs in INT8 precision can offer faster inference and a much lower memory footprint than its floating-point counterpart. NVIDIA TensorRT supports post-training quantization (PTQ) and QAT techniques to convert floating-point DNN models to INT8 precision.
In this post, we discuss these techniques, introduce the NVIDIA QAT toolkit for TensorFlow, and demonstrate an end-to-end workflow to design quantized networks optimal for TensorRT deployment.
Quantization-aware training
The main idea behind QAT is to simulate lower precision behavior by minimizing quantization errors during training. To do that, you modify the DNN graph by adding quantize and de-quantize (QDQ) nodes around desired layers. This enables the quantized networks to minimize accuracy loss over PTQ due to the fine-tuning of the model’s quantization and hyperparameters.
PTQ, on the other hand, performs model quantization using a calibration dataset after that model has already been trained. This can result in accuracy degradation due to the quantization not being reflected in the training process. Figure 1 shows both processes.
For more information about quantization, quantization methods (PTQ compared to QAT), and quantization in TensorRT, see Achieving FP32 Accuracy for INT8 Inference Using Quantization Aware Training with NVIDIA TensorRT.
NVIDIA QAT Toolkit for TensorFlow
The goal of this toolkit is to enable you to easily quantize networks in a way that is optimal for TensorRT deployment.
Currently, TensorFlow offers asymmetric quantization in their open-source Model Optimization Toolkit. Their quantization recipe consists of inserting QDQ nodes at the outputs and weights (if applicable) of desired layers, and they offer quantization of the full model or partial by layer class type. This is optimized for TFLite deployment, not TensorRT deployment.
This toolkit is needed for obtaining a quantized model that is ideal for TensorRT deployment. TensorRT optimizer propagates Q and DQ nodes and fuses them with floating-point operations across the network to maximize the proportion of the graph that can be processed in INT8. This leads to optimal model acceleration on NVIDIA GPUs. Our quantization recipe consists of inserting QDQ nodes at the inputs and weights (if applicable) of desired layers.
We also perform symmetric quantization (used by TensorRT) and offer extended quantization support with partial quantization by layer name and pattern-based layer quantization.
Table 1 summarizes the differences between TFMOT and the NVIDIA QAT Toolkit for TensorFlow.
| Feature | TFMOT | NVIDIA QAT Toolkit |
| QDQ node placements | Outputs and weights | Inputs and weights |
| Quantization support | Whole model (full) and of some layers (partial by layer class) | Extends TF quantization support: partial quantization by layer name and pattern-based layer quantization by extending CustomQDQInsertionCase |
| Quantization op used | Asymmetric quantization (tf.quantization.fake_quant_with_min_max_vars) | Symmetric quantization, needed for TensorRT compatibility (tf.quantization.quantize_and_dequantize_v2) |
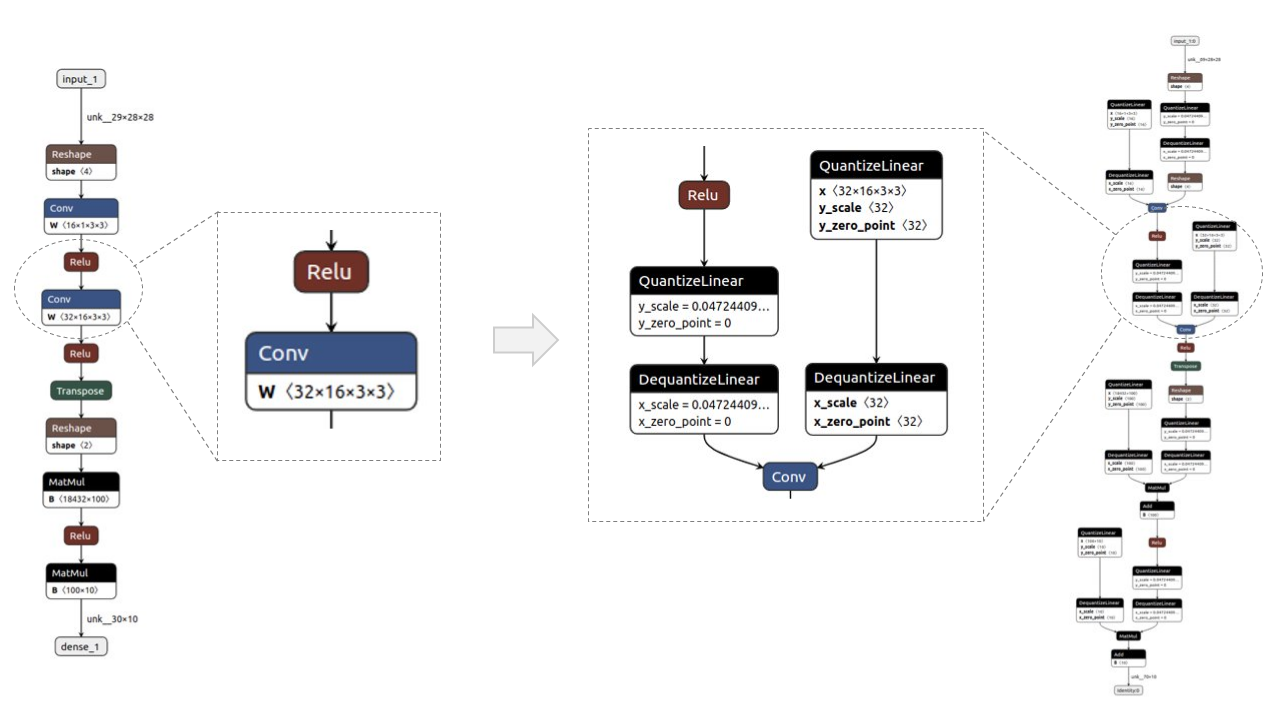
Figure 2 shows a before/after example of a simple model, visualized with Netron. The QDQ nodes are placed in the inputs and weights(if applicable) of desired layers, namely convolution (Conv) and fully connected (MatMul).
Workflow for deploying QAT models in TensorRT
Figure 3 shows the full workflow to deploy a QAT model, obtained with the QAT Toolkit, in TensorRT.

- Assume a pretrained TensorFlow 2 model in SavedModel format, also referred to as the baseline model.
- Quantize that model using the
quantize_modelfunction, which clones and wraps each desired layer with QDQ nodes. - Fine-tune the obtained quantized model, simulating quantization during training, and save it in
SavedModelformat. - Convert it to ONNX.
The ONNX graph is then consumed by TensorRT to perform layer fusions and other graph optimizations, such as dedicated QDQ optimizations, and generate an engine for faster inference.
Example with ResNet-50v1
In this example, we show you how to quantize and fine-tune a QAT model with the TensorFlow 2 toolkit and how to deploy that quantized model in TensorRT. For more information, see the full example_resnet50v1.ipynb Jupyter notebook.
Requirements
To follow along, you need the following resources:
- Python 3.8
- TensorFlow 2.8
- NVIDIA TF-QAT Toolkit
- TensorRT 8.4
Prepare the data
For this example, use the ImageNet 2012 dataset for image classification (task 1), which requires manual downloads due to the terms of the access agreement. This dataset is needed for the QAT model fine-tuning, and it is also used to evaluate the baseline and QAT models.
Log in or sign up on the linked website and download the train/validation data. You should have at least 155 GB of free space.
The workflow supports the TFRecord format, so use the following the instructions (modified from the TensorFlow instructions) to convert the downloaded .tar ImageNet files to the required format:
- Set
IMAGENET_HOME=/path/to/imagenet/tar/filesin data/imagenet_data_setup.sh. - Download imagenet_to_gcs.py to
$IMAGENET_HOME. - Run
./data/imagenet_data_setup.sh.
You should now see the compatible dataset in $IMAGENET_HOME.
Quantize and fine-tune the model
from tensorflow_quantization import quantize_model
from tensorflow_quantization.custom_qdq_cases import ResNetV1QDQCase

# Create baseline model
model = tf.keras.applications.ResNet50(weights="imagenet", classifier_activation="softmax")

# Quantize model
q_model = quantize_model(model, custom_qdq_cases=[ResNetV1QDQCase()])

# Fine-tune
q_model.compile(
    optimizer="sgd",
    loss=tf.keras.losses.SparseCategoricalCrossentropy(),
    metrics=["accuracy"]
)
q_model.fit(
    train_batches, validation_data=val_batches,
    batch_size=64, steps_per_epoch=500, epochs=2
)

# Save as TF 2 SavedModel
q_model.save(“saved_model_qat”)
Convert SavedModel to ONNX
$ python -m tf2onnx.convert --saved-model=<path_to_saved_model> --output=<path_to_save_onnx_file.onnx> --opset 13
Deploy the TensorRT engine
Convert the ONNX model into a TensorRT engine (also obtains latency measurements):
$ trtexec --onnx=<path_to_onnx_file> --int8 --saveEngine=<path_to_save_trt_engine> -v
Obtain accuracy results on the validation dataset:
$ python infer_engine.py --engine=<path_to_trt_engine> --data_dir=<path_to_tfrecord_val_data> -b=<batch_size>
Results
In this section, we report accuracy and latency performance numbers for various models in the ResNet and EfficientNet families:
- ResNet-50v1
- ResNet-50v2
- ResNet-101v1
- ResNet-101v2
- EfficientNet-B0
- EfficientNet-B3
All results were obtained on the NVIDIA A100 GPU with batch size 1 using TensorRT 8.4 (EA for ResNet and GA for EfficientNet).
Figure 4 shows the accuracy comparison between baseline FP32 models and their quantized equivalent models (PTQ and QAT). As you can see, there’s little to no loss in accuracy between the baseline and QAT models. Sometimes there’s even better accuracy due to further overall fine-tuning of the model. There’s also overall higher accuracy in QAT over PTQ due to the fine-tuning of the model parameters in QAT.
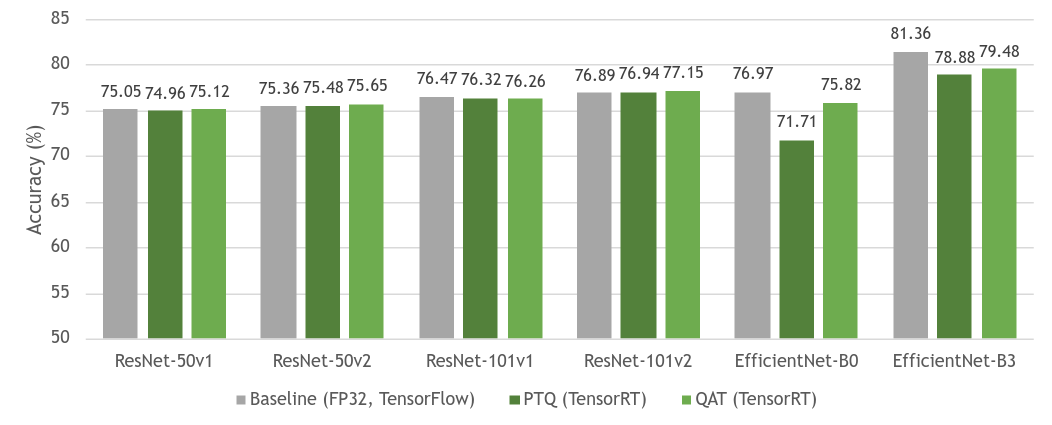
ResNet, as a network structure, is stable for quantization in general, so the gap between PTQ and QAT is small. However, EfficientNet greatly benefits from QAT, noted by reduced accuracy loss from the baseline model when compared to PTQ.
For more information about how different models may benefit from QAT, see Table 7 in Integer Quantization for Deep Learning Inference: Principles and Empirical Evaluation (quantization whitepaper).
Figure 5 shows that PTQ and QAT have similar times and introduce an up to 19x speedup compared to their respective baseline model.
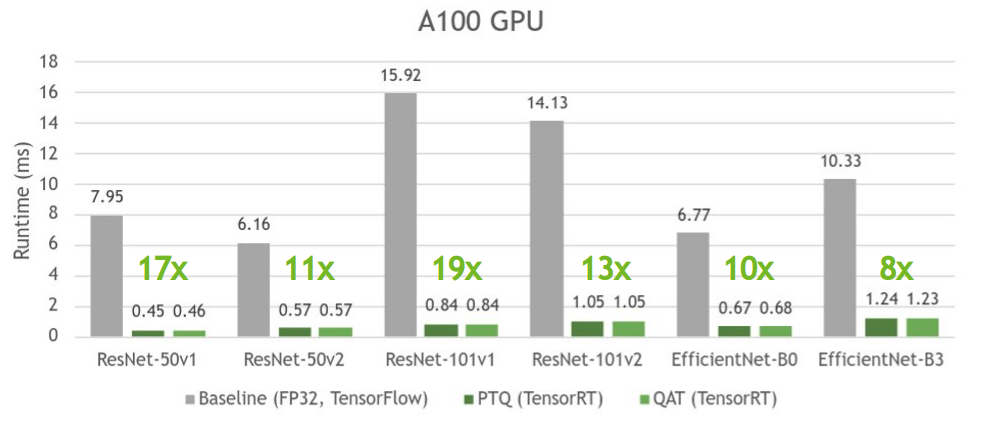
PTQ can sometimes be slightly faster than QAT as it tries to quantize all layers in the model, which usually results in faster inference, whereas QAT only quantizes the layers wrapped with QDQ nodes.
For more information about how TensorRT works with QDQ nodes, see Working with INT8 in the TensorRT documentation and the Toward INT8 Inference: An End-to-End Workflow for Deploying Quantization-Aware Trained Networks Using TensorRT GTC session.
For more information about performance numbers on various supported models, see the model zoo.
Conclusion
In this post, we introduced the NVIDIA QAT Toolkit for TensorFlow 2. We discussed the advantages of using the toolkit in the context of TensorRT inference acceleration. We then demonstrated how to use the toolkit with ResNet50 and perform accuracy and latency evaluations on ResNet and EfficientNet datasets.
Experimental results show that the accuracy of INT8 models trained with QAT is within around a 1% difference compared to FP32 models, achieving up to 19x speedup in latency.
For more information, see the following resources:
- Toward INT8 Inference: An End-to-End Workflow for Deploying Quantization-Aware Trained Networks Using TensorRT GTC session
- Code repository:
- NVIDIA TF-QAT Toolkit (discussed in this post)
- PyTorch quantization toolkit (PyTorch equivalent)
- Accelerating DNNs with TensorRT and ONNX:
- Accelerating DNNs with TensorRT directly in a DL framework:
- Integer Quantization for Deep Learning Inference: Principles and Empirical Evaluation
- Achieving FP32 Accuracy for INT8 Inference Using Quantization Aware Training with NVIDIA TensorRT
- Deep Learning Deployment with NVIDIA TensorRT (webinar)
- Estimating Depth with ONNX Models and Custom Layers Using NVIDIA TensorRT