
With the third-generation Tensor Core technology, NVIDIA recently unveiled A100 Tensor Core GPU that delivers unprecedented acceleration at every scale for AI, data analytics, and high-performance computing. Along with the great performance increase over prior generation GPUs comes another groundbreaking innovation, Multi-Instance GPU (MIG). With MIG, each A100 GPU can be partitioned up to seven GPU instances, isolated and secured at the hardware level. MIG can offer you right-sized GPU acceleration for optimal utilization and expand access to multiple users on a single A100 GPU.
In this post, we discuss MIG, MIG management, and MIG use cases for deep learning.
What is MIG?
MIG allows the A100 Tensor Core GPU to be securely partitioned up to seven separate GPU instances for CUDA applications, providing multiple users with separate GPU resources such as streaming multiprocessors (SMs), GPU memory, cache, memory bandwidth, and so on. With MIG, each GPU instance has separate and isolated paths through the entire memory system. The on-chip crossbar ports, L2 cache banks, memory controllers, and DRAM address busses are all assigned uniquely to an individual instance. This ensures that the workload on each individual GPU instance can run with predictable throughput and latency, without being interfered by other workloads in other GPU instances.
This feature is particularly beneficial for workloads that do not fully saturate the GPU’s compute capacity and therefore you may want to run different workloads in parallel to maximize utilization. While the entire A100 can be used to handle big and complex workloads, less demanding workloads such as early-stage development or low batch size inference on simpler models can be run on a subset of seven GPU instances provided with MIG. MIG increases GPU hardware utilization while providing a defined QoS and isolation between different clients such as VMs, containers, and processes. It is especially beneficial for use cases where multiple users are sharing a single A100 GPU while having hardware-level isolation, let alone the single-user multiple-application scenario where fault isolation between processes is critical.
GPU instances and compute instances
To fully understand MIG, it’s essential to distinguish between GPU instances and compute instances. Think of GPU instances as splitting one big GPU into multiple smaller GPUs. Each GPU instance has HW-level separation with dedicated compute and memory resources and is isolated and protected from faults in the other instances. The whole GPU can be one GPU instance, or can be divided into up to seven GPU instances with MIG.
A compute instance is another grouping that can configure different levels of compute power within a GPU instance. A GPU instance can be subdivided into multiple smaller compute instances to further split its compute resources. Figure 1 shows the concept of GPU instances and compute instances, with the whole GPU consisting of three GPU instances, each with four, one, and one compute instances, respectively.
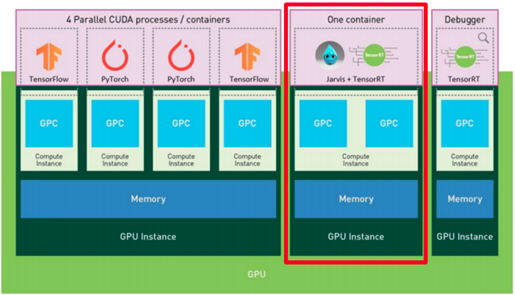
The smallest possible partition of the GPU, one of seven partitions, is called a GPU slice. A Riva and TensorRT GPU instance, highlighted with a red box in Figure 1, is composed of one compute instance with two GPU slices.
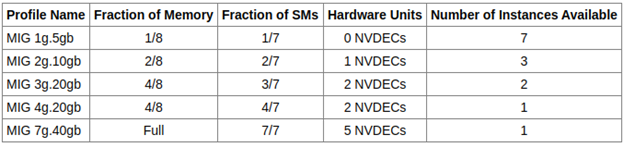
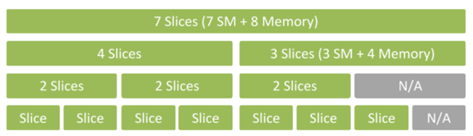
MIG partitioning and GPU instance profiles
MIG does not allow GPU instances to be created with an arbitrary number of GPU slices. Instead, it provides several GPU instance profiles for you to choose from. On a given GPU, you can create multiple GPU instances from a mix and match of these profiles within the availability of GPU slices.
Multi-Process Service differences
Multi-Process Service (MPS) is a CUDA programming model feature that increases GPU utilization with the concurrent execution of multiple processes on the GPU. It is particularly useful for HPC applications to take advantage of the inter-MPI rank parallelism. However, MPS does not partition the hardware resources for application processes. A highly demanding application may allow a greedy process to dominantly consume shared GPU resources and starve other applications. MIG GPU instances have hardware isolation to ensure that all instances continue to run if there is a compute demand spike. MPS works within each MIG instance, so the two technologies are complementary.
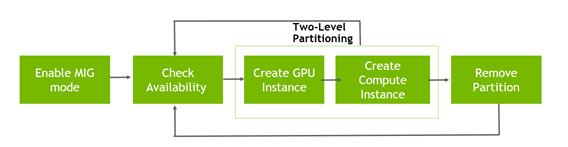
MIG management
Before you use MIG, the MIG devices should be made available to the CUDA applications or containers. MIG can be managed using NVML and nvidia-smi (with root privilege). Management of MIG includes the following tasks:
- Enable MIG mode
- Check GPU instance profiles
- Create GPU instances
- Check compute instance profiles
- Create compute instances before using MIG
To remove MIG partitions and get back to a full A100 GPU, the compute instances and GPU instances must be destroyed and MIG mode disabled.
For more information about enabling or disabling MIG and creating or destroying GPU instances and compute instances, see the MIG User Guide and demo videos. All the demo videos and experiments in this post are based on DGX A100, which has eight A100-SXM4-40GB GPUs.
MIG instances can be created and destroyed dynamically. Creating and destroying does not impact other instances, so it gives you the flexibility to destroy an instance that is not being used and create a different configuration.
When disabling or enabling MIG, the following warning information may be displayed:
$ sudo nvidia-smi -i 1 -mig 0
Warning: MIG mode is in pending disable state for GPU 00000000:0F:00.0:In use by another client
00000000:0F:00.0 is currently being used by one or more other processes (e.g. CUDA application or a monitoring application such as another instance of nvidia-smi). Please first kill all processes using the device and retry the command or reboot the system to make MIG mode effective.
To avoid reboot, stop dcgm and nvsm using the following command:
$ sudo systemctl stop dcgm nvsm
MIG for deep learning use cases
MIG supports running CUDA applications in containers or on bare-metal. All the GPU devices can be listed using the following command:
$ nvidia-smi -L
GPU 0: A100-SXM4-40GB  (UUID: GPU-e91edf3b-b297-37c1-a2a7-7601c3238fa2)
MIG 3g.20gb Device 0: (UUID: MIG-GPU-e91edf3b-b297-37c1-a2a7-7601c3238fa2/1/0)
MIG 3g.20gb Device 1: (UUID: MIG-GPU-e91edf3b-b297-37c1-a2a7-7601c3238fa2/2/0)
To launch a container on a specific MIG device, use the NVIDIA_VISIBLE_DEVICES variable, or the --gpus option with Docker version 19.03+ to specify a MIG device such as MIG-GPU-e91edf3b-b297-37c1-a2a7-7601c3238fa2/1/0. CUDA applications can also be run on bare-metal by specifying the MIG device on which to run the application. With CUDA 11, only the enumeration of a single MIG instance is supported.
Training
For small models that underutilize a single GPU, MIG can be used to improve GPU utilization by enabling multiple workloads to run in parallel on multiple MIG instances. Whether to use MIG for deep learning training is highly dependent on the models themselves. The metrics to consider are memory consumption and batch size used for the training workload.
There is no GPU-to-GPU P2P (both PCIe and NVLINK) support in MIG mode, so MIG mode does not support multi-GPU or multi-node training. For large models or models trained with a large batch size, the models may fully utilize a single GPU or even be scaled to multi-GPUs or multi-nodes. In these cases, we still recommend using a full GPU or multi-GPUs, even multi-nodes, to minimize total training time.
These models may still be trained on MIG instances, for example with 20 GB of memory, by decreasing the batch size to a number that is small enough to avoid “out of memory” error during the training. This can enable at least two models being trained in parallel. However, the tradeoff is that the total training time would be increased dramatically, for example, be doubled. Usually, you wouldn’t want to wait that long to see the training results and then iteratively improve the model layers, hyperparameters, and so on, until you have a model that delivers a satisfactory outcome.
If the GPU is underutilized by training a small model, using MIG to train multiple small models simultaneously is an efficient way to improve GPU utilization while experimenting with different model layers, hyperparameters, and so on. In a learning and teaching environment where models are developed from scratch and usually small enough to fit in a MIG instance with 20-GB or even smaller memory size, a single A100 can be shared by multiple users at the same time with hardware isolation. It could also be used by a single user to experiment with multiple models with different number and type of layers and hyperparameters at the same time.
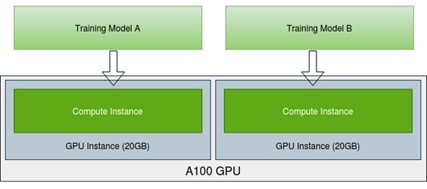
Figure 5 shows training two models in parallel on two MIG instances when each model consumes less than 20 GB of memory. You can experiment with different choices to see which model can achieve higher accuracy, for example, LSTM or GRU layers? Should you add a dropout layer and what is the dropout rate? Should you use L1 or L2 regularization, MSE or MAE loss, Adam or SGD optimizer, fixed or decayed learning rate, and so on.
Fine-tuning the BERT base PyTorch model
When A100 is used for a workload like fine-tuning the BERT base PyTorch model, the A100 is underutilized. How can the computation power be completely utilized? How about running multiple fine-tuning tasks at the same time, or having several users fine-tune their own models in parallel? A single A100 can be utilized by up to seven BERT base models fine-tuned on seven MIG instances with hardware isolation. For example, seven GPU instances can be created, each having a compute instance, for up to seven users who want to fine-tune their BERT base models for chatbot deployments using different datasets, as shown in Figure 6.

Here are the steps for fine-tuning seven BERT base PyTorch models in parallel using MIG on a A100 GPU. Use NVIDIA BERT PyTorch example on GitHub and reference the quick start guide.
- Download the pretrained BERT base checkpoint from NGC.
- Build the BERT container on top of the NGC PyTorch container using the following command:
$ bash scripts/docker/build.sh
- Because the default file is for BERT large, replace the existing
bert_config.jsonfile with the following code example for the BERT base:
{
 "attention_probs_dropout_prob": 0.1,
  "hidden_act": "gelu",
  "hidden_dropout_prob": 0.1,
  "hidden_size": 768,
  "initializer_range": 0.02,
  "intermediate_size": 3072,
  "max_position_embeddings": 512,
  "num_attention_heads": 12,
  "num_hidden_layers": 12,
  "type_vocab_size": 2,
  "vocab_size": 30522
}
- Launch a BERT container on each MIG compute instance. When you launch the container, you must specify the device to be the MIG device ID, instead of the GPU ID for MIG disabled mode. For example, replace the MIG device ID in the following command with your own ID:
$ docker run --gpus device=MIG-GPU-ad5561b2-9c6c-8855-09bd-65fdf84ba2e1/7/0 -it --rm --shm-size=1g --ulimit memlock=-1 --ulimit stack=67108864 -v $PWD:/workspace/bert -v $PWD/results:/results bert:latest
- Download and preprocess the dataset. Use the existing script to download public datasets such as MRPC, SST-2, SQuAD, or use any proprietary datasets.
- Fine-tune seven BERT base models for different datasets using seven MIG instances in parallel. To use the existing scripts in the
/scriptsdirectory, you must make minor changes. Change the checkpoint tobert_baseand the number of GPUs to 1, as mentioned in Video 4.
$ bash scripts/run_squad.sh
This is just one example showing how to use MIG instances to fine-tune seven BERT base models for different datasets at the same time. You can also have different deep learning frameworks, models, or datasets on each MIG instance. Depending on the different models and datasets, GPU memory consumption can vary. You may need to have different MIG configurations, such as three GPU instances with 10-GB GPU memory each, or two GPU instances with 20-GB GPU memory each, and so on.
To compare the performance with MIG and without MIG, measure the total fine-tuning time and throughput for the BERT base PyTorch model using SQuAD with batch size 4, for four cases:
- A100 with seven MIG instances fine-tuning seven models simultaneously
- A100 without MIG fine-tuning seven models simultaneously
- A100 without MIG fine-tuning seven models in serial
- T4 fine-tuning seven models in serial
| Fine-tune BERT base PyTorch model, SQuAD, BS=4 | 1 | 2 | 3 | 4 | 5 | 6 | 7 | Avg/ Total | |
| A100 MIG: 7 models on 7 MIG devices simultaneously | Fine-tuning time (sec) | 5542.00 | 5543.10 | 5538.96 | 5534.97 | 5543.10 | 5529.51 | 5541.51 | 5539.02 (Avg) |
| Sequences/sec | 31.99 | 31.98 | 32.01 | 32.03 | 31.98 | 32.06 | 31.99 | 224.04 (Total) | |
| A100 No MIG: 7 models in 7 containers simultaneously | Fine-tuning time (sec) | 8208.23 | 8206.72 | 8200.11 | 8208.62 | 8208.54 | 8208.48 | 8208.68 | 8207.05 (Avg) |
| Sequences/sec | 21.60 | 21.60 | 21.60 | 21.60 | 21.60 | 21.60 | 21.60 | 151.20 (Total) | |
| A100 No MIG: 7 models in serial | Fine-tuning time (sec) | 1485.29 | 1474.06 | 1469.31 | 1472.35 | 1489.77 | 1478.95 | 1490.81 | 10360.55 (Total) |
| Sequences/sec | 119.36 | 120.27 | 120.66 | 120.41 | 119.00 | 119.87 | 118.92 | 119.78 (Avg) | |
| T4: 7 models in serial | Fine-tuning time (sec) | 3772.47 | 3784.15 | 3769.82 | 3763.70 | 3769.90 | 3773.79 | 3764.50 | 26398.34 (total) |
| Sequences/sec | 46.99 | 46.85 | 47.03 | 47.10 | 47.03 | 46.98 | 47.09 | 47.01 (Avg) |
According to the results, A100 with seven MIG instances shows the highest throughput and shortest fine-tuning time for seven models in total. The speedup of total fine-tuning time was as follows:
- 1.48x for A100 MIG compared to A100 No MIG seven models simultaneously
- 1.87x for A100 MIG compared to A100 No MIG seven models in serial
- 4.77x for A100 MIG compared to T4 seven models in serial
Fine-tuning seven models simultaneously without MIG can also achieve high GPU utilization (99%), but the difference is that there is no hardware isolation such as MIG provides. It therefore incurs overhead from context switching and leads to lower performance compared to using MIG. Figure 7 shows the speedup of total throughput.
![1.48x for A100 MIG vs A100 No MIG seven models simultaneously, 1.87x for A100 MIG vs A100 No MIG seven models in serial, 4.77x for A100 MIG vs T4 seven models in serial]](https://developer-blogs.nvidia.com/wp-content/uploads/2020/10/speedup-throughput.png)
Inference
As shown in the previous example with seven MIG instances for BERT base fine-tuning, a single A100 can be partitioned to up to seven MIG instances running seven models for inference simultaneously, supporting inference requests from multiple users at the same time. It can support not only the same model, but also different models using different deep learning frameworks.
For example, you may consider deploying a fine-tuned BERT model for inference with NVIDIA Triton Inference Server, optimized with NVIDIA TensorRT. With Triton, both the server and client are responsible for serving models for inferences and making requests to the server using gRPC or HTTP, respectively. Use the following steps to deploy a BERT Large TF model on one MIG instance.
- Download and set up NVIDIA TensorRT to your system.
- Build the TensorRT engine for the BERT Large TF model.
- Pull the NVIDIA Triton Inference Server image from NGC.
$ docker pull nvcr.io/nvidia/tritonserver:20.08-py3
- Place the TensorRT engine created in step 2 in a directory with the structure as shown in the following structure. The TensorRT engine should be renamed to model.plan.
      ├── triton_models
      │     ├── bert
      │     │     ├── 1
      │     │     │     ├── model.plan
- Launch a Triton container on one MIG compute instance. You must specify device as the MIG device ID or as GPU:MIG DEV and the path to the directory that contains the TensorRT engine.
$ docker run -d -p 8000:8000 -p 8001:8001 \
 -v <path_to_dir>/bert_tf/results/triton_models:/models --gpus device=0:2 \
nvcr.io/nvidia/tritonserver:20.08-py3 tritonserver --model-repository=/models --allow-gpu-metrics=false --strict-model-config=false
With Triton Inference Server deployed with the BERT Large model, you can submit an inference request to Triton. The following steps show you how to engage an example client running inference on the SQuAD 1.1 dataset on Triton. Use NVIDIA BERT TensorFlow Triton example on NVIDIA/DeepLearningExamples GitHub repo.
- Clone the NVIDIA/DeepLearningExamples GitHub repo:
$ git clone https://github.com/NVIDIA/DeepLearningExamples.git
- Find the BERT TensorFlow directory:
$ cd DeepLearningExamples/TensorFlow/LanguageModeling/BERT/
- Run a client with the batch size that you used to create the TensorRT engine. The example command uses batch size of 1 and the second command shows the parameters passed to the script.
$ bash triton/scripts/run_client.sh 1 128 128 1 bert \
<path_to_dir>/MIG/TensorRT/demo/BERT/models/fine-tuned/bert_tf_v2_large_fp16_128_v2 \
--version_2_with_negative=false \
 --trt_engine --predict_file=<path_to_dir>/MIG/TensorRT/demo/BERT/squad/dev-v1.1.json

$ bash triton/scripts/run_client.sh <batch_size> <seq_length> <doc_stride> <triton_version_name>  <triton_model_name> \
<bert_dir> \
--version_2_with_negative=<True/False> \
 --trt_engine --predict_file=<SQUAD_DIR>/dev-v<squad_version>.json
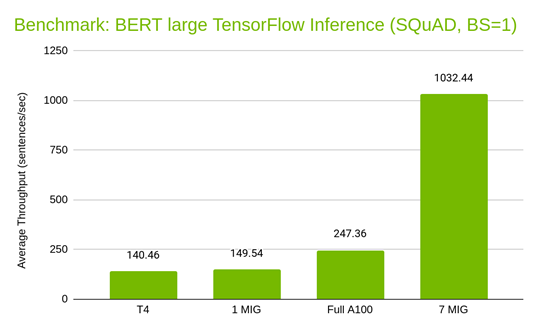
To compare the performance of A100 with and without MIG and also compare it to the NVIDIA T4 GPU, we measured the inference latency and throughput for the BERT Large TensorFlow model using SQuAD with batch size 1, for four cases:
- Full A100 without MIG inferencing seven models in serial.
- A100 with one MIG instance (six instances idle) inferencing seven models in serial.
- A100 with seven MIG instances inferencing seven models simultaneously.
- T4 GPU inferencing seven models in serial.
| Inference BERT Large TensorFlow model, SQuAD, BS=1 | 1 | 2 | 3 | 4 | 5 | 6 | 7 | Avg/ Total | |
| A100 No MIG:7 models in serial | Average Throughput (sentences/sec) | 247.25 | 247.45 | 246.61 | 247.53 | 247.66 | 247.85 | 247.2 | 247.36 (Avg) |
| Latency Average (ms) | 3.77 | 3.76 | 3.77 | 3.75 | 3.74 | 3.76 | 3.76 | 3.75 (Avg) | |
| A100 with 1 MIG instance: 7 models in serial | Average Throughput (sentences/sec) | 149.54 | 149.78 | 149.53 | 149.31 | 149.79 | 149.68 | 149.21 | 149.54 (Avg) |
| Latency Average (ms) | 6.38 | 6.37 | 6.38 | 6.39 | 6.37 | 6.38 | 6.39 | 6.38 (Avg) | |
| A100 with MIG: 7 models in 7 MIG instances in parallel | Average Throughput (sentences/sec) | 147.78 | 147.61 | 146.68 | 147.69 | 147.12 | 147.82 | 147.74 | 1032.44 (Total) |
| Latency Average (ms) | 6.46 | 6.47 | 6.51 | 6.47 | 6.50 | 6.45 | 6.47 | 6.47 (Avg) | |
| T4: 7 models in serial | Average Throughput (sentences/sec) | 139.95 | 141.65 | 139.55 | 139.39 | 140.77 | 139.83 | 141.67 | 140.46 (Avg) |
| Latency Average (ms) | 6.11 | 6.04 | 6.13 | 6.15 | 6.08 | 6.11 | 6.03 | 6.09 (Avg) |
Comparing the two cases of A100 with MIG, one MIG instance running one model (six instances idle) and seven MIG instances running seven models simultaneously, you can see that the average throughput and latency are equivalent. This supports the statement that MIG provides predictable latency and throughput without being interfered by other processes running on other MIG instances on the same GPU.
You can also see that, compared to the NVIDIA T4 GPU, one MIG slice delivers 1.07x throughput (149.54 / 140.4) with 1.05x latency (6.38 / 6.09). Against the full A100 GPU without MIG, seven fully activated MIG instances on one A100 GPU produces 4.17x throughput (1032.44 / 247.36) with 1.73x latency (6.47 / 3.75). So, seven MIG slices inferencing in parallel deliver higher throughput than a full A100 GPU, while one MIG slice delivers equivalent throughput and latency as a T4 GPU.
Mixed workloads
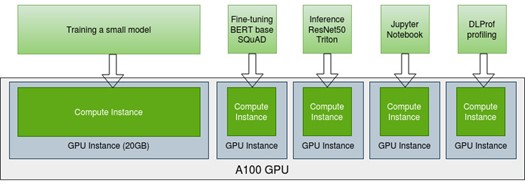
Earlier in this post, we showed examples for training and fine-tuning using an A100 GPU with the same type of MIG instances. You can also partition an A100 into multiple instances of different sizes and then schedule mixed workloads in parallel with MIG. Figure 8 shows examples of the workloads, such as training, fine-tuning, inference, Jupyter notebooks, debugging, and deep learning profiler.
In this way, you can maximize the GPU utilization of a A100 as well as shorten the development time by overlapping multiple workloads instead of waiting for one to finish before starting another. In addition, a single A100 can serve not only a single user with multiple workloads, but also multiple users given the isolation in the resources such as memory, SMs, bandwidth, and so on. You can extend this idea of using MIG from a single A100 to a DGX with multiple GPUs or nodes, so that the GPUs in a data center environment can be utilized to their maximum potential.
There is one limitation in MIG for profiling. Because the hardware performance monitors are shared across all the MIG devices, only one profiling session can be active at any given point in time. You cannot have parallel profiling sessions.
Next steps
This post showed several examples and demo videos using MIG to schedule multiple deep learning workloads in parallel on a single A100 GPU, which brings the advantages of improving the GPU utilization as well as serving multiple users to use a single GPU in parallel. If your A100 GPU is underutilized or if you want to partition for multiple users, try MIG for your deep learning applications. In addition to the examples and videos, we also provide many deep learning examples on GitHub from a wide range of domains.
For more information, see Getting Kubernetes Ready for NVIDIA A100 with Multi-Instance GPU. In that post, we present the steps to enable MIG support in a Kubernetes environment to enhance your overall GPU utilization.
