Recently, NVIDIA unveiled the A100 GPU model, based on the NVIDIA Ampere architecture. Ampere introduced many features, including Multi-Instance GPU (MIG), that play a special role for deep learning-based (DL) applications. MIG makes it possible to use a single A100 GPU as if it were multiple smaller GPUs, maximizing utilization for DL workloads and providing dynamic scalability.
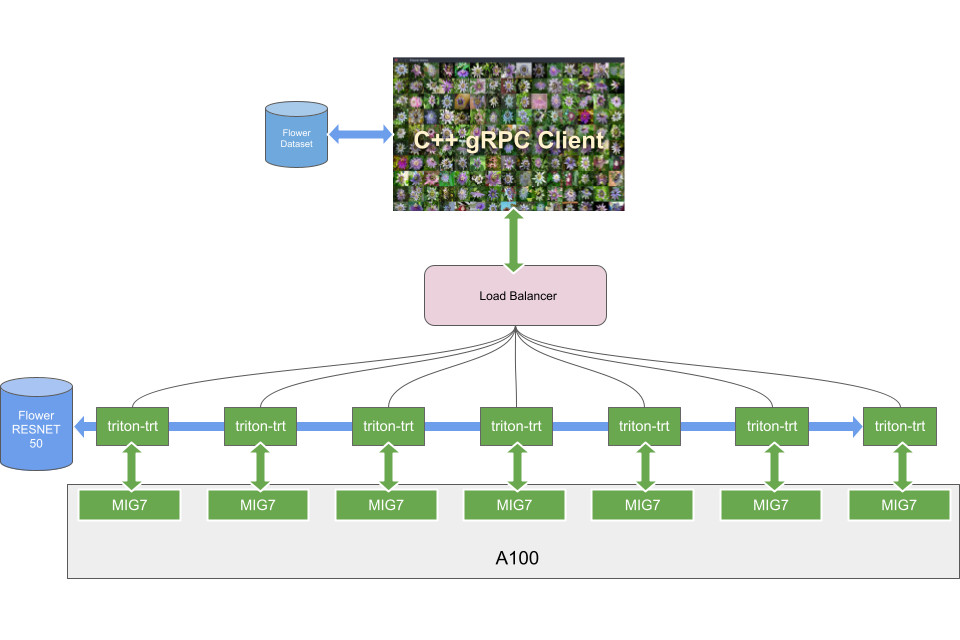
For the V100 launch, we presented the flower demo to showcase the ability of NVIDIA TensorRT to achieve impressive performance for a typical image classification inference problem. Later, the flower demo was also used to demonstrate full utilization and scalability of a multi-GPU system in a Kubernetes cluster. We showed how the use of Triton makes it possible for you to load multiple models on the same GPU so that inference requests for one model or the other could be processed on any of the available GPUs, increasing your ability to satisfy the peaks of the inference demand.
With MIG, the flower demo goes one step further: while it was designed for a multi-GPU system, we now show you how to run multiple image classification tasks independently (fault isolation) on the same GPU (single device, MIG).
Multi-Instance GPU
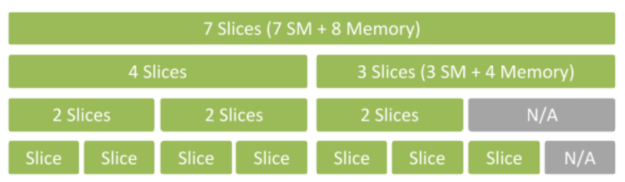
The NVIDIA Ampere architecture lets you share accelerated computing with MIG. MIG uses spatial slicing to carve the physical resources of a single A100 GPU into as many as seven independent GPU instances. They run simultaneously, each with its own memory, cache, and streaming multiprocessors. That enables the A100 GPU to deliver guaranteed quality of service at up to 7x higher utilization, compared to prior GPUs.
The A100 in MIG mode can run 2-7 independent AI or HPC workloads of different sizes. The capability is especially useful for AI inference jobs that don’t typically demand all the performance that a modern GPU delivers.
For example, you can create two MIG instances with 20 gigabytes (GB) of memory each, three instances with 10 GB, or seven with 5 GB. Create the mix that’s right for your workloads.
Flower demo approach
To demonstrate the usage of MIG, this post shows running classification on the flower dataset with a classical ResNet50 network trained for this purpose.
A typical inference scenario for an A100 GPU with MIG instances activated is to serve multiple models and scale one model or the other according to the number of incoming requests. In this first example, you run a single flower model aiming for lowest latency with batch size 1 on seven MIG instances. The advantages of this configuration are as follows:
- Parallel requests: The ability to serve multiple requests in a truly parallel fashion
- Fault tolerance and isolation: each instance keeps the same QoS, even if one instance is failing for any reason, the others can still work properly;
- Throughput and latency: For batch size equal to 1, running an increasing number of MIG instances achieves higher throughput and lower latency.
On the server, each MIG ‘slice’ is served by a Triton instance running in a Docker container. A load balancer directs incoming requests, using HTTP or gRPC to the active MIG.
In this post, we briefly describe some details of training, as well as the steps needed for the configuration of the server and the client.
Training with the flower dataset
We organized the flower dataset to the ImageNet format. There is one folder for each class so the training and validation data sets each have 102 folders. We trained the ResNet-50 model in PyTorch. For more information about the original model, see the NVIDIA/DeepLearningExamples/ GitHub repo.
We customized the output layer of the ResNet-50 model so that it can classify the 102 flower classes and added a softmax layer as the last layer. After the training was finished, we generated an ONNX model from the checkpoint for inference on Triton. To optimize performance, we generated a TensorRT engine file using the TensorRT Docker container nvcr.io/nvidia/tensorrt:20.11-py3 with the following commands:
trtexec --onnx=flower_resnet50.onnx --fp16 --saveEngine=flower_resnet50.plan --verbose --explicitBatch
We then used the generated file as the inference model in Triton.
Flower server
On the server, with a A100 GPU, make sure that the MIG mode was enabled before you can create MIG instances. Run the following command, which requires sudo privileges:
$ sudo nvidia-smi -mig 1
Enabled MIG Mode for GPU 00000000:65:00.0
When enabling MIG mode, the GPU goes through a reset process. The next step is to list the profiles available for the GPU instances:
$ sudo nvidia-smi mig --list-gpu-instance-profiles
+--------------------------------------------------------------------------+
| GPU instance profiles:                                                   |
| GPU   Name          ID    Instances   Memory     P2P    SM    DEC   ENC  |
|                           Free/Total   GiB              CE    JPEG  OFA  |
|==========================================================================|
|   0  MIG 1g.5gb     19     7/7        4.95       No     14     0     0   |
|                                                          1     0     0   |
+--------------------------------------------------------------------------+
|   0  MIG 2g.10gb    14     3/3        9.90       No     28     1     0   |
|                                                          2     0     0   |
+--------------------------------------------------------------------------+
|   0  MIG 3g.20gb     9     2/2        19.79      No     42     2     0   |
|                                                          3     0     0   |
+--------------------------------------------------------------------------+
|   0  MIG 4g.20gb     5     1/1        19.79      No     56     2     0   |
|                                                          4     0     0   |
+--------------------------------------------------------------------------+
|   0  MIG 7g.40gb     0     1/1        39.59      No     98     5     0   |
|                                                          7     1     1   |
+--------------------------------------------------------------------------+
The profile ID=19 (1g.5gb) is the one to create: it is the smallest available MIG instance and you can have seven of them on A100. On each one of them, you fit the flower model for a total of seven replicas.
Create the GPU instances with the following command:
$ sudo nvidia-smi mig --create-gpu-instance <profileId>
In this case, it becomes the following command:
$ sudo nvidia-smi mig --create-gpu-instance 19
You must run the command multiple times (seven) to get all the instances created.
List the gpu instances just created:
$ sudo nvidia-smi mig --list-gpu-instances
+----------------------------------------------------+
| GPU instances:                                     |
| GPU   Name        Profile  Instance   Placement    |
|                        ID     ID     Start:Size    |
|====================================================|
|   0  MIG 1g.5gb        19      7            4:1    |
+----------------------------------------------------+
|   0  MIG 1g.5gb        19      8            5:1    |
+----------------------------------------------------+
|   0  MIG 1g.5gb         19    9            6:1    |
+----------------------------------------------------+
|   0  MIG 1g.5gb         19     11            0:1    |
+----------------------------------------------------+
|   0  MIG 1g.5gb         19     12            1:1    |
+----------------------------------------------------+
|   0  MIG 1g.5gb         19     13            2:1    |
+----------------------------------------------------+
|   0  MIG 1g.5gb         19     14            3:1    |
+----------------------------------------------------+
Now that you have the GPU instances that you need for creating compute instances, you can list all the available configurations with the following command:
$ sudo nvidia-smi mig --list-compute-instance-profiles
+--------------------------------------------------------------------------------------+
| Compute instance profiles:                                                           |
| GPU GPU   Name           Profile  Instances   Exclusive      Shared               |
|      Instance                    ID Free/Total         SM         DEC   ENC   OFA    |
|      ID                                                           CE    JPEG         |
|======================================================================================|
|   0   7     MIG 1g.5gb            0*      1/1          14      0      0       0      |
|                                                                       1       0      |
+--------------------------------------------------------------------------------------+
|   0   8     MIG 1g.5gb            0*      1/1          14      0      0       0      |
|                                                                       1       0      |
+--------------------------------------------------------------------------------------+
|   0   9     MIG 1g.5gb            0*      1/1          14      0      0       0      |
|                                                                       1       0      |
+--------------------------------------------------------------------------------------+
|   0  11     MIG 1g.5gb            0*      1/1          14      0      0       0      |
|                                                                       1       0      |
+--------------------------------------------------------------------------------------+
|   0  12     MIG 1g.5gb            0*     1/1           14     0       0       0      |
|                                                                       1       0      |
+--------------------------------------------------------------------------------------+
|   0  13     MIG 1g.5gb            0*     1/1           14     0       0       0      |
|                                                                       1       0      |
+--------------------------------------------------------------------------------------+
|   0  14     MIG 1g.5gb            0*     1/1           14     0       0       0      |
|                                                                       1       0      |
+--------------------------------------------------------------------------------------+
If you run the following command, no MIG devices are found:
$ nvidia-smi
...
+-----------------------------------------------------------------------------+
| MIG devices:                                                                |
+------------------+----------------------+-----------+-----------------------+
| GPU  GI  CI  MIG |         Memory-Usage |        Vol|         Shared        |
|      ID  ID  Dev |                      | SM     Unc| CE  ENC  DEC  OFA  JPG|
|                  |                      |        ECC|                       |
|==================+======================+===========+=======================|
|  No MIG devices found                                                       |
+-----------------------------------------------------------------------------+
+-----------------------------------------------------------------------------+
| Processes:                                                                  |
|  GPU   GI   CI        PID   Type   Process name                  GPU Memory |
|        ID   ID                                                   Usage      |
|=============================================================================|
|  No running processes found                                                 |
+-----------------------------------------------------------------------------+
To create compute instances to use MIGs, run the following command:
$ sudo nvidia-smi mig --gpu-instance-id <gpuInstanceId> –-create-compute-instance <computInstanceProfileId>
If you run the following two commands, you’ve created the first two compute instances:
$ sudo nvidia-smi mig --gpu-instance-id 7 --create-compute-instance 0
$ sudo nvidia-smi mig --gpu-instance-id 8 --create-compute-instance 0
$ nvidia-smi
...
+-----------------------------------------------------------------------------+
| MIG devices:                                                                |
+------------------+----------------------+-----------+-----------------------+
| GPU  GI  CI  MIG |         Memory-Usage |        Vol|         Shared        |
|      ID  ID  Dev |                      | SM     Unc| CE  ENC  DEC  OFA  JPG|
|                  |                      |        ECC|                       |
|==================+======================+===========+=======================|
|  0    7   0   0  |      3MiB /  4888MiB | 14      0 |  1   0    0    0    0 |
+------------------+----------------------+-----------+-----------------------+
|  0    8   0   1  |      3MiB /  4888MiB | 14      0 |  1   0    0    0    0 |
+------------------+----------------------+-----------+-----------------------+

+-----------------------------------------------------------------------------+
| Processes:                                                                  |
|  GPU   GI   CI        PID   Type   Process name                  GPU Memory |
|        ID   ID                                                   Usage      |
|=============================================================================|
|  No running processes found                                                 |
+-----------------------------------------------------------------------------+
Now list the UUID for the instances that you just created:
$ sudo nvidia-smi -L
GPU 0: Graphics Device (UUID: GPU-6e89a967-292d-f5fc-2af0-a2e2f2ccc326)
  MIG 1g.5gb Device 0: (UUID: MIG-GPU-6e89a967-292d-f5fc-2af0-a2e2f2ccc326/7/0)
  MIG 1g.5gb Device 1: (UUID: MIG-GPU-6e89a967-292d-f5fc-2af0-a2e2f2ccc326/8/0)
For this example, you create one compute instance for each GPU instance, so you must create the other five compute instances:
$ sudo nvidia-smi mig --gpu-instance-id 9 --create-compute-instance 0
$ sudo nvidia-smi mig --gpu-instance-id 11 --create-compute-instance 0
$ sudo nvidia-smi mig --gpu-instance-id 12 --create-compute-instance 0
$ sudo nvidia-smi mig --gpu-instance-id 13 --create-compute-instance 0
$ sudo nvidia-smi mig --gpu-instance-id 14 --create-compute-instance 0
Now that you have configured the hardware, you can test that everything is working correctly when you run the CUDA container. Install the latest nvidia-docker version, enable only one MIG, and see what the nvidia-smi -L command shows. You should see only the enabled MIG:
$ sudo docker run \
  --gpus '"device=0:0"' \
  nvidia/cuda:9.0-base nvidia-smi -L
The result of the preceding command is as follows:
GPU 0: Graphics Device (UUID: GPU-6e89a967-292d-f5fc-2af0-a2e2f2ccc326)
  MIG 1g.5gb Device 0: (UUID: MIG-GPU-6e89a967-292d-f5fc-2af0-a2e2f2ccc326/7/0)
You are now ready to run Triton Inference Server on the compute instances created. Pull version 20.07-py3 of the Triton Docker container from NGC:
$ sudo docker pull nvcr.io/nvidia/tritonserver:20.07-py3
You can run the inference server on each compute instance with the following command:
$ sudo docker run -d -p 8000:8000 -p 8001:8001 -v '/home/user/flower_model:/models' --gpus '"device=0:0"' \
nvcr.io/nvidia/tritonserver:20.07-py3 --model-repository=/models --allow-gpu-metrics=false
…
$ sudo docker run -d -p 8010:8000 -p 8011:8001 -v '/home/user/flower_model:/models' --gpus '"device=0:1"' \
nvcr.io/nvidia/tritonserver:20.07-py3 --model-repository=/models --allow-gpu-metrics=false
…
$ sudo docker run -d -p 8020:8000 -p 8021:8001 -v '/home/user/flower_model:/models' --gpus '"device=0:2"' \
nvcr.io/nvidia/tritonserver:20.07-py3 --model-repository=/models --allow-gpu-metrics=false
…
$ sudo docker run -d -p 8030:8000 -p 8031:8001 -v '/home/user/flower_model:/models' --gpus '"device=0:3"' \
nvcr.io/nvidia/tritonserver:20.07-py3 --model-repository=/models --allow-gpu-metrics=false
…
$ sudo docker run -d -p 8040:8000 -p 8041:8001 -v '/home/user/flower_model:/models' --gpus '"device=0:4"' \
nvcr.io/nvidia/tritonserver:20.07-py3 --model-repository=/models --allow-gpu-metrics=false
…
$ sudo docker run -d -p 8050:8000 -p 8051:8001 -v '/home/user/flower_model:/models' --gpus '"device=0:5"' \
nvcr.io/nvidia/tritonserver:20.07-py3 --model-repository=/models --allow-gpu-metrics=false
…
$ sudo docker run -d -p 8060:8000 -p 8061:8001 -v '/home/user/flower_model:/models' --gpus '"device=0:6"' \
nvcr.io/nvidia/tritonserver:20.07-py3 --model-repository=/models --allow-gpu-metrics=false
The parameter --allow-gpu-metrics=false is telling Triton to disable the GPU metrics, usually available on port 8002.
The expected output for each of the earlier commands is like the following code example:
=============================
== Triton Inference Server ==
=============================
NVIDIA Release 20.07
….
tensorflow/core/common_runtime/gpu/gpu_device.cc:1639] Found device 0 with properties:
name: Graphics Device MIG 1g.6gb major: 8 minor: 0 memoryClockRate(GHz): 1.005
pciBusID: 0000:65:00.0
2020-06-04 21:17:26.436662: I tensorflow/stream_executor/platform/default/dso_loader.cc:48] Successfully
…
GPU (device: 0, name: Graphics Device MIG 1g.5gb, pci bus id: 0000:65:00.0, compute capability: 8.0)
2020-06-04 21:17:28.159864: I tensorflow/compiler/xla/service/service.cc:168] XLA service 0x7f638234b7a0 initialized for platform CUDA (this does not guarantee that XLA will be used). Devices:
2020-06-04 21:17:28.159887: I tensorflow/compiler/xla/service/service.cc:176]   StreamExecutor device (0): Graphics Device MIG 1g.5gb, Compute Capability 8.0
I0604 21:17:28.162996 1 model_repository_manager.cc:888] successfully loaded 'simple' version 1
Starting endpoints, 'inference:0' listening on
I0604 21:17:28.166764 1 grpc_server.cc:1942] Started GRPCService at 0.0.0.0:8001
I0604 21:17:28.166817 1 http_server.cc:1428] Starting HTTPService at 0.0.0.0:8000
I0604 21:17:28.210177 1 http_server.cc:1443] Starting Metrics Service at 0.0.0.0:8002
As you can see from the log, each of the Triton instances finds one MIG (1g.5gb) with compute capability 8.0.
At this point, you have seven Triton instances, each running on a separate MIG.
The last step for the flower server is to install and run a load balancer to redirect incoming inference requests to the appropriate Triton instance. For this post, use the Envoy load balancer which is open source and easily configured.
Pulling the Envoy Docker container with the following command:
$ docker pull envoyproxy/envoy:v1.14.1
You can run inference using either the HTTP or gRPC protocol. For the GRPC, use the following lb-envoy-grpc.yaml configuration:
static_resources:
  listeners:
  - address:
      socket_address:
        address: 0.0.0.0
        port_value: 50050
    filter_chains:
    - filters:
      - name: envoy.http_connection_manager
        config:
          codec_type: auto
          stat_prefix: ingress_http
          route_config:
            name: local_route
            virtual_hosts:
            - name: backend
              domains:
              - "*"
              routes:
              - match:
                  prefix: "/"
                  headers:
                  - name: content-type
                    prefix_match: application/grpc
                route:
                  cluster: inference
          http_filters:
          - name: envoy.router
            config: {}
  clusters:
  - name: inference
    connect_timeout: 10.00s
    type: strict_dns
    lb_policy: round_robin
    http2_protocol_options: {}
    hosts:
    - socket_address:
        address: 127.0.0.1
        port_value: 8001
    - socket_address:
        address: 127.0.0.1
        port_value: 8011
    - socket_address:
        address: 127.0.0.1
        port_value: 8021
    - socket_address:
        address: 127.0.0.1
        port_value: 8031
    - socket_address:
        address: 127.0.0.1
        port_value: 8041
    - socket_address:
        address: 127.0.0.1
        port_value: 8051
    - socket_address:
        address: 127.0.0.1
        port_value: 8061
admin:
  access_log_path: "/workspace/envoy.log"
  address:
    socket_address:
      address: 0.0.0.0
      port_value: 9001
For HTTP, the configuration is similar. The Triton ports to be used are 8000, 8010, 8020, 8030, 8040, 8050, and 8060. You can enable and disable one or multiple MIG instances by commenting out the socket_address related section in the earlier configuration.
Finally, the following command runs the load balancer:
$ docker run -it --net host -v $PWD:/workspace envoyproxy/envoy:v1.14.1 envoy -c /workspace/lb-envoy.yaml
The server is now waiting for incoming inference requests. Download the necessary files to install and run the server.
Flower client
Now that you have the server up and running, you can send flower classification requests to it. The client is implemented in C++ and takes advantage of the Triton client libraries. It loads a grid of flower images and runs inference on them in two ways:
- Interactive mode: The user selects one flower image, and the inference result is asynchronously displayed when received from the server.
- Automatic mode: A given number of asynchronous inference requests are kept automatically active. Every time a reply is received from the server, a new request is created.
This is a convenient way of visually comparing the latency across different systems. If you set a fixed latency budget, the number of outstanding open requests is proportionally bigger for faster systems. More requests can wait in the queue to be processed in the given latency budget.

The following code example shows the main steps of the asynchronous GRPC inference request implementation. Some code is omitted to highlight the salient operations. For more information, see the triton-inference-server/server GitHub repo.
#include "src/clients/c++/library/grpc_client.h"
#include "src/clients/c++/library/http_client.h"
#include "src/core/model_config.pb.h"

// Variable initialization
...

// Create the inference client for the server. From it,
// extract and validate that the model meets the requirements for
// image classification.
TritonClient triton_client;
nic::Error err;
err = nic::InferenceServerGrpcClient::Create(&triton_client.grpc_client_, url, verbose);

ModelInfo model_info;
ni::ModelMetadataResponse model_metadata;
err = triton_client.grpc_client_->ModelMetadata(&model_metadata, model_name, model_version, http_headers);

ni::ModelConfigResponse model_config;
err = triton_client.grpc_client_->ModelConfig(&model_config, model_name, model_version, http_headers);

// Preprocess the images into input data according to model requirements
std::vector <std::vector<uint8_t>> image_data;
...

// Initialize the inputs with the data.
nic::InferInput *input;
err = nic::InferInput::Create(&input, model_info.input_name_, shape, model_info.input_datatype_);

std::shared_ptr <nic::InferInput> input_ptr(input);
nic::InferRequestedOutput *output;

// Set the number of classifications expected
err = nic::InferRequestedOutput::Create(&output, model_info.output_name_, topk);

std::shared_ptr <nic::InferRequestedOutput> output_ptr(output);
std::vector < nic::InferInput * > inputs = {input_ptr.get()};
std::vector<const nic::InferRequestedOutput *> outputs = {output_ptr.get()};

// Configure context for 'batch_size' and 'topk'
nic::InferOptions options(model_name);
options.model_version_ = model_version;

// Send requests of 'batch_size' images. If the number of images
// isn't an exact multiple of 'batch_size' then just start over with
// the first images until the batch is filled.
//
// Number of requests sent = ceil(number of images / batch_size)
...
auto callback_func = ...

while (!last_request) {
   // Reset the input for new request.
   err = input_ptr->Reset();

   // Set input to be the next 'batch_size' images (preprocessed).
   std::vector <std::string> input_filenames;
   for (int idx = 0; idx < batch_size; ++idx) {
      input_filenames.push_back(image_filenames[image_idx]);
      ...
   }

   result_filenames.emplace_back(std::move(input_filenames));
   options.request_id_ = std::to_string(sent_count);
   err = triton_client.grpc_client_->AsyncInfer(
           callback_func, options, inputs, outputs, http_headers);
   sent_count++;
}

// Wait until all callbacks are invoked
...

// Post-process the results to make prediction(s)
...
Download the compiled client GUI container from Docker Hub. After you download the container to run the client, form a terminal type:
xhost +
docker run -it \
-v /tmp/.X11-unix:/tmp/.X11-unix:rw \
--privileged  \
-e DISPLAY -e XAUTHORITY -e NVIDIA_DRIVER_CAPABILITIES=all \
-v $PWD:/workspace \
--device /dev/dri \
--net host dltme/triton_flower \ /workspace/build/FlowerDemo server_url server_grpc_port
The client will be released as open source.
Performance charts
The performance numbers are obtained by running the Triton perf_client. It generates random data inference requests to the flower model and measures the throughput and latency. For more information, see perf_client.
The perf_client application measures latency and throughput using the lowest possible load on the model, that is by sending one inference request to Triton and waiting for the response. When that response is received, the perf_client immediately sends another request, and then repeats this process within the measurement windows. The default concurrency, which is the number of outstanding inference requests, is 1.
Using the --concurrency-range option, you can have multiple requests open at the same time. The requests that are sent but not executed immediately are queued on the server side by Triton.
For each request concurrency level, perf_client reports latency and throughput as seen from the client. The latency can be further analyzed as its basic components, like the time spent in the queue, the time needed to compute the inference, are also reported.
By increasing the number of concurrent requests, you can observe that the server, at least in an initial phase, can satisfy the increase of classification demand so that the overall throughput increases as well. Over some threshold—which depends on many factors on the server like the type of GPU and the number of GPU used—the throughput reaches its maximum and therefore the requests are queued and, as a result, the latency increases.
To start the perf_client, run the following command:
$ perf_client -m flower -u 127.0.0.1:50050 -i http --concurrency-range 1:100 -f results.csv
All the requests are sent to the load balancer, which is responsible for the final distribution among the available Triton instances. Both gRPC and HTTP requests are possible. For this post, the benchmarks are obtained for HTTP requests.
Figure 4 shows the throughput-concurrency curves obtained for different numbers of MIG 1g.6gb instances used:
- A100-MIG7x1 shows the throughput with only 1 MIG 1g.5gb.
- A100-MIG7x7 shows the throughput with 7 MIG 1g.5gb.
- V100 shows the throughput when running a single Triton instance on a V100 16Gb.
- T4 is the throughput curve for T4.
From the figure, you can see how each MIG brings the same amount of increase in throughput when more MIGs are added and how using only two MIGs already represents an improvement over a V100 or T4 GPU.
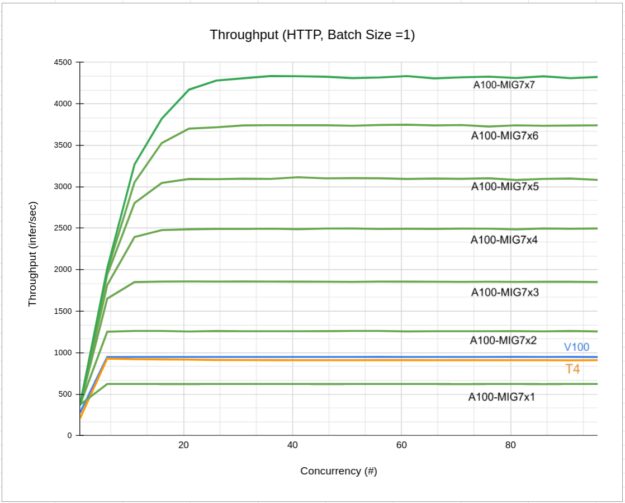
Figure 5 shows the latency-concurrency for the same configurations. The chart shows how the latency is lower when using an increase number of MIG instances.
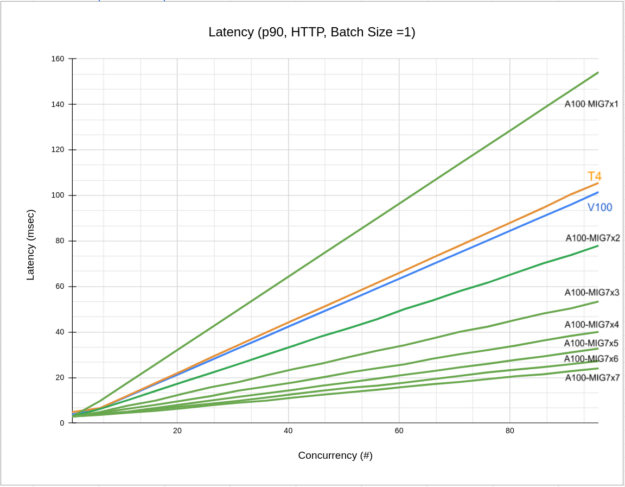
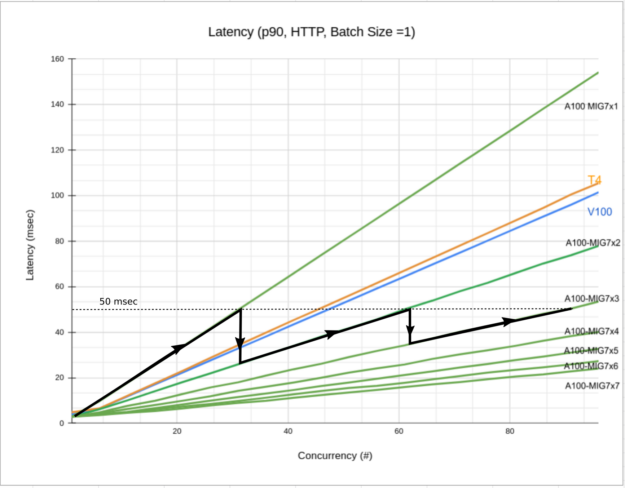
Figure 6 shows that for a latency budget of 50 msec (dashed horizontal line) starting with 1 MIG and increasing the number of concurrent requests, the latency increases (black solid line). At some point, to satisfy your budget, you should increase the number of MIG instances. With the increase, the latency of the system drops, and you can satisfy the inference demand while keeping the latency within your budget.
Conclusion
In this post, we presented a new version of the flower demo running on an A100. We deployed the system on multiple MIG instances of the same type (1g.5gb) and showed how throughput and latency are affected and compared with V100 and T4 results. The system presented is a case study that illustrated the basic principles of deploying inference on A100 with MIG activated. For more information, see Getting the Most Out of the NVIDIA A100 GPU with Multi-Instance GPU.
You can take further advantage of the flexibility available with MIGs by automatically increasing or decreasing the number of instances occupied by the flower models depending on the inference demand. This would optimize resources and potentially free MIGs for other applications or models. Automatic scaling is easily obtained within a Kubernetes system.
