Multi-Instance GPU (MIG) is a new feature of the latest generation of NVIDIA GPUs, such as A100. It enables users to maximize the utilization of a single GPU by running multiple GPU workloads concurrently as if there were multiple smaller GPUs. MIG supports running multiple workloads in parallel on a single A100 GPU or allowing multiple users to share an A100 GPU with hardware-level isolation and quality of service. For more information about MIG management and deep learning use cases, see the NVIDIA Multi-Instance GPU User Guide and Getting the Most Out of the NVIDIA A100 GPU with MIG.
Kubernetes is one of the standard container orchestration platforms when it comes to deep learning, so it’s a priority for MIG support. NVIDIA expanded the k8s-device-plugin and gpu-feature-discovery plugins with support for MIG devices. The k8s-device-plugin on each Kubernetes compute node is responsible for checking the availability of NVIDIA GPUs and providing the nvidia.com/gpu resource type. The gpu-feature-discovery plugin on the node generates and applies node labels based on the meta-information of the GPU device, such as driver version, type of GPU, and so on.
Kubernetes support for the new MIG feature on the A100 GPU comes with three strategies for your convenience: none, single, or mixed. To minimize the changes to well-known Kubernetes interfaces, NVIDIA provides operation strategies that are fully compatible with existing job scripts, which gradually show the necessary changes to the job script YAML file. All scripts can continue to be executed with the following command:
kubectl apply -f <script>.yaml
None
Use this strategy when MIG mode is not enabled on your GPU. Both the k8s-device-plugin and gpu-feature-discovery plugins works in the same way. As a recap, running a GPU job with Kubernetes requires a job file as follows:
# example-job.yaml
apiVersion: v1
kind: Pod
metadata:
  name: gpu-example
spec:
  restartPolicy: Never
  containers:
    - name: gpu-example
      image: "nvidia/cuda"
      command: ["nvidia-smi"]
      resources:
        limits:
          nvidia.com/gpu: 1
Single
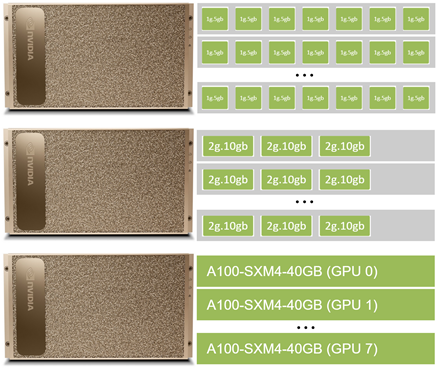
In this strategy, a node can only expose a single type of MIG device across all its GPUs. All GPUs on the node must be of the same product line—for example, A100-SXM4-40GB—and have MIG enabled. In addition, it must be configured to expose the exact same MIG devices types across all of them. In this configuration, all GPUs on a DGX A100 must be configured into one of the following:
- 2x 3g.20GB MIG devices (4x5GB memory, 3×14 SMs)
- 3x 2g.10GB MIG devices (2x5GB memory, 2×14 SMs)
- 7x 1g.5GB MIG devices (1x5GB memory, 1x14SMs)
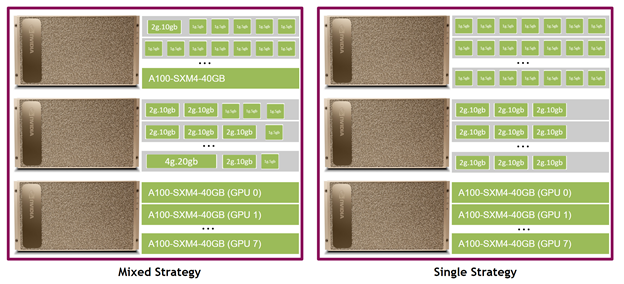
The idea behind this strategy is to allow you to provide different MIG device types on different nodes in a Kubernetes cluster, while keeping the same kind of device on the same node to avoid the fragmentation of jobs across different nodes. In the single configuration, the gpu-feature-discovery plugin populates a new property to the resource manager (RM) called CUDA device name using the label nvidia.com.gpu.product. At the same time, the k8s-device-plugin plugin verifies the invariants mentioned earlier and populates the traditional nvidia.com/gpu resource type. This way, existing job scripts continue to run without any changes. Figure 1 shows the potential configurations of a couple of nodes running with the single strategy in a Kubernetes cluster.
The nodeSelector constraint exposes information to the user, such as the exact type of the GPU resource. You can specify the exact model of GPU or MIG device that you need. A sample job script reads as follows:
# example-job-single.yaml
apiVersion: v1
kind: Pod
metadata:
  name: gpu-example
spec:
  restartPolicy: Never
  containers:
    - name: gpu-example
      image: "nvidia/cuda"
      command: ["nvidia-smi"]
      resources:
        limits:
          nvidia.com/gpu: 1
  nodeSelector: # optional if you have only a single type of MIG device in the entire cluster
    nvidia.com/gpu.product: A100-SXM4-40GB MIG 3g.20gb
Mixed
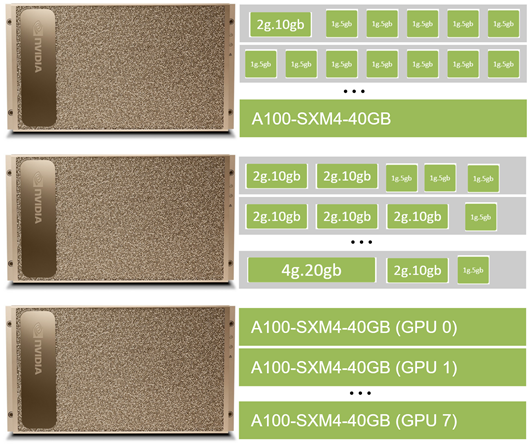
With the mixed strategy, a node can expose a mixture of different MIG device types and GPUs in non-MIG mode across all its GPUs. Requesting a specific MIG device requires you to specify both the number of compute instances and the total amount of memory provided by the device type, for example, 2g.10GB. In this case, the only invariant that applies is that all GPUs on the same node must be of the same product line, such as A100-SXM-40GB. When this strategy is used, the k8s-device-plugin plugin running on the compute nodes does the following:
- Exposes any of the GPUs not running in MIG-mode using the traditional
nvidia.com/gpuresource type. - Exposes individual MIG devices that are already created using a new device type following the schema of
nvidia.com/mig-<sm_slice_count>g-<memory_size>gb.
The gpu-feature-discovery plugin on the compute nodes applies node labels for the GPUs in non-MIG mode, as it is done traditionally. For the MIG devices, it applies node labels prefixed with nvidia.com/mig-<sm_slice_count>g-<memory_size>gb. Information such as total memory size, number of memory slices, number of SMs, number of DMA engines, and so on are exposed with these labels. Figure 2 shows the potential configurations of a couple of nodes running with the mixed strategy in a Kubernetes cluster.
To request a MIG device from the mixed strategy, you must change your job script and request its corresponding resource type:
# example-job-mixed.yaml
apiVersion: v1
kind: Pod
metadata:
  name: gpu-example
spec:
  restartPolicy: Never
  containers:
    - name: gpu-example
      image: "nvidia/cuda"
      command: ["nvidia-smi"]
      resources:
        limits:
          nvidia.com/mig-3g.20gb: 1
  nodeSelector:  # optional if you have only a single type of GPU product in your entire cluster
    nvidia.com/gpu.product: A100-SXM4-40GB
Enabling MIG support for Kubernetes
In the following section, we list the steps for enabling MIG support for Kubernetes.
Prerequisites
To integrate MIG support with Kubernetes, set up and install a supported Docker version with the latest version of nvidia-docker2.
Next, deploy Kubernetes for the cluster using tools like Kubespray. For setting the Docker and Kubernetes environment for MIG, use tools such as NVIDIA DeepOps to deploy a Kubernetes environment.
In the following sections, we assume that your Kubernetes environment is set up and the compute node equipped with an A100 GPU is ready to be used.
Adding a Helm repository
First, add the k8s-device-plugin and gpu-feature-discovery Helm repositories and verify that the version 0.7.0 or later of k8s-device-plugin and version 0.2.0 or later of gpu-feature-discovery are accessible.
$ helm repo add nvdp https://nvidia.github.io/k8s-device-plugin
$ helm repo add nvgfd https://nvidia.github.io/gpu-feature-discovery
$ helm repo update
$ helm search repo nvdp --devel
NAME                            CHART VERSION   APP VERSION     DESCRIPTION
nvdp/k8s-device-plugin       0.7.0           0.7.0           A Helm chart for...
$ helm search repo nvgfd --devel
NAME                            CHART VERSION   APP VERSION     DESCRIPTION
nvgfd/gpu-feature-discovery     0.2.0      0.2.0      A Helm chart for...
Using the none strategy
If you are using non-MIG mode only, install the two plugins with the following command:
$ helm install --version=0.7.0 --generate-name --set migStrategy=none nvdp/k8s-device-plugin
$ helm install --version=0.2.0 --generate-name --set migStrategy=none nvgfd/gpu-feature-discovery
The plugins can find the GPU and correctly add the nvidia.com/gpu resource type to the node. Change the node name from dgx-a100-node as needed.
$ kubectl get node dgx-a100-node
…
Capacity:
  cpu:                256
  ephemeral-storage:  960783416Ki
  hugepages-1Gi:      0
  hugepages-2Mi:      0
  memory:             65513880Ki
  nvidia.com/gpu:     8
  pods:               110
…
To run the example of TensorFlow benchmarks, create a file that has the following content:
# tf-benchmarks.yaml
apiVersion: v1
kind: Pod
metadata:
  name: tf-benchmarks
spec:
  restartPolicy: Never
  containers:
    - name: tf-benchmarks
      image: "nvcr.io/nvidia/tensorflow:20.08-tf2-py3"
      command: ["/bin/sh", "-c"]
      args: ["cd /workspace && git clone https://github.com/tensorflow/benchmarks/ && cd /workspace/benchmarks/scripts/tf_cnn_benchmarks && python tf_cnn_benchmarks.py --num_gpus=1 --batch_size=64 --model=resnet50 --use_fp16"]
      resources:
        limits:
          nvidia.com/gpu: 1
The script is started with kubectl apply -f tf-benchmarks.yaml. In Kubernetes, a new Pod can’t be deployed if the Pod already exists. If you have launched the example already, delete the existing Pod first with kubectl delete -f tf-benchmarks.yaml. Wait a few minutes until the execution ends and then check the output of the execution output with kubectl logs tf-benchmarks. In the following example, the job was executed on an entire A100 GPU.
$ kubectl logs tf-benchmarks
...
StreamExecutor device (0): A100-SXM4-40GB, Compute Capability 8.0
2020-09-28 10:45:01.219308: I tensorflow/core/common_runtime/gpu/gpu_device.cc:1561] Found device 0 with properties:
pciBusID: 0000:b7:00.0 name: A100-SXM4-40GB computeCapability: 8.0
coreClock: 1.41GHz coreCount: 108 deviceMemorySize: 37.25GiB deviceMemoryBandwidth: 1.41TiB/s
...
Using the single strategy
If you are using the single strategy, install the two plugins with the following command:
$ helm install \
   --version=0.7.0 \
   --generate-name \
   --set migStrategy=single \
   nvdp/k8s-device-plugin
$ helm install \
   --version=0.2.0 \
   --generate-name \
   --set migStrategy=single \
   nvgfd/gpu-feature-discovery
The plugins can find physical GPUs or MIG devices and correctly add them as the nvidia.com/gpu resource type. Depending on the type of MIG devices that you are using, you can see a different number of GPUs in the node description. Any MIG device is listed as separated nvidia.com/gpu. In the following example, we created 2x 3g.20gb MIG devices on each of the GPU of a DGX A100, resulting in a total of 16 nvidia.com/gpu resources (16 MIG devices):
$ kubectl get node dgx-a100-node
…
Capacity:
  cpu:                     256
  ephemeral-storage:       1844244028Ki
  hugepages-1Gi:           0
  hugepages-2Mi:           0
  memory:                  2113616652Ki
  nvidia.com/gpu:          16
  pods:                    110
…
You can see the extended node label list, indicating the information exposed by nvidia-feature-discovery:
$ kubectl get node -o json dgx-a100-node | grep "nvidia.com" -A 15
…
           "nvidia.com/gpu.family": "ampere",
            "nvidia.com/gpu.machine": "DGXA100-920-23687-2530-000",
            "nvidia.com/gpu.memory": "20096",
            "nvidia.com/gpu.multiprocessors": "42",
            "nvidia.com/gpu.product": "A100-SXM4-40GB-MIG-3g.20gb",
            "nvidia.com/gpu.slices.ci": "3",
            "nvidia.com/gpu.slices.gi": "3",
            "nvidia.com/mig.strategy": "single"
…
For the single strategy, the example introduced above can run without any change. However, if you need a specific type of MIG device, you must use nodeSelector to select a value for gpu.product. Name the new job under the single strategy with nodeSelector as tf-benchmarks-single. Check the execution output with the following command:
$ kubectl logs tf-benchmarks-single
...
StreamExecutor device (0): A100-SXM4-40GB, Compute Capability 8.0
2020-09-28 10:51:01.154892: I tensorflow/core/common_runtime/gpu/gpu_device.cc:1561] Found device 0 with properties: A100-SXM4-40GB MIG 3g.20gb computeCapability: 8.0
coreClock: 1.41GHz coreCount: 42 deviceMemorySize: 19.62GiB deviceMemoryBandwidth: 1.41TiB/s
...
Note the new label for the GPU device and the smaller SM and memory count, which indicates the correct execution on a 3g.20gb MIG device.
Using the mixed strategy
If you are using the mixed strategy, install the two plugins with the following command:
$ helm install \
   --version=0.7.0 \
   --generate-name \
   --set migStrategy=mixed \
   nvdp/k8s-device-plugin
$ helm install \
   --version=0.2.0 \
   --generate-name \
   --set migStrategy=mixed \
   nvgfd/gpu-feature-discovery
The plugins can find the GPU and correctly add the nvidia.com/gpu resource type for any GPUs in non-MIG mode, as well as any GPUs in MIG mode according to the naming scheme nvidia.com/mig-<#sm-slices>g.<#mem-size>gb.
$ kubectl get node dgx-a100-node
…
Capacity:
  cpu:                     256
  ephemeral-storage:       1844244028Ki
  hugepages-1Gi:           0
  hugepages-2Mi:           0
  memory:                  2113616652Ki
  nvidia.com/gpu:          5
  nvidia.com/mig-1g.5gb:   2
  nvidia.com/mig-2g.10gb:  4
  nvidia.com/mig-3g.20gb:  2
  pods:                    110
…
Also, you can see the extended node label list, indicating the information exposed by nvidia-feature-discovery:
$ kubectl get node -o json dgx-a100-node | grep "nvidia.com"
…
                    "nvidia.com/gpu.family": "ampere",
                    "nvidia.com/gpu.machine": "DGXA100-920-23687-2530-000",
                    "nvidia.com/gpu.memory": "40537",
                    "nvidia.com/gpu.product": "A100-SXM4-40GB",
                    "nvidia.com/mig-1g.5gb.count": "2",
                    "nvidia.com/mig-1g.5gb.engines.copy": "1",
                    "nvidia.com/mig-1g.5gb.engines.decoder": "0",
                    "nvidia.com/mig-1g.5gb.engines.encoder": "0",
                    "nvidia.com/mig-1g.5gb.engines.jpeg": "0",
                    "nvidia.com/mig-1g.5gb.engines.ofa": "0",
                    "nvidia.com/mig-1g.5gb.memory": "4864",
...
                    "nvidia.com/mig-3g.20gb.count": "2",
                    "nvidia.com/mig-3g.20gb.engines.copy": "3",
                    "nvidia.com/mig-3g.20gb.engines.decoder": "2",
                    "nvidia.com/mig-3g.20gb.engines.encoder": "0",
                    "nvidia.com/mig-3g.20gb.engines.jpeg": "0",
                    "nvidia.com/mig-3g.20gb.engines.ofa": "0",
                    "nvidia.com/mig-3g.20gb.memory": "20096",
                    "nvidia.com/mig-3g.20gb.multiprocessors": "42",
                    "nvidia.com/mig-3g.20gb.slices.ci": "3",
                    "nvidia.com/mig-3g.20gb.slices.gi": "3",
                    "nvidia.com/mig.strategy": "mixed"
…
To run the TensorFlow benchmarks example with the mixed strategy on a MIG device with three GPU slices and 20 GB memory, adapt your script as follows and select the correct MIG device type instead of a full GPU.
# tf-benchmarks-mixed.yaml
apiVersion: v1
kind: Pod
metadata:
  name: tf-benchmarks-mixed
spec:
  restartPolicy: Never
  containers:
    - name: tf-benchmarks-mixed
      image: "nvcr.io/nvidia/tensorflow:20.08-tf2-py3"
      command: ["/bin/sh", "-c"]
      args: ["cd /workspace && git clone https://github.com/tensorflow/benchmarks/ && cd /workspace/benchmarks/scripts/tf_cnn_benchmarks && python tf_cnn_benchmarks.py --num_gpus=1 --batch_size=64 --model=resnet50 --use_fp16"]
      resources:
        limits:
          nvidia.com/mig-3g.20gb: 1
  nodeSelector:  #optional
    nvidia.com/gpu.product: A100-SXM4-40GB
The output of kubectl logs tf-benchmarks reads as follows, showing that the job is executed on an MIG device with 3g.20gb configuration:
$ kubectl logs tf-benchmarks-mixed
...
2020-09-28 10:45:01.217174: I tensorflow/compiler/xla/service/service.cc:176]   StreamExecutor device (0): A100-SXM4-40GB MIG 3g.20gb, Compute Capability 8.0
2020-09-28 10:45:01.219308: I tensorflow/core/common_runtime/gpu/gpu_device.cc:1561] Found device 0 with properties:
pciBusID: 0000:b7:00.0 name: A100-SXM4-40GB MIG 3g.20gb computeCapability: 8.0
coreClock: 1.41GHz coreCount: 42 deviceMemorySize: 19.62GiB deviceMemoryBandwidth: 1.41TiB/s
...
Switching between different strategies
To switch between different strategies, do the following:
- Remove the previously installed plugins
k8s-device-pluginandgpu-feature-discovery. Already deployed plugins can be found withhelm list, and they can be deleted withhelm uninstall <name-of-the-deployment>. - Reconfigure the MIG configuration with
nvidia-smiand perform a GPU reset or reboot. - Install the
k8s-device-pluginandgpu-feature-discoveryplugins again with the new strategy to use.
Alternatively, you can also use helm upgrade. Change <desired_strategy> to "single", "mixed", or "none".
helm upgrade --install \--version=0.7.0 \--set migStrategy=<desired_strategy> \nvdp/nvidia-device-pluginhelm upgrade --install \--version=0.2.0 \--set migStrategy=<desired_strategy>\--set sleepInterval=600 \nvgfd/gpu-feature-discovery
Summary
This post showed the steps to enable MIG support in a Kubernetes environment. MIG brings the advantages of improving the GPU utilization, as well as serving multiple users to share a single GPU. If your A100 GPU is underutilized and you want to set up your A100 with MIG using Kubernetes, you could choose either mixed or single strategy to enhance the overall GPU utilization of your cluster.
For more information about using MIG to run multiple deep learning workloads in parallel on a single A100 GPU, see Getting the Most Out of the NVIDIA A100 GPU with MIG. For more information about deep learning examples from a wide range of domains, see the NVIDIA/DeepLearningExamples GitHub repo.
