In recent years, there has been a surge in building and adopting machine learning (ML) tools. The use of GPUs to accelerate increasingly compute-intensive models has been a prominent trend.
To increase user access, the Accelerated WEKA project provides an accessible entry point for using GPUs in well-known WEKA algorithms by integrating open-source RAPIDS libraries.
In this post, you will be introduced to Accelerated WEKA and learn how to leverage GPU-accelerated algorithms with a graphical user interface (GUI) using WEKA software. This Java open-source alternative is suitable for beginners looking for a variety of ML algorithms from different environments or packages.
What is Accelerated WEKA?
Accelerated WEKA unifies the WEKA software, a well-known and open-source Java software, with new technologies that leverage the GPU to shorten the execution time of ML algorithms. It has two benefits aimed at users without expertise in system configuration and coding: an easy installation and a GUI that guides the configuration and execution of the ML tasks.
Accelerated WEKA is a collection of packages available for WEKA, and it can be extended to support new tools and algorithms.
What is RAPIDS?
RAPIDS is a collection of open-source Python libraries for users to develop and deploy data science workloads on NVIDIA GPUs. Popular libraries include cuDF for GPU-accelerated DataFrame processing and cuML for GPU-accelerated machine learning algorithms. RAPIDS APIs conform as much as possible to the CPU counterparts, such as pandas and scikit-learn.
Accelerated WEKA architecture
The building blocks of Accelerated WEKA are packages like WekaDeeplearning4j and wekaRAPIDS (inspired by wekaPython). WekaDeeplearning4j (WDL4J) already supports GPU processing but has very specific needs in terms of libraries and environment configuration. WDL4J provides WEKA wrappers for the Deeplearning4j library.
For Python users wekaPython initially provided Python integration by creating a server and communicating with it through sockets. With this the user can execute scikit-learn ML algorithms (or even XGBoost) inside the WEKA workbench. Furthermore, wekaRAPIDS provides integration with RAPIDS cuML library by using the same technique in wekaPython.
Together, both packages provide enhanced functionality and performance inside the user-friendly WEKA workbench. Accelerated WEKA goes a step further in the direction of performance by improving the communication between the JVM and Python interpreter. It does so by using alternatives like Apache Arrow and GPU memory sharing for efficient data transfer between the two languages.
Accelerated WEKA also provides integration with the RAPIDS cuML library, which implements machine learning algorithms that are accelerated on NVIDIA GPUs. Some cuML algorithms can even support multi-GPU solutions.
Supported algorithms
The algorithms currently supported by Accelerated WEKA are:
- LinearRegression
- LogisticRegression
- Ridge
- Lasso
- ElasticNet
- MBSGDClassifier
- MBSGDRegressor
- MultinomialNB
- BernoulliNB
- GaussianNB
- RandomForestClassifier
- RandomForestRegressor
- SVC
- SVR
- LinearSVC
- KNeighborsRegressor
- KNeighborsClassifier
The algorithms supported by Accelerated WEKA in multi-GPU mode are:
- KNeighborsRegressor
- KNeighborsClassifier
- LinearRegression
- Ridge
- Lasso
- ElasticNet
- MultinomialNB
- CD
Using Accelerated WEKA GUI
During the Accelerated WEKA design stage, one main goal was for it to be easy to use. The following steps outline how to set it up on a system along with a brief example.
Please refer to the documentation for more information, and a comprehensive getting started. The only prerequisite for Accelerated WEKA is having Conda installed in your system.
- The installation of Accelerated WEKA is available through Conda, a system providing package and environment management. Such capability means that a simple command can install all dependencies for the project. For example, on a Linux machine, issue the following command in a terminal for installing Accelerated WEKA and all dependencies.
conda create -n accelweka -c rapidsai -c nvidia -c conda-forge -c waikato weka
- After Conda has created the environment, activate it with the following command:
conda activate accelweka
- This terminal instance just loaded all dependencies for Accelerated WEKA. Launch WEKA GUI Chooser with the command:
weka
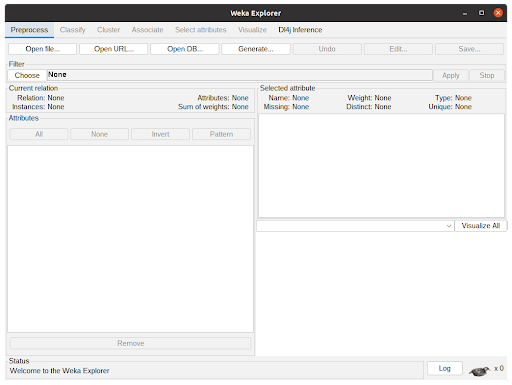
- Figure 1 shows the WEKA GUI Chooser window. From there, click the Explorer button to access the functionalities of Accelerated WEKA.

- In the WEKA Explorer window (Figure 2), click the Open file button to select a dataset file. WEKA works with ARFF files but can read from CSVs. Converting from CSVs can be pretty straightforward or require some configuration by the user, depending on the types of the attributes.
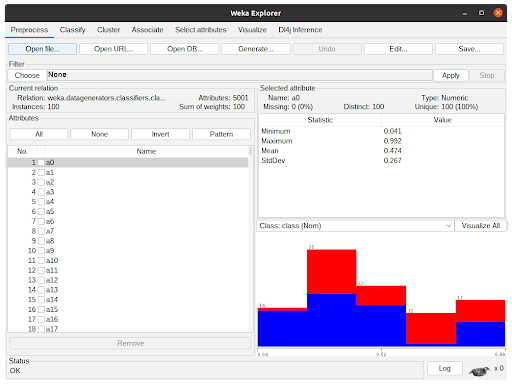
- The WEKA Explorer window with a dataset loaded is shown in Figure 3. Assuming one does not want to preprocess the data, clicking the Classify tab will present the classification options to the user.
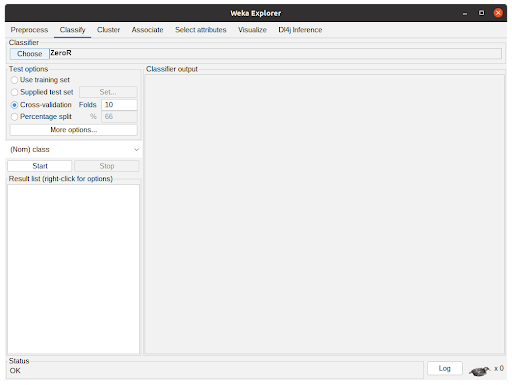
The Classify tab is presented in Figure 4. Clicking “Choose” button will show the implemented classifiers. Some might be disabled because of the dataset characteristics. To use Accelerated WEKA, the user must select rapids.CuMLClassifier. After that, clicking the bold CuMLClassifier will take the user to the option windows for the classifier.
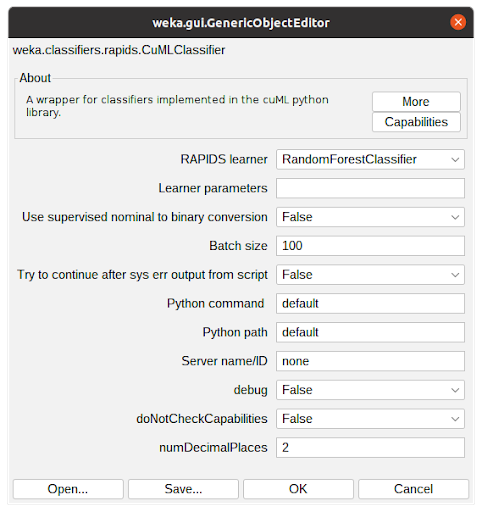
- Figure 5 shows the Option window for CuMLClassifier. With the field RAPIDS learner, the user can choose the desired classifier among the ones supported by the package. The field Learner parameters are for the modification of the cuML parameters, details of which can be found in the cuML documentation.
The other options are for the user to fine-tune the attribute conversion, configure which python environment is to be used, and determine the number of decimal places the algorithm should operate. For the sake of this tutorial, select Random Forest Classifier and keep everything with the default configuration. Clicking OK will close the window and return to the previous tab.
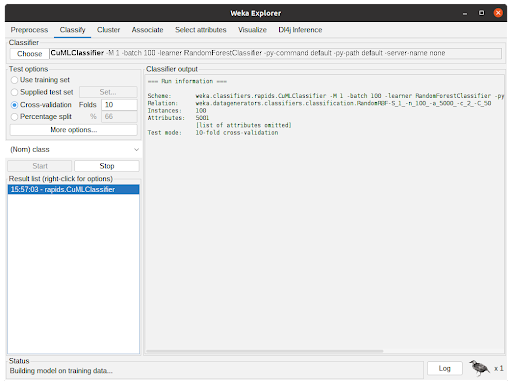
- After configuring the Classifier according to the previous step, the parameters will be shown in the text field beside the Choose button. After clicking Start, WEKA will start executing the chosen classifier with the dataset.
Figure 6 shows the classifier in action. The Classifier output is showing debug and general information regarding the experiment, such as parameters, classifiers, dataset, and test options. The status shows the current state of the execution and the Weka bird on the bottom animates and flips from one side to the other while the experiment is running.
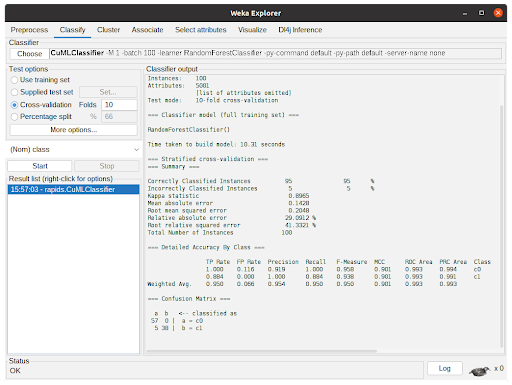
- After the algorithm finishes the task, it will output the summary of the execution with information regarding predictive performance and the time taken. In Figure 7, the output shows the results for 10-fold cross-validation using the RandomForestClassifier from cuML through CuMLClassifier.
Benchmarking Accelerated WEKA
We evaluated the performance of Accelerated WEKA, comparing the execution time of the algorithms on the CPU with the execution time using the Accelerated WEKA. The hardware used in the experiments was an i7-6700K, a GTX 1080Ti, and a DGX Station with four A100 GPUs. Unless stated otherwise, the benchmarks use a single GPU.
We used datasets with different characteristics for the benchmarks. Some of them were synthetic for better control of the attributes and instances, like the RDG and RBF generators. The RDG generator builds instances based on decision lists. The default configuration has 10 attributes, 2 classes, a minimum rule size of 1, and a maximum rule size of 10. We changed the minimum and maximum limits to 5 and 20, respectively. With this generator, we created datasets with 1, 2, 5, and 10 million instances, as well as 5 million instances with 20 attributes.
The RBFgenerator creates a random set of centers for each class and then generates instances by getting random offsets from the centers for the attribute values. The number of attributes is indicated with the suffix a__ (for example, a5k means 5 thousand attributes), and the number of instances is indicated by the suffix n__ (for example, n10k means 10 thousand instances).
Lastly, we used the HIGGS dataset, which contains data about the kinematic properties of the atom accelerator. The first 5 million instances of the HIGGS dataset were used to create HIGGS_5m.
The results for the wekaRAPIDS integration are shown, where we make a direct comparison between the baseline CPU execution with the Accelerated WEKA execution. The results for the WDL4J are shown in Table 5.
| XGBoost (CV) | i7-6700K | GTX 1080Ti | Speedup |
| dataset | Baseline (seconds) | AWEKA SGM (seconds) | |
| RDG1_1m | 266.59 | 65.77 | 4.05 |
| RDG1_2m | 554.34 | 122.75 | 4.52 |
| RDG1_5m | 1423.34 | 294.40 | 4.83 |
| RDG1_10m | 2795.28 | 596.74 | 4.68 |
| RDG1_5m_20a | 2664.39 | 403.39 | 6.60 |
| RBFa5k | 17.16 | 15.75 | 1.09 |
| RBFa5kn1k | 110.14 | 25.43 | 4.33 |
| RBFa5kn5k | 397.83 | 49.38 | 8.06 |
| XGBoost (no-CV) | i7-6700K | GTX 1080Ti | Speedup | A100 | Speedup |
| dataset | Baseline (seconds) | AWEKA CSV (seconds) | AWEKA CSV (seconds) | ||
| RDG1_1m | 46.40 | 21.19 | 2.19 | 22.69 | 2.04 |
| RDG1_2m | 92.87 | 34.76 | 2.67 | 35.42 | 2.62 |
| RDG1_5m | 229.38 | 73.49 | 3.12 | 65.16 | 3.52 |
| RDG1_10m | 461.83 | 143.08 | 3.23 | 106.00 | 4.36 |
| RDG1_5m_20a | 268.98 | 73.31 | 3.67 | – | |
| RBFa5k | 5.76 | 7.73 | 0.75 | 8.68 | 0.66 |
| RBFa5kn1k | 23.59 | 13.38 | 1.76 | 19.84 | 1.19 |
| RBFa5kn5k | 78.68 | 34.61 | 2.27 | 29.84 | 2.64 |
| HIGGS_5m | 214.77 | 169.48 | 1.27 | 76.82 | 2.80 |
| RandomForest (CV) | i7-6700K | GTX 1080Ti | Speedup |
| dataset | Baseline (seconds) | AWEKA SGM (seconds) | |
| RDG1_1m | 494.27 | 97.55 | 5.07 |
| RDG1_2m | 1139.86 | 200.93 | 5.67 |
| RDG1_5m | 3216.40 | 511.08 | 6.29 |
| RDG1_10m | 6990.00 | 1049.13 | 6.66 |
| RDG1_5m_20a | 5375.00 | 825.89 | 6.51 |
| RBFa5k | 13.09 | 29.61 | 0.44 |
| RBFa5kn1k | 42.33 | 49.57 | 0.85 |
| RBFa5kn5k | 189.46 | 137.16 | 1.38 |
| KNN (no-CV) | AMD EPYC 7742 (4 cores) | NVIDIA A100 | Speedup | 4X NVIDIA A100 | Speedup |
| dataset | Baseline (seconds) | wekaRAPIDS (seconds) | wekaRAPIDS (seconds) | ||
| covertype | 3755.80 | 67.05 | 56.01 | 42.42 | 88.54 |
| RBFa5kn5k | 6.58 | 59.94 | 0.11 | 56.21 | 0.12 |
| RBFa5kn10k | 11.54 | 62.98 | 0.18 | 59.82 | 0.19 |
| RBFa500n10k | 2.40 | 44.43 | 0.05 | 39.80 | 0.06 |
| RBFa500n100k | 182.97 | 65.36 | 2.80 | 45.97 | 3.98 |
| RBFa50n10k | 2.31 | 42.24 | 0.05 | 37.33 | 0.06 |
| RBFa50n100k | 177.34 | 43.37 | 4.09 | 37.94 | 4.67 |
| RBFa50n1m | 21021.74 | 77.33 | 271.84 | 46.00 | 456.99 |
| 3,230,621 params Neural Network | i7-6700K | GTX 1080Ti | Speedup |
| Epochs | Baseline (seconds) | WDL4J (seconds) | |
| 50 | 1235.50 | 72.56 | 17.03 |
| 100 | 2775.15 | 139.86 | 19.84 |
| 250 | 7224.00 | 343.14 | 21.64 |
| 500 | 15375.00 | 673.48 | 22.83 |
This benchmarking shows that Accelerated WEKA provides the most benefit to compute-intensive tasks with larger datasets. Small datasets like the RBFa5k and RBFa5kn1k (possessing 100 and 1,000 instances, respectively) present bad speedup, which happens because the dataset is too small to make the overhead of moving things to GPU memory worthwhile.
Such behavior is noticeable in the A100 (Table 4) experiments, where the architecture is more complex. The benefits of using it start to kick in at the 100,000 instances or bigger datasets. For instance, The RBF datasets with 100,000 instances show ~3 and 4x speedup, which is still lackluster but shows improvement. Bigger datasets like the covertype dataset (~700,000 instances) or the RBFa50n1m dataset (1 million instances) show speedups of 56X and 271X, respectively. Note that for Deep Learning tasks, the Speedup can reach over 20X even with the GTX 1080Ti.
Key takeaways
Accelerated WEKA will help you supercharge WEKA using RAPIDS. Accelerated WEKA helps with efficient algorithm implementations of RAPIDS and has an easy-to-use GUI. The installation process is simplified using the Conda environment, making it straightforward to use Accelerated WEKA from the beginning.
If you use Accelerated WEKA, please use the hashtag #AcceleratedWEKA on social media. Also, please refer to the documentation for the correct publication to cite Accelerated WEKA in academic work and find out more details about the project.
Contributing to Accelerated WEKA
WEKA is freely available under the GPL open-source license and so is Accelerated WEKA. In fact, Accelerated WEKA is provided through Conda to automate the installation of the required tools for the environment, and the additions to the source code are published to the main packages for WEKA. Contributions and bug fixes can be contributed as patch files and posted to the WEKA mailing list.
Acknowledgments
We would like to thank Ettikan Karuppiah, Nick Becker, Dr. Johan Barthelemy, and Brian Klobucher from NVIDIA for the technical support they provided during the execution of this project. Their insights were essential in helping us reach the goal of efficient integration with the RAPIDS library. In addition, we would like to thank Johan Barthelemy for running benchmarks in extra graphic cards.


