
Acceleration structures spatially organize geometry to accelerate ray tracing traversal performance. When you create an acceleration structure, a conservative memory size is allocated.
- Upon initial build, the graphics runtime doesn’t know how optimally a geometry fits into the oversized acceleration structure memory allocation.
- After the build is executed on the GPU, the graphics runtime reports back the smallest memory allocation that the acceleration structure can fit into.
This process is called compacting the acceleration structure and it is important for reducing the memory overhead of acceleration structures.
Another key ingredient to reducing memory is suballocating acceleration structures. Suballocation enables acceleration structures to be tightly packed together in memory by using a smaller memory alignment than is required by the graphics API.
Typically, buffer allocation alignment is at a minimum of 64 KB while the acceleration structure memory alignment requirement is only 256 B. Games using many small acceleration structures greatly benefit from suballocation, enabling the tight packaging of many small allocations.
The NVIDIA RTX Memory Utility (RTXMU) SDK is designed to reduce the coding complexity associated with optimal memory management of acceleration structures. RTXMU provides compaction and suballocation solutions for both DXR and Vulkan Ray Tracing while the client manages synchronization and execution of acceleration structure building. The SDK provides sample implementations of suballocators and compaction managers for both APIs while providing flexibility for the client to implement their own version.
For more information about why compaction and suballocation are so important in reducing acceleration structure memory overhead, see Tips: Acceleration Structure Compaction.
Why Use RTXMU?
RTXMU allows you to quickly integrate acceleration structure memory reduction techniques into their game engine. Below is a summary of these techniques along with some key benefits in using RTXMU
- Reduces the memory footprint of acceleration structures involves both compaction and suballocation code, which are not trivial to implement. RTXMU can do the heavy lifting.
- Abstracts away memory management of bottom level acceleration structures (BLASes) but is also flexible enough to enable users to provide their own implementation based on their engine’s needs.
- Manages all barriers required for compaction size readback and compaction copies.
- Passes back handles to the client that refer to complex BLAS data structures. This prevents any mismanagement of CPU memory, which could include accessing a BLAS that has already been deallocated or doesn’t exist.
- Can help reduce BLAS memory by up to 50%.
- Gives the benefit of less translation lookaside buffer (TLB) misses by packing more BLASes into 64 KB or 4 MB pages.
RTXMU Design
RTXMU has a design philosophy that should reduce integration complexities for most developers. The key principles of that design philosophy are as follows:
- All functions are thread-safe. If simultaneous access occurs, they are blocking.
- The client passes in client-owned command lists and RTXMU populates them.
- The client is responsible for synchronizing command list execution.
API Function Calls
RTXMU abstracts away the coding complexities associated with compaction and suballocation. The functions detailed in this section describe the interface entry points for RTXMU.
Initialize—Specifies the suballocator block size.PopulateBuildCommandList—Receives an array ofD3D12_BUILD_RAYTRACING_ACCELERATION_STRUCTURE_INPUTSand returns a vector of acceleration structure handles for the client to fetch acceleration structure GPUVAs later during top-level acceleration structure (TLAS) construction, and so on.- PopulateUAVBarriersCommandList – Receives acceleration structure inputs and places UAV barriers for them
- PopulateCompactionSizeCopiesCommandList – Performs copies to bring over any compaction size data
PopulateUpdateCommandList—Receives an array ofD3D12_BUILD_RAYTRACING_ACCELERATION_STRUCTURE_INPUTSand valid acceleration structure handles so that updates can be recorded.PopulateCompactionCommandList—Receives an array of valid acceleration structure handles and records compaction commands and barriers.RemoveAccelerationStructures—Receives an array of acceleration structure handles that specify which acceleration structure can be completely deallocated.GarbageCollection—Receives an array of acceleration structure handles that specify that build resources (scratch and result buffer memory) can be deallocated.GetAccelStructGPUVA—Receives an acceleration structure handle and returns a GPUVA of the result or compacted buffer based on state.Reset—Deallocates all memory associated with current acceleration structure handles.
Suballocator DXR design
The BLAS suballocator works around the 64 KB and 4 MB buffer alignment requirement by placing small BLAS allocations within a larger memory heap. The BLAS suballocator still must fulfill the 256 B alignment required for BLAS allocations.
- If the application requests 4 MB or larger suballocation blocks, then RTXMU uses placed resources with heaps that can provide 4 MB alignment.
- If the application requests fewer than 4 MB suballocation blocks, then RTXMU uses committed resources, which only provide 64 KB alignment.
The BLAS suballocator reuses freed suballocations within blocks by maintaining a free list. If a memory request is greater than the suballocator block size, then a single allocation is created that can’t be suballocated.
Compaction DXR design
If the build requests compaction, then RTXMU requests that the compaction size be written out to a chunk of video memory. After the compaction size has been copied from video memory to system memory, then RTXMU allocates a suballocated compaction buffer to be used as the destination for the compaction copy.
The compaction copy takes the original build containing unused memory segments and truncates it down to the smallest memory footprint it can fit in. The original noncompacted build and scratch memory gets released back to the suballocator after compaction is complete. The only thing you have worry about is passing in the allow compaction flag and calling GetGPUVA with a BLAS handle. The GPUVA could either be the original build or the compacted build, based on what state the BLAS is in.
How to Use RTXMU
In this section, I detail the RTXMU sequence loop and synchronization.
RTXMU sequence loop
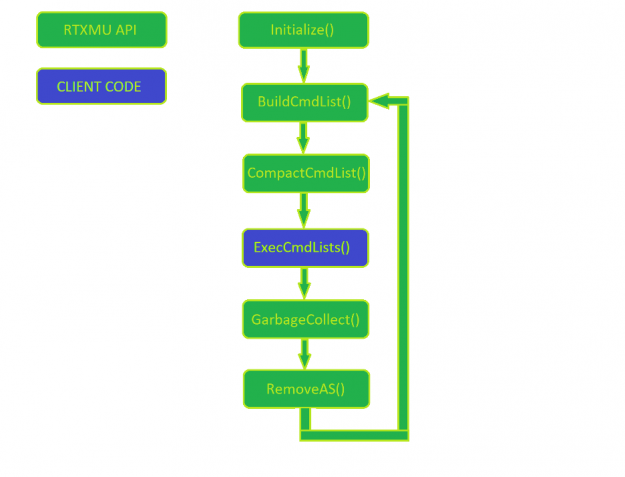
Figure 1 shows a normal usage pattern of RTXMU. The client manages the command list execution, while everything else is a call into RTXMU
First, initialize RTXMU by passing in the suballocator block size and the device responsible for allocating suballocation blocks. In each frame, the engine builds new acceleration structures while also compacting acceleration structures built in previous frames.
After RTXMU populates the client’s command lists, the client is free to execute and manage the synchronization of the initial build to the final compaction copy build. It’s important to make sure that each acceleration structure build has been fully executed before calling PopulateCompactionCommandList. This is left to the client to manage properly.
When an acceleration structure has finally reached the compaction state, then the client can choose to call GarbageCollection, which notifies RTXMU that the scratch and original acceleration structure buffer can be deallocated. If the engine does heavy streaming of assets, then the client can deallocate all acceleration structure resources by calling RemoveAS with a valid acceleration structure handle.
Client Acceleration Structure Build Synchronization
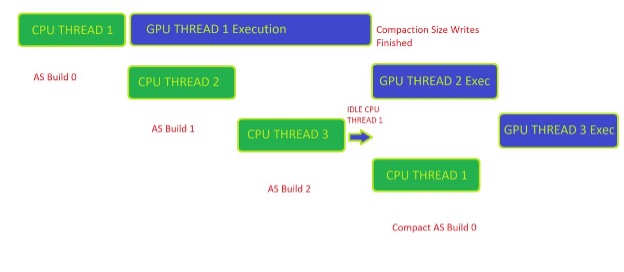
Figure 2 shows the synchronization required by the client to manage compaction-ready workloads properly. The example here is a triple frame buffered loop in which the client can have up to three asynchronous frames being built on the CPU and executed on the GPU.
To get the compaction size available on the CPU side, Build 0 must have finished executing on the GPU. After the client has received a fence signal back from the GPU, the client can then call RTXMU to start the compaction command list recording.
A helpful way to manage the synchronization of compaction for acceleration structures is to employ a key/value pair data structure of some kind that tracks the state of each acceleration structure handle given by RTXMU. The four basic states of an acceleration structure can be described as follows:
- Prebuilt—The build command is recorded on a command list but hasn’t finished executing on the GPU.
- Built— The initial build has been executed on the GPU and is ready for compaction commands.
- Compacted—The compaction copy has been finished on the GPU and is ready for
GarbageCollectionto release the scratch and initial build buffers. - Released—The client releases the acceleration structure from memory because it is no longer in the scene. At that point, all memory associated with an acceleration structure handle is freed back to the OS.
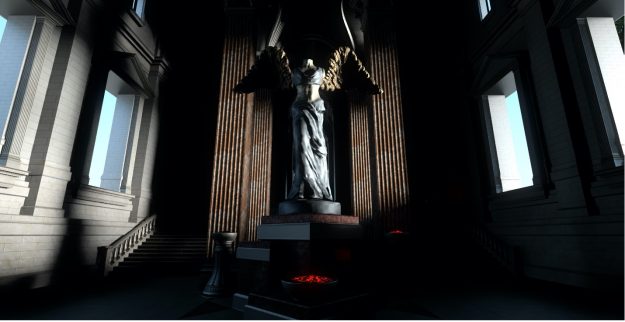
RTXMU Test Scenes
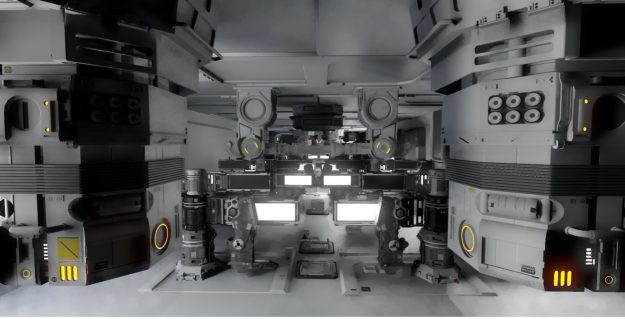
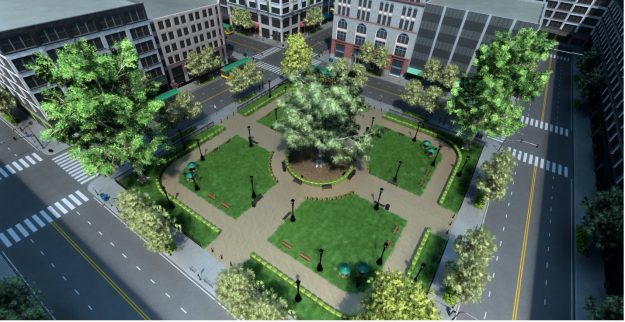
RTXMU was tested with six text scenes to provide real use case data about the benefits of compaction and suballocation. The following figures show just some of the scenes.
10,740 BLAS, uncompacted acceleration structure memory size 458.9 MB, compacted acceleration structure memory size 208.3 MB, 55% memory reduction, suballocating memory saved 71.3 MB
281 BLAS, uncompacted acceleration structure memory size 189.7 MB, compacted acceleration structure memory size 106.1 MB, 44% memory reduction, suballocating memory saved 8.3 MB
1,056 BLAS, uncompacted acceleration structure memory size 45.8 MB, compacted acceleration structure memory size 20.7 MB, 55% memory reduction, suballocating memory saved 56.8 MB
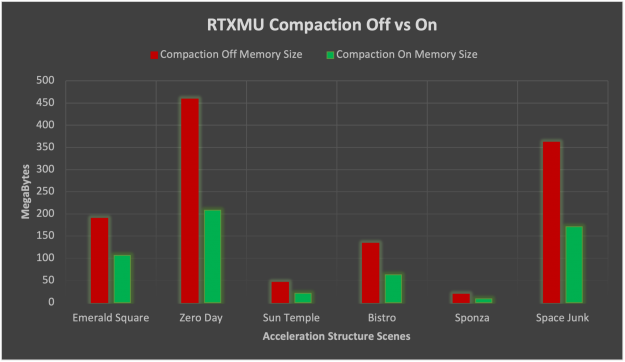
RTXMU integration results
On average, compaction on NVIDIA RTX cards reduced acceleration structure by 52% for the test scenes. The standard deviation of compaction memory reduction was 2.8%, which is quite stable.
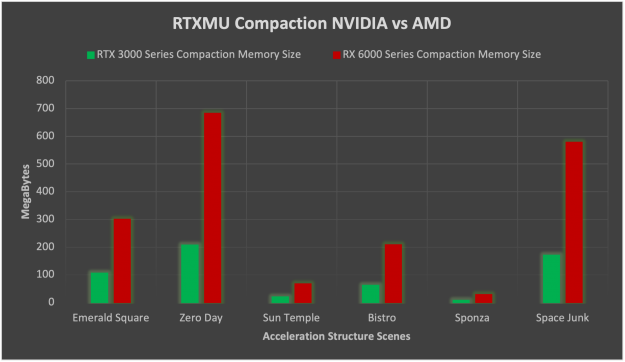
When enabling compaction on NVIDIA and AMD HW, the memory savings on NVIDIA HW is much improved compared to AMD. NVIDIA ends up being on average 3.26x smaller than AMD for acceleration structure memory when enabling compaction. The reason for such a huge reduction in memory footprint on NVIDIA is that AMD without compaction uses double the memory as is when compared to NVIDIA. Compaction then also reduces the NVIDIA memory by another 50% on average while AMD tends to reduce memory only by 75%.
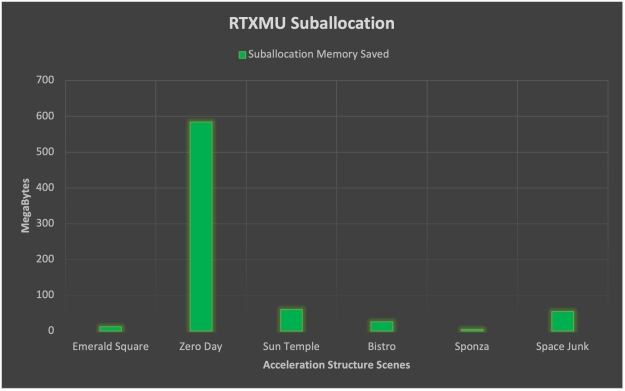
Suballocation tells a slightly different story here in which scenes with many small acceleration structures like Zero Day benefit greatly. The average memory savings from suballocation ends up being 123 MB but the standard deviation is rather large at 153 MB. From this data, we can assert that suballocation is highly dependent on the scene geometry and benefits from thousands of small triangle count BLAS geometry.
Source Code
NVIDIA is open-sourcing the RTXMU SDK along with a sample application integrating RTXMU. Maintaining RTXMU as an open-source project on GitHub helps developers understand the logic flow and provides access to modifying the underlying implementation. The RT Bindless sample application provides an example of an RTXMU integration for both Vulkan Ray Tracing and DXR backends.
Here’s how to build and run the sample application integrating RTXMU. You must have the following resources:
- Windows, Linux, or an OS that supports DXR or Vulkan Ray Tracing
- CMake 3.12
- C++ 17
- Git
First, clone the repository using the following command:
git clone --recursive https://github.com/NVIDIAGameWorks/donut_examples.git
Next, open CMake. For Where is the source code, enter the /donut_examples folder. Create a build folder in the /donut_examples folder. For Where to build the binaries, enter the new build folder. Select the cmake variable NVRHI_WITH_RTXMU to ON, choose Configure, wait for it to complete and then click Generate.
If you are building with Visual Studio, then select 2019 and x64 version. Open the donut_examples.sln file in Visual Studio and build the entire project.
Find the rt_bindless application folder under /Examples/Bindless Ray Tracing, choose the project context (right-click) menu, and choose Startup Project.
By default, bindless ray tracing runs on DXR. To run the Vulkan version, add -vk as a command-line argument in the project.
Summary
RTXMU combines both compaction and suballocation techniques to optimize and reduce memory consumption of acceleration structures for any DXR or Vulkan Ray Tracing application. The data shows that using RTXMU significantly reduces acceleration structure memory. This enables you to either add more geometry to your ray-traced scenes or use the extra memory for other resources.
Get started using the RTXMU SDK today:
