
TensorRT is an SDK for high performance, deep learning inference. It includes a deep learning inference optimizer and a runtime that delivers low latency and high throughput for deep learning applications. TensorRT uses the ONNX format as an intermediate representation for converting models from major frameworks such as TensorFlow and PyTorch.
In this post, you learn how to convert PyTorch-based networks into ONNX, modify ONNX graphs using ONNX-GraphSurgeon (ONNX-GS), and implement plugins in TensorRT.
For this, we demonstrate the TensorRT inference of PackNet (published at CVPR 2020), a novel, state-of-the-art, self-supervised, monocular depth estimation network developed by the Toyota Research Institute (TRI) for automated driving applications. It uses novel packing and unpacking blocks designed to preserve spatial information during the encoding-decoding process, leading to more detailed depth maps with better performance at longer ranges. This is achieved by applying 3D convolutions on a packed feature space, where spatial information is stored as extra channel dimensions.
This demonstration is released as onnx_packnet, a part of the TensorRT samples. Figure 1 shows the TensorRT support for different frameworks and backends.
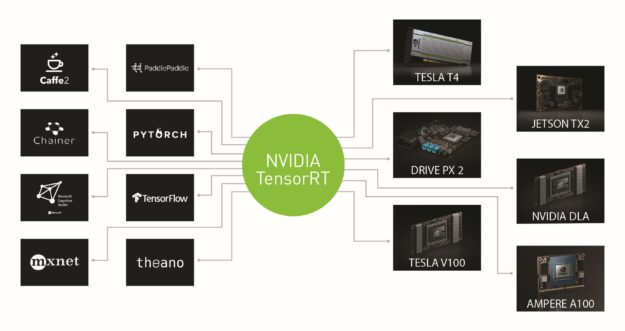
ONNX is an open format for representing machine-learning models. ONNX is a common file format used by AI developers who use a variety of different frameworks, tools, runtimes, and compilers. TensorRT provides tools to parse ONNX graphs. For more information about the layers supported by the TensorRT ONNX Parser, see Supported Ops. Figure 2 shows the ONNX-TensorRT workflow.

TensorRT provides a plugin interface for implementing custom layers specific to the network. In this post, you also implement a plugin for the group normalization (GN) layer and register it with TensorRT. The GN layer is used as a normalization layer in the PackNet network.
ONNX-PackNet workflow
The workflow for optimizing the PackNet network with TensorRT involves the following steps:
- Convert the PyTorch model to the ONNX format
- Transform the ONNX graph using ONNX-GS
- Implement plugins in TensorRT
- Perform inference
Convert the PyTorch model to the ONNX format
The first step is to convert the PyTorch model to an ONNX graph. PyTorch provides a torch.onnx.export utility, which can be used for this conversion. The following code example shows one such example:
import torch
import onnx
from packnet_sfm.networks.depth.PackNet01 import PackNet01

def build_packnet(model_file, args):

   """
    Construct the PackNet network and export it to ONNX
    ""”

   # Get the names of the input and output nodes.
   input_pyt = torch.randn((1, 3, 192, 640), requires_grad=False)

   # Build the model
   model_pyt = PackNet01(version='1A')

   # Convert the model into ONNX
   torch.onnx.export(model_pyt, input_pyt, model_file, verbose=args.verbose, opset_version=args.opset)
For more information about the training and the PackNet pretrained model, see the PackNet repository.
Transform the ONNX graph using ONNX-GS
As a part of TensorRT OSS, NVIDIA open-sourced the ONNX-GS API, which provides helpful utilities for modifying ONNX graphs. Use the ONNX-GS API to remove, add, modify layers and perform constant folding in the graph. In this example, you use ONNX-GS to collapse a GN subgraph into a single custom layer and transform the upsample and pad layers.
GN is an alternative to batch normalization (BN), which divides the channels into groups and computes mean and variance within each group for normalization. GN can outperform its BN counterparts for object detection and segmentation, which are generally trained with a small batch size. The GN layer in PyTorch 1.4 is expressed as multiple layers in ONNX (opset 11). Figure 3 shows the structure of the GN subgraph.

This subgraph consists of the Reshape, Shape, Unsqueeze, Mul, Add, and Instance Normalization layers. As an optimization, you can collapse this subgraph into a single layer to perform GN in a single CUDA kernel. This reduces memory transfers as there are fewer layers. The following code example collapses the subgraph and creates a custom GroupNormalizationPlugin layer in ONNX:
import onnx_graphsurgeon as gs


def process_groupnorm_nodes(graph):
   """
   Gather the instance normalization nodes and the rest of the subgraph
   and convert into a single GN node
   """
   instancenorms = [node for node in graph.nodes if node.op == "InstanceNormalization"]
   for node in instancenorms:
        convert_to_groupnorm(node, graph)

    return graph


def convert_to_groupnorm(instancenorm, graph):
   """
    Convert the PyTorch-exported GroupNorm subgraph to the subgraph below
    Conv
      |
    GroupNorm
      |
    ReLU
    Attributes:
        instancenorm: Instance Normalization node in the graph.
        graph: Input graph object
    """

   attrs = retrieve_attrs(instancenorm)
   groupnorm = gs.Node(op="GroupNormalizationPlugin", attrs=attrs)
   graph.nodes.append(groupnorm)

   # The plugin receives an input from the Conv node, and output to the ReLU node
   # o() corresponds to the node output and i() corresponds to node input.
   # Output of Conv
   conv_output_tensor = instancenorm.i().inputs[0]
   # Output of Add.
   relu_input_tensor = instancenorm.o().o().o().outputs[0]

   # Reconnect inputs/outputs to the groupnorm plugin
   conv_output_tensor.outputs[0] = groupnorm
   relu_input_tensor.inputs[0] = groupnorm

   # Add scale and bias tensors from unsqueeze op as input to groupnorm plugin
   groupnorm.inputs.append(instancenorm.o().o().i(1).inputs[0])
   groupnorm.inputs.append(instancenorm.o().o().o().i(1).inputs[0])
Figure 4 shows the post-processed GN layer in ONNX after using the ONNX-GS API.
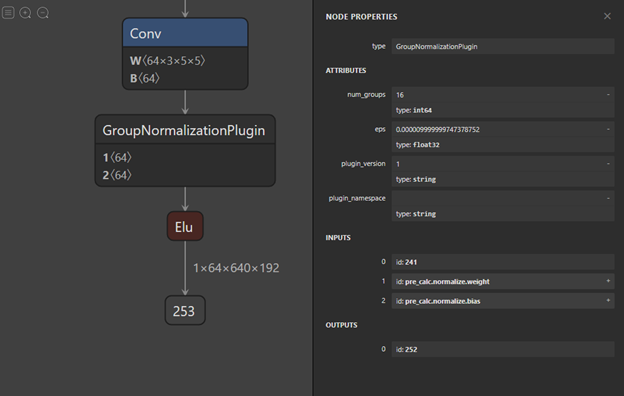
Similar post-processing is performed for the upsample and pad subgraphs. Upsample and pad subgraphs calculate the parameters such as scale factors and amount of padding, respectively. You replace these subgraphs with constant tensors as they are explicitly known during inference. This way of collapsing the subgraphs into a single layer can be useful when there are multiple layers grouped together in ONNX that are not supported by TensorRT. In such cases, replace them with a single layer and implement plugins that perform all those operations in a single CUDA kernel. For more information, see the post_processing.py script of the onnx_packnet sample. The following code example performs post-processing on some ONNX layers of the PackNet network:
import torch
import onnx
from monodepth.models.networks.PackNet01 import PackNet01

def post_process_packnet(model_file, opset=11):

   """
    Use ONNX-Graphsurgeon to replace upsample and instance normalization nodes. For more information, see the post_processing.py script
    Args:
        model_file : Path to ONNX file
    ""”

    # Load the PackNet graph
    graph = gs.import_onnx(onnx.load(model_file))

    if opset==11:
        graph = process_pad_nodes(graph)

    # Replace the subgraph of upsample with a single node with input and scale factor.
    graph = process_upsample_nodes(graph, opset)

    # Convert the GN subgraph into a single plugin node.
    graph = process_groupnorm_nodes(graph)

    # Remove unused nodes, and topologically sort the graph.
    graph.cleanup().toposort()

    # Export the ONNX graph from graphsurgeon
    onnx.save_model(gs.export_onnx(graph), model_file)

    print("Saving the ONNX model to {}".format(model_file))
Implement plugins in TensorRT
TensorRT provides IPluginV2DynamicExt interface to implement plugins for custom layers in the network. For more information about the plugin API, see the TensorRT Developer Guide.
GN is not natively supported by TensorRT. You implement a TensorRT plugin for this layer that can be recognized by the ONNX Parser. Find the open source implementation for the GN plugin in the TensorRT repository. This implementation has a GroupNormalizationPlugin class and GroupNormalizationPluginCreator class. The former is the core implementation of the layer and the latter creates the plugin and sets up the parameters of the plugin.
Some of the important steps for a valid plugin implementation are as follows:
- Starting with TensorRT 7.1, you do not need to write a specific ONNX importer for individual plugins. You can use
REGISTER_TENSORRT_PLUGIN, which statically registers the plugin creator to the plugin registry. In this example,REGISTER_TENSORRT_PLUGIN(GroupNormalizationPluginCreator)is used to register the GN plugin. - The name of the plugin layer in the ONNX graph should be the same as the name returned by the
getPluginNamefunction of theGroupNormalizationPluginCreatorclass.
During parsing, the layer is identified by TensorRT as a plugin, based on its name. In this example, the name of the layer isGroupNormalizationPlugin. - The attributes set for the custom layer in ONNX must match with the plugin attributes of
GroupNormalizationPluginCreatorclass. In this plugin, the attributes areepsandnum_groups, respectively.
Build the plugin library in TensorRT
After the plugin is implemented, add it to the plugins directory of TensorRT repository along with the CMakeFile and README files. The TensorRT repository open sources the ONNX Parser and sample plugins. It provides instructions for compiling and building parser and plugin libraries. Add the plugin dependencies to plugin/CMakeLists.txt and plugin/InferPlugin.cpp.
The GN plugin and its dependencies are already available in the TensorRT repository. The earlier instructions are for illustrative purposes for any external plugins.
After adding the plugin, follow the instructions in the README to build the plugin shared object library (libnvinfer_plugin.so). Add the path of this new plugin library along with other TensorRT libraries to LD_LIBRARY_PATH.
An alternative way is to build a standalone library for individual plugins instead of relying on the TensorRT repository. For more information, see the Tensor RT Developer Guide and DL4AGX repository.
Perform inference
You can use the trtexec tool, available with the TensorRT package to run inference on a random input data. To perform inference, run the following command:
trtexec --onnx=model.onnx --explicitBatch
This command parses the input ONNX graph layer by layer using the ONNX Parser. The trtexec tool also has the option --plugins to load external plugin libraries. After the parsing is completed, TensorRT performs a variety of optimizations and builds the engine that is used for inference on a random input.
Conclusion
In this post, we discussed how to export PyTorch models to ONNX and perform post-processing on ONNX graphs using the ONNX-GS API. ONNX-GS can be useful to simplify complex graphs with redundant layers. We described how to implement plugins in TensorRT and how they can be configured. We demonstrated this workflow on a state-of-the-art PackNet network and accelerated it with TensorRT. This workflow is released as onnx_packnet, which is part of the TensorRT samples.
Acknowledgements
We thank Vitor Guizilini, Sudeep Pillai, Adrien Gaidon, Ryan Eustice, and the rest of the Toyota Research Institute team for their contributions and feedback on this post and the sample.
