Whole slide imaging (WSI), the digitization of tissue on slides using whole slide scanners, is gaining traction in healthcare. WSI enables clinicians in histopathology, immunohistochemistry, and cytology to:
- interpret images using computational approaches
- apply deep learning to digital images to improve accuracy and reproducibility of clinical analysis
- provide new insights about patient data
This post explains how GPU-accelerated toolkits improve the input/output (I/O) performance and image processing tasks. More specifically, it details how to:
- use GPU-accelerated toolkits to load tiled data from disk directly to GPU memory
- perform image processing using CUDA
- write the processed tiles back to disk
Time savings using accelerated histopathology techniques can be critical in the quick identification and treatment of illness and disease.
Challenges in WSI I/O and image processing
Incorporating deep learning into processing of whole slide images requires more than simply training and testing a model. Image analysis using deep learning requires substantial preprocessing and postprocessing to improve interpretation and prediction. Whole slide images must be prepared for modeling and the resultant predictions require additional processing for interpretation. Examples include artifact detection, color normalization, image subsampling, and removal of errant predictions.
In addition, whole slide images are often very large in size with resolutions higher than 100,000 x 100,000 pixels. This forces images to be tiled, meaning that a series of subsamples from the whole slide image are used in modeling. Loading these tiled images from disk into memory and then processing the tiled image can be immensely time-consuming.
Tools to accelerate WSI I/O and image processing
The use cases featured in this post are benchmarked using the GPU-accelerated tools detailed below.
cuCIM
cuCIM (Compute Unified Device Architecture Clara IMage) is an open source, accelerated computer vision and image processing software library for multidimensional images. Use cases include biomedical, geospatial, material and life science, and remote sensing. The cuCIM library is publicly available under a permissive license (Apache 2.0) and welcomes community contributions.
Magnum IO GPUDirect Storage
Magnum IO GPUDirect Storage (GDS) provides storage I/O acceleration, which is part of the Magnum IO libraries for parallel, asynchronous, and intelligent data center I/O. GDS enables a direct data path for direct memory access (DMA) transfers between GPU memory and storage, which avoids a bounce buffer through the CPU. This direct path increases system bandwidth, decreases latency, and decreases use load on the CPU.
Overall, GDS provides the following benefits:
- increases the bandwidth, reduces the latency, and reduces the load on CPUs and GPUs for data transferral
- reduces the performance impact and dependence on CPUs to process storage data transfer
- acts as a force multiplier on top of the compute advantage for computational pipelines that are fully migrated to the GPU
- supports interoperability with other open source-based file access, enabling data to be transferred to and from the device by using traditional file I/O that is then accessed by a program that uses the cuFile APIs
GDS can be accessed from Python with the RAPIDS kvikIO package. KvikIO provides both Python and C++ APIs capable of performing read or write operations with GDS support. (Fall back to basic POSIX and cudaMemcpy operations when GDS is not available.)
Whole slide image data I/O
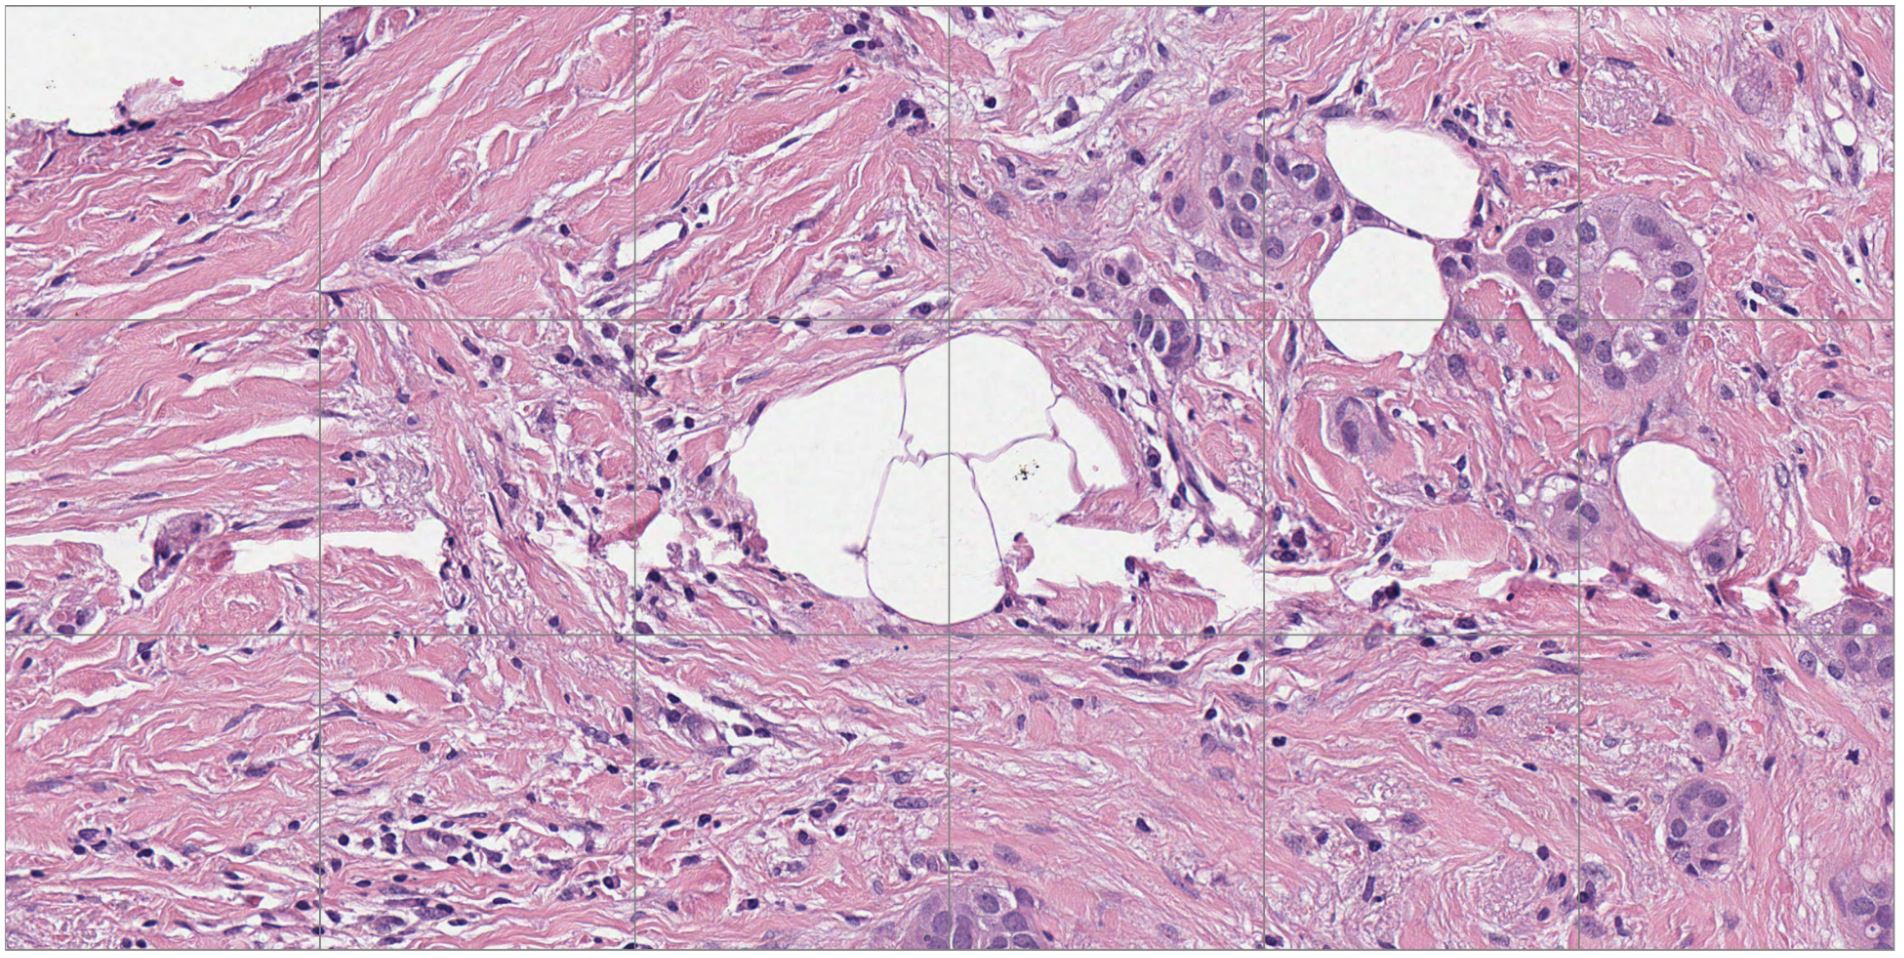
When glass slides are digitized by digital whole slide image scanners in histopathology, high-resolution images are taken at multiple magnifications. WSIs have a pyramidal data structure, with the images taken at each magnification each forming a ‘layer’ of the WSI. The maximum magnification of these images is frequently 200x (using a 20x objective lens at 10x magnification) or 400x (using a 40x objective lens at 10x magnification).
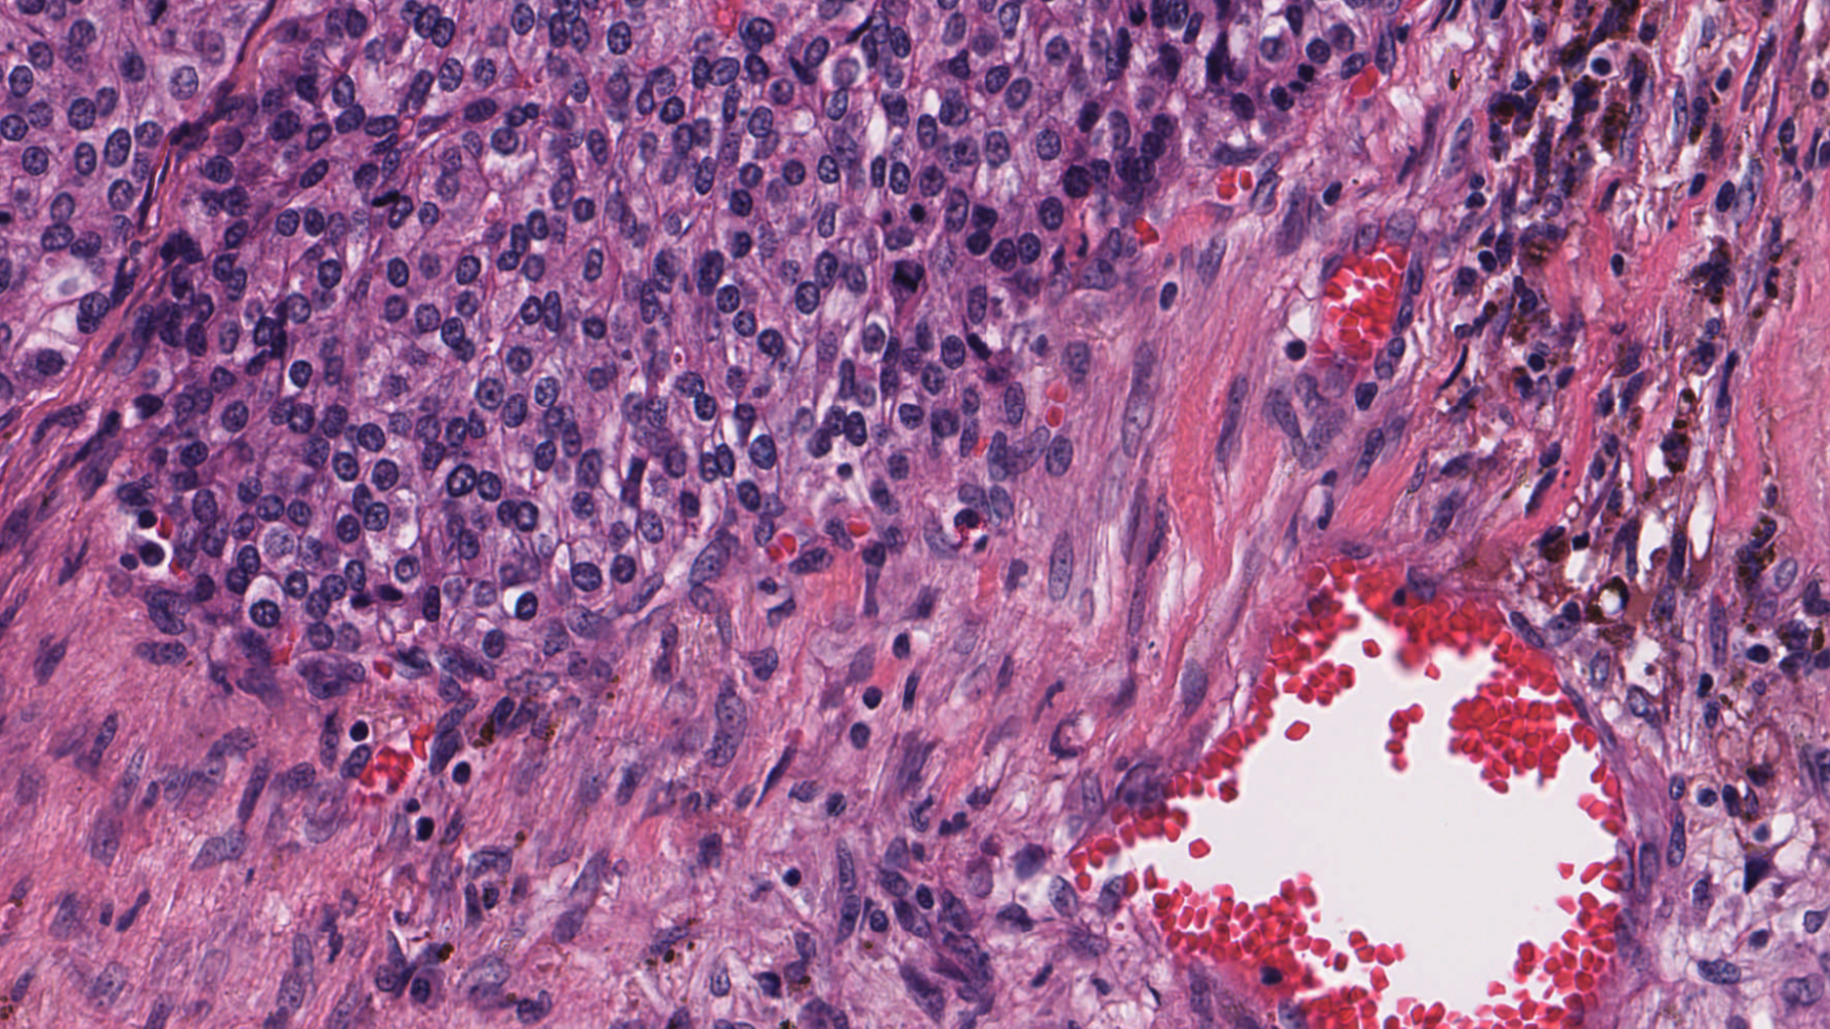
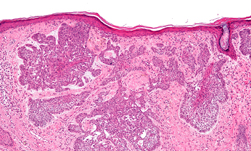
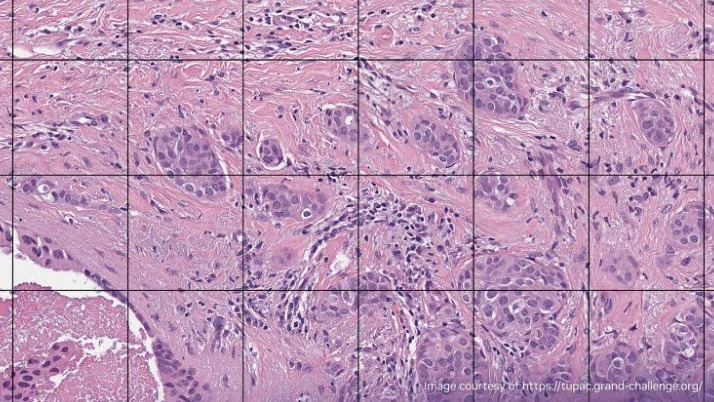
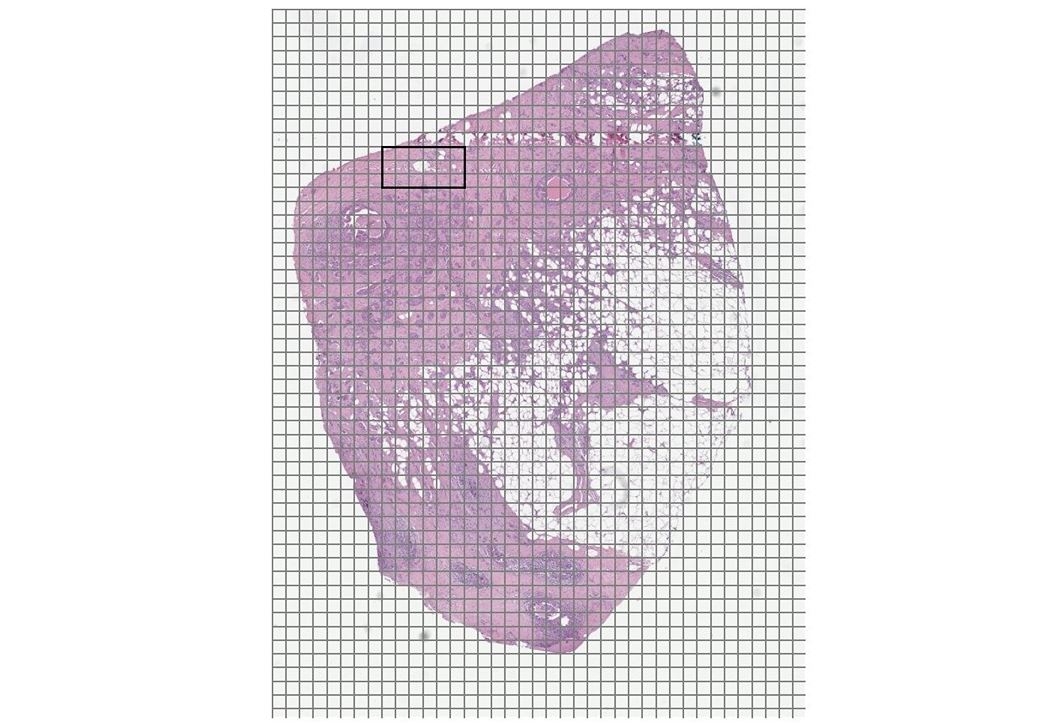
Figures 1 and 2 show a benchmarking use case comparison from a breast cancer study. Figure 1 shows a zoomed-out view of an H&E-stained digital pathology slide with the region of interest (ROI) highlighted. Figure 2 shows a high-resolution view corresponding to the ROI highlighted in Figure 1.
An image dataset with the following characteristics was selected for this use case:
- number of layers in the digital image is 6
- highest resolution layer of the digital image containing 2028 Red, Green, Blue (RGB) tiles of size (512, 512)
- highest resolution layer of the digital image is sized (26420, 19920)
Digital pathology use cases
This section presents three different digital pathology use cases.
Use case 1: Loading WSI tiles into a GPU array
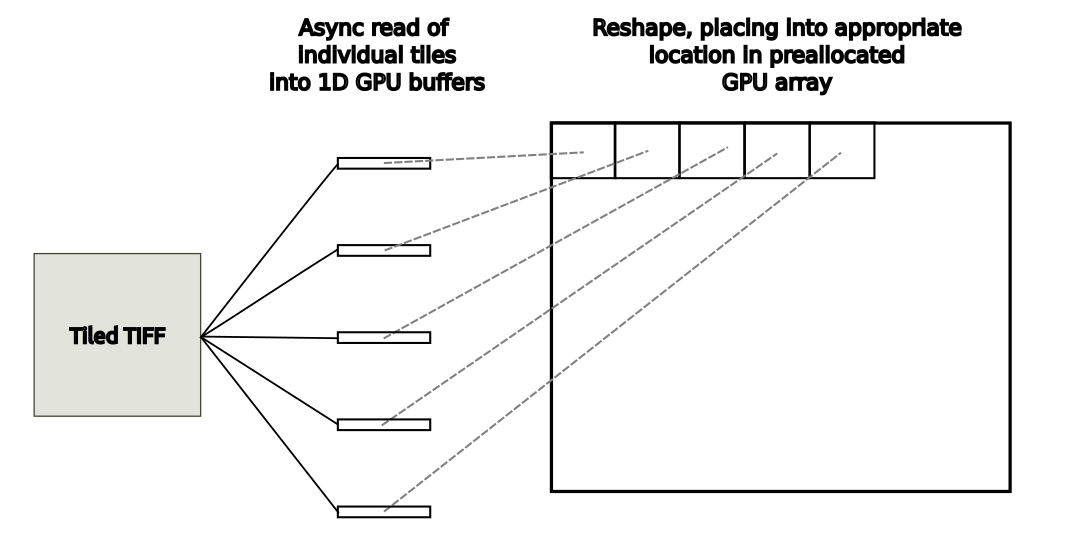
In this image analysis use case, each individual tile from the WSI image from disk is loaded into a 1D GPU buffer with and without GDS. The destination GPU array is pre-allocated. In each use, the read tile is reshaped and placed in the appropriate location in the GPU output array, as shown in Figure 3.
Benchmark results shown in Figure 4 plot acceleration relative to the use of tifffile.imread followed by a call to cupy.asarray to transfer the array from the host to the GPU. Without GDS enabled, kivikIO provided 2.0x and 4.2x acceleration for the single threaded and parallel read scenarios. The single threaded case improved from 2.0x to 2.7x acceleration with GDS enabled, while the parallel read improved more dramatically from 4.2x to 11.8x.

tifffile.imread followed by cupy.asarrayUse case 2: Writing uncompressed Zarr files
In this image analysis use case, start with a CuPy array in GPU memory. You could, for example, start with the output from use case 1. Then do a tiled-write of this GPU array into separate Zarr files with and without GDS. This involves writing 6,084 MB of data to disk in a format where each “chunk” is written to an independent file. The file sizes for the various chunk shapes are:
- (256, 256, 3) == 768 kB
- (512, 512, 3) == 3 MB
- (1024, 1024, 3) == 12 MB
- (2048, 2048, 3) == 48 MB
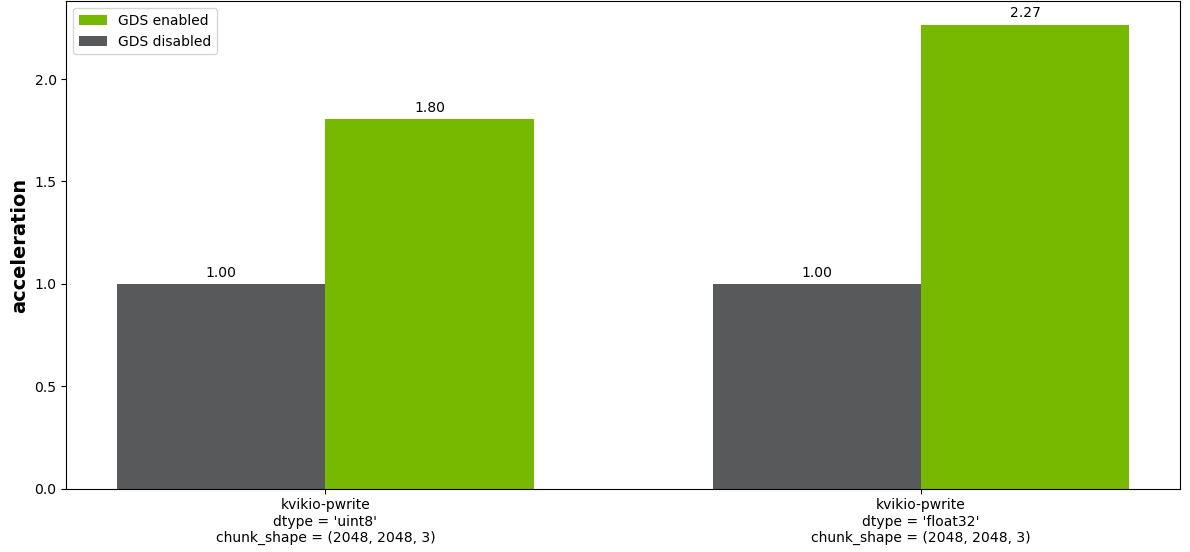
Figure 5 shows the result for chunk size (2048, 2048, 3). For all but the smallest chunk size, (256, 256, 3), there is a substantial benefit to enabling GDS (not shown).
Use case 3: Tiled image processing workflow
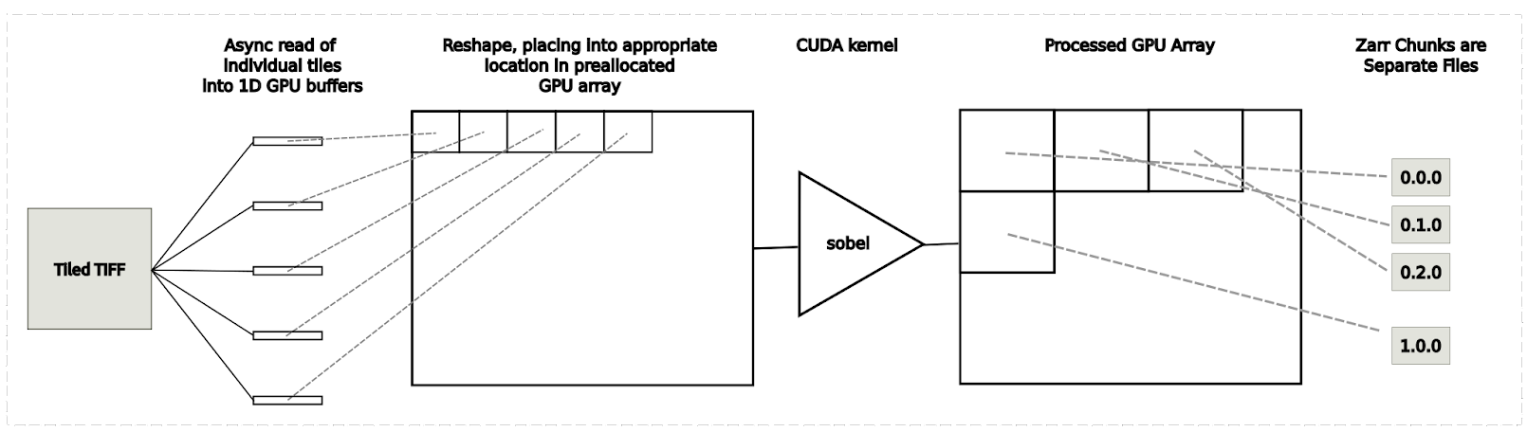
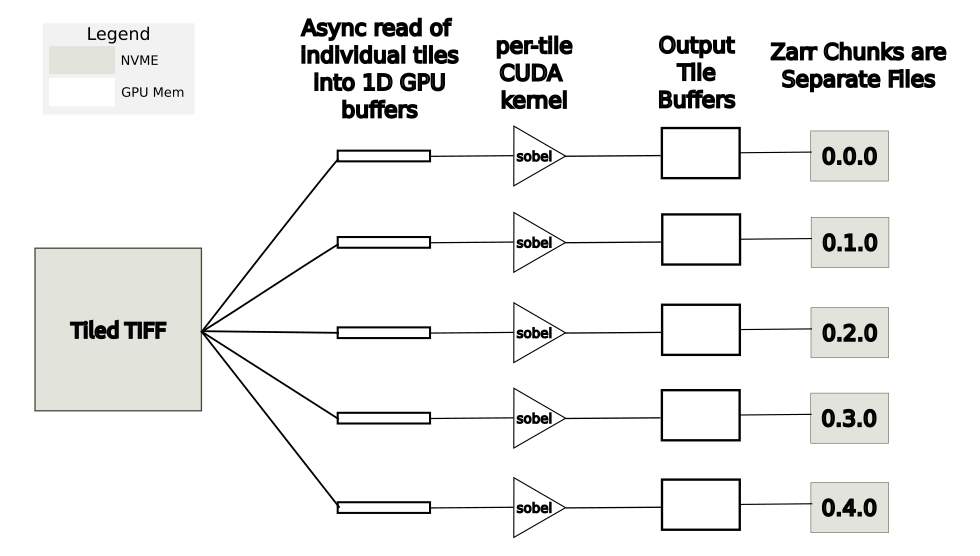
This image analysis use case combines loading, processing, and saving whole slide images into a single application. This use case is illustrated in Figure 6. The steps are provided below:
- load individual tiles into 1D GPU buffers
- place tiles into the appropriate location of the pre-allocated GPU array
- process using a CUDA-based Sobel edge detection kernel
- write individual chunks of data into Zarr files to disk
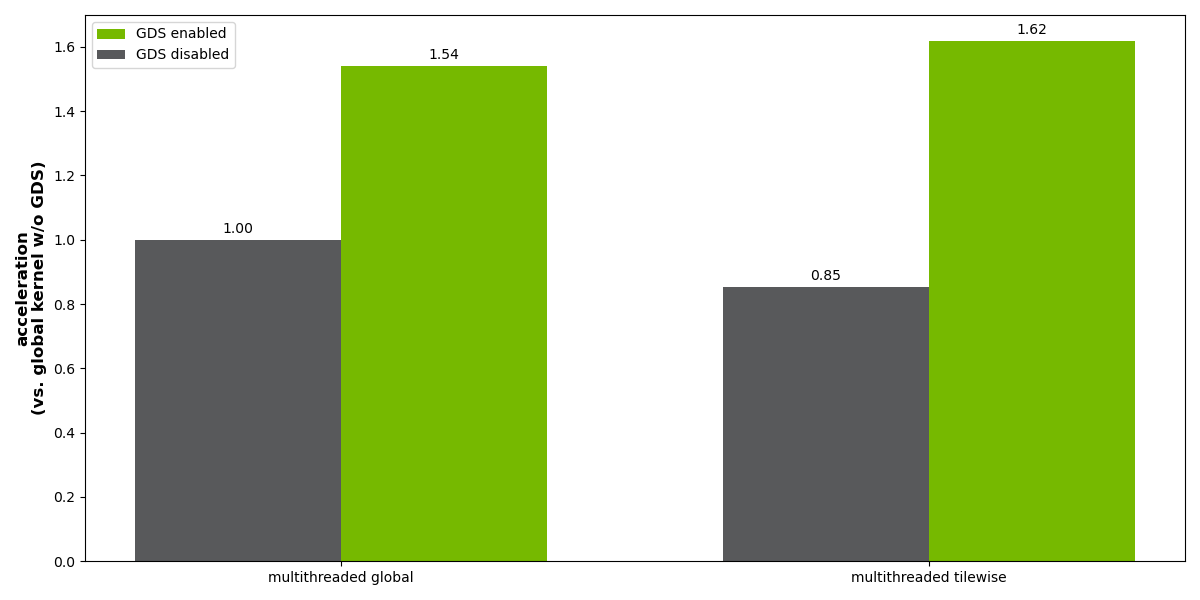
One approach is to perform the tiled read from use case 1, followed by the application of a CUDA kernel to the full array and a tiled write from use case 2. This approach has relatively high GPU memory overhead, as two copies of the full image must be stored in GPU memory. In the benchmark results shown in Figure 8, this approach is labeled ‘multithreaded global.’
A more memory-efficient approach is to asynchronous read, process, and write the individual tiles in parallel. In this case, GPU memory requirements are greatly reduced as only a small fraction of the image is in GPU memory at any one time. This approach is shown in Figure 7. In the benchmark results shown in Figure 8, this approach is labeled ‘multithreaded tilewise.’
Results for the multithreaded tilewise method are normalized in terms of performance relative to the multithreaded global method with GDS disabled. Without GDS, there is a 15% performance penalty to performing the asynchronous tilewise processing, but with GDS runtime improved by a factor of ~2 becoming slightly faster than the global approach with GDS.
The main downside of the tilewise CUDA processing approach is that the simple implementation does not currently handle potential border artifacts due to tilewise processing. This is not of concern for pixelwise computations like color space conversion or conversion from RGB to absorbance units in digital pathology.
However, for operations involving convolutions, using edge extension of individual tiles instead of the actual data from the neighboring tile may create subtle artifacts. To deal with similar image analysis use cases, we recommend first saving to a Dask array and then performing the tilewise processing using map blocks, which can take such boundary considerations into account.
Sample scripts for accelerating WSI I/O and image processing
Scripts used for benchmarking can be obtained from the examples/python/gds_whole_slide folder of the cuCIM repository. Currently, these image analysis use cases are using RAPIDS kvikIO for the GDS-accelerated read/write operations. These histopathology demos are for illustration purposes and have not yet been tested for production use. In the future, we hope to extend the cuCIM API to provide supported methods for performing these types of tiled read and write operations.
Summary: Why accelerating WSI I/O matters
The image analysis use cases presented in this post demonstrate that NVIDIA GPUDirect Storage can be of substantial benefit in reducing I/O time in a variety of high-resolution images requiring reading and writing of tiled datasets. Time savings shown using accelerated histopathology techniques can be critical in the quick identification and treatment of illness and disease. We look forward to extending these initial results on uncompressed TIFF and Zarr data to include compressed data in the future. In the interim, we invite you to download cuCIM using Conda or PyPI. GDS is part of CUDA 11.8. For installation requirements, see the GDS documentation.