The Dataiku platform for everyday AI simplifies deep learning. Use cases are far-reaching, from image classification to object detection and natural language processing (NLP). Dataiku helps you with labeling, model training, explainability, model deployment, and centralized management of code and code environments.
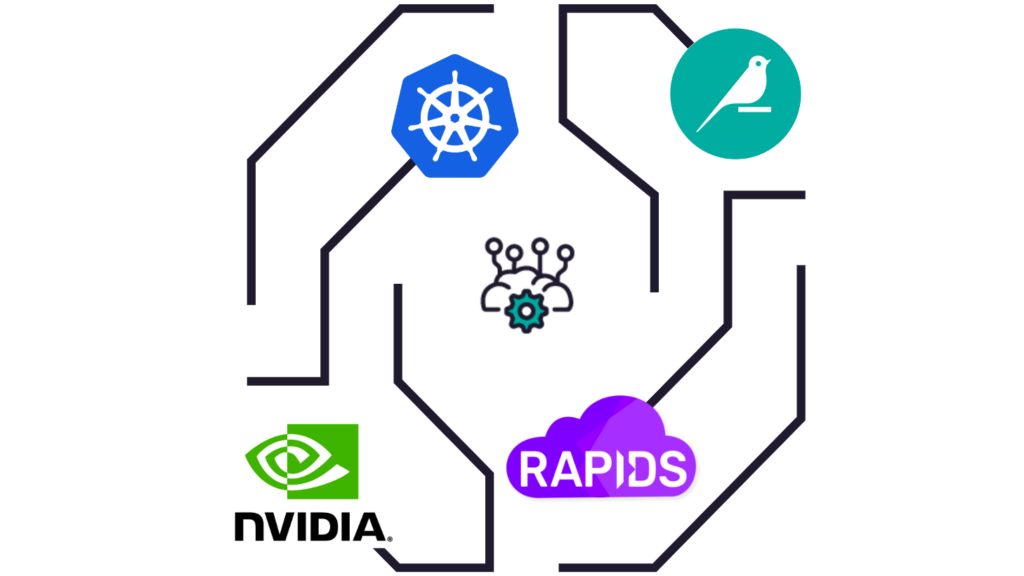
This post dives into high-level Dataiku and NVIDIA integrations for image classification and object detection. It also covers deep learning model deployment for real-time inference and how to use open source RAPIDS and cuML libraries for a customer support Tweet topic modeling use case. NVIDIA provides the hardware (NVIDIA A10 Tensor Core GPUs, in this case) and various OSS (CUDA, RAPIDS) to get the job done.
Note that all of the NVIDIA AI software featured in this post is available with NVIDIA AI Enterprise, a secure, end-to-end software suite for production AI, with enterprise support from NVIDIA.
Deep learning for image classification and object detection
This section walks through the steps to train and evaluate a deep learning model for image classification or object detection using Dataiku and NVIDIA GPUs.
A no-code approach
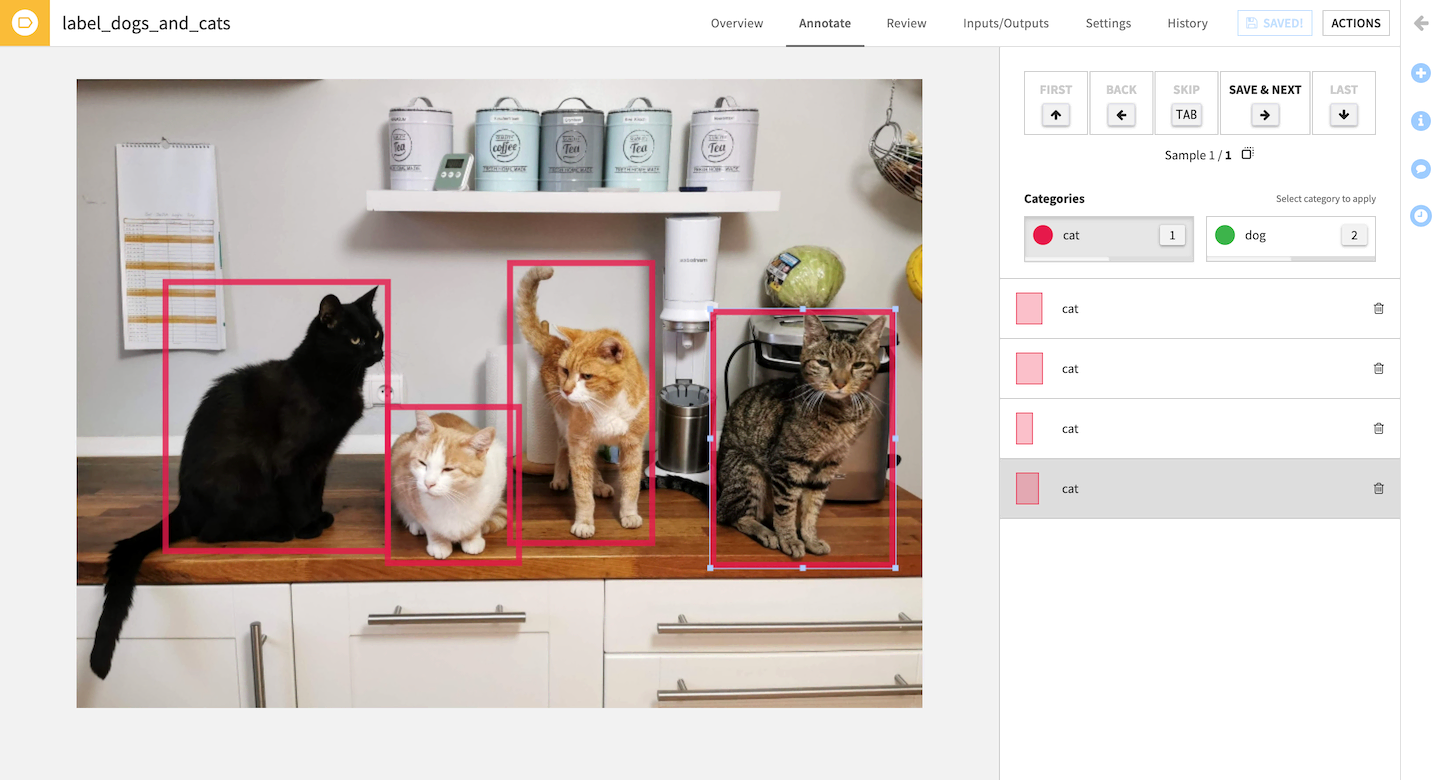
Starting with Dataiku 11.3, you can use visual, no-code tools to deliver on the core areas of an image classification or object detection workflow. You can label images, draw bounding boxes, and review/govern annotations using a native web app (Figure 1). Image labeling is key to training performant models: good data in → good model out.
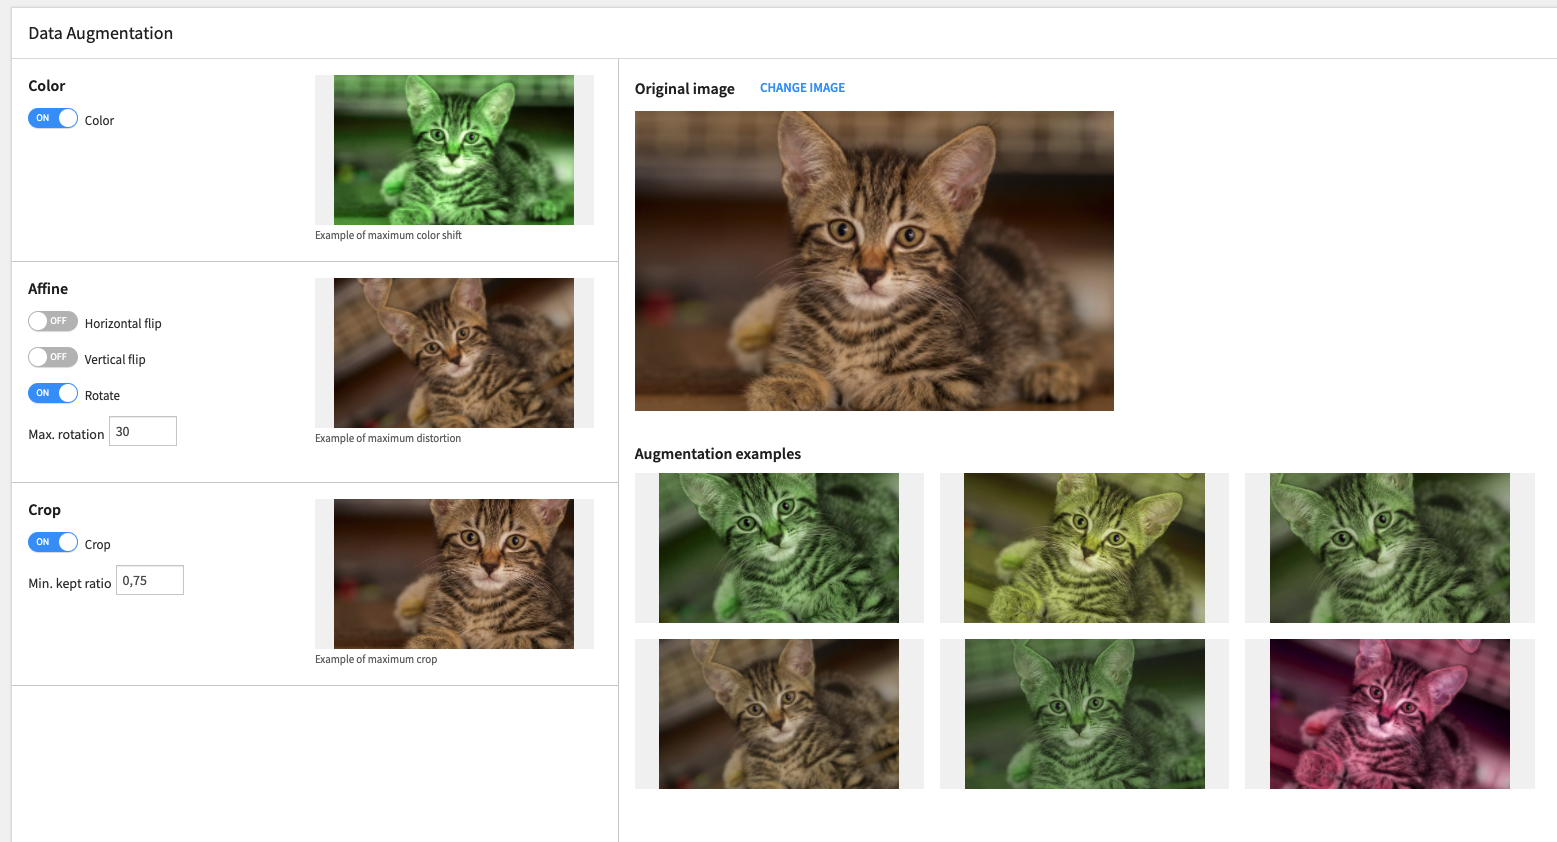
Dataiku enables you to train image classification and object detection models specifically using transfer learning to fine-tune pretrained models based on custom images / labels / bounding boxes. Data augmentation—recoloring, rotating, and cropping training images—is a common way to increase the size of the training set and expose a model to a variety of situations (Figure 2).
EfficientNet (image classification) and Faster R-CNN (object detection) neural networks can be used with pretrained weights in the model retraining user interface, out of the box.
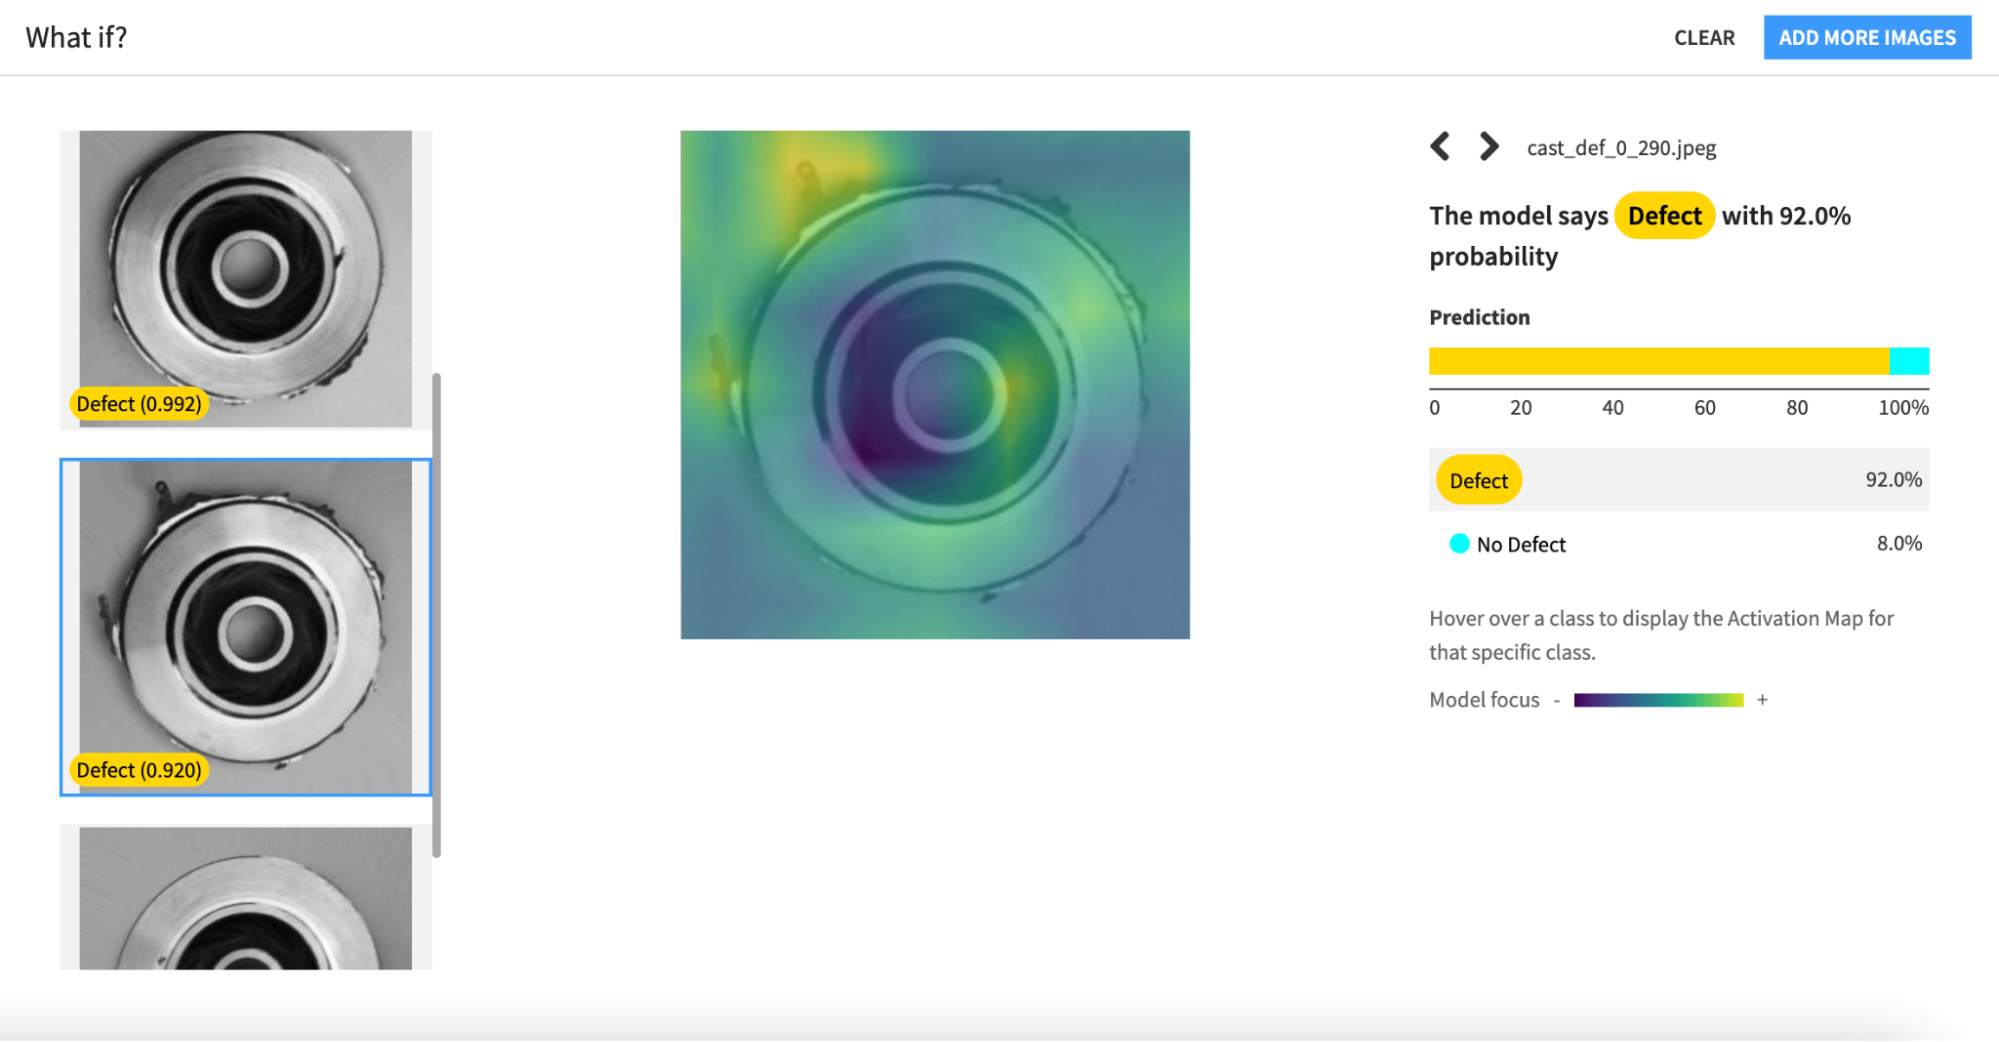
After training a model to custom image labels and bounding boxes, you can use an overlaid heat map model focus to explain the model’s predictions (Figure 3).
Once you are comfortable with the model’s performance, deploy the trained model as a containerized inference service to a Kubernetes cluster. This is managed by the Dataiku API Deployer tool.
Where is the compute happening?
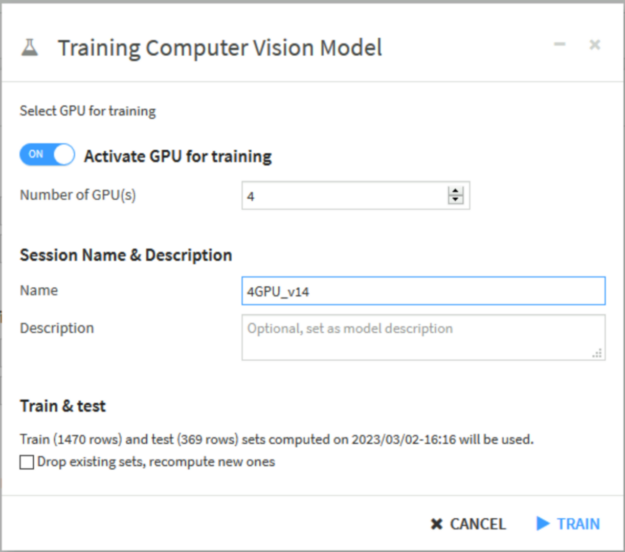
Dataiku can push all the compute behind deep learning model training, explanations, and inference to NVIDIA GPUs (Figure 4). You can even leverage multiple GPUs for distributed training through the PyTorch DistributedDataParallel module and TensorFlow MirroredStrategy.
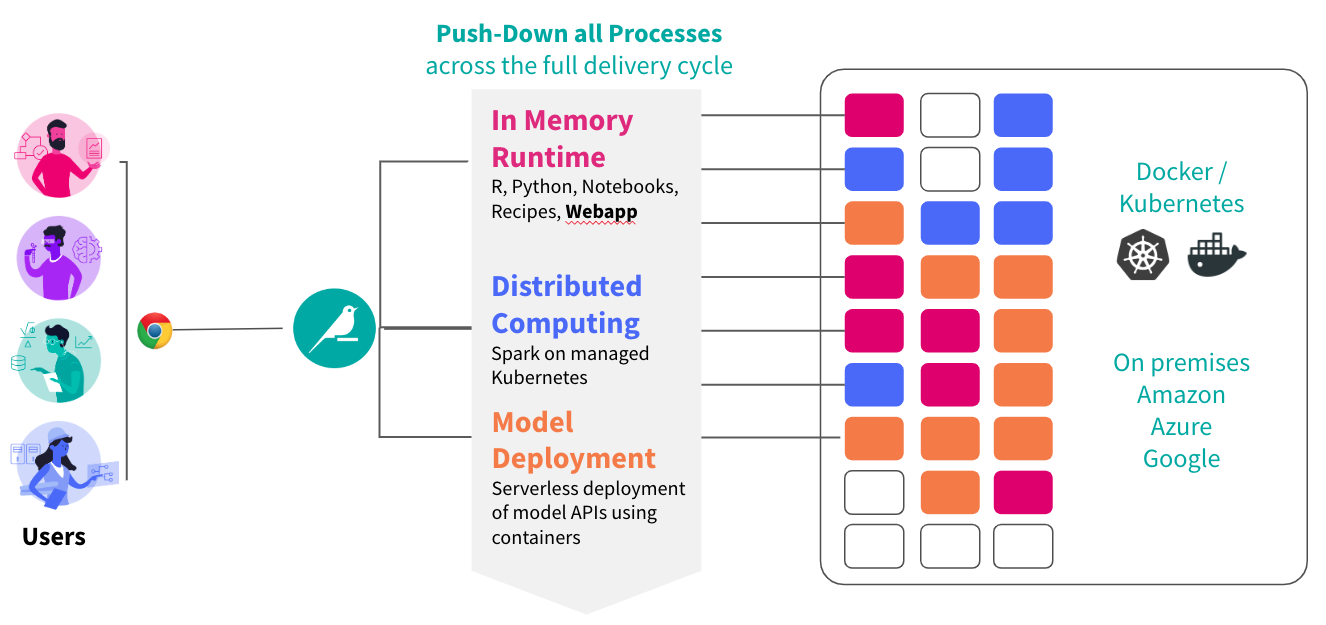
Pushing this compute to NVIDIA GPUs happens through the Dataiku Elastic AI integrations. First, connect your Dataiku instance to a Kubernetes cluster with NVIDIA GPU resources (managed through EKS, GKE, AKS, OpenShift). Dataiku will then create the Docker image and deploy containers behind the scenes.
Deep learning training and inference jobs can run on a Kubernetes cluster, as well as arbitrary Python code or Apache Spark jobs (Figure 5).
Coding model training scripts
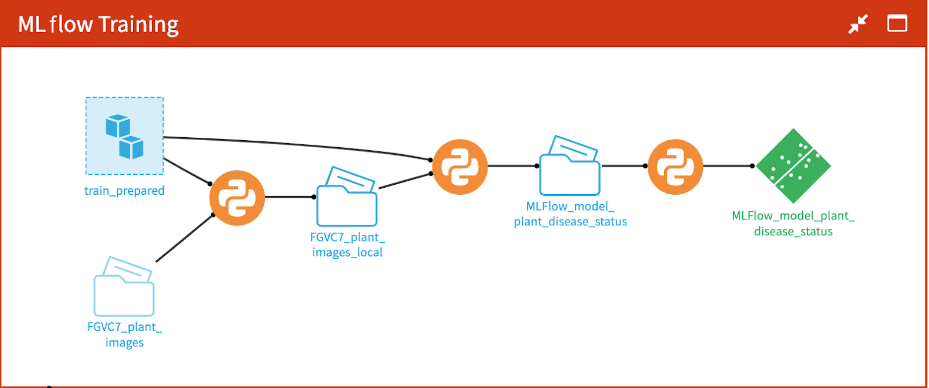
If you want to custom code your own deep learning models in Python, try wrapping a train function in an MLflow experiment tracker. Figure 6 shows a Python-based flow. See the machine learning tutorial in the Dataiku Developer Guide for an example. This approach provides the full flexibility of custom code, along with some out-of-the-box experiment tracking, model analysis visualizations, and point-and-click model deployment from visual trained models in Dataiku.
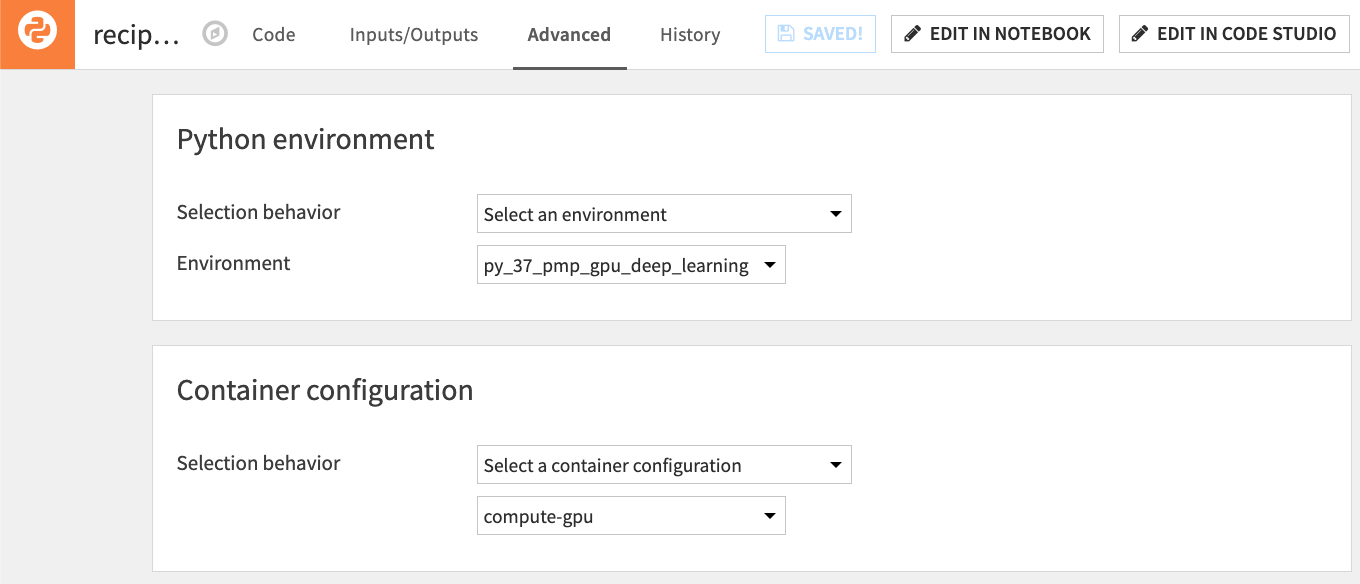
Custom Python deep learning models can leverage NVIDIA GPUs through containerized execution, like visually trained deep learning models in Dataiku (Figure 7).
Model deployment for real-time inference
Once the model is trained, it is time to deploy it for real-time inference. If you used Dataiku’s visual image classification, object detection, or a custom coded model with MLflow, then imported as a Dataiku model, all it takes is a few clicks to create a containerized inference API service on top of the trained model.
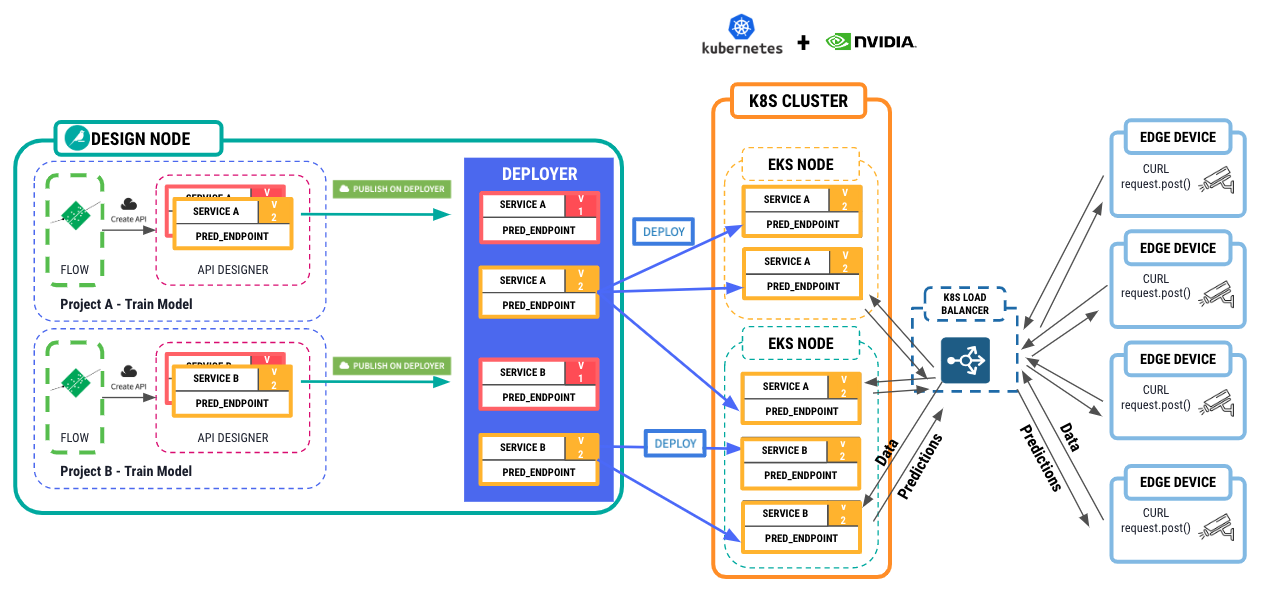
First, connect the Dataiku API Deployer tool to a Kubernetes cluster to host these inference API services, again with NVIDIA GPUs available in the cluster nodes. Then deploy 1-N replicas of the containerized service behind a load balancer. From here, edge devices can send requests to the API service and receive predictions back from the model. Figure 8 shows this whole architecture.
Tutorial: Accelerate topic modeling using BERT models with RAPIDS in Dataiku
For a deeper dive, this section walks through how to set up a Python environment in Dataiku to use BERTopic with GPU-accelerated cuML library from RAPIDS. It also highlights the performance gain using cuML.
This example uses the Kaggle Customer Support on Twitter dataset and key customer complaint themes with topic modeling.
Step 1. Prepare the dataset
First, normalize the Tweet text by removing the punctuation, stop words, and stemming words. Also filter the dataset to the complaints customers tweeted in English. All of this can be done using Dataiku visual recipes. Figure 9 shows the screenshot of the workflow in Dataiku.

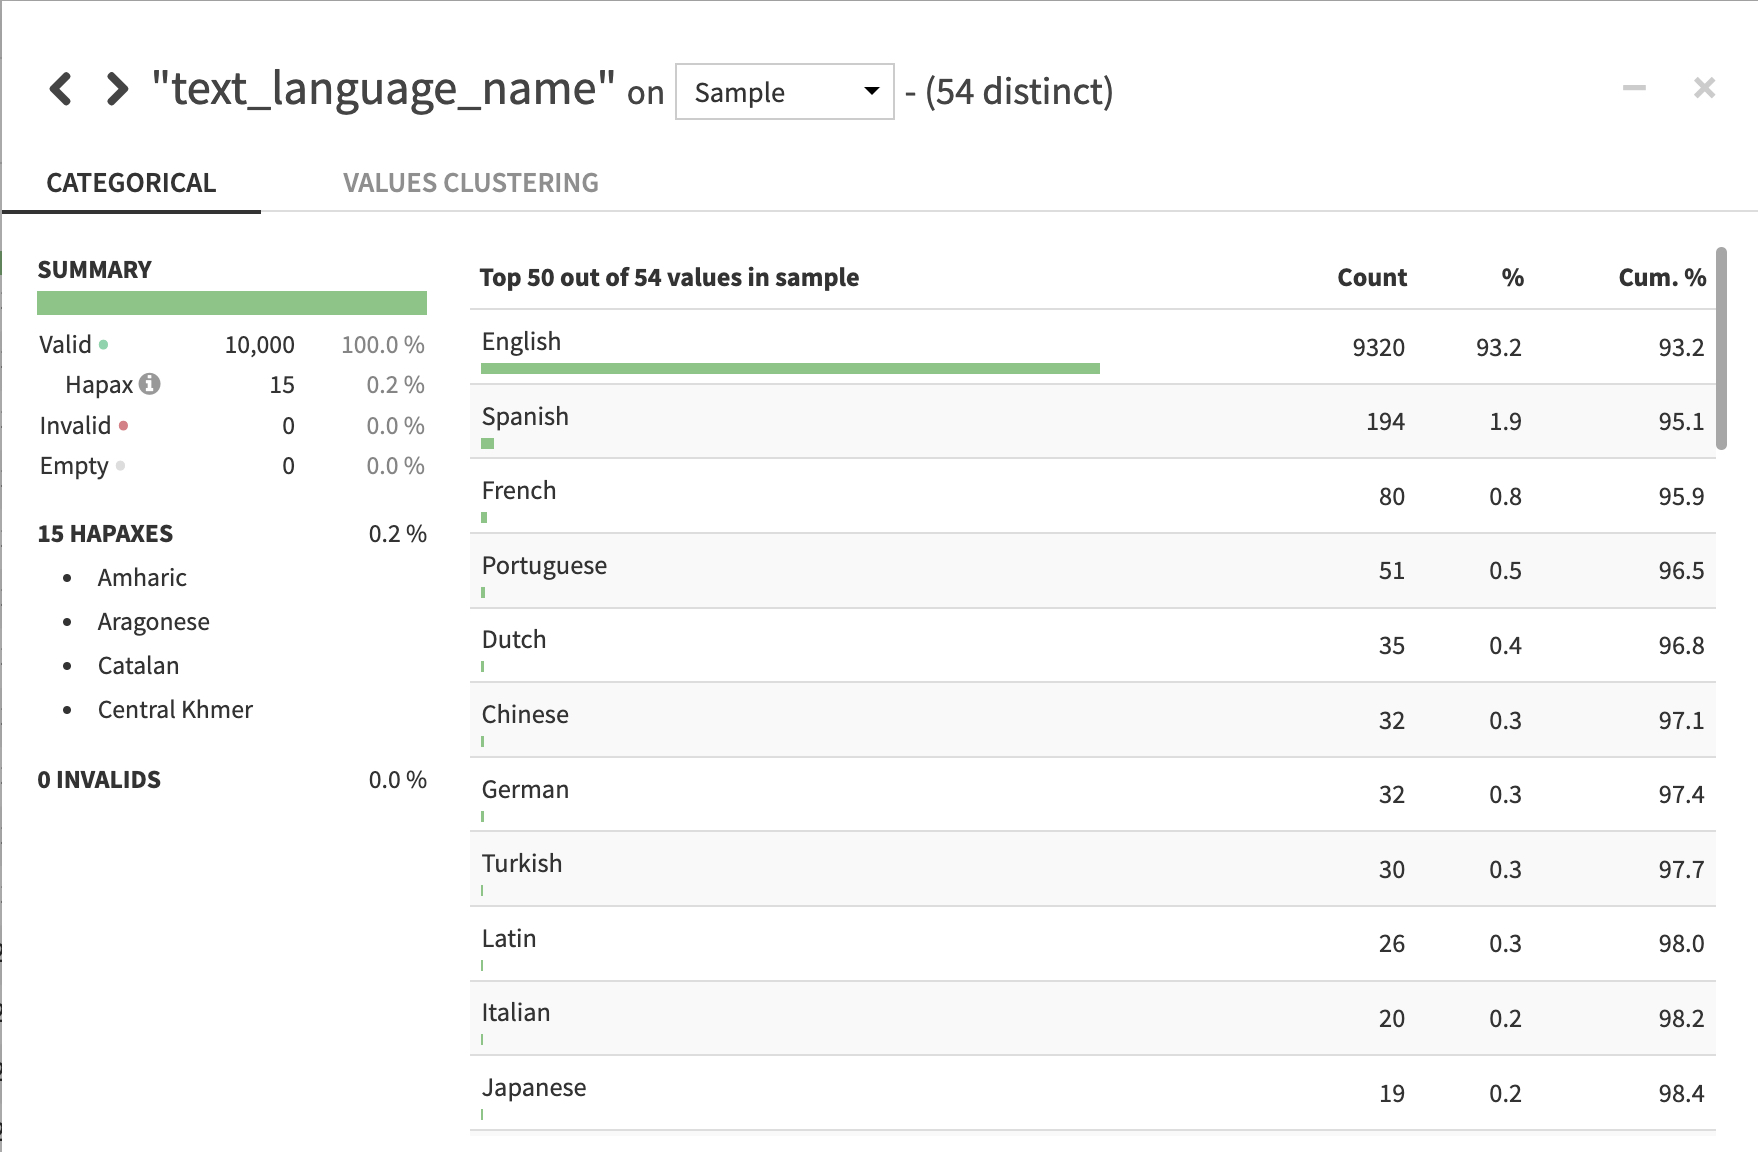
Use a split recipe to filter the company’s replies from initial user Tweets. Next, use Dataiku’s Text Preparation plugin recipe to detect language distribution across user Tweets. Figure 10 shows the distribution of Tweets by language.
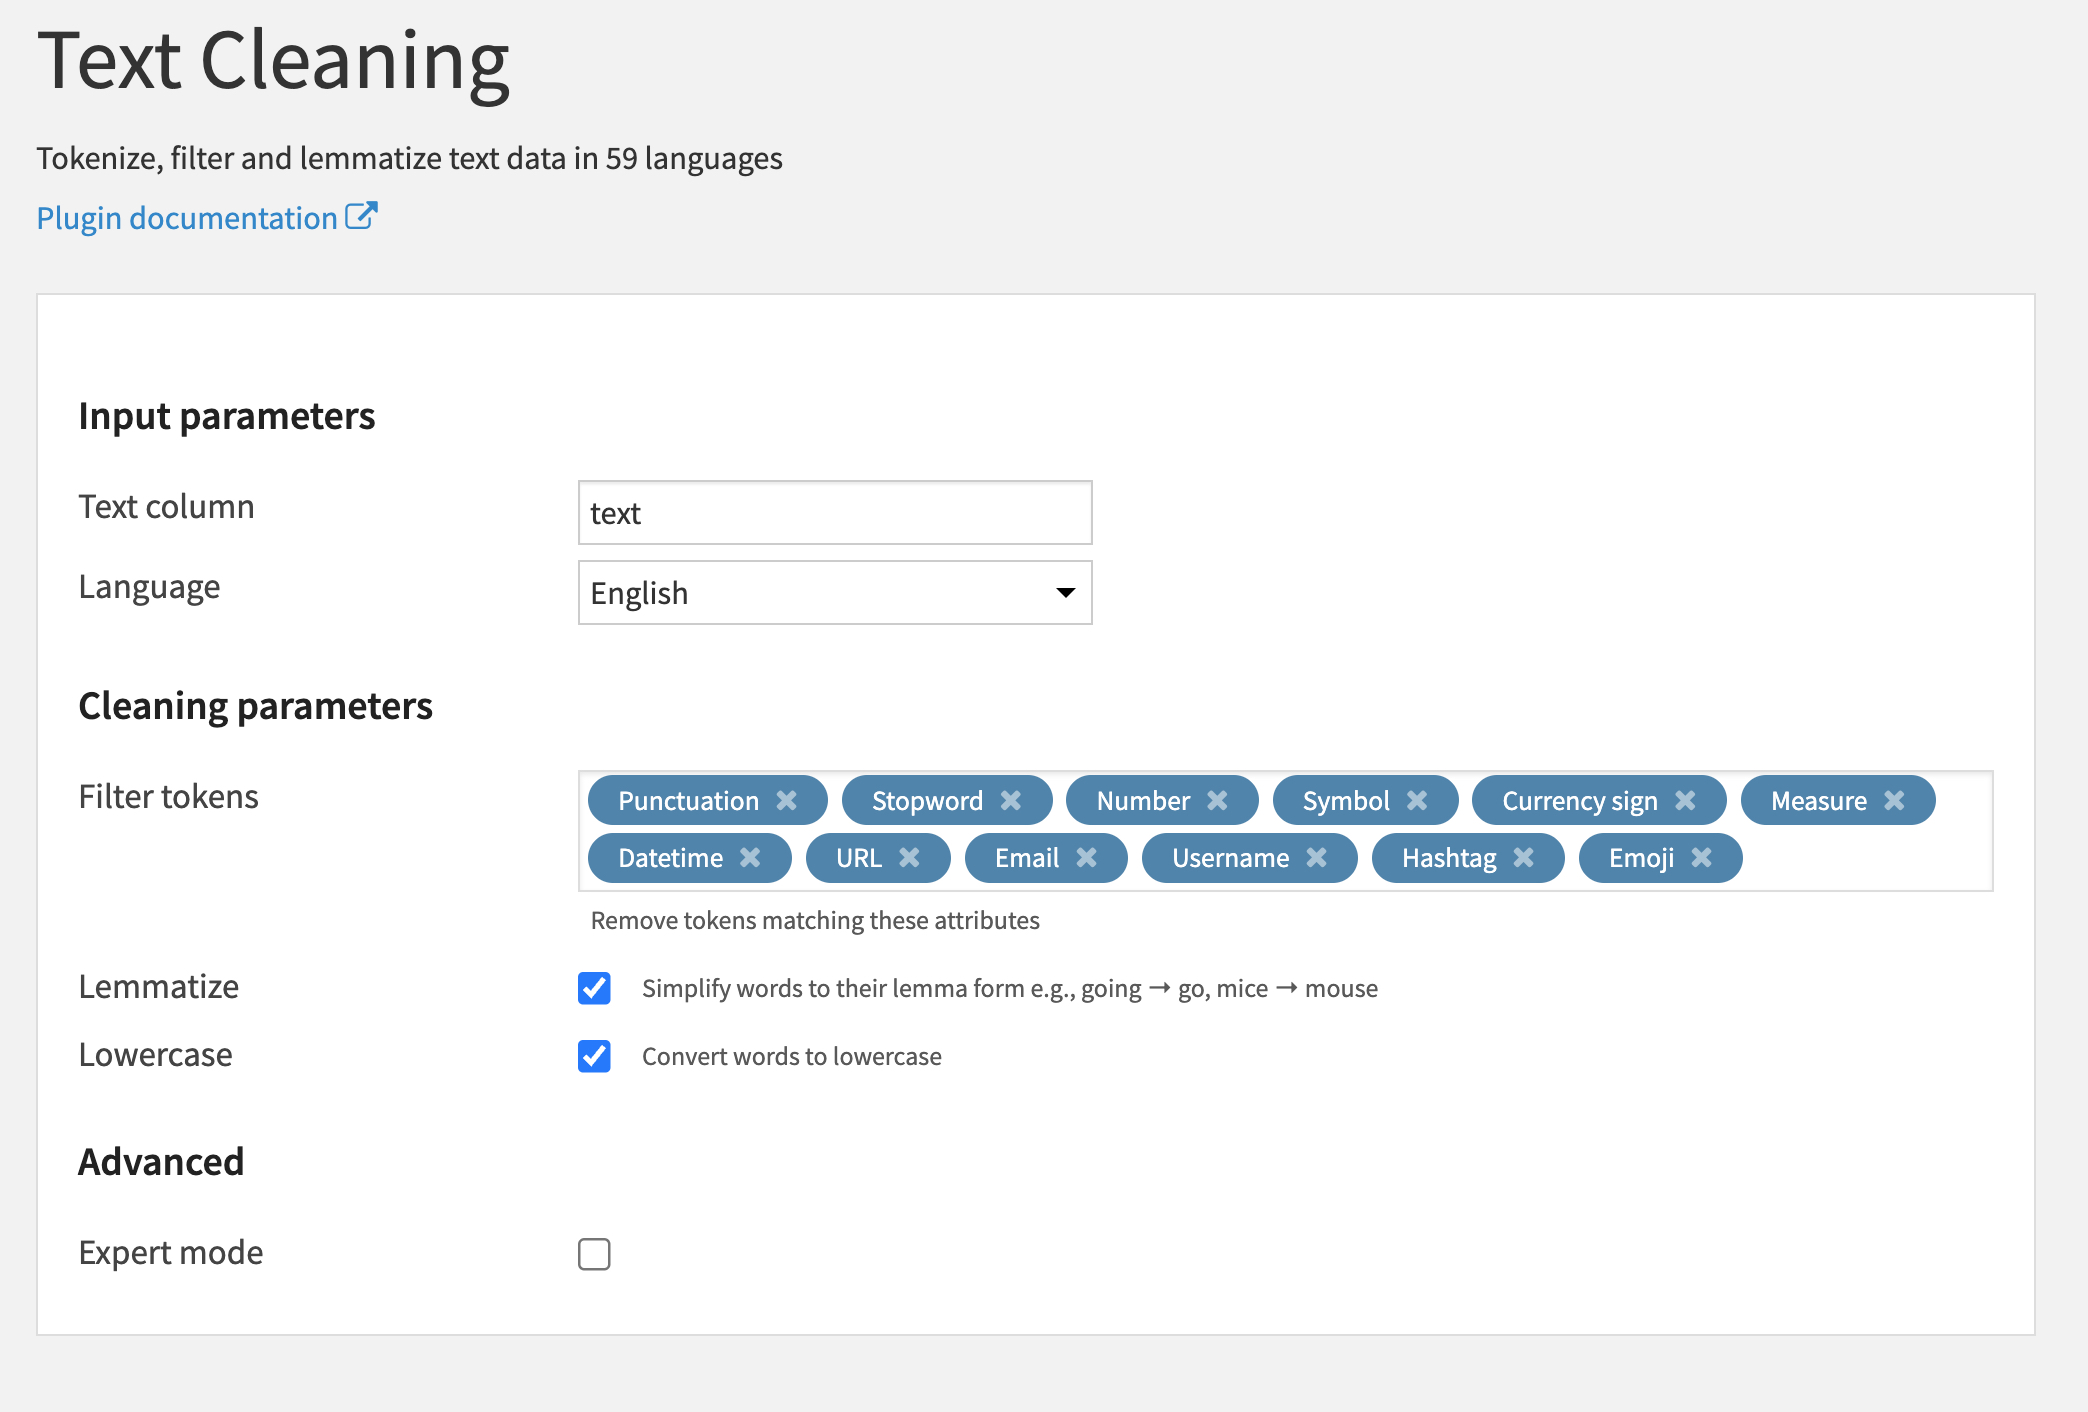
Use a filter recipe to filter out all non-English and blank Tweets. Be sure to use a text preparation recipe to filter stop words, punctuation, URL, emojis, and so on. Convert text to lowercase.
Finally, use a split recipe to split the data for training and testing (simple 80% / 20% random split).
Step 2. Set up Python environment with BERTopic and RAPIDS library
Running the Python processes requires an elastic compute environment with NVIDIA GPUs, the Python BERTopic package (and its required packages), and a RAPIDS container image. This example uses an Amazon EKS Cluster (Instance Type:g4dn with NVIDIA A10 Tensor Core GPUs), RAPIDS Release Stable 22.12, and BERTopic (0.12.0).
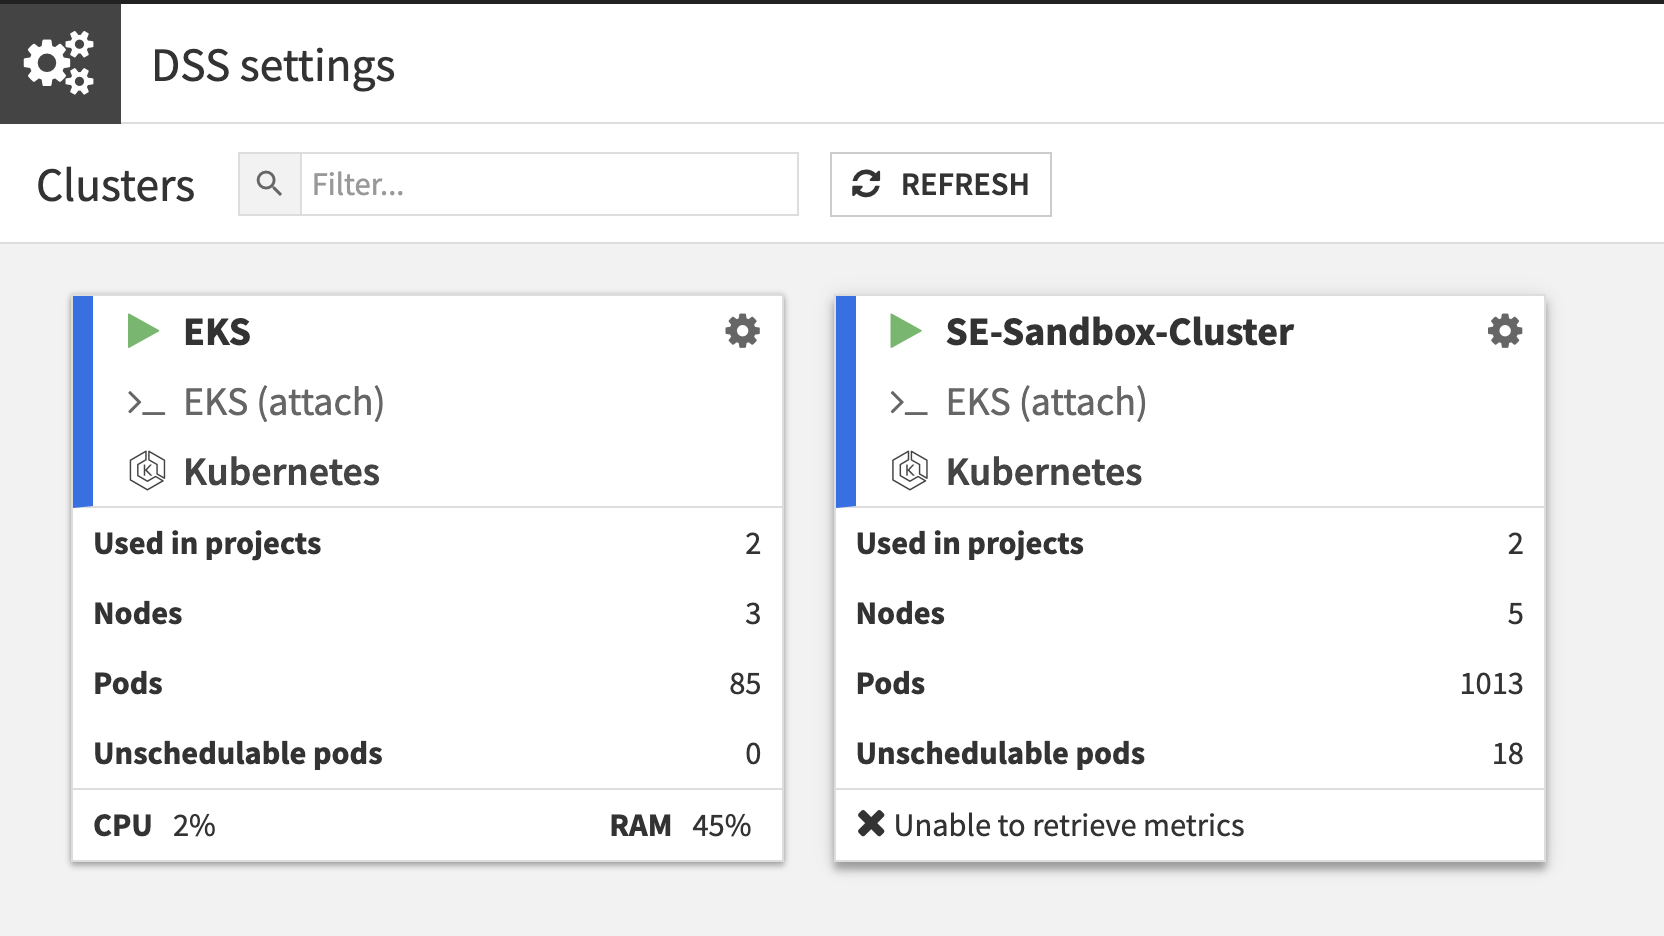
First, launch an EKS Cluster in Dataiku. Once the cluster is set up, you can check its status and configuration in the Clusters Tab under Administration.
BERTopic
Create a Dataiku code environment with BERTopic and its required packages using Dataiku’s managed virtual code environments.
RAPIDS
Build a container environment using the RAPIDS image from Docker Hub. In Dataiku, use either the Dataiku base image for your code environment, or download custom container images from DockerHub or NGC. Then, attach your Dataiku code environment to it. Note that NVIDIA has released a RAPIDS on PyPi, so you can now just use the default Dataiku base image.
Step 3. Running BERTopic with default UMAP
Next, use BERTopic to source the top five topics from the Twitter complaints. To accelerate the UMAP process on GPU, use cuML UMAP. The default UMAP is provided below:
# -------------------------------------------------------------------------------- NOTEBOOK-CELL: CODE
# -*- coding: utf-8 -*-
import dataiku
import pandas as pd, numpy as np
from dataiku import pandasutils as pdu
from bertopic import BERTopic

# -------------------------------------------------------------------------------- NOTEBOOK-CELL: CODE
# Read the train dataset in the dataframe and the variable sample_size which defines the number of records to be used
sample_size = dataiku.get_custom_variables()["sample_size"]
train_data = dataiku.Dataset("train_cleaned")
train_data_df = train_data.get_dataframe(sampling='head',limit=sample_size)

# -------------------------------------------------------------------------------- NOTEBOOK-CELL: CODE
# Create Bertopic object and run fit transform
topic_model = BERTopic(calculate_probabilities=True,nr_topics=4)
topics, probs = topic_model.fit_transform(train_data_df["Review Description_cleaned"])
all_topics_rapids_df = topic_model.get_topic_info()

# -------------------------------------------------------------------------------- NOTEBOOK-CELL: CODE
#Write the List of Topics output as a DSS Dataset

Topic_Model_df = all_topics_rapids_df
Topic_Model_w_Rapids = dataiku.Dataset("Topic_Model")
Topic_Model_w_Rapids.write_with_schema(Topic_Model_df)


RAPIDS cuML UMAP:

# -*- coding: utf-8 -*-
import dataiku
import pandas as pd, numpy as np
from dataiku import pandasutils as pdu

from bertopic import BERTopic
from cuml.manifold import UMAP
from cuml.cluster.hdbscan.prediction import approximate_predict

# -------------------------------------------------------------------------------- NOTEBOOK-CELL: CODE
# Read the train dataset in the dataframe and the variable sample_size which defines the number of records to be used
sample_size = dataiku.get_custom_variables()["sample_size"]
train_data = dataiku.Dataset("train_cleaned")
train_data_df = train_data.get_dataframe(sampling='head',limit=sample_size)

# -------------------------------------------------------------------------------- NOTEBOOK-CELL: CODE
# Create a cuML UMAP Obejct and pass it in the Bertopic object and run fit transform
umap_model = UMAP(n_components=5, n_neighbors=15, min_dist=0.0)
cu_topic_model = BERTopic(calculate_probabilities=True,umap_model=umap_model,nr_topics=4)
cu_topics, cu_probs = cu_topic_model.fit_transform(train_data_df["Review Description_cleaned"])
all_topics_rapids_df = cu_topic_model.get_topic_info()

# -------------------------------------------------------------------------------- NOTEBOOK-CELL: CODE
# Write the List of Topics output as a DSS Dataset

Topic_Model_w_Rapids_df = all_topics_rapids_df
Topic_Model_w_Rapids = dataiku.Dataset("Topic_Model_w_Rapids")
Topic_Model_w_Rapids.write_with_schema(Topic_Model_w_Rapids_df)
UMAP is a substantial contributor to overall compute time. Running UMAP on an NVIDIA GPU with RAPIDS cuML resulted in a 4x performance speedup. Additional improvement can be achieved by running more of the algorithm on GPU, such as with cuML HDBSCAN.
| Topic modeling process without/with RAPIDS | Runtime |
| Without RAPIDS | 12 minutes 21 seconds |
| With RAPIDS | 2 minutes 59 seconds |
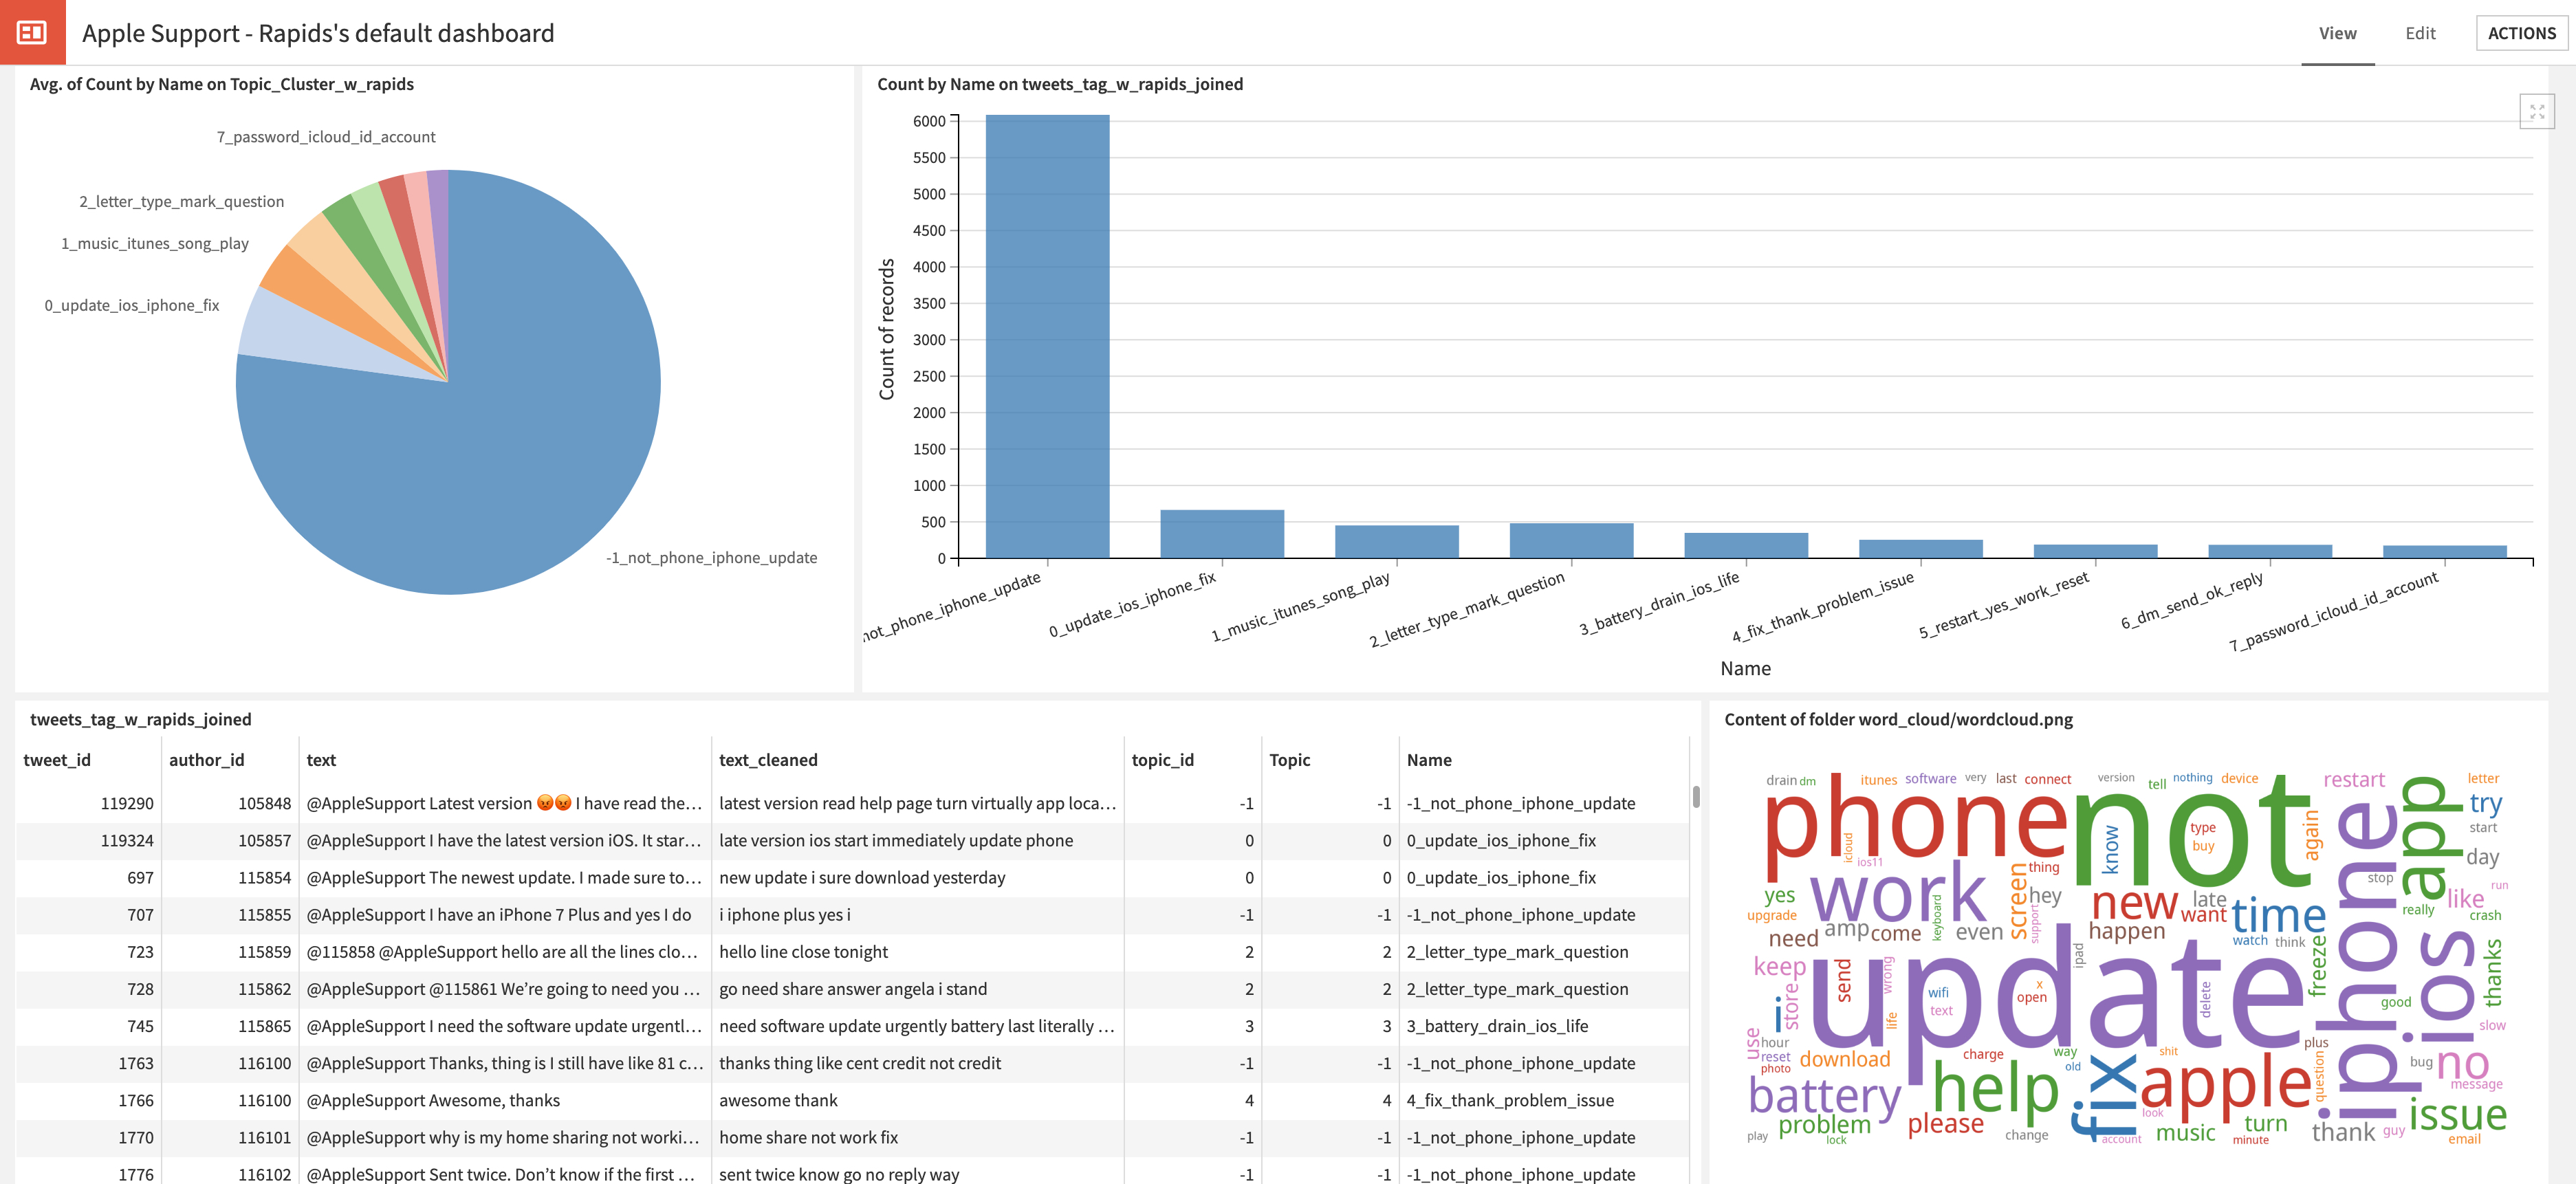
Step 4. Complaint Clustering Dashboard
Finally, you can build various cool-looking charts on the output datasets (with cleaned Tweet text and topics) in Dataiku and push to a dashboard for executive team review (Figure 13).
Putting it all together
If you are looking to use deep learning for an image classification, object detection, or NLP use case, Dataiku helps you with labeling, model training, explainability, model deployment, and centralized management of code and code environments. Tight integrations with the latest NVIDIA data science libraries and hardware for compute make for a complete stack.
Additional resources
Check out the resources below to learn more.
