
 Managing complexity in large programs requires breaking them down into components that are responsible for small, well-defined portions of the overall program. Separate compilation is an integral part of the C and C++ programming languages which allows portions of a program to be compiled into separate objects and then linked together to form an executable or library. Developing large and complex GPU programs is no different, and starting with CUDA 5.0, separate compilation and linking are now important tools in the repertoire of CUDA C/C++ programmers.
In this post, we explore separate compilation and linking of device code and highlight situations where it is helpful. In the process, we’ll walk through a simple example to show how device code linking can let you move existing code to the GPU with minimal changes to your class hierarchy and build infrastructure.
One of the key limitations that device code linking lifts is the need to have all the code for a GPU kernel present when compiling the kernel, including all the device functions that the kernel calls. As C++ programmers, we are used to calling externally defined functions simply by declaring the functions’ prototypes (or including a header that declares them).
Managing Complexity with Separate Compilation
The common approach to organizing and building C++ applications is to define all member functions of a single class in one or more .cpp source files, and compile each .cpp source file into a separate .o object file. Other classes and functions may call these member functions from anywhere in the program by including the class header file; the function implementation is not needed to compile another function that calls it. After compiling all code, the linker connects calls to functions implemented in other files as part of the process of generating the executable.
Let’s imagine a very simple example application which has two classes: a particle class and a three-dimensional vector class, v3, that it uses. Our main task is moving the particle objects along randomized trajectories. Particle filters and Monte Carlo simulations frequently involve operations of this sort. We’ll use a CUDA C++ kernel in which each thread calls particle::advance() on a particle.
Using the conventional C/C++ code structure, each class in our example has a .h header file with a class declaration, and a .cpp file that contains class member function definitions. We compile each .cpp file separately into its own .o file, which the linker combines into an executable. Figure 1 shows the structure of our example application.
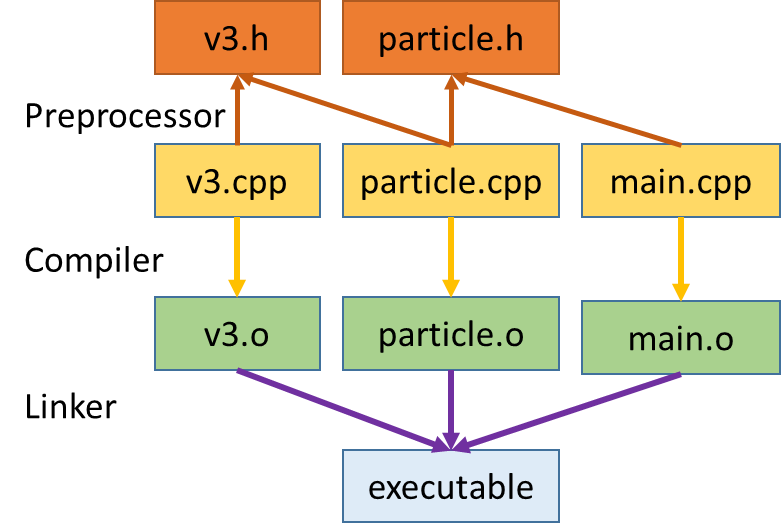
This time-honored project structure is highly desirable for the purposes of maintaining abstraction barriers, class reuse, and separate units in development. It also enables partial rebuilding, which can greatly reduce compilation time, especially in large applications where the programmer modifies only a few classes at a time.
The following two listings show the header and implementation for our 3D vector class, v3.
class v3
{
public:
    float x;
    float y;
    float z;

    v3();
    v3(float xIn, float yIn, float zIn);
    void randomize();
    __host__ __device__ void normalize();
    __host__ __device__ void scramble();
};
#include <v3.h>
#include <math.h>

v3::v3() { randomize(); }

v3::v3(float xIn, float yIn, float zIn) : x(xIn), y(yIn), z(zIn) {}

void v3::randomize()
{
    x = (float)rand() / (float)RAND_MAX;
    y = (float)rand() / (float)RAND_MAX;
    z = (float)rand() / (float)RAND_MAX;
}

__host__ __device__ void v3::normalize()
{
    float t = sqrt(x*x + y*y + z*z);
    x /= t;
    y /= t;
    z /= t;
}

__host__ __device__ void v3::scramble()
{
    float tx = 0.317f*(x + 1.0) + y + z * x * x + y + z;
    float ty = 0.619f*(y + 1.0) + y * y + x * y * z + y + x;
    float tz = 0.124f*(z + 1.0) + z * y + x * y * z + y + x;
    x = tx;
    y = ty;
    z = tz;
}
In our example, particle::advance() relies on two helper routines from the vector class: v3::normalize() and v3::scramble(). The following two listings show the particle class header and source. We’ll see that device object linking enables us to keep our code organized in a familiar way while satisfying the inter-class dependency.
#include <v3.h>

class particle
{
private:
    v3 position;
    v3 velocity;
    v3 totalDistance;

public:
    particle();
    __host__ __device__ void advance(float dist);
    const v3& getTotalDistance() const;
};
#include <particle.h>

particle::particle() : position(), velocity(), totalDistance(0,0,0) {}

__device__ __host__
void particle::advance(float d)
{
    velocity.normalize();
    float dx = d * velocity.x;
    position.x += dx;
    totalDistance.x += dx;
    float dy = d * velocity.y;
    position.y += dy;
    totalDistance.y += dy;
    float dz = d * velocity.z;
    position.z += dz;
    totalDistance.z += dz;
    velocity.scramble();
}

const v3& particle::getTotalDistance() const
{
    return totalDistance;
}
Before CUDA 5.0, if a programmer wanted to call particle::advance() from a CUDA kernel launched in main.cpp, the compiler required the main.cpp compilation unit to include the implementation of particle::advance() as well any subroutines it calls (v3::normalize() and v3::scramble() in this case). In complex C++ applications, the call chain may go deeper than the two-levels that our example illustrates. Without device object linking, the developer may need to deviate from the conventional application structure to accommodate this compiler requirement. Such changes are difficult for existing applications in which changing the structure is invasive and/or undesirable.
Using object linking of device code, the compiler can generate device code for all functions in a .cpp file, store it in a .o file, and then link device code from multiple .o files together in the same way that we are used to linking CPU code. As a result, the build structure does not change much, if at all, and changes to utility classes like v3 are minimal.
Utility Code for Host and Device
The source changes necessary to call v3 and particle member functions from a GPU kernel are minimal. The only required change in v3.h, v3.cpp, particle.h, and particle.cpp is to add __host__ and __device__ decorators to member functions that device code calls. The implementations are otherwise completely unchanged from their CPU-only version.
The __host__ __device__ decorations indicate to nvcc to compile these routines into both CPU code and device-callable GPU code. You can use __host__ or __device__ in isolation as well. Using __host__ alone tells the compiler to generate only a CPU version of this routine. This usage is unnecessary, as this is the default behavior. Using __device__ alone tells the compiler to generate only GPU code for a function. This is useful if you know this routine will never be needed by the host, or if you want to implement your function using operations specific to the GPU, such as fast math or texture unit operations. If you call a __host__ function from the device or a __device__ function from the host, the compiler will report an error.
The example code in main.cpp, shown below, generates particles on the host, copies them to the GPU and then executes the advance operations in a CUDA kernel. The program then copies the particles back and computes and prints a summary of the total distance traveled by all particles. For each of 100 steps, the program generates a random total distance on the CPU and passes it as an argument to the kernel.
You can get the complete example on Github.
#include <particle.h>
#include <stdlib.h>
#include <stdio.h>

__global__
void advanceParticles(float dt, particle * pArray, int nParticles)
{
    int idx = threadIdx.x + blockIdx.x*blockDim.x;
    if(idx < nParticles) { pArray[idx].advance(dt); }
}

int main(int argc, char ** argv)
{
    int n = 1000000;
    if(argc > 1) { n = atoi(argv[1]);}     // Number of particles
    if(argc > 2) { srand(atoi(argv[2])); } // Random seed

    particle * pArray = new particle[n];
    particle * devPArray = NULL;
    cudaMalloc(&devPArray, n*sizeof(particle));
    cudaMemcpy(devPArray, pArray, n*sizeof(particle), cudaMemcpyHostToDevice);
    for(int i=0; i<100; i++)
    {   // Random distance each step
        float dt = (float)rand()/(float) RAND_MAX;
        advanceParticles<<< 1 +  n/256, 256>>>(dt, devPArray, n);
        cudaDeviceSynchronize();
    }

    cudaMemcpy(pArray, devPArray, n*sizeof(particle), cudaMemcpyDeviceToHost);
    v3 totalDistance(0,0,0);
    v3 temp;
    for(int i=0; i<n; i++)
    {
        temp = pArray[i].getTotalDistance();
        totalDistance.x += temp.x;
        totalDistance.y += temp.y;
        totalDistance.z += temp.z;
    }
    float avgX = totalDistance.x /(float)n;
    float avgY = totalDistance.y /(float)n;
    float avgZ = totalDistance.z /(float)n;
    float avgNorm = sqrt(avgX*avgX + avgY*avgY + avgZ*avgZ);
    printf("Moved %d particles 100 steps. Average distance traveled is |(%f, %f, %f)| = %f\n",
                                          n, avgX, avgY, avgZ, avgNorm);
    return 0;
}
Building and running
Using make will work on this project so long as you have the CUDA 5.0 or later compiler in your path and a CUDA capable device with SM version 2.0 or later in your system. The following listing shows the contents of the Makefile.
objects = main.o particle.o v3.o

all: $(objects)
    nvcc -arch=sm_20 $(objects) -o app

%.o: %.cpp
    nvcc -x cu -arch=sm_20 -I. -dc $< -o $@

clean:
    rm -f *.o app
When you run app you can optionally specify two command line arguments. The first is the number of particles to create and run (default is 1 million particles).
./app <numParticles>
The second number is a random seed, to generate different sequences of particles and distance steps.
./app <numParticles> <randomSeed>
In the absence of arguments, the program uses the default random seed.
Using Device Code Linking
Beyond the __host__ and __device__ decorations and the CUDA kernel, the only difference from a CPU-only version of this code is the use of nvcc as the compiler and the –dc compiler option. The –dc option tells nvcc to generate device code for later linking. It is worth noting that we have specified –arch=sm_20 before the –dc option, because not all SM code variants support device linking and nvcc needs to know that it is targeting a compatible SM architecture. Device code linking requires Compute Capability 2.0 (sm_20) or later. We omit –dc in the link command to tell nvcc to link the objects. When nvcc is passed the object files with both CPU and GPU object code, it will link both automatically.
Finally, you may not recognize the option –x cu. This option tells nvcc to treat the input files as .cu files containing both CPU and GPU code. By default, nvcc treats .cpp files as CPU-only code. This option is required to have nvcc generate device code here, but it is also a handy way to avoid renaming source files in larger projects. (A side note: if you #include <cuda_runtime.h> in a .cpp file and compile it with a compiler other than nvcc, __device__ and __host__ will be defined to nothing to enable portability of this code to other compilers!)
Advanced Usage: Using a Different Linker
When you use nvcc to link, there is nothing special to do: replace your normal compiler command with nvcc and it will take care of all the necessary steps. However, you may choose to use a compiler driver other than nvcc (such as g++) for the final link step. Since your CPU compiler will not know how to link CUDA device code, you’ll have to add a step in your build to have nvcc link the CUDA device code, using the nvcc option –dlink. In our example, we could do the following.
> nvcc –arch=sm_20 –dlink v3.o particle.o main.o –o gpuCode.o
This links all the device object code and places it into gpuCode.o. Note that this does not link the CPU object code. In fact, the CPU object code in v3.o, particle.o, and main.o is discarded in this step. To complete the link to an executable, we can use ld or g++.
> g++ gpuCode.o main.o particle.o v3.o –lcudart –o app
We give g++ all of the objects again because it needs the CPU object code, which is not in gpuCode.o. The device code stored in the original objects (particle.o, v3.o, main.o) does not conflict with the code in gpuCode.o. g++ ignores device code because it does not know how to link it, and the device code in gpuCode.o is already linked and ready to go. This intentional ignorance is extremely useful in large builds where intermediate objects may have both CPU and GPU code. In this case, we just let the GPU and CPU linkers each do its own job, noting that the CPU linker is always the last one we run. The CUDA Runtime API library is automatically linked when we use nvcc for linking, but we must explicitly link it (-lcudart) when using another linker.
Caveats
There are some limitations with device code linking. As mentioned previously, not all SM versions support device object linking; it requires sm_20 or higher, and CUDA 5.0 or newer.
Performance of linked device code may also be a bit lower than the performance of device code built with full code path visibility at compile time. When both the function and the call site code are known at compile time, the compiler can optimize the function call, but when the call site and the function are in different compilation units, the compiler must fully adhere to an ABI (Application Binary Interface), which prevents this type of optimization. Performance effects are variable, but CUDA 5.5 and 6.0 both contain notable improvements in the performance of applications using device code linking.
Conclusion: Device Code Linking is a Powerful Tool
The primary advantage of device code linking is the availability of more traditional code structures, especially in C++, for your application. Device code linking dramatically eases the process of compiling complicated C++ composition chains for the GPU and enabling their use in GPU kernels. For example, we have used this feature to enable GPU acceleration in a large C++ code with dozens of classes organized in the typical fashion shown here. In that case, the call chain routinely went through tens of classes and we compiled over 200 member functions for the device, all used in a single kernel. Using device code linking, we maintained the existing C++ structure while the computational load was parallelized on the GPU. Thanks to device object linking, this project took only a matter of days to port.
Using device code linking can allow you to have the best of both worlds: maintain the existing structure of your application, have control over each build and link step, and make use of the most powerful processors on the planet in your application.