The CUDA 11.3 release of the CUDA C++ compiler toolchain incorporates new features aimed at improving developer productivity and code performance. NVIDIA is introducing cu++flt, a standalone demangler tool that allows you to decode mangled function names to aid source code correlation.
Starting with this release, the NVRTC shared library versioning scheme is relaxed to facilitate compatible upgrades of the library within a CUDA major release sequence. The alloca built-in function that can be used to allocate dynamic memory out of the stack frame is now available for use in device code as a preview feature.
With the CUDA 11.3 release, the CUDA C++ language is extended to enable the use of the constexpr and auto keywords in broader contexts. The CUDA device linker has also been extended with options that can be used to dump the call graph for device code along with register usage information to facilitate performance analysis and tuning.
We are again proud to help enhance the developer experience on the CUDA platform.
Standalone demangler tool: cu++filt
To facilitate function overloading in CUDA C++, the NVCC compiler frontend mangles (or encodes) function identifiers to include information about their return types and arguments. The compiler follows the Itanium C++ (IA-64) mangling scheme, with some added CUDA specific extensions.
When disassembling or debugging CUDA programs, it is hard to trace the mangled identifier back to its original function name as the encoded names are not human readable. To simplify debugging and to improve readability of PTX assembly, we introduced a new CUDA SDK tool in the CUDA SDK: cu++filt.
The cu++filt tool demangles or decodes these mangled function names back to their original identifiers for readability. You can use the demangled names for precisely tracing the call flow. We modelled this tool after the GNU C++ demangler: c++filt with a similar user interface. This tool can be found in the \bin directory of the CUDA SDK and is available on the Linux and Windows operating systems.
Example:
Demangling a regular C++ identifier:
#cu++filt  _ZSt7forwardIRPcEOT_RNSt16remove_referenceIS2_E4typeE
T1 && std::forward<char *&>(std::remove_reference<T1>::type &)
Demangling a CUDA device function call from within a CUDA kernel:
#cu++filt  $_Z5helloPi$_Z7displayv
hello(int *)::display()
#cu++filt $_Z5helloPc$_Z7displayv
	hello(char *)::display()
Demangling a CUDA kernel with static (internal) linkage:
#cu++filt __nv_static_21__12_test_cpp1_ii_main__Z5helloc
hello(char)
Demangling a non-compliant identifier:
#cu++filt _InV@LiD_mAnGled_n@M3
_InV@LiD_mAnGled_n@M3
NVRTC supports enhanced compatibility
Starting with the CUDA 11.3 release, the NVRTC shared library versioning scheme and the library naming convention is relaxed to allow you to use newer NVRTC libraries on older toolkits, but only within a major CUDA release series.
Typically, an NVRTC library’s SONAME value (Linux), or the DLL file name (Windows), always encoded both the major and minor number of the CUDA toolkit version to which it belonged. As a result, developers were unable to upgrade to the latest NVRTC library without upgrading the entire CUDA toolkit.
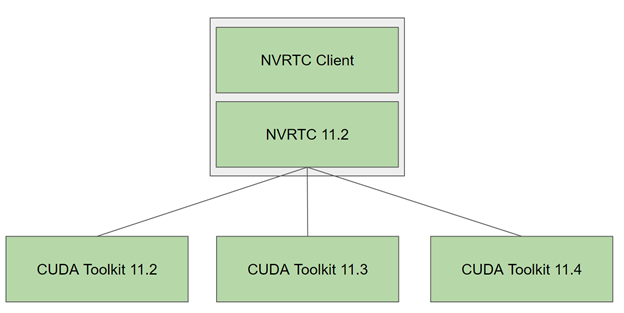
In CUDA toolkits prior to CUDA 11.3, the SONAME value was in the form MAJOR.MINOR and the DLL filename was in the form nvrtc64_XY_0.dll, where X=MAJOR, Y=MINOR. Starting from CUDA 11.3, and for all future CUDA 11.x toolkit releases, the NVRTC shared library version will not change and will be frozen at 11.2. The SONAME in the Linux version of the library is 11.2 and the corresponding DLL filename in Windows is nvrtc64_112_0.dll.
From the next major CUDA release onwards, X (which will be greater than 11), the NVRTC shared library’s SONAME and its DLL filename equivalent will only encode the CUDA major version. On Linux, the SONAME will be X and on Windows the DLL filename will be nvrtc64_X0_0.dll, where X is the major version.
Figure 1 shows that this relaxed versioning scheme enables you to easily upgrade to a newer NVRTC library within the same major release stream and take advantage of bug fixes and performance improvements. The current version of the NVRTC library in use can be found by using the nvrtcVersion API:
nvrtcResult nvrtcVersion(int *major, int *minor);
However, there is a caveat. A more recent NVRTC library may generate PTX with a version that is not accepted by the CUDA Driver API functions of an older CUDA driver. In the event of such an incompatibility between the CUDA Driver and the newer NVRTC library, you have two options:
- Install a more recent CUDA driver that is compatible with the CUDA toolkit containing the NVRTC library being used.
- Compile device code directly to SASS instead of PTX with NVRTC, using the nvrtcGetCUBIN API introduced in 11.2.
This versioning scheme allows applications developed using different toolkits to coexist and NVRTC to be redistributed along with it without a dependency on the toolkit versions. It also allows applications to take advantage of the latest compiler enhancements by updating the library transparently.
However, those updates could impact performance in some cases, especially for highly tuned code that depends on compiler heuristics that may change across CUDA versions. Expert users who would like to optimize for a specific version of NVRTC and want to maintain that dependency can do so using the dlopen (Linux) or LoadLibrary (Windows) API functions to use a specific library version at run time on an existing installation from a compatible minor release.
Preview support for alloca
CUDA C++ supports dynamic memory allocation using either the built-in function malloc or using the operator new. However, allocations by malloc and new contribute to significant runtime performance overhead due to dynamic allocation on the heap.
In CUDA 11.3, CUDA C++ introduces support for using the memory allocator alloca in device code as a preview feature. Unlike malloc and new, the built-in function alloca allocates memory on the current thread’s stack, offering a faster and more convenient way to allocate small chunks of memory dynamically. This is especially useful when the size of an allocation is not known in advance at compile time.
When memory is allocated using alloca, the stack pointer of the thread’s stack is moved based on the requested memory allocation size to reserve or otherwise allocate the memory. The memory allocated is aligned at a 16-byte boundary, making possible accesses using all basic types, including vector types, without alignment constraints.
There are some caveats that you should pay attention to when using alloca, so that you don’t risk introducing memory corruptions or undefined behaviors during program execution. Consider the following code sample of allocate.cu:
$ cat allocate.cu
...
#ifdef USE_MALLOC
#define ALLOC(sz) malloc((sz))
#define FREE(ptr) free((ptr))
#else
#define ALLOC(sz) alloca((sz))
#define FREE(ptr)
#endif

__device__ int out;
__device__ int foo(int *ptr1, int *ptr2, int len)
{
    int ret = 0;
    for (int i=0; i < len; i++) ptr2[i+i] = i;
    for (int i=0; i < len; i++) ret  += ptr1[i] - ptr2[i+i];
    return ret;
}

__device__ int bar(int len) {
  int *bptr1 = (int *)ALLOC(len*sizeof(int));
  int *bptr2 = (int *)ALLOC(2*len*sizeof(int));
  for (int i=0; i < len; i++) bptr1[i] = i;

  int ret = foo(bptr1, bptr2, len );
  FREE(bptr1);
  FREE(bptr2);
  return ret;
}

__global__ void launch(int bufLength, int iteration) {
  int *lptr1 = (int *)ALLOC(bufLength*sizeof(int));
  int *lptr2 = (int *)ALLOC(2*bufLength*sizeof(int));

  for (int i=0; i < bufLength; i++) lptr1[i] = i;
  atomicAdd(&out, foo(lptr1, lptr2, bufLength));

  for (int j=0; j <iteration; j++) {
    atomicAdd(&out, bar(bufLength));
  }

  FREE(lptr1);
  FREE(lptr2);
}
...
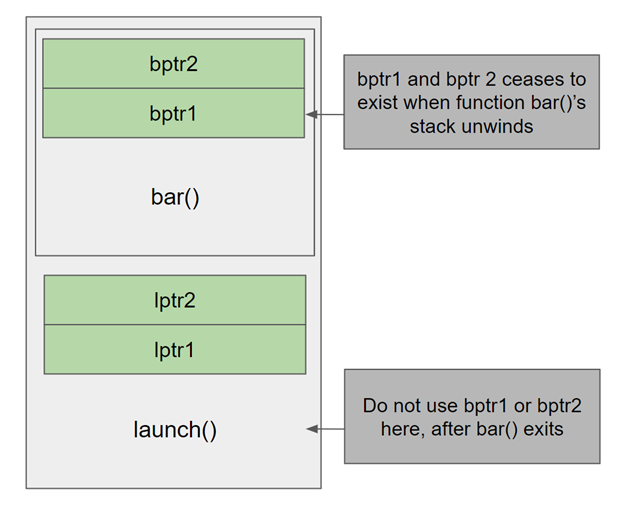
Unlike memory allocated using malloc or new that must be explicitly freed, memory allocated by bar using alloca is part of the stack, so it should not be freed or accessed after the stack unwinds.
Thread stack space is a limited resource. Be wary of a possible stack overflow when using alloca. Currently, you can’t determine ahead of time whether the stack is going to overflow. To aid you, a ptax warning is shown when compiling a code using alloca, reminding you that the stack size cannot be determined at compile time.
$ nvcc.exe -arch=sm_80 allocate.cu -o allocate.exe

ptxas warning : Stack size for entry function '_Z6launchi' cannot be statically determined
   Creating library alloc.lib and object alloc.exp
As the CUDA driver cannot set the correct stack size for the program, the default stack size is used. Set stack size according to the actual stack memory usage in the program.
Despite the caveats, the potential performance benefits of using alloca combined with automatic memory management makes alloca an attractive alternative to dynamic memory allocation on the heap.
Comparing alloca and malloc usage and performance
The performance benefits of allocating memory on the thread stack using alloca is significant.
The earlier allocate.cu example showed the difference in usage and performance between stack-based alloca and heap-based, per-thread malloc. Before launching the kernel, you must set device limits properly, with cudaDeviceSetLimit (cudaLimitStackSize, bytesPerThread) for stack size, or cudaDeviceSetLimit (cudaLimitMallocHeapSize, heapSize) for heap size. The FREE(ptr) is defined as free(ptr) only when USE_MALLOC is defined; otherwise, it is empty.
For this test, we set the following limits:
#ifdef USE_MALLOC
  cudaDeviceSetLimit (cudaLimitMallocHeapSize, 500000000);
#else
  cudaDeviceSetLimit (cudaLimitStackSize, 1024*50);
#endif
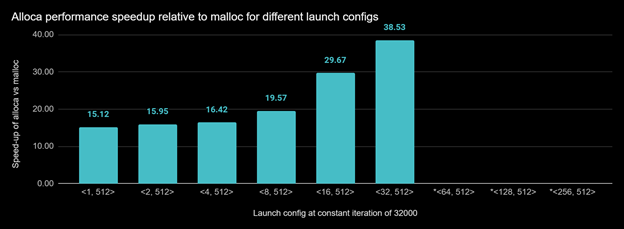
In the first performance measurement, we executed alloca.exe and malloc.exe with different launch configurations. When launch config is <64, 512> (block size is 512 and grid size is 64) and up, the malloc.exe ran out of memory for the heap size limit 500000000.
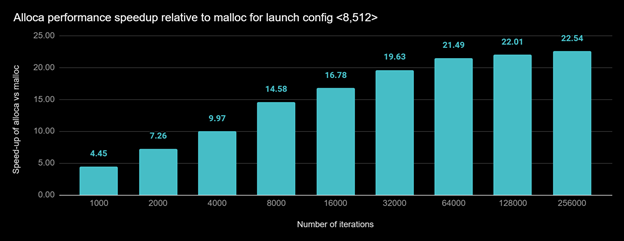
In the next measurement, we used fixed launch configuration <8, 512>, but doubled the number of iterations of bar for, which is invoked for each run. Figure 5 shows the results.
In CUDA 11.3, the cuda-gdb/classic backend debugger returns a truncated stack. You can see the first device function that invokes alloca. Full support for alloca by CUDA tools may be available in the next release.
CUDA C++ support for new keywords
CUDA 11.3 has added device code support for new C++ keywords: constexpr and auto.
Support for constexpr
In CUDA C++, __device__ and __constant__ variables can now be declared constexpr. The constexpr variables can be used in constant expressions, where they are evaluated at compile time, or as normal variables in contexts where constant expressions are not required. While CUDA C++ allowed some uses of host constexpr variables from device code in constant expressions in 11.2 and earlier, using them in other contexts would result in errors. For this case, constexpr device variables now be used instead.
Example:
constexpr int host_var = 10;
__device__ constexpr int dev_var = 10;

__device__ void foo(int idx) {
  constexpr int vx = host_var; // ok
  constexpr int vy = dev_var; // also ok

  const int& rx = host_var; // error, host_var is not defined in device code.
  const int& ry = dev_var; // ok
}
Support for auto
In CUDA C++, we are introducing support for the auto type for namespace scope device variables. A placeholder type uses the initializer to deduce the type of the variable being declared. This can be useful as a shorthand if the type of the variable has a long name. It enables the declaration of namespace scope variable templates where the type of the initializer is not known until instantiation.
Example:
namespace N1 { namespace N2 { struct longStructName { int x; }; } }
constexpr __device__ N1::N2::longStructName foo() { return N1::N2::longStructName{10}; }

__device__ auto x = foo; // x has 'int' type

template<typename T> constexpr __device__
  auto foo() -> decltype(+T{}) { return {}; }

template<typename T> __device__ auto y = foo<T>();

__global__ void test() {
  auto i = y<char>;  // i has type int
  auto f = y<float>; // f has type float
}
NVLINK call graph and register usage support
Optimizing for register usage can improve the performance of device code. To get the best performance in device code, it is important to consider the usage of limited GPU resources like registers, as using fewer registers can increase occupancy and parallelism. When using separate compilation, the linker builds a call graph and then propagates the register usage of the called device functions, up to the kernel function representing the root node of the call graph.
However, if there are indirect calls through function pointers, then the call graph conservatively adds an edge for every potential target. The targets are where the prototype (function signature) of potential target functions match the prototype of the function pointer call, and where the function target has their address taken somewhere. This can result in the call graph reaching functions that you know are not real targets. If these false targets increase the register usage, that can in turn affect occupancy, as we show later in this section.
In large CUDA C++ applications with complex call graphs or precompiled device libraries, it can be difficult to know what the device linker infers to be potential indirect function call targets. So, we’ve added an option to dump the call graph information. The option is specific to the device linker nvlink, which is invoked as follows:
nvcc -Xnvlink -dump-callgraph
By default, this dumps demangled names. To avoid demangled names, use the following:
nvcc -Xnvlink -dump-callgraph-no-demangle
The format of the -dump-callgraph output is as follows:
# A: s -> B // Function s is given a number #A, and s potentially calls the function number B".
# s [N]     // s uses N registers
# ^s        // s is entry point
# &s        // s has address taken
For the CUDA sample in 0_Simple/simpleSeparateCompilation, the following code is in one file:
__device__ float multiplyByTwo(float number)
{
return number * 2.0f;
}
__device__ float divideByTwo(float number)
{
return number * 0.5f;
}
Then another file has the following:
__device__ deviceFunc dMultiplyByTwoPtr = multiplyByTwo;
__device__ deviceFunc dDivideByTwoPtr = divideByTwo;

//! Applies the __device__ function "f" to each element of the vector "v".
__global__ void transformVector(float *v, deviceFunc f, uint size)
{
    uint tid = blockIdx.x * blockDim.x + threadIdx.x;
    if (tid < size) {
    v[tid] = (*f)(v[tid]);
    }
}
This is invoked as follows:
cudaMemcpyFromSymbol(&hFunctionPtr, dMultiplyByTwoPtr, sizeof(deviceFunc));
transformVector<<<dimGrid, dimBlock>>>(dVector, hFunctionPtr, kVectorSize);
The call graph for this on sm_52 is as follows:
1: ^transformVector(float *, float (*)(float), unsigned int) [20] -> 4 3 2: <ignore this blank> 3: &multiplyByTwo(float) [5] -> 4: ÷ByTwo(float) [5] ->
According to the call graph, the transformVector kernel calls two functions, divideByTwo (#4) and multiplyByTwo (#3). The called functions all use fewer registers (five) than transformVector[20], so the final register count stays at 20.
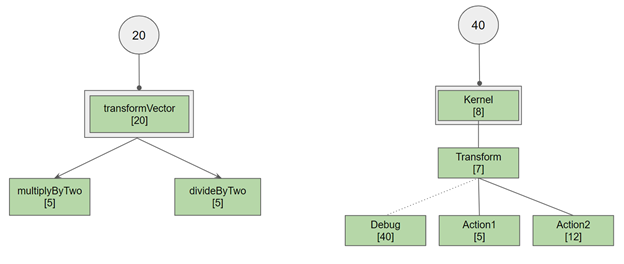
Figure 5. Call graph and corresponding register reservations for transformVector and Kernel.
Consider a more interesting case, where a Transform function calls either Action1 or Action2, but also potentially matches a Debug function:
1: &Debug(int, int) [40] ->
2: &Action1(int, int) [5] ->
3: &Action2(int, int) [12] ->
4: Transform(int, int, int (*)(int, int)) [7] -> 3 2 1
5: ^Kernel(int *) [8] -> 4
In this case, Kernel calls Transform (function #4) which potentially calls Action2 (#3), Action1 (#2), and Debug (#1). The max register count for Action2, Action1, and Debug is 40 (for Debug), so a register usage of 40 ends up being propagated into Kernel. But if you know that Debug is not called by Transform, you could restructure your code to remove Debug from the call graph. Either modify the prototype for Debug or don’t have the address taken for Debug. The result would be that Transform would only call Action1 or Action2, which would then have a max register count of 12.
The resulting reduced register reservation increases the availability of the unused register for other kernels, increasing the throughput of kernel execution.
Try out the CUDA 11.3 compiler features
Whether it is the cu++flt demangler tool, redistributable NVRTC versioning scheme, or NVLINK call graph option, the compiler features and tools in CUDA 11.3 are aimed at improving your development experience on the CUDA platform. There is preview support for alloca in this release as well. Download today!
As always, please share any feedback or questions that you may have in the CUDA Forum or leave a comment here.


