

Model deployment is a key phase of the machine learning lifecycle where a trained model is integrated into the existing application ecosystem. This tends to be one of the most cumbersome steps where various application and ecosystem constraints should be satisfied for a target hardware platform, all without compromising the model accuracy.
NVIDIA Triton Inference Server is an open-source model serving tool that simplifies inference and has several features to maximize hardware utilization and increase inference performance. This includes features like:
- Concurrent model execution, which enables multiple instances of the same model to execute in parallel on the same system.
- Dynamic batching, where client-side requests are grouped together on the server to form a larger batch.
For more information, see Fast and Scalable AI Model Deployment with NVIDIA Triton Inference Server.
There are several key decisions to be made when optimizing model deployment:
- How many model instances should NVIDIA Triton run on the same CPU/GPU concurrently to maximize utilization?
- How many incoming client requests should be dynamically batched together?
- Which format should the model be served in?
- At what precision should the outputs be computed?
These key decisions lead to a combinatorial explosion, where hundreds of possible configurations are available for each model and hardware choice. Often, this leads to wasted development time or costly subpar serving decisions.
In this post, we explore how the NVIDIA Triton Model Analyzer can automatically sweep through various serving configurations for your target hardware platform and find the best model configurations based on your application’s needs. This can improve developer productivity while increasing the utilization of serving hardware at the same time.
NVIDIA Triton Model Analyzer
NVIDIA Triton Model Analyzer is a versatile CLI tool that helps with a better understanding of the compute and memory requirements of models served through NVIDIA Triton Inference Server. This enables you to characterize the tradeoffs between different configurations and choose the best one for your use case.
NVIDIA Triton Model Analyzer can be used with all the model formats that NVIDIA Triton Inference Server supports: TensorRT, TensorFlow, PyTorch, ONNX, OpenVINO, and others.
You can specify your application constraints (latency, throughput, or memory) to find the serving configurations that satisfy them. For example, a virtual assistant application might have a certain latency budget for the interaction to feel real-time for the end user. An offline processing workflow should be optimized for throughput to reduce the amount of required hardware and to keep the cost as low as possible. The available memory in the model serving hardware may be limited and necessitate the serving configuration to be optimized for memory.

As an example, we take a pretrained model and show how to use NVIDIA Triton Model Analyzer and optimize the serving of this model on a VM instance on Google Cloud Platform. However, the steps shown here can be used on any public cloud or on-premises with any model type that NVIDIA Triton Inference Server supports.
Creating the model
In this post, we use the pretrained BERT Large model from Hugging Face in PyTorch format. NVIDIA Triton Inference Server can serve PyTorch models using its LibTorch backend for TorchScript models or using its Python backend for pure PyTorch models. To get the best performance, we recommend converting PyTorch models to TorchScript format. To this end, use the tracing functionality of PyTorch.
Begin by pulling the PyTorch container from NGC and install the transformers package within the container. If it is your first time using NGC, create an account. We use the 22.04 releases of the relevant tools throughout this post, which were the latest at the time of writing. NVIDIA Triton has a monthly release cadence and ships a new version at the end of every month.
docker pull nvcr.io/nvidia/pytorch:22.04-py3
docker run --rm -it -v $(pwd):/workspace nvcr.io/nvidia/pytorch:22.04-py3 /bin/bash
pip install transformers
When the transformers package is installed, run the following Python code to download the pretrained BERT Large model and trace it into TorchScript format.
from transformers import BertModel, BertTokenizer
import torch
model_name = "bert-large-uncased"
tokenizer = BertTokenizer.from_pretrained(model_name)
model = BertModel.from_pretrained(model_name, torchscript=True)

max_seq_len = 512
sample = "This is a sample input text"
tokenized = tokenizer(sample, return_tensors="pt", max_length=max_seq_len, padding="max_length", truncation=True)

inputs = (tokenized.data['input_ids'], tokenized.data['attention_mask'], tokenized.data['token_type_ids'])
traced_model = torch.jit.trace(model, inputs)
traced_model.save("model.pt")
Building the model repository
The first step in using NVIDIA Triton Inference Server to serve your models is to create a model repository. In this repository, you include a model configuration file that provides information about the model. At a minimum, a model configuration file must specify the backend, the maximum batch size for the model, and the input/output structure.
For this model, the following code example is the model configuration file. For more information, see Model Configuration.
platform: "pytorch_libtorch"
max_batch_size: 64
input [
  {
    name: "INPUT__0"
    data_type: TYPE_INT64
    dims: [ 512 ]
  },
  {
    name: "INPUT__1"
    data_type: TYPE_INT64
    dims: [ 512 ]
  },
  {
    name: "INPUT__2"
    data_type: TYPE_INT64
    dims: [ 512 ]
  }
]
output [
  {
    name: "OUTPUT__0"
    data_type: TYPE_FP32
    dims: [ -1, 1024 ]
  },
  {
    name: "OUTPUT__1"
    data_type: TYPE_FP32
    dims: [ 1024 ]
  }
]
After naming the model configuration file as config.pbtxt, create a model repository by following the repository layout structure. The folder structure of the model repository should be similar to the following:
.
└── bert-large
    ├── 1
    │   └── model.pt
    └── config.pbtxt
Running NVIDIA Triton Model Analyzer
The recommended way to use Model Analyzer is to build the Docker image for it yourself:
git clone https://github.com/triton-inference-server/model_analyzer.git
cd ./model_analyzer
git checkout r22.04
docker build --pull -t model-analyzer .
Now that you have the Model Analyzer image built, spin up the container:
docker run -it --rm --gpus all \
      -v /var/run/docker.sock:/var/run/docker.sock \
      -v <path-to-triton-model-repository>:/models \
      -v <path-to-output-model-repo>:/output \
      -v <path-to-model-config-repo>:/config \
      --net=host model-analyzer
Different hardware configurations might lead to different optimal serving configurations. As such, it is important to run Model Analyzer on the target hardware platform where the models will be eventually served from.
For reproducibility of the results we present in this post, we ran our experiments in the public cloud. Specifically, we used an a2-highgpu-1g instance on Google Cloud Platform with a single NVIDIA A100 GPU.
A100 GPUs support Multi-Instance GPU (MIG), which can maximize the GPU utilization by splitting up a single A100 GPU up to seven partitions with hardware-level isolation that can independently run NVIDIA Triton servers. For the sake of simplicity, we did not use MIG for this post. For more information, see Deploying NVIDIA Triton at Scale with MIG and Kubernetes.
Model Analyzer supports automatic and manual sweeping through different configurations for NVIDIA Triton models. Automatic configuration search is the default behavior and enables dynamic batching for all configurations. In this mode, Model Analyzer sweeps through different batch sizes and the number of instances of a model that can handle incoming requests simultaneously.
The default ranges swept through are up to five instances of a model and up to a batch size of 128. These defaults can be changed.
Now create a configuration file named sweep.yaml to analyze the BERT Large model prepared earlier and perform an automatic sweep through the possible configurations.
model_repository: /models
checkpoint_directory: /output/checkpoints/
output-model-repository-path: /output/bert-large
profile_models:
  bert-large
perf_analyzer_flags:
  input-data: "zero"
Using the preceding configuration, you can get the top line and the bottom line numbers for the model throughput and latency, respectively.
Model Analyzer also writes the collected measurements to checkpoint files when profiling. These are located within the specified checkpoint directory. You can use the profiled checkpoints to create data tables, summaries, and detailed reports of the results.
With the configuration file in place, you are now ready to run Model Analyzer:
model-analyzer profile -f /config/sweep.yaml
As a sample, Table 1 shows a few rows from the results. Each row corresponds to an experiment run on a model configuration under a hypothetical client load.
| Model | Batch | Concurrency | Model Config Path | Instance Group | Satisfies Constraints | Throughput (infer/sec) | p99 Latency (ms) |
| bert-large | 1 | 16 | bert-large_config_8 | 2/GPU | Yes | 139 | 150.9 |
| bert-large | 1 | 32 | bert-large_config_8 | 2/GPU | Yes | 128 | 222.1 |
| bert-large | 1 | 8 | bert-large_config_8 | 2/GPU | Yes | 123 | 79.6 |
| bert-large | 1 | 64 | bert-large_config_8 | 2/GPU | Yes | 114 | 442.6 |
| … | … | … | … | … | … | … | … |
| bert-large | 1 | 16 | bert-large_config_default | 1/GPU | Yes | 66 | 219.1 |
To get a more detailed report of each model configuration tested, use the model-analyzer report command:
model-analyzer report --report-model-configs bert-large_config_default,bert-large_config_1,bert-large_config_2 --export-path /output --config-file /config/sweep.yaml --checkpoint-directory /output/checkpoints/
This generates a report that details the following:
- The hardware the analysis was run on
- A plot of throughput with respect to latency
- A plot of GPU memory with respect to latency
- A report for the chosen configurations in the CLI
This is a great start for any MLOps team to start their analysis before putting a model in production.
Different stakeholders, differing constraints
In a typical production environment, there are multiple teams that should work symbiotically to deploy AI models at a large scale in production. For example, there might be an MLOps team responsible for the model serving pipeline stability and handling the changes in the service-level agreements (SLAs) imposed by the applications. Separately, the infrastructure team is usually responsible for the entire GPU/CPU farm.
Assume that a product team requested that the MLOps team serve BERT Large with 99% of the requests processed within a latency budget of 30 ms. The MLOps team should consider various serving configurations on the available hardware to satisfy that requirement. Using Model Analyzer removes most of the friction in doing so.
The following code example is an example of a configuration file named latency_constraint.yaml, where we added a constraint on the 99th percentile of measured latency values to satisfy the given SLA.
model_repository: /models
checkpoint_directory: /output/checkpoints/
analysis_models:
  bert-large:
    constraints:
      perf_latency_p99:
        max: 30
perf_analyzer_flags:
  input-data: "zero"
Because you have the checkpoints from the previous sweep, you can reuse them for the SLA analysis. Running the following command gives you the top three configurations satisfying the latency constraint:
model-analyzer analyze -f latency_constraint.yaml
Table 2 shows the measurements taken for the top three configurations and how they compare to the default configuration.
| Model Config Name | Max Batch Size | Dynamic Batching | Instance Count | p99 Latency (ms) | Throughput (infer/sec) | Max CPU Memory Usage (MB) | Max GPU Memory Usage (MB) | Average GPU Utilization (%) |
| bert-large_config_10 | 1 | Enabled | 3/GPU | 29.278 | 92.0 | 0 | 6026.0 | 32.1 |
| bert-large_config_5 | 1 | Enabled | 2/GPU | 24.269 | 90.0 | 0 | 4683.0 | 23.3 |
| bert-large_config_9 | 16 | Enabled | 2/GPU | 25.985 | 90.0 | 0 | 4767.0 | 13.6 |
| bert-large_config_default | 64 | Disabled | 1/GPU | 29.14 | 73.0 | 0 | 3268.0 | 19.2 |
In large-scale production, the software and the hardware constraints affect the SLA in production.
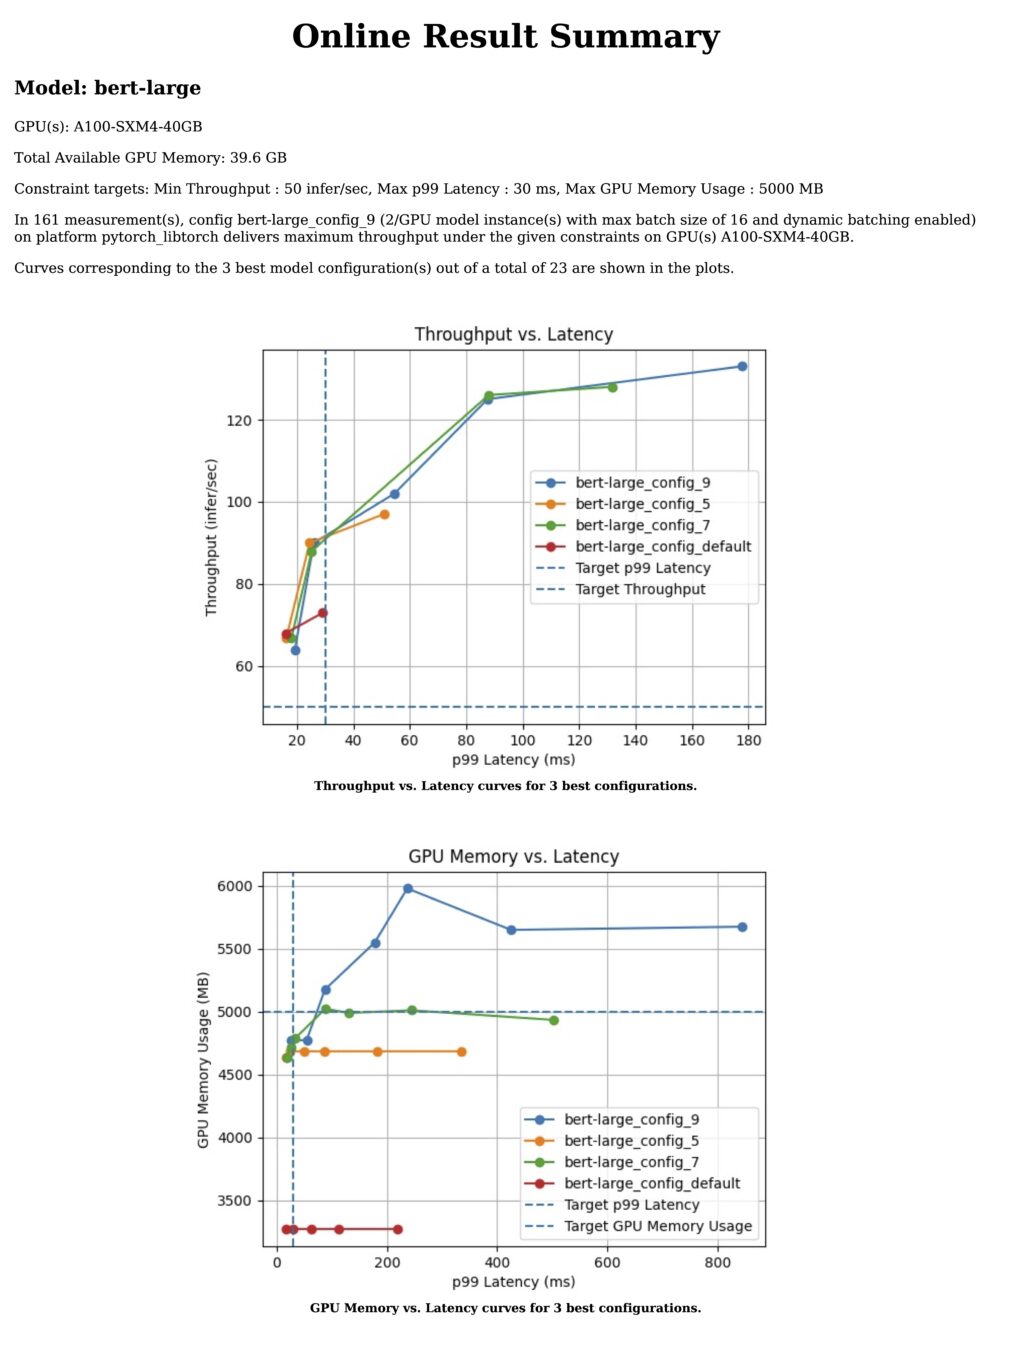
Assume that the constraints of the application have changed. The team would now like to satisfy a p99 latency of 50 ms along with a throughput of 30+ inferences per second for the same model. Also assume that the infrastructure team is able to spare 5,000 MB of GPU memory for its use. Manually finding a serving configuration to satisfy the stakeholders becomes harder and harder as the number of constraints increases. This is where the need for a solution like Model Analyzer becomes more obvious as you can now specify all of our constraints together in a single configuration file.
The following sample configuration file named multiple_constraint.yaml combines throughput, latency, and GPU memory constraints:
model_repository: /models
checkpoint_directory: /output/checkpoints/
analysis_models:
  bert-large-pytorch:
    constraints:
      perf_throughput:
        min: 50
      perf_latency_p99:
        max: 30
   gpu_used_memory:
        max: 5000
perf_analyzer_flags:
  input-data: "zero"
With this updated constraint in place, run the following command:
model-analyzer analyze -f multiple_constraint.yaml
Model Analyzer now finds the serving configurations given below as the top three options and shows how they compare to the default configuration.
| Model Config Name | Max Batch Size | Dynamic Batching | Instance Count | p99 Latency (ms) | Throughput (infer/sec) | Max CPU Memory Usage (MB) | Max GPU Memory Usage (MB) | Average GPU Utilization (%) |
| bert-large_config_9 | 16 | Enabled | 2/GPU | 25.985 | 90.0 | 0 | 4767.0 | 13.6 |
| bert-large_config_5 | 1 | Enabled | 2/GPU | 24.269 | 90.0 | 0 | 4683.0 | 23.3 |
| bert-large_config_7 | 4 | Enabled | 2/GPU | 25.216 | 88.0 | 0 | 4717.0 | 38.7 |
| bert-large_config_default | 64 | Disabled | 1/GPU | 29.14 | 73.0 | 0 | 3268.0 | 19.2 |
NVIDIA Triton Model Analyzer also generates plots and a more detailed report (Figure 2).
Summary
As enterprises find themselves serving more and more models in production, it becomes more and more difficult to make model serving decisions manually or based on heuristics. Doing this manually results in wasted development time or subpar model serving decisions, which necessitates automated tooling.
In this post, we explored how NVIDIA Triton Model Analyzer enables finding model serving configurations satisfying the application SLAs and requirements of various stakeholders. We showed how Model Analyzer can be used to sweep through various configurations, and how it can be used to satisfy specified serving constraints.
Even though we focused on a single model for this post, there are plans to have Model Analyzer perform the same analysis for multiple models at the same time. For example, you could define constraints on different models running on the same GPU and optimize each.
We hope you share our excitement about how much development time Model Analyzer will save and enable your MLOps teams to make well-informed decisions. For more information, see the /triton-inference-server/model_analyzer GitHub repo.
