The new NVIDIA NGP Instant NeRF is a great introduction to getting started with neural radiance fields. In as little as an hour, you can compile the codebase, prepare your images, and train your first NeRF. Unlike other NeRF implementations, Instant NeRF only takes a few minutes to train a great-looking visual.
In my hands-on video (embedded), I walk you through the ins and outs of making your first NeRF. I cover a couple of key tips to help you compile the codebase and explain how to capture good input imagery. I walk through the GUI interface and explain how to optimize your scene parameters. Finally, I show you have to create an animation from your scene.
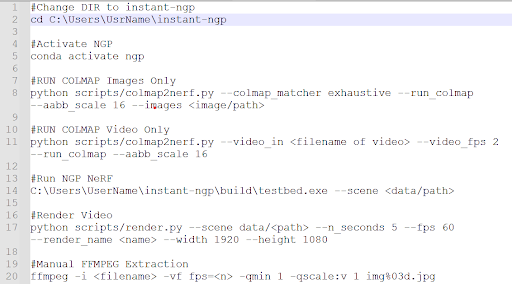
Compiling the codebase
The codebase is straightforward to compile for experienced programmers and data scientists. Beginners can easily follow the detailed instructions provided in bycloudai’s fork from the main GitHub repository. Here are a few additional tips that helped with the installation process:
- Re-install Visual Studio 2019.
- Re-install CUDA Toolkit with the latest version.
- Install Python 3.9. If you are new to Python, this is not the latest version.
- Use CMake 3.22 and make sure that Python 3.9 is used to compile the codebase.
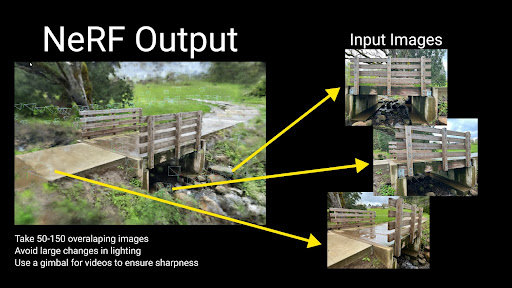
Capturing imagery for Instant NeRF
The pipeline accepts both photo and video input for Instant NeRF generation. The first step in the Instant NeRF generation pipeline uses COLMAP to determine camera positions. Due to this fact, you must follow basic principles of photogrammetry with respect to overlapping and sharp imagery. The video shows you example imagery from an ideal capture.
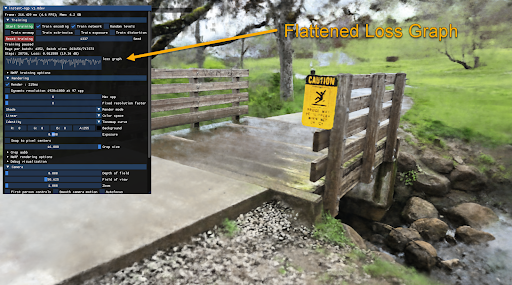
Launching the GUI and training your first NeRF
When the images’ positions are prepared for your first Instant NeRF, launch the graphical user interface through Anaconda using the included Testbed.exe file compiled from the codebase. The NeRF automatically starts training your NeRF.
You will find a majority of visual quality gained in the first 30 seconds; however, your NeRF will continue to improve over several minutes. The loss graph in the GUI eventually flattens out and you can stop the training to improve your viewer’s framerate.
The GUI includes many visualization options, including controls over the camera and debug visualizations. I cover several different options in the GUI in the hands-on demo video.
Tip: save your commonly used command-line prompts in Notepad for future reference.
Creating an animation
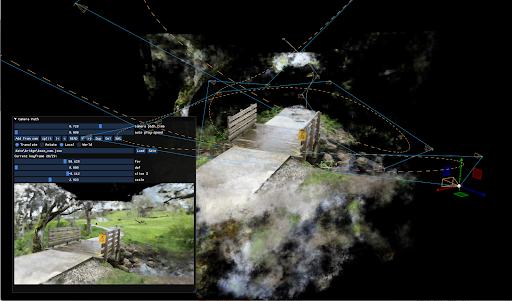
NVIDIA provides an easy-to-use camera path editor with the GUI. To add keyframes, navigate through the scene and choose Add from Cam. The GUI generates a camera trajectory with Bézier curves. To preview your animation, choose Read. When you are happy with the animation, save your camera path and render a full-quality video with the render script in your scripts folder.
Conclusion
One large benefit that I’ve found with Instant NeRFs is that I capture the entire background as part of the scene. Using photogrammetry, I lose the context of the object’s surroundings. This fact excites me as it unlocks a whole new world of potential for capturing and visualizing the world in new ways.
I found that experimenting with NVIDIA Instant NeRFs has been a great introduction to emerging technology. The speed at which I am able to produce results means that I can quickly learn about what works for image capturing. I hope that this walkthrough benefits you as you start your own journey to explore the power and fun of NeRFs.
Bonus: Cropping an Instant NeRF rendering
Now that you know how to create an Instant NeRF, watch this new tutorial on how to crop out the background:
