
Data labeling and model training are consistently ranked as the most significant challenges teams face when building an AI/ML infrastructure. Both are essential steps in the ML application development process, and if not done correctly, they can lead to inaccurate results and decreased performance. See the AI Infrastructure Ecosystem of 2022 report from the AI Infrastructure Alliance for more details.
Data labeling is essential for all forms of supervised learning, in which an entire dataset is fully labeled. It is also a key ingredient of semi-supervised learning, which combines a smaller set of labeled data with algorithms designed to automate the labeling of the rest of the dataset programmatically. Labeling is essential to computer vision, one of the most advanced and developed areas of machine learning. Despite its importance, labeling is slow because it requires scaling a distributed human labor team.
Model training is another major bottleneck in machine learning, alongside labeling. Training is slow because it involves waiting for machines to finish complex calculations. It requires teams to know about networking, distributed systems, storage, specialized processors (GPUs or TPUs), and cloud management systems (Kubernetes and Docker).
Superb AI Suite with NVIDIA TAO Toolkit
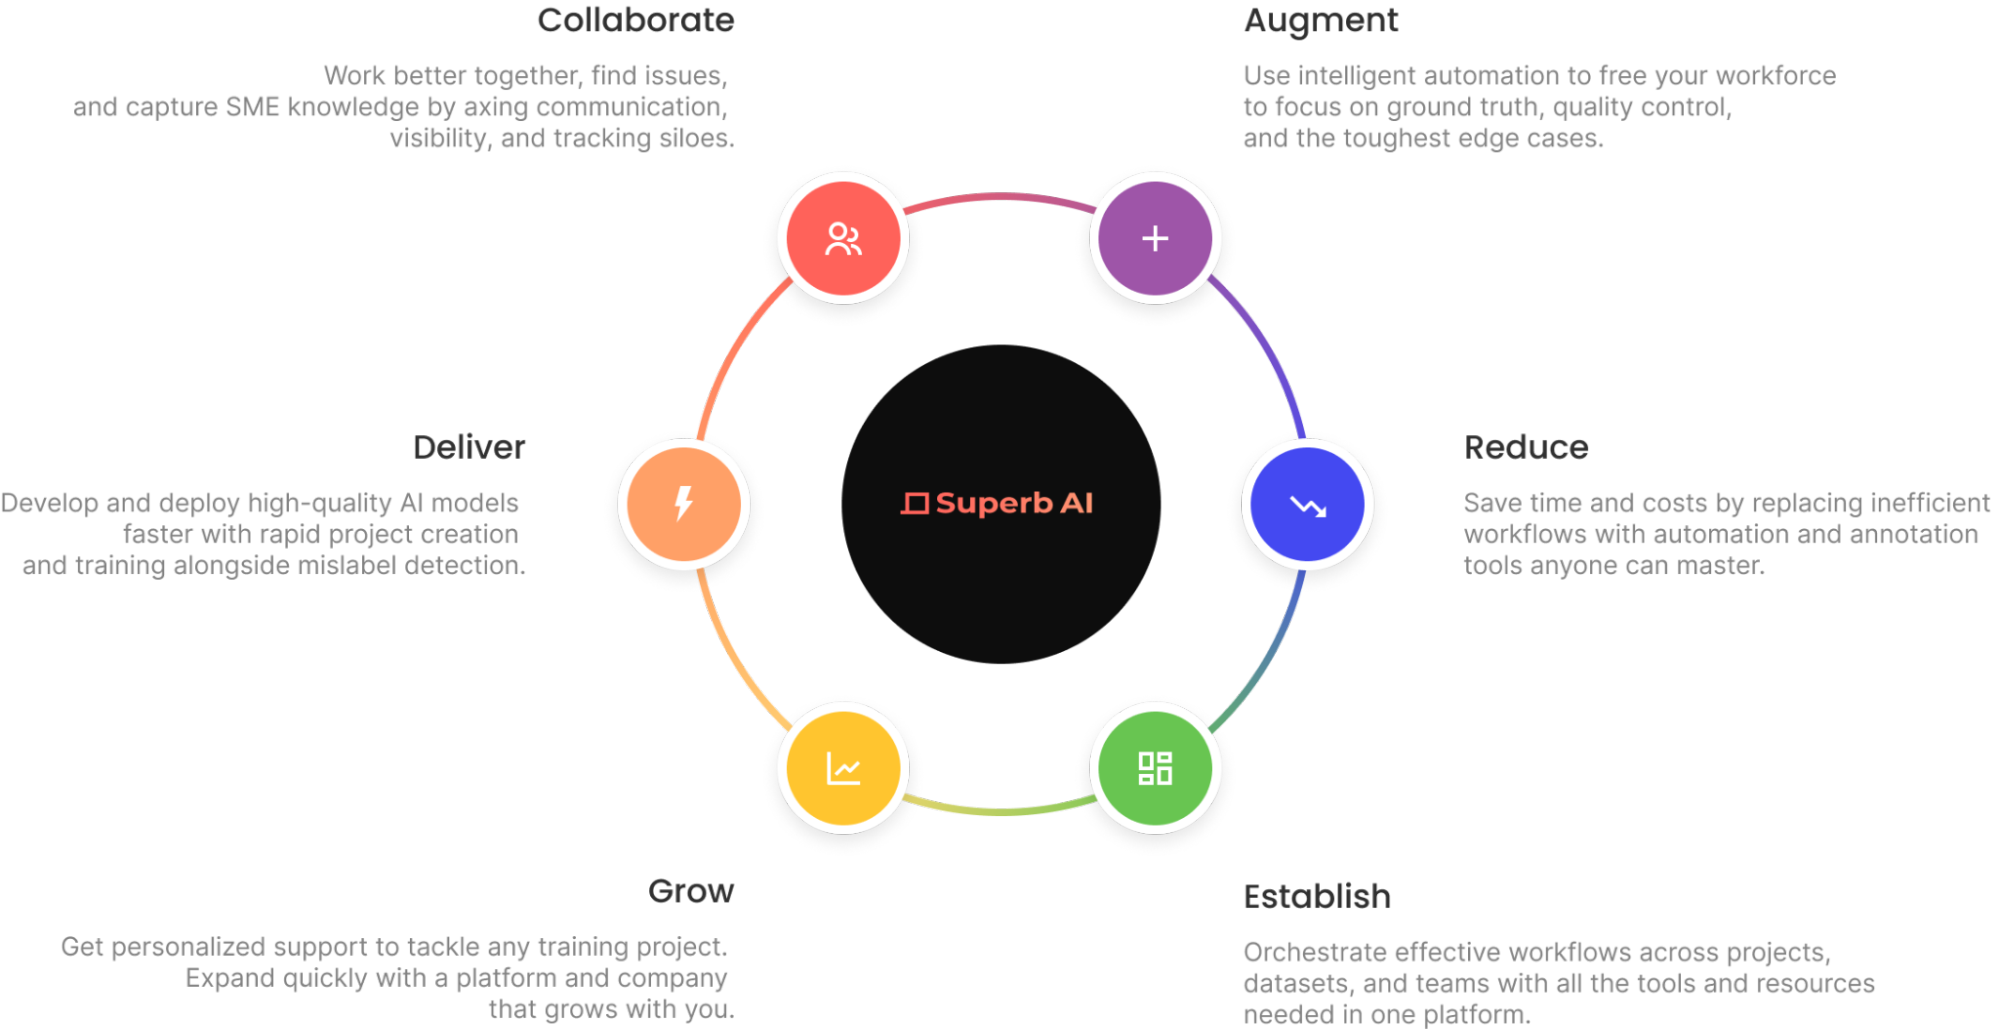
Superb AI has introduced a new way for computer vision teams to drastically decrease the time it takes to deliver high-quality training datasets. Instead of relying on human labelers for a majority of the data preparation workflow, teams can now implement a much more time- and cost-efficient pipeline with the Superb AI Suite.
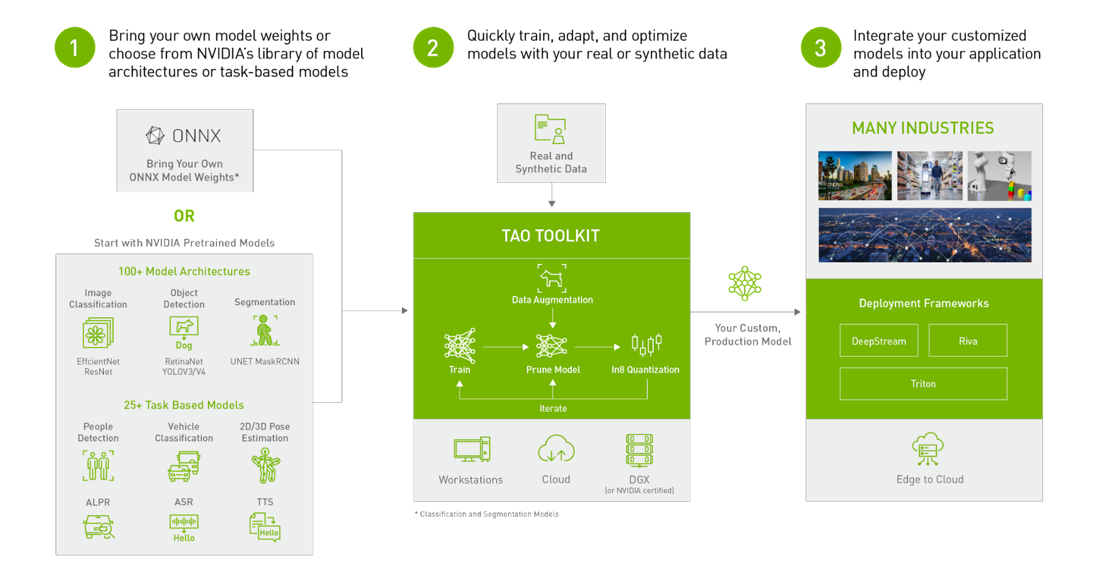
NVIDIA TAO Toolkit, built on TensorFlow and PyTorch, is a low-code version of the TAO framework that accelerates the model development process by abstracting away the framework complexity. TAO Toolkit enables you to use the power of transfer learning to fine-tune NVIDIA pretrained models with your own data and optimize for inference.
Computer vision engineers can use the Superb AI Suite and the TAO Toolkit in combination to address the challenges of data labeling and model training. More specifically, you can quickly generate labeled data in Suite and train models with TAO to perform specific computer vision tasks, whether classification, detection, or segmentation.
Prepare a computer vision dataset
This post demonstrates how to use Superb AI Suite to prepare a high-quality computer vision dataset that is compatible with TAO Toolkit. It walks through the process of downloading the dataset, creating a new project on Suite, uploading data to the project through Suite SDK, using Superb AI’s Auto-Label capability to quickly label the dataset, exporting the labeled dataset, and setting up a TAO Toolkit configuration to use the data.
Step 1: Get Started with Suite SDK
First, head over to superb-ai.com to create an account. Then follow the quick-start guide to install and authenticate Suite CLI. You should be able to install the latest version of spb-cli and retrieve the Suite Account Name / Access Key for authentication.
Step 2: Download the dataset
This tutorial works with the COCO dataset, a large-scale object detection, segmentation, and captioning dataset that is popular in the computer vision research community.
You can use this code snippet to download the dataset. Save it in a file called download-coco.sh and run bash download-coco.sh from the terminal. This will create a data/ directory that stores the COCO dataset.
The next step is to convert COCO to Suite SDK format to sample the five most frequent classes in the COCO validation 2017 dataset. This tutorial handles bounding box annotations only, but Suite can also handle polygons and key points.
You can use this code snippet to perform the conversion. Save it in a file called convert.py and run python convert.py from the terminal. This will create an upload-info.json file that stores information about the image name and annotations.
Step 3: Create a project in Suite SDK
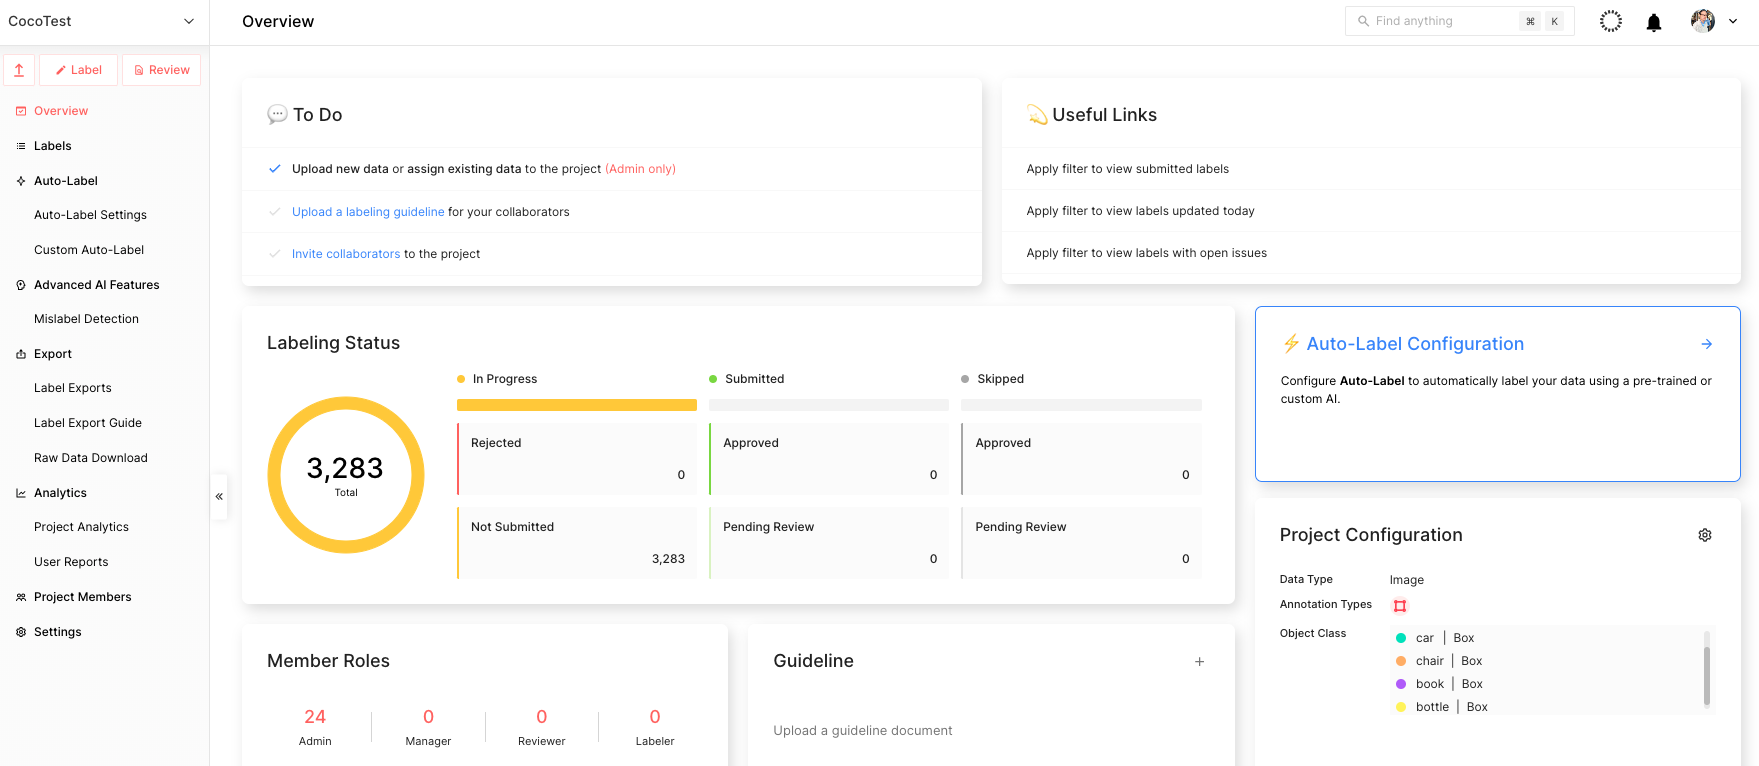
Creating projects through Suite SDK is a work in progress. For this tutorial, create a project on the web using the Superb AI guide for project creation. Follow the configuration presented below.
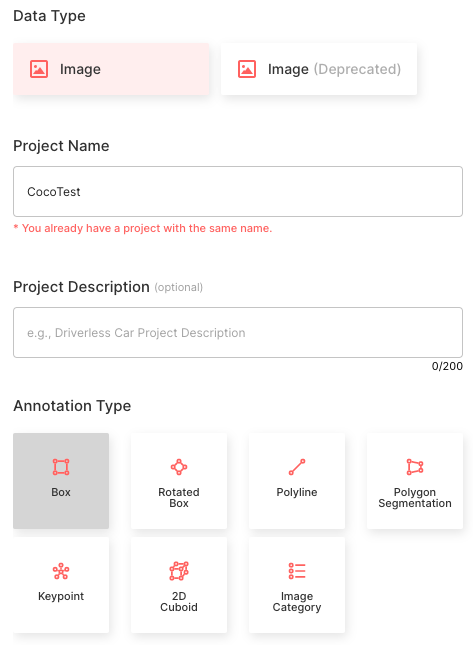
- Choose the Image data type
- Set the Project Name as CocoTest
- Select the Annotation Type as Bounding Box
- Create five object classes that match the class names of COCO class names: [‘person’, ‘car’, ‘chair’, ‘book’, ‘bottle’]
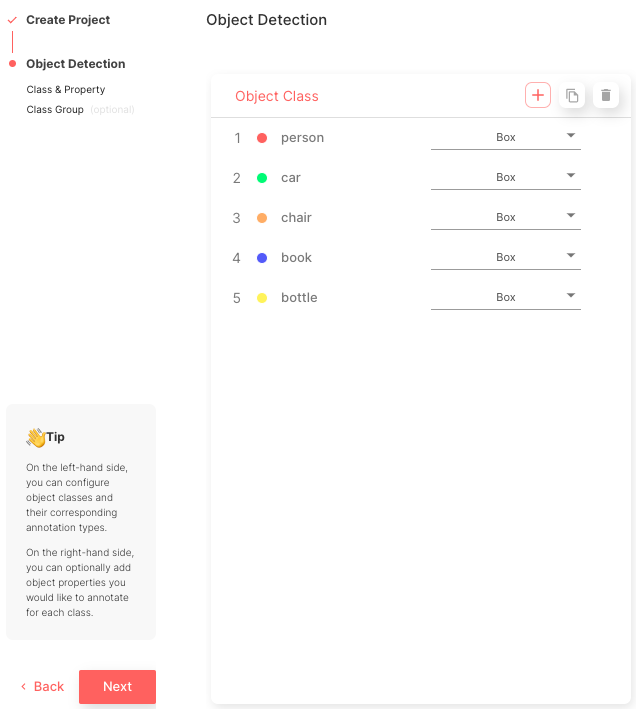
After this process is complete, you can view the main project page, as shown in Figure 5.
Step 4: Upload data using Suite SDK
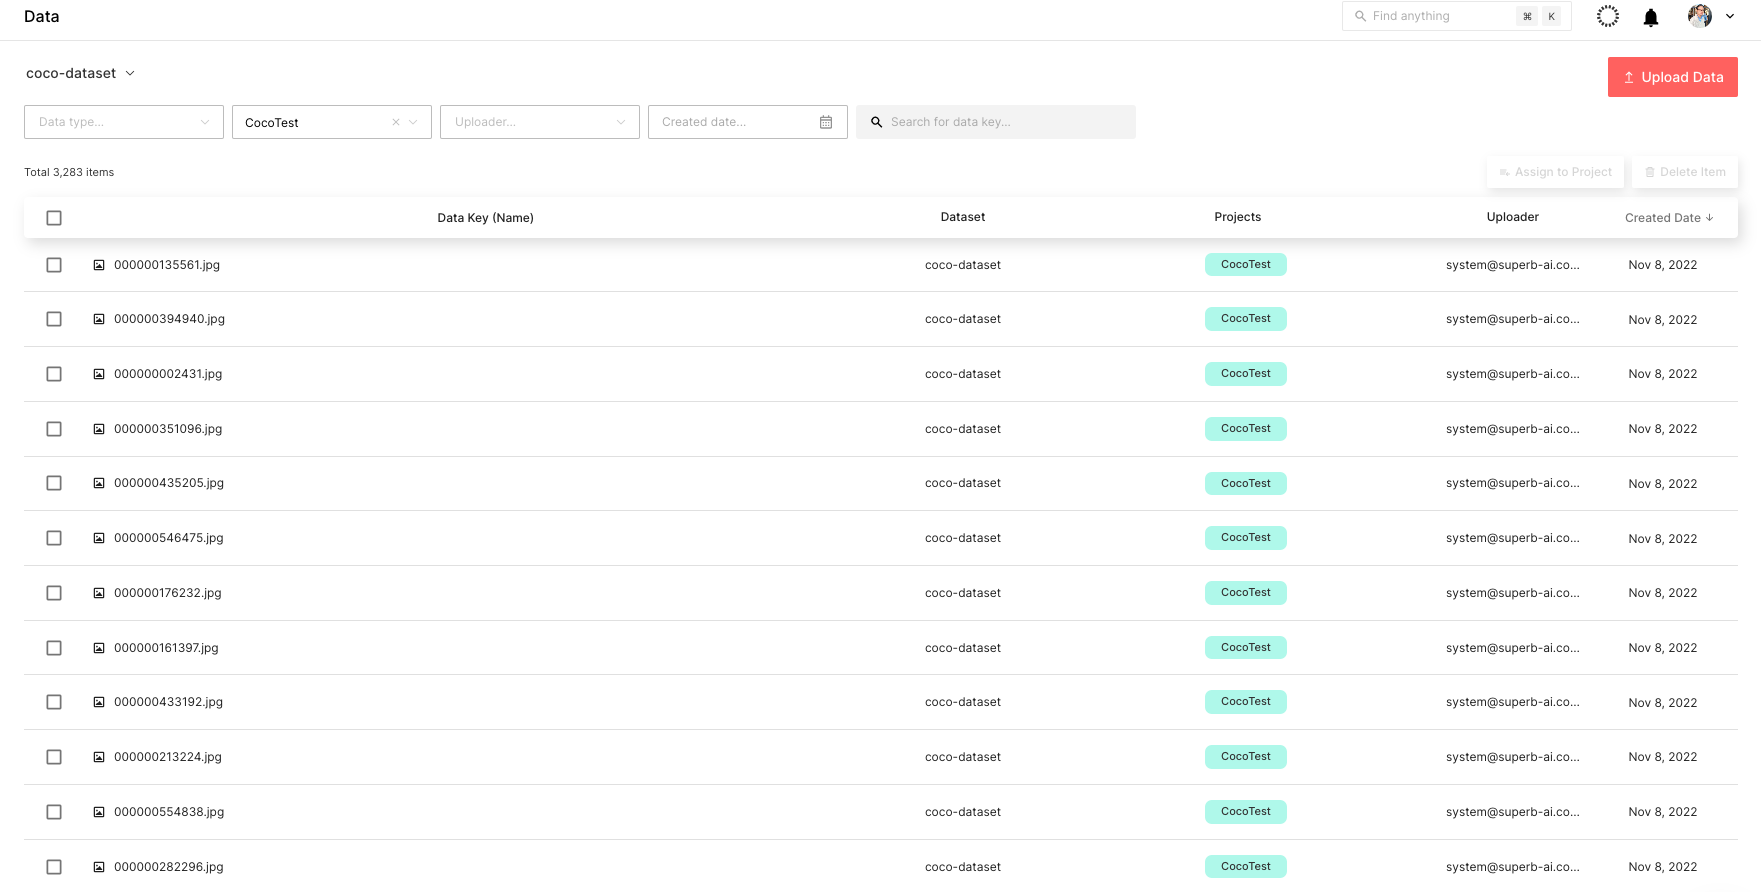
After you finish creating the project, start uploading the data. You can use this code snippet to upload the data. Save it in a file called upload.py and run python upload.py --project CocoTest --dataset coco-dataset in the terminal.
That means CocoTest is the project name and coco-dataset is the dataset name. This will kickstart the uploading process, which can take several hours to complete, depending on the processing power of the device.
You can check the uploaded dataset through the Suite web page in real time, as shown in Figure 6.
Step 5: Label the dataset
The next step is to label the COCO dataset. To do so quickly, use Suite’s powerful automated labeling capabilities. More specifically, Auto-Label and Custom Auto-Label are both powerful tools that can boost labeling efficiency by automatically detecting objects and labeling them.
Auto-Label is a pretrained model developed by Superb AI that detects and labels 100+ common objects, whereas Custom Auto-Label is a model trained using your own data that detects and labels niche objects.
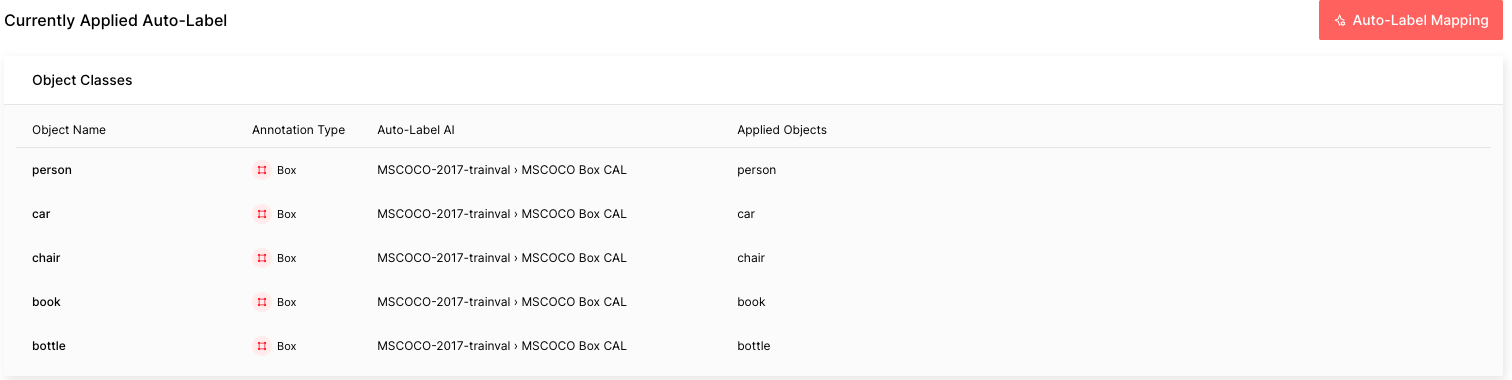
The COCO data in this tutorial is composed of five common objects that Auto-Label is capable of labeling. Follow the guide to configure Auto-Label. The important thing to remember is that you would want to choose the MSCOCO Box CAL as the Auto-Label AI and map the object names with the respective applied objects. It can take about an hour to process all 3,283 labels in the COCO dataset.
After the Auto-Label finishes running, you will see the difficulty of each automated labeling task: red is difficult, yellow is moderate, and green is easy. The higher the difficulty is, the more likely that the Auto-Label incorrectly labeled that image.
This level of difficulty, or estimated uncertainty, is calculated based on factors such as small object size, bad lighting conditions, complex scenes, and so on. In a real-world situation, you can easily sort and filter labels by difficulty in order to prioritize going over labels with a higher chance of errors.
Step 6: Export the labeled dataset from the Suite
After obtaining the labeled dataset, export and download the labels. There is more to a label than just the annotation information. In order to fully use a label for training ML models, you must know additional information, such as the project configuration and meta-information about the raw data. To download all this information along with the annotation files, first request an export so that the Suite system can create a zip file for download. Follow the guide to export and download labels from the Suite.
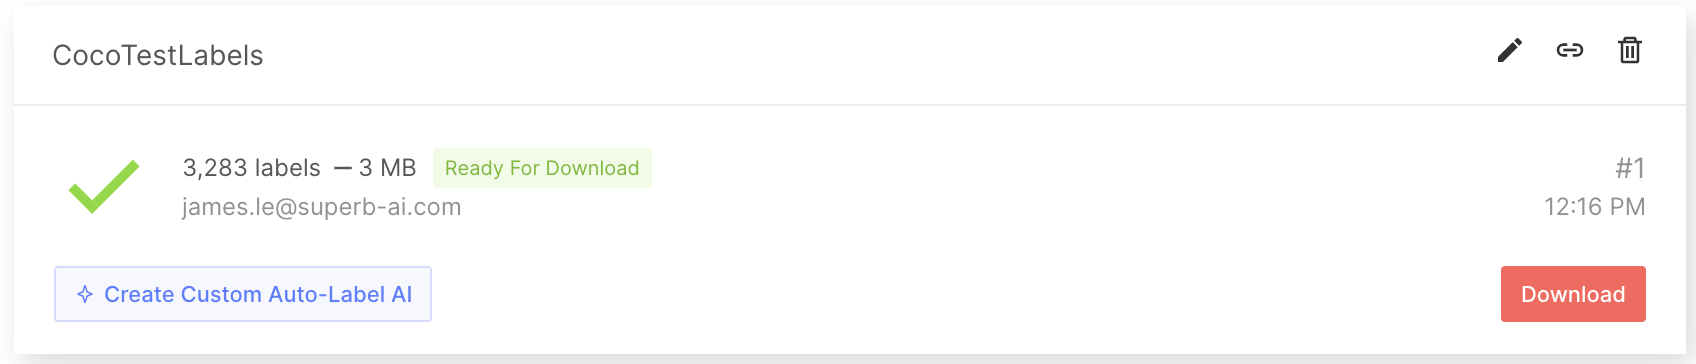
When you export labels, a compressed zip file will be created for you to download. The export result folder will contain general information regarding the project as a whole, annotation information for each label, and the metadata for each data asset. For more details, see the Export Result Format documentation.
Step 7: Convert the output to COCO format
Next, create a script to convert your labeled data to a format that can be input to TAO Toolkit, such as the COCO format. Note that because this tutorial uses the COCO dataset, the data is already in the COCO format. For instance, you can find the JSON file below of a random exported label:
{
   "objects": [
       {
           "id": "7e9fe8ee-50c7-4d4f-9e2c-145d894a8a26",
           "class_id": "7b8205ef-b251-450c-b628-e6b9cac1a457",
           "class_name": "person",
           "annotation_type": "box",
           "annotation": {
               "multiple": false,
               "coord": {
                   "x": 275.47,
                   "y": 49.27,
                   "width": 86.39999999999998,
                   "height": 102.25
               },
               "meta": {},
               "difficulty": 0,
               "uncertainty": 0.0045
           },
           "properties": []
       },
       {
           "id": "70257635-801f-4cad-856a-ef0fdbfdf613",
           "class_id": "7b8205ef-b251-450c-b628-e6b9cac1a457",
           "class_name": "person",
           "annotation_type": "box",
           "annotation": {
               "multiple": false,
               "coord": {
                   "x": 155.64,
                   "y": 40.61,
                   "width": 98.34,
                   "height": 113.05
               },
               "meta": {},
               "difficulty": 0,
               "uncertainty": 0.0127
           },
           "properties": []
       }
   ],
   "categories": {
       "properties": []
   },
   "difficulty": 1
}
Step 8: Prepare the labeled data for model training
Next, pull the COCO data from Suite into model development by using SuiteDataset. SuiteDataset makes an exported dataset within the Suite accessible through the PyTorch data pipeline. The code snippet shown below instantiates the SuiteDataset object class for your training set.
class SuiteDataset(Dataset):
   """
   Instantiate the SuiteDataset object class for training set
   """

   def __init__(
           self,
           team_name: str,
           access_key: str,
           project_name: str,
           export_name: str,
           train: bool,
           caching_image: bool = True,
           transforms: Optional[List[Callable]] = None,
           category_names: Optional[List[str]] = None,
   ):
       """Function to initialize the object class"""
       super().__init__()

       # Get project setting and export information through the SDK
       # Initialize the Python Client
       client = spb.sdk.Client(team_name=team_name, access_key=access_key, project_name=project_name)
       # Use get_export
       export_info = call_with_retry(client.get_export, name=export_name)
       # Download the export compressed file through download_url in Export
       export_data = call_with_retry(urlopen, export_info.download_url).read()

       # Load the export compressed file into memory
       with ZipFile(BytesIO(export_data), 'r') as export:
           label_files = [f for f in export.namelist() if f.startswith('labels/')]
           label_interface = json.loads(export.open('project.json', 'r').read())
           category_infos = label_interface.get('object_detection', {}).get('object_classes', [])

       cache_dir = None
       if caching_image:
           cache_dir = f'/tmp/{team_name}/{project_name}'
           os.makedirs(cache_dir, exist_ok=True)

       self.client = client
       self.export_data = export_data
       self.categories = [
           {'id': i + 1, 'name': cat['name'], 'type': cat['annotation_type']}
           for i, cat in enumerate(category_infos)
       ]
       self.category_id_map = {cat['id']: i + 1 for i, cat in enumerate(category_infos)}
       self.transforms = build_transforms(train, self.categories, transforms, category_names)
       self.cache_dir = cache_dir

       # Convert label_files to numpy array and use
       self.label_files = np.array(label_files).astype(np.string_)

   def __len__(self):
       """Function to return the number of label files"""
       return len(self.label_files)

   def __getitem__(self, idx):
       """Function to get an item"""
       idx = idx if idx >= 0 else len(self) + idx
       if idx < 0 or idx >= len(self):
           raise IndexError(f'index out of range')

       image_id = idx + 1
       label_file = self.label_files[idx].decode('ascii')

       # Load label information corresponding to idx from the export compressed file into memory
       with ZipFile(BytesIO(self.export_data), 'r') as export:
           label = load_label(export, label_file, self.category_id_map, image_id)

       # Download the image through the Suite sdk based on label_id
       try:
           image = load_image(self.client, label['label_id'], self.cache_dir)
       # Download data in real time using get_data from Suite sdk
       except Exception as e:
           print(f'Failed to load the {idx}-th image due to {repr(e)}, getting {idx + 1}-th data instead')
           return self.__getitem__(idx + 1)

       target = {
           'image_id': image_id,
           'label_id': label['label_id'],
           'annotations': label['annotations'],
       }

       if self.transforms is not None:
           image, target = self.transforms(image, target)
       return image, target
Handle the test set in a similar fashion. The code snippet below instantiates the SuiteCocoDataset object class for the test set by wrapping SuiteDataset to make it compatible with the Torchvision COCOEvaluator.
class SuiteCocoDataset(C.CocoDetection):
   """
   Instantiate the SuiteCocoDataset object class for test set
   (by wrapping SuiteDataset to make compatible with torchvision's official COCOEvaluator)
   """

   def __init__(
           self,
           team_name: str,
           access_key: str,
           project_name: str,
           export_name: str,
           train: bool,
           caching_image: bool = True,
           transforms: Optional[List[Callable]] = None,
           category_names: Optional[List[str]] = None,
           num_init_workers: int = 20,
   ):
       """Function to initialize the object class"""
       super().__init__(img_folder='', ann_file=None, transforms=None)

       # Call the SuiteDataset class
       dataset = SuiteDataset(
           team_name, access_key, project_name, export_name,
           train=False, transforms=[],
           caching_image=caching_image, category_names=category_names,
       )
       self.client = dataset.client
       self.cache_dir = dataset.cache_dir

       self.coco = build_coco_dataset(dataset, num_init_workers)
       self.ids = list(sorted(self.coco.imgs.keys()))
       self._transforms = build_transforms(train, dataset.categories, transforms, category_names)

   def _load_image(self, id: int):
       """Function to load an image"""
       label_id = self.coco.loadImgs(id)[0]['label_id']
       image = load_image(self.client, label_id, self.cache_dir)
       return image

   def __getitem__(self, idx):
       """Function to get an item"""
       try:
           return super().__getitem__(idx)
       except Exception as e:
           print(f'Failed to load the {idx}-th image due to {repr(e)}, getting {idx + 1}-th data instead')
           return self.__getitem__(idx + 1)
SuiteDataset and SuiteCocoDataset can then be used for your training code. The code snippet below illustrates how to use them. During model development, train with train_loader and evaluate with test_loader.
train_dataset = SuiteDataset(
   team_name=args.team_name,
   access_key=args.access_key,
   project_name=args.project_name,
   export_name=args.train_export_name,
   caching_image=args.caching_image,
   train=True,
)
test_dataset = SuiteCocoDataset(
   team_name=args.team_name,
   access_key=args.access_key,
   project_name=args.project_name,
   export_name=args.test_export_name,
   caching_image=args.caching_image,
   train=False,
   num_init_workers=args.workers,
)

train_loader = DataLoader(
   train_dataset, num_workers=args.workers,
   batch_sampler=G.GroupedBatchSampler(
       RandomSampler(train_dataset),
       G.create_aspect_ratio_groups(train_dataset, k=3),
       args.batch_size,
   ),
   collate_fn=collate_fn,
)
test_loader = DataLoader(
   test_dataset, num_workers=args.workers,
   sampler=SequentialSampler(test_dataset), batch_size=1,
   collate_fn=collate_fn,
)
Step 9: Train your model with NVIDIA TAO Toolkit
Your data annotated with Suite can now be used to train your object detection model. TAO Toolkit enables you to train, fine-tune, prune, and export highly optimized and accurate computer vision models for deployment by adapting popular network architectures and backbones to your data. For this tutorial, you can choose YOLO v4, an object detection model included in TAO.
First, download the notebook samples from TAO Toolkit Quick Start.
pip3 install nvidia-tao
wget --content-disposition https://api.ngc.nvidia.com/v2/resources/nvidia/tao/tao-getting-started/versions/4.0.1/zip -O getting_started_v4.0.1.zip


$ unzip -u getting_started_v4.0.1.zip  -d ./getting_started_v4.0.1 && rm -rf getting_started_v4.0.1.zip && cd ./getting_started_v4.0.1
Next, start the notebook using the code below:
$ jupyter notebook --ip 0.0.0.0 --port 8888 --allow-rootOpen your Internet browser on localhost and navigate to the URL:
http://0.0.0.0:8888To create a YOLOv4 model, open notebooks/tao_launcher_starter_kit/yolo_v4/yolo_v4.ipynb and follow the notebook instructions to train the model.
Based on the results, fine-tune the model until it achieves your metric goals. If desired, you can create your own active learning loop at this stage. In a real-world scenario, query samples of failed predictions, assign human labelers to annotate this new batch of sample data, and supplement your model with newly labeled training data. Superb AI Suite can further assist you with data collection and annotation in subsequent rounds of model development as you iteratively improve your model performance.
With the recently released TAO Toolkit 4.0, it is even easier to get started and create high-accuracy models without any AI expertise. Automatically fine-tune your hyperparameters with AutoML, experience turnkey deployment of TAO Toolkit into various cloud services, integrate TAO Toolkit with third-party MLOPs services, and explore new transformer-based vision models (CitySemSegformer, Peoplenet Transformer).
Conclusion
Data labeling in computer vision can present many unique challenges. The process can be difficult and expensive due to the amount of data that needs labeling. In addition, the process can be subjective, which makes it challenging to achieve consistently high-quality labeled outputs across a large dataset.
Model training can be challenging as well, as many algorithms and hyperparameters require tuning and optimization. This process requires a deep understanding of the data and the model, and significant experimentation to achieve the best results. Additionally, computer vision models tend to require large computing power to train, making it difficult to do so on a limited budget and timeline.
Superb AI Suite enables you to collect and label high-quality computer vision datasets. With NVIDIA TAO Toolkit, you can optimize pretrained computer vision models. Using both together significantly accelerates your computer vision application development times without sacrificing quality.
Want more information? Check out:
- TAO Toolkit Google Colab notebook
- TAO Toolkit documentation
- Superb AI Suite Labeling Platform
- Superb AI Suite Docs
About Superb AI
Superb AI provides a training data platform that makes building, managing, and curating computer vision datasets faster and easier than ever before. Specializing in adaptable automation models for labeling and quality assurance, our solutions help companies drastically reduce the time and cost of building data pipelines for computer vision models. Launched in 2018 by researchers and engineers with decades of experience in computer vision and deep learning (including 25+ publications, 7,300+ citations, and 100+ patents), our vision is to empower companies at all stages to develop computer vision applications faster than ever before.
Superb AI is also a proud collaborator with NVIDIA through the NVIDIA Inception Program for Startups. This program helps nurture the development of the world’s cutting-edge startups, providing them with access to NVIDIA technologies and experts, opportunities to connect with venture capitalists, and comarketing support to heighten their visibility.
