
NVIDIA Jetson Orin is the best-in-class embedded platform for AI workloads. One of the key components of the Orin platform is the second-generation Deep Learning Accelerator (DLA), the dedicated deep learning inference engine that offers one-third of the AI compute on the AGX Orin platforms.
This post is a deep technical dive into how embedded developers working with Orin platforms can deploy deep neural networks (DNNs) using YOLOv5 as a reference. To learn more about how DLA can help maximize the performance of your deep learning applications, see Maximizing Deep Learning Performance on NVIDIA Jetson Orin with DLA.
YOLOv5 is an object detection algorithm. Building on the success of v3 and v4, YOLOv5 aims to provide improved accuracy and speed in real-time object detection tasks. YOLOv5 has gained notoriety due to its excellent trade-off between accuracy and speed, making it a popular choice among researchers and practitioners in the field of computer vision. Its open-source implementation enables developers to leverage pretrained models and customize them according to specific goals.
The following sections walk through an end-to-end YOLOv5 cuDLA sample that shows you how to:
- Train a YOLOv5 model with Quantization-Aware Training (QAT) and export it for deployment on DLA.
- Deploy the network and run inference using CUDA through TensorRT and cuDLA.
- Execute on-target YOLOv5 accuracy validation and performance profiling.
Using this sample, we demonstrate how to achieve 37.3 mAP on the COCO dataset with DLA INT8 (official FP32 mAP is 37.4). We also show how to obtain over 400 FPS for YOLOv5 on a single NVIDIA Jetson Orin DLA. (A total of two DLA instances are available on Orin.)
QAT training and export for DLA
To balance the inference performance and accuracy of YOLOv5, it’s essential to apply Quantization-Aware-Training (QAT) on the model. Because DLA does not support QAT through TensorRT at the time of writing, it’s necessary to convert the QAT model to a Post-Training Quantization (PTQ) model before inference. The steps are outlined in Figure 1.

QAT training workflow
Use the TensorRT pytorch-quantization toolkit to quantize YOLOv5. The first step is to add quantizer modules to the neural network graph. This toolkit provides a set of quantized layer modules for common DL operations. If a module is not among the provided quantized modules, you can create a custom quantization module for the right place in the model.
The second step is to calibrate the model, obtaining the scale values for each Quantization/Dequantization (Q/DQ) module. After the calibration is complete, select a training schedule and fine-tune the calibrated model using the COCO dataset.

Adding Q/DQ nodes
There are two options for adding Q/DQ nodes to your network:
Option 1: Place Q/DQ nodes, as recommended, in TensorRT Processing of Q/DQ Networks. This method follows TensorRT fusion strategy for Q/DQ layers. These TensorRT strategies are mostly tuned for GPU inference. To make this compatible with DLA, add additional Q/DQ nodes, which can be derived using the scales from their neighboring layers with the Q/DQ Translator.
Any missing scales would otherwise result in certain layers running in FP16. This may result in a slight decrease in mAP and possibly a large performance drop. The Orin DLA is optimized for INT8 convolutions, about 15x over FP16 dense performance (or 30x when comparing dense FP16 to INT8 sparse performance).
Option 2: Insert Q/DQ nodes at every layer to make sure all tensors have INT8 scales. With this option, all layers’ scales can be obtained during model fine-tuning. However, this method may potentially disrupt TensorRT fusion strategy with Q/DQ layers when running inference on GPU and lead to higher latency on the GPU. For DLA, on the other hand, the rule of thumb with PTQ scales is, “The more available scales, the lower the latency.”
As confirmed by experiment, our YOLOv5 model was verified on the COCO 2017 validation dataset with a resolution of 672 x 672 pixels. Option 1 and Option 2, respectively, achieved mAP scores of 37.1 and 37.0.
Choose the best option based on your needs. If you already have an existing QAT workflow for GPU and would like to preserve it as much as possible, Option 1 is probably better. (You may need to extend Q/DQ Translator to infer more missing scales to achieve optimal DLA latency as well.)
On the other hand, if you are looking for a QAT training method that inserts Q/DQ nodes into all layers and is compatible with DLA, Option 2 may be your most promising.
Q/DQ Translator workflow
The purpose of the Q/DQ Translator is to translate an ONNX graph trained with QAT, to PTQ tensor scales and an ONNX model without Q/DQ nodes.
For this YOLOv5 model, extract quantization scales from Q/DQ nodes in the QAT model. Use the information of neighboring layers to infer the input/output scales of other layers such as Sigmoid and Mul in YOLOv5’s SiLU or for Concat nodes. After scales are extracted, export the ONNX model without Q/DQ nodes and the (PTQ) calibration cache file such that TensorRT can use them to build a DLA engine.
Deploying network to DLA for inference
The next step is to deploy the network and run inference using CUDA through TensorRT and cuDLA.
Loadable build with TensorRT
Use TensorRT to build the DLA loadable. This provides an easy-to-use interface for DLA loadable building and seamless integration with GPU if needed. For more information about TensorRT-DLA, see Working with DLA in the TensorRT Developer Guide.
trtexec is a convenient tool provided by TensorRT for building engines and benchmarking performance. Note that a DLA loadable is the result of successful DLA compilation through the DLA Compiler, and that TensorRT can package DLA loadables inside of serialized engines.
First, prepare the ONNX model and the calibration cache generated in the previous section. The DLA loadable can be built with a single command. Pass the --safe option and the entire model can run on DLA. This directly saves the compilation result as a serialized DLA loadable (without a TensorRT engine wrapping around it). For more details about this step, see the NVIDIA Deep Learning TensorRT Documentation.
trtexec --onnx=model.onnx --useDLACore=0 --safe --saveEngine=model.loadable --inputIOFormats=int8:dla_hwc4 --outputIOFormats=fp16:chw16 --int8 --fp16 --calib=qat2ptq.cacheNote that the input format dla_hwc4 is highly recommended from a performance point of view, if your model input qualifies. The input must have at most four input channels and be consumed by a convolution. In INT8, DLA can benefit from a specific hardware and software optimization that is not available if you use --inputIOFormats=int8:chw32 instead, for example.
Running inference using cuDLA
cuDLA is the CUDA runtime interface for DLA, an extension of the CUDA programming model that integrates DLA with CUDA. cuDLA enables you to submit DLA tasks using CUDA programming constructs. You can run inference using cuDLA either implicitly through TensorRT runtime or you can explicitly call the cuDLA APIs. This sample demonstrates the latter approach to explicitly call cuDLA APIs to run inference in hybrid mode and standalone mode.
cuDLA hybrid mode and standalone mode mainly differ in synchronization. In hybrid mode, DLA tasks are submitted to a CUDA stream, so synchronization can be done seamlessly with other CUDA tasks.
In standalone mode, the cudlaTask structure has a provision to specify wait and signal events that cuDLA must wait on and signal respectively, as part of cudlaSubmitTask.
In short, using cuDLA hybrid mode can give quick integration with other CUDA tasks. Using cuDLA standalone mode can prevent the creation of CUDA context, and thus can save resources if the pipeline has no CUDA context.
The primary cuDLA APIs used in this YOLOv5 sample are detailed below.
cudlaCreateDevicecreates the DLA device.cudlaModuleLoadFromMemoryloads the engine memory for DLA use.cudaMallocandcudlaMemRegisterare called to first allocate memory on GPU, then let the CUDA pointer be registered with the DLA. (Used only for hybrid mode.)cudlaImportExternalMemoryandcudlaImportExternalSemaphoreare called to import external NvSci buffers and sync objects. (Used only for standalone mode.)cudlaModuleGetAttributesgets module attributes from the loaded module.cudlaSubmitTaskis called to submit the inference task. In hybrid mode, users need to specify the CUDA stream to let cuDLA tasks run on it. In standalone mode, users need to specify the signal event and wait event to let cuDLA wait and signal when the corresponding fence expires.
On-target validation and profiling
It’s important to note the numerical differences between GPU to DLA. The underlying hardware is different, so the computations are not bit-wise accurate. Because training the network is done on the GPU and then deployed to DLA on the target, it’s important to validate on the target. This specifically comes into play when it comes to quantization. It’s also important to compare against a reference baseline.
YOLOv5 DLA accuracy validation
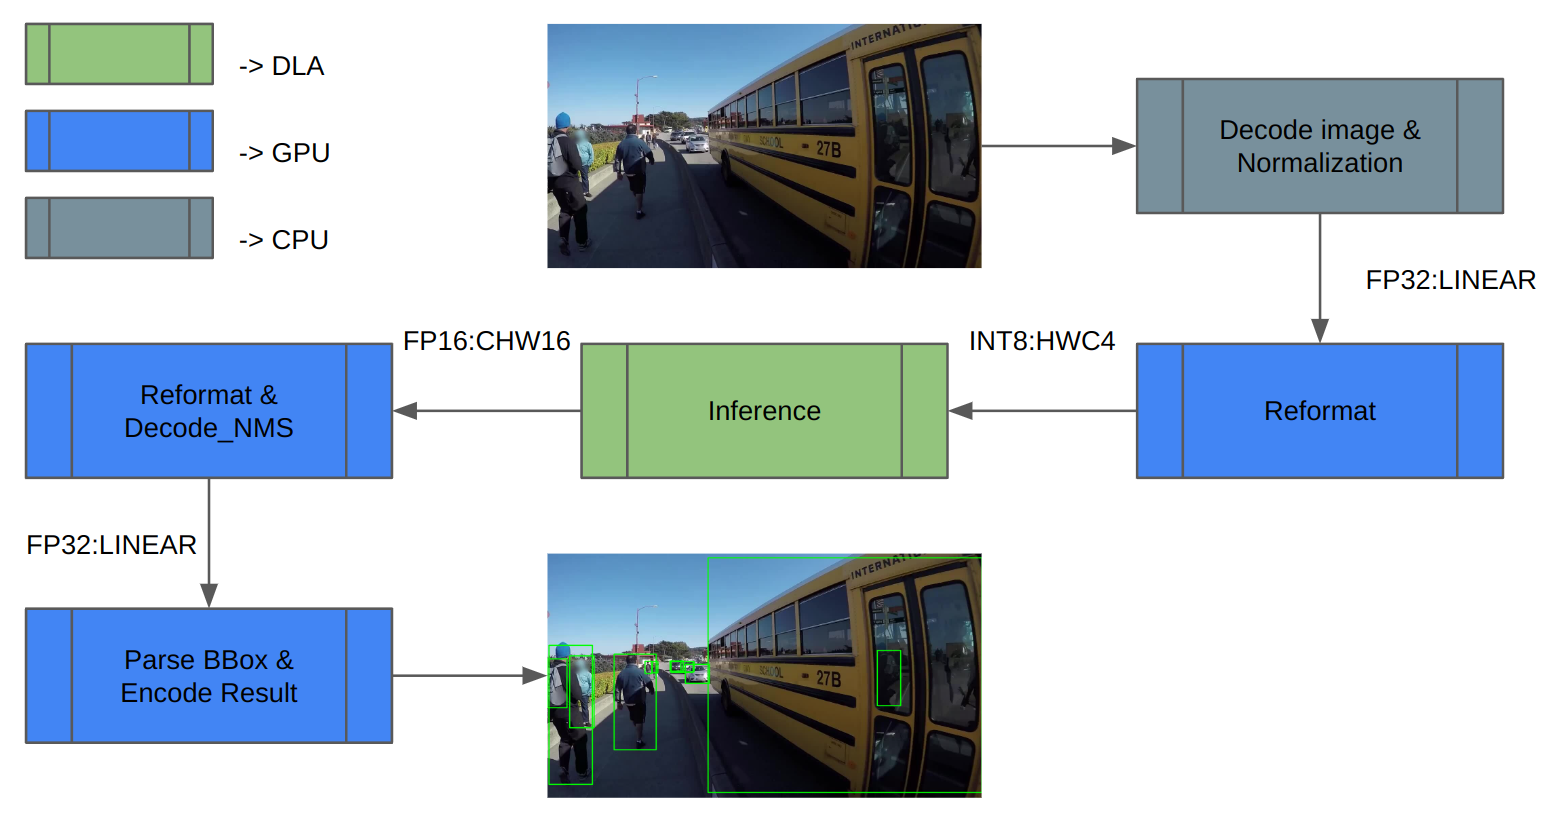
We used the COCO dataset to validate. Figure 3 shows the inference pipeline architecture. First, load the image data and normalize it. Extra reformats on the inference inputs and outputs are needed because DLA only supports INT8/FP16.
After inference, decode the inference result and perform NMS (non-maximum suppression) to get the detection result. Finally, save the result and compute mAP.
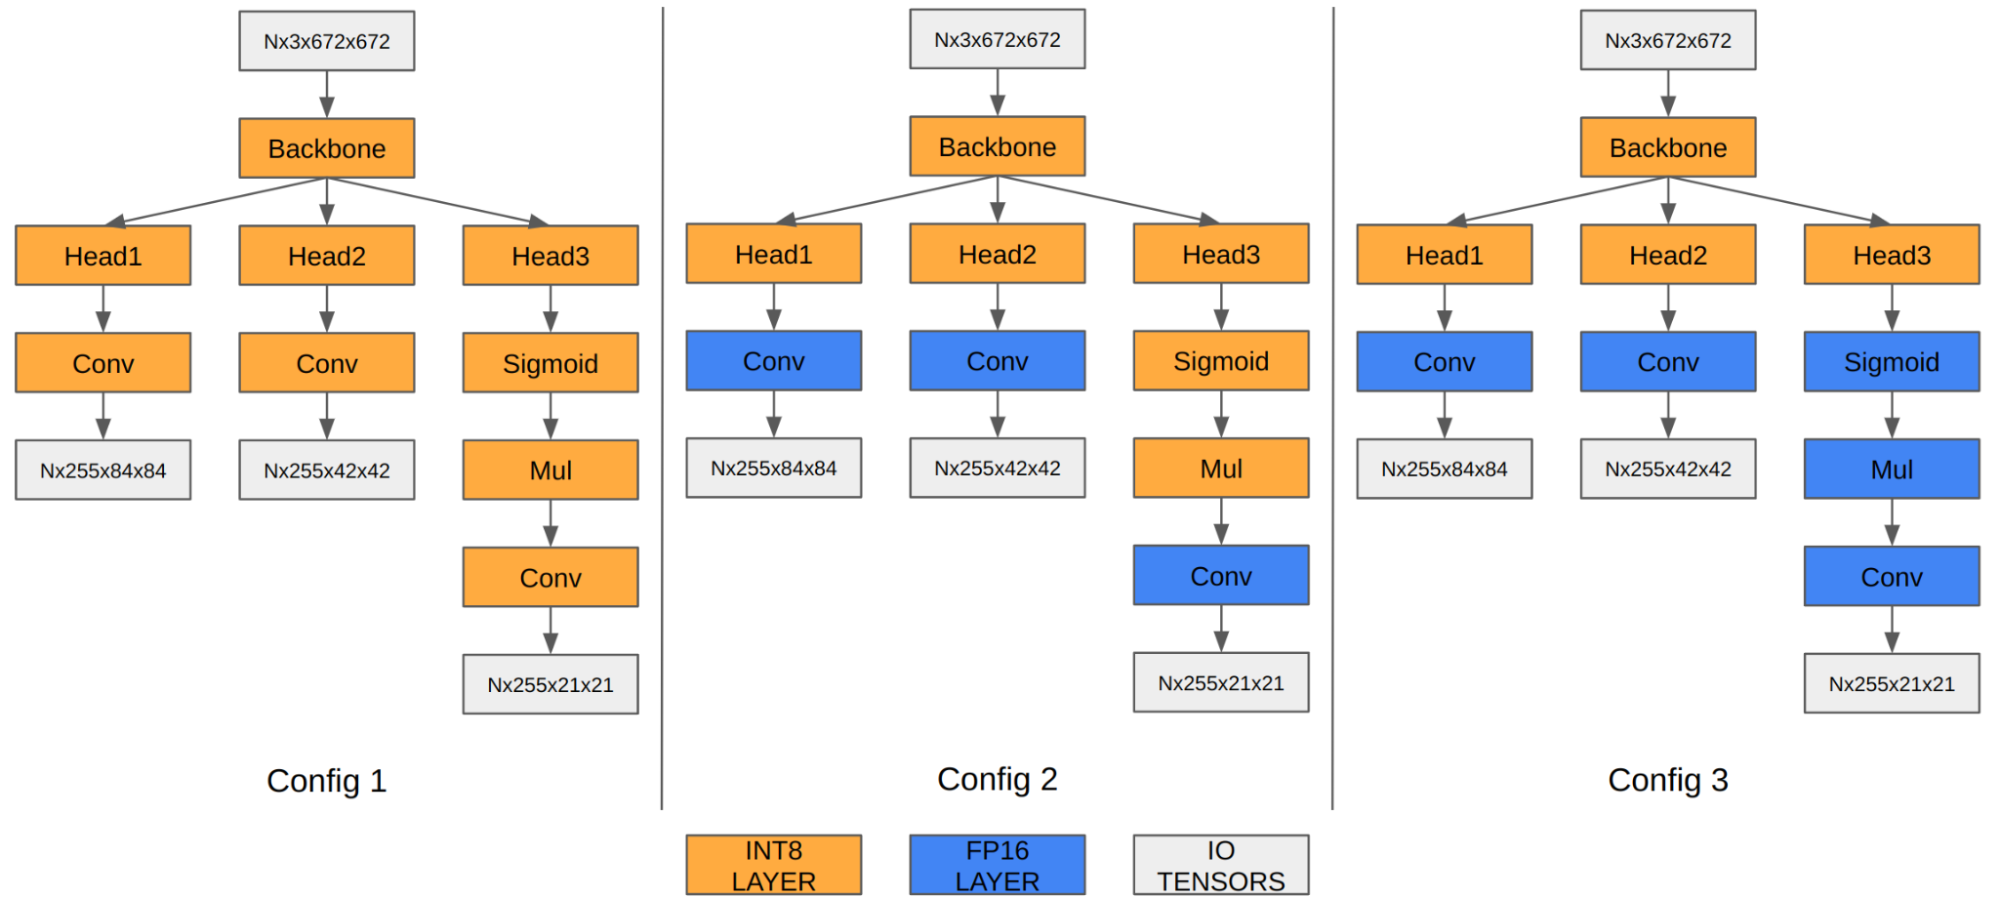
In the case of YOLOv5, the feature maps of the last three convolution layers encode final detection information. When quantized to INT8, the quantization error of the bounding box coordinates becomes noticeable compared to FP16/FP32, thus affecting the final mAP.
Our experiment shows that running the last three convolution layers in FP16 improves the final mAP from 35.9 to 37.1. Orin DLA has a special hardware design highly optimized for INT8, so we observe a performance drop when these three convolutions run in FP16.
| Configuration 1 | Configuration 2 | Configuration 3 | |
| Input tensor format | INT8:DLA_HWC4 | INT8:DLA_HWC4 | INT8:DLA_HWC4 |
| Output tensor format | INT8:CHW32 | FP16:CHW16 | FP16:CHW16 |
| COCO Val mAP | 35.9 | 37.1 | 37.3 |
| FPS (DLA 3.14.0, 1x DLA @ 1.33 GHz, EMC @ 3.2 GHz) | 410 | 255 | 252 |
Note that the mAP results are based on Option 1 described in the preceding section on adding Q/DQ nodes. You can apply the same principle to Option 2 as well.
YOLOv5 DLA performance
DLA offers one-third of AI compute on Orin AGX platforms, thanks to the two DLA cores. For a general baseline of Orin DLA performance, see Deep-Learning-Accelerator-SW on GitHub.
In the latest release, DLA 3.14.0 (DOS 6.0.8.0 and JetPack 6.0), several performance optimizations were added to the DLA compiler that specifically apply for INT8 CNN architecture-based models:
- Native INT8 Sigmoid (previously ran in FP16 and had to be cast to and from INT8; also applies to Tanh)
- INT8 SiLU fusion into a single DLA HW operation (instead of standalone Sigmoid plus standalone elementwise Mul)
- Fusing the INT8 SiLU HW op with the previous INT8 Conv HW op (also applies to standalone Sigmoid or Tanh)
These improvements can provide a 6x speedup for YOLO architectures compared to prior releases. For instance, in the case of YOLOv5, the inference performance jumped from 13 ms to 2.4 ms in INT8 (with a few layers running in FP16), which is a 5.4x improvement. Further, you can use the cuDLA sample to profile your DNN layer-wise, identify bottlenecks, and modify your network to improve its performance.
Get started with DLA
This post explains how to run an entire object detection pipeline on Orin in the most efficient way using YOLOv5 on its dedicated Deep Learning Accelerator. Keep in mind that other SoC components such as the GPU are either idling or running at very small load. If you had a single camera producing inputs at 30 fps, one DLA instance would only be loaded at about 10%. So there is plenty of headroom for adding more bells and whistles to your application.
Ready to dive in? The YOLOv5 sample replicates the entire workflow discussed here. You can use it as a reference point for your own use case.
For beginners, the Jetson_dla_tutorial on GitHub demonstrates a basic DLA workflow to help you get started deploying a simple model to DLA.
For additional samples and resources on leveraging DLA to get the most out of NVIDIA DRIVE or NVIDIA Jetson, visit Deep-Learning-Accelerator-SW on GitHub. For more information about cuDLA, visit Deep-Learning-Accelerator-SW/samples/cuDLA.
