
Whether it’s a warehouse looking to balance product distribution and optimize traffic, a factory assembly line inspection, or hospital management, making sure that employees and caregivers use personal protection equipment (PPE) while attending to patients, advanced intelligent video analytics (IVA) turn out to be useful.
At the foundational layer, there are billions of cameras and IoT sensors deployed worldwide across cities, stadiums, factories, and hospitals—generating petabytes of data every day. With this data explosion, it’s imperative to use AI to streamline and perform effective IVA.
Many companies and developers struggle with building manageable IVA pipelines as these efforts require AI expertise, efficient hardware, reliable software, and extensive resources to deploy at scale. NVIDIA built the DeepStream SDK to remove these barriers and enable everyone to create AI-based, GPU-accelerated apps easily and efficiently for video analytics.
The DeepStream SDK is a scalable framework to build high-performance, managed IVA applications for the edge. DeepStream enables you to build AI applications across various industries ranging from smart cities and buildings to retail, manufacturing, and healthcare.
The DeepStream runtime system is pipelined to enable deep learning inference, image, and sensor processing, and sending insights to the cloud in a streaming application. For deployment at scale, you can build cloud-native, DeepStream applications using containers and orchestrate it all with Kubernetes platforms. When deployed on edge, the applications can communicate between the IoT device and cloud-standard message brokers—such as Kafka and MQTT—for large-scale, wide-area deployments.
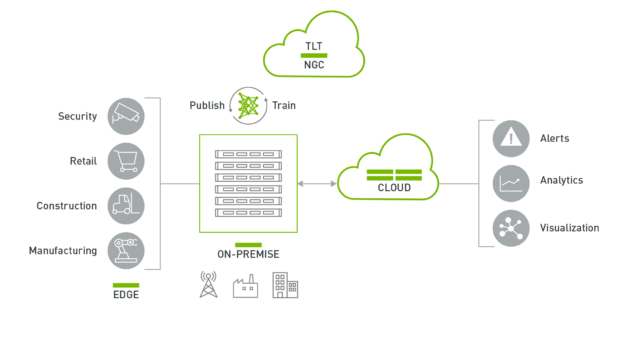
The DeepStream application can run on an edge device powered by NVIDIA Jetson or on-premises servers powered by NVIDIA T4s. The data from the edge can be sent to the cloud for higher-level analytics and visualization.
The remaining sections of this post provide a deep dive into the key features released with DeepStream 5.0.
DeepStream 5.0 features
With the DeepStream 5.0, NVIDIA has made it easier than ever to get started on building and deploying AI-based IVA apps on the edge. Here are the new features:
- Support for NVIDIA Triton Inference Server
- Python bindings
- Remote management and control for applications
- Secure communication
- Instance segmentation with Mask R-CNN
Support for Triton Inference Server
Creating AI is an iterative, experimental process, where data scientists spend considerable time experimenting and prototyping with different architectures. During this phase, their focus is more on how to best solve the problem rather than how efficient the AI model is. They want to spend more time getting high accuracy for their use case instead of spending cycles optimizing for inference. They want to quickly prototype in a real-world scenario and see how the model performs.
In the past, performing video analytics with DeepStream involved converting the model to NVIDIA TensorRT, an inference runtime. Starting with DeepStream 5.0, you can choose to run models natively in your training framework. This enables you to prototype the end-to-end system quickly..
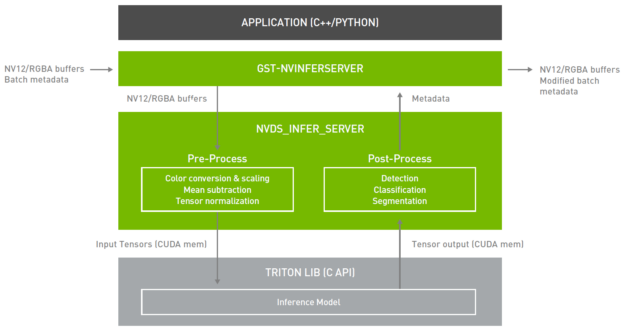
DeepStream 5.0 integrates Triton Server directly from the application. Triton Server provides you with the flexibility of using any deep learning framework with DeepStream. The inference service is natively integrated from the DeepStream plugin (Gst-nvinferserver) through the available API. The plugin receives NV12/RGBA buffers and sends this to the lower-level library. This library preprocesses the image and converts to the desired tensor size that is acceptable to the model. The tensors are sent to the Triton Server library through CUDA shared memory.
After inference, Triton Server returns the output tensors back to the shared library, where they are post-processed to generate the metadata. This metadata is attached back to the existing metadata and sent downstream. By integrating the inference server, you can use all the building blocks in DeepStream to build an efficient IVA pipeline and perform inference natively on your training framework.
TensorRT is still supported natively with DeepStream. If you are looking for the highest inference throughput or are resource-constrained to deploy full frameworks and large models, it is the preferred path. If you are looking for flexibility and can trade off some performance for effort, Triton Server is the best path.
The following table summarizes the advantages and disadvantages for both approaches.
| TensorRT | Triton Server | |
| Pros | Highest throughput | Highest flexibility |
| Cons | Custom layers require writing plugins | Less performant than a TensorRT solution |
Here are the key features for Triton Server with DeepStream:
- Supports the following model formats:
- TensorRT, TensorFlow GraphDef and SavedModel, and TensorFlow-TensorRT models on Jetson and T4
- ONNX, PyTorch, and Caffe2 NetDef on T4 only
- Multiple models (or multiple instances of the same model) can run simultaneously on the same GPU.
To get started with Triton Server with DeepStream, we have provided several sample config files and a script to retrieve open-source models. There are examples of running both TensorRT and TensorFlow models. For this post, we refer to the DeepStream installation directory as $DEEPSTREAM_DIR. The actual installation directory depends on whether you are using a bare-metal version or a container.
If you are running on a NVIDIA GPU on the x86 platform, pull the nvcr.io/nvidia/deepstream:5.0-20.04-triton container from NVIDIA NGC. Triton Server with DeepStream on x86 only works with -triton containers. If you are running on Jetson, Triton Server–shared libraries come preinstalled as part of DeepStream. This can be used with any Jetson container.
Go to the /samples directory:
cd $DEEPSTREAM_DIR/deepstream-5.0/samples
Execute the bash script in this directory. This script downloads all the required open-source models as well as converting the provided Caffe and UFF models to a TensorRT engine file. This step converts all the models to an engine file so that it can take a few minutes or longer.
The maximum batch size of the generated engine file is specified in the bash script. To modify the default batch size, you must modify this script. This also downloads the TensorFlow ssd-inception_v2 model.
./prepare_ds_trtis_model_repo.sh
The models are generated or copied in the /trtis_model_repo directory. Here’s how to run the ssd-inception_v2 model. Start by going into the /trtis_model_repo/ssd_inception_v2_coco_2018_01_28 directory and find the config.pbtxt file. If the bash script ran successfully, you should also see 1/model.graphdef. This is the TensorFlow frozen graphdef.
Here’s the sample config.pbtxt file provided in the model repo. First, specify the deep learning framework using the platform keyword. The available options are as follows:
tensorrt_plantensorflow_graphdeftensorflow_savedmodelcaffe2_netdefonnxruntime_onnxpytorch_libtorchcustom
Next, specify the input dimension, data type, and data format. Then, specify all output dimensions and data types of all output tensors. For more information about all options in the config file, see Model Configuration.
name: "ssd_inception_v2_coco_2018_01_28"
platform: "tensorflow_graphdef"
max_batch_size: 128
input [
  {
    name: "image_tensor"
    data_type: TYPE_UINT8
    format: FORMAT_NHWC
    dims: [ 300, 300, 3 ]
  }
]
output [
  {
    name: "detection_boxes"
    data_type: TYPE_FP32
    dims: [ 100, 4]
    reshape { shape: [100,4] }
  },
  {
    name: "detection_classes"
    data_type: TYPE_FP32
    dims: [ 100 ]
  },
  {
    name: "detection_scores"
    data_type: TYPE_FP32
    dims: [ 100 ]
  },
  {
    name: "num_detections"
    data_type: TYPE_FP32
    dims: [ 1 ]
    reshape { shape: [] }
  }
]
Next, run the deepstream-app with the ssd_inception_v2 model. The sample config files for Triton Server are in /configs/deepstream-app-trtis. There are generally two or more config files that are required to run deepstream-app. One is the top-level config file, which sets parameters for the entire pipeline, and others are config files for the inference.
For usability and simplicity, each inference engine requires a unique config file. If you cascade multiple inferences, you require multiple config files. For this example, use the following files:
source1_primary_detector.txtconfig_infer_primary_detector_ssd_inception_v2_coco_2018_01_28.txt
[primary-gie]
enable=1
(0): nvinfer; (1): nvinferserver
plugin-type=1
infer-raw-output-dir=trtis-output
batch-size=1
interval=0
gie-unique-id=1
config-file=config_infer_primary_detector_ssd_inception_v2_coco_2018_01_28.txt
The source1_primary_detector.txt file is the top-level config file. This is common if you are doing inference with native TensorRT or with Triton Server. In this config file, change the plugin-type under [primary-gie] to 1 to use the inference server.
The config_infer_primary_detector_ssd_inception_v2_coco_2018_01_28.txt file is used to specify inference options such as preprocessing, post-processing, and model repo. For more information about different options, see the NVIDIA DeepStream SDK Quick Start Guide and NVIDIA DeepStream Plugin Manual.
For post-processing tensor data into bounding boxes, this example uses a custom bounding box parser called NvDsInferParseCustomTfSSD, as specified by the custom_parse_bbox_func key in the config file. This custom function is compiled in the library specified under the custom_lib section of the following config file. The source code for NvDsInferParseCustomTfSSD is provided in $DEEPSTREAM_DIR/sources/libs/nvdsinfer_customparser/.
infer_config {
  unique_id: 5
  gpu_ids: [0]
  max_batch_size: 4
  backend {
    trt_is {
      model_name: "ssd_inception_v2_coco_2018_01_28"
      version: -1
      model_repo {
        root: "../../trtis_model_repo"
        log_level: 2
        tf_gpu_memory_fraction: 0.6
        tf_disable_soft_placement: 0
      }
    }
  }

  preprocess {
    network_format: IMAGE_FORMAT_RGB
    tensor_order: TENSOR_ORDER_NONE
    maintain_aspect_ratio: 0
    normalize {
      scale_factor: 1.0
      channel_offsets: [0, 0, 0]
    }
  }

  postprocess {
    labelfile_path: "../../trtis_model_repo/ssd_inception_v2_coco_2018_01_28/labels.txt"
    detection {
      num_detected_classes: 91
      custom_parse_bbox_func: "NvDsInferParseCustomTfSSD"
      nms {
        confidence_threshold: 0.3
        iou_threshold: 0.4
        topk : 20
      }
    }
  }

  extra {
    copy_input_to_host_buffers: false
  }

  custom_lib {
    path: "/opt/nvidia/deepstream/deepstream-5.0/lib/libnvds_infercustomparser.so"
  }
}
input_control {
  process_mode: PROCESS_MODE_FULL_FRAME
  interval: 0
}
Now, run the application using the following command:
deepstream-app -c source1_primary_detector.txt
A pop-up window should open with the sample video, showing bounding boxes around pedestrians, cars, and bicycles.
It takes a few minutes for the application to build the TensorFlow graph. If the application fails to run and returns “Killed”, it is most likely that the system ran out of memory. Check for system memory usage to confirm the issue. If it is a memory issue, then modify the tf_gpu_memory_fraction parameter under infer_config in config_infer_primary_detector_ssd_inception_v2_coco_2018_01_28.txt, or any other nvinferserver configuration file as applicable based on the model. This parameter allocates the GPU memory fraction per process for TF models. Changing it to 0.4 might help. For more information about how to use this parameter, see the DS Plugins manual – Gst-inferserver.
This model can detect up to 91 classes including various animals, food, and sports equipment. For more information about the classes that can be detected, see the trtis-model-repo/ssd_inception_v2_coco_2018_01_28/labels.txt file.
Try running this application with other videos and see if the model can detect other classes. To use Triton Server with your custom DeepStream pipeline, check out the source code for deepstream-app under $DEEPSTREAM_DIR/sources/apps/sample-apps/deepstream-app.
Python bindings
Python is easy to use and widely adopted by data scientists and deep learning experts when creating AI models. NVIDIA introduced Python bindings to help you build high-performance AI applications using Python. DeepStream pipelines can be constructed using Gst-Python, the GStreamer framework’s Python bindings.
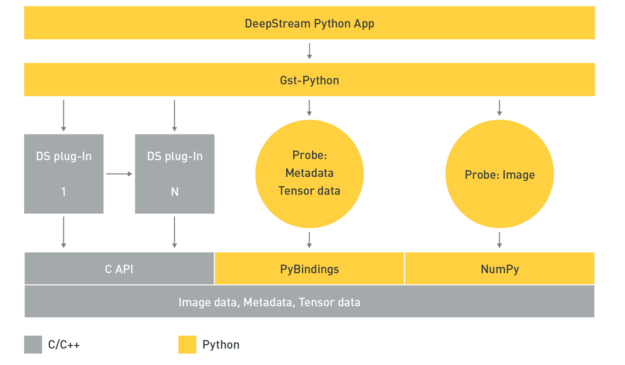
The DeepStream Python application uses the Gst-Python API action to construct the pipeline and use probe functions to access data at various points in the pipeline. The data types are all in native C and require a shim layer through PyBindings or NumPy to access them from the Python app. Tensor data is the raw tensor output that comes out after inference. If you are trying to detect an object, this tensor data needs to be post-processed by a parsing and clustering algorithm to create bounding boxes around the detected object.
With the availability of tensor data, you can create your parsing algorithm inside the Python app. This is important because the size and dimension of the tensor data, as well as the parsing and clustering algorithm needed to parse the data, is dependent on the type of AI models. If you want to be able to bring new models or new post-processing techniques to DeepStream, you’ll find this extremely useful.
Another useful data source to access is image data. This can be used to capture anomalies where the AI model picks up an object, and you want to save the image for future reference. Accessing this frame is now supported through the app.
Python bindings for DeepStream metadata are available along with sample applications to demonstrate their usage. The Python sample applications can be downloaded from the GitHub repo, NVIDIA-AI-IOT/deepstream_python_apps. The Python bindings module is now available as part of the DeepStream SDK package.
Remotely managing and controlling the application
Sending metadata from the edge to the cloud is useful but being able to receive and control messages from the cloud onto the edge is also important.
DeepStream 5.0 now supports bi-directional communication to send and receive cloud-to-device messages. This is particularly important for various use cases, such as triggering the application to record an important event, changing operating parameters and app configurations, over-the-air (OTA) updates, or requesting system logs and other vital information.
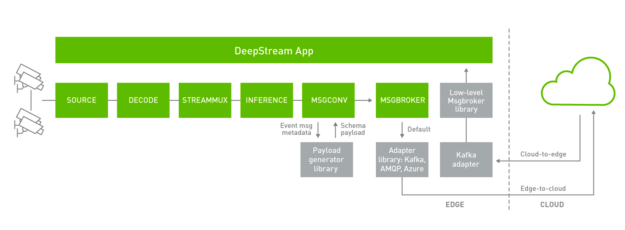
DeepStream applications can subscribe to Apache Kafka topics to receive the messages from the cloud. Device-to-cloud messaging currently happens through the Gstnvmsgbroker (MSGBROKER) plugin. The Gstnvmsgbroker plugin by default calls the lower-level adapter library with the appropriate protocol. You can choose between Kafka, AMQP, MQTT, or Azure IoT, or you can even create a custom adapter. DeepStream 5.0 introduces a new low-level msgbroker library to present a unified interface for bi-directional messaging across the various protocols. The Gstnvmsgbroker plugin has the option of interfacing with this new library instead of directly calling the protocol adaptor libraries, as controlled using a configuration option.
For cloud-to-edge messaging, the supported protocol in DeepStream 5.0 is Kafka using the new low-level msgbroker library, interacting directly with the DeepStream application.
DeepStream 5.0 supports several other IoT features that can be used in conjunction with bi-directional messaging. DeepStream now offers an API to do a smart record based on an anomaly or could-to-device message. In addition, DeepStream also supports OTA updates of AI models while the application is running.
Smart video recording
There is often a need to have event-based video recording. Instead of continuously recording the content, smart recording can save valuable disk space and can provide faster searchability.
Smart record only records the event when specific rules or conditions are met. The trigger to signal the record can come locally from the app, from some service running at the edge or from the cloud.
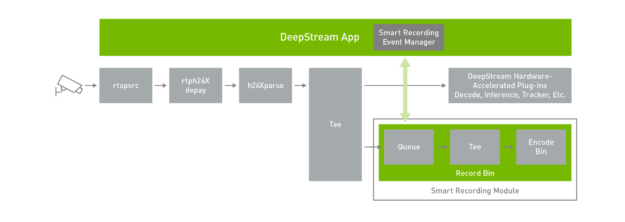
Rich APIs are provided to build a smart recording event manager. These actions can be used to start and stop the recording at any time. When an event must be recorded, it’s useful to start saving the clip before the trigger. With the smart record API action, you can configure it to record time before the event. This is extremely useful because, by the time the anomaly is detected and triggered, there is some latency between when the anomaly happens and when the recording event manager starts the recording. Recording for some finite amount of time before the record starts to provide the entire sequence of events.
To demonstrate this feature, a smart recording event manager is built in to the deepstream-test5 application. The smart recording module keeps a video cache so that the recorded video not only has frames after the event is generated, but it can also have frames just before the event. This size of the video cache can be configured per use case. The event manager initiates the start and stop option to the smart recording module.
Recording can be triggered by JSON messages received from the cloud. The message format is as follows:
{
      command: string   // <start-recording / stop-recording>
      start: string     // "2020-05-18T20:02:00.051Z"
      end: string       // "2020-05-18T20:02:02.851Z",
      sensor: {
        id: string
      }
    }
Receiving and processing such messages from the cloud is demonstrated in the deepstream-test5 sample application. This is currently supported for Kafka. To activate this functionality, populate and enable the following block in the application configuration file:
Configure this group to enable cloud message consumer.
[message-consumer0]
enable=1
proto-lib=/opt/nvidia/deepstream/deepstream-5.0/lib/libnvds_kafka_proto.so
conn-str=;
config-file=
subscribe-topic-list=;;
Use this option if message has sensor name as id instead of index (0,1,2 etc.).
sensor-list-file=dstest5_msgconv_sample_config.txt
While the application is running, use a Kafka broker to publish the above JSON messages on topics in the subscribe-topic-list to start and stop recording.
For more information about how to use this feature in your application, see the Smart Video Record section of the NVIDIA DeepStream Plugin Manual. The source code for deepstream-test5 can be found in the following directory:
$DEEPSTREAM_DIR/sources/apps/sample_apps/deepstream-test5/
The implementation of the smart record event manager can be found in the following file:
$DEEPSTREAM_DIR/sources/apps/apps-common/src/deepstream_source_bin.c
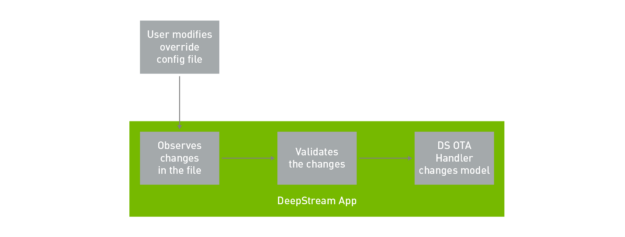
OTA model update
One of the desirable requirements for edge IVA applications is to modify or update AI models on the fly as they get enhanced for higher accuracy. With DeepStream 5.0, you can now update a model while the application is running. This means that models can be updated with zero-downtime. This is important for mission-critical applications that can’t accept any latency.
This feature can also be useful when models need to be swapped continuously. An example could be swapping the model based on time of day. Typically, one model might work great during the day when there’s ample light, but another model would work better in a low-light setting. In that case, the model needs to be swapped effortlessly based on time of the day without restarting the application. The assumption is that the model being updated should have the same network parameters.
In the sample application, the model update is initiated by the user modifying the config file. The DeepStream application watches the changes made in the config file and validates it. After the changes have been validated, the DeepStream OTA handler swaps to the new model, completing the process.
This feature is demonstrated in the deepstream-test5 application with the source code provided. To run the OTA model update, run the app with the -o option. This is the OTA override file. When you want to swap the model, update this file with the new model engine file.
deepstream-test5 -c <DS config> -o <OTA override>
The updated model needs to be a TensorRT engine file, and this is done offline before changing the OTA override file. To create a TensorRT engine file, run trtexec:
trtexec --model= --maxBatch= --saveEngine= --deploy= --buildOnly
After the model is generated, update the OTA override file. When this change is detected by the application, it automatically starts the model update process. In a real-world environment, you would need a daemon or a service on the edge that updates the file on the edge or updates the file from the cloud.
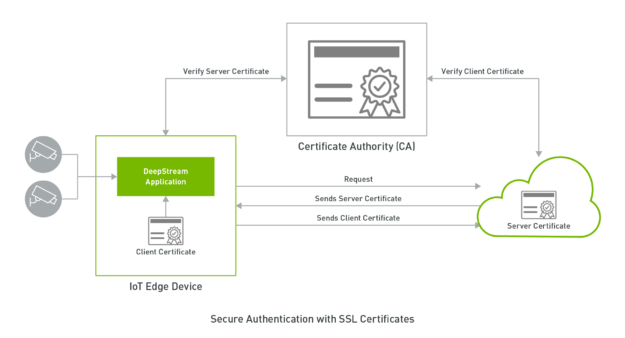
Secure communication
For a successful deployment of IoT devices at scale, one of the most important and overlooked aspects is security: being able to securely communicate between the edge device and the cloud. For companies, securing IoT devices and transmitting and receiving sensitive data to and from a trusted location is crucial.
With DeepStream 5.0, the Kafka adapter supports secure communication using TLS-based encryption, thereby ensuring the confidentiality of data. TLS (Transport Layer Security) is a successor to SSL, but the two terms are still used interchangeably in the literature. TLS/SSL is used commonly for secure communication while connecting to servers (for example, HTTPS) on the web. TLS uses public-key cryptography to establish session keys that are used symmetrically by both the DeepStream application and broker to encrypt data being transferred during the session, thereby keeping it confidential even when sent on public networks.
DeepStream 5.0 supports two forms of client authentication: two-way TLS authentication based on SSL certificates and SASL/Plain authentication based on a username/password mechanism. Client authentication enables brokers to validate clients connecting to them and provide access control selectively based on their identity. While SASL/Plain uses the familiar password authentication metaphor and is easier to set up, two-way TLS uses client-side certificates for authentication and provides several advantages that enable implementation of a robust security mechanism.
For more information about implementing secure connections, see the NVIDIA DeepStream Plugin Manual.
Instance segmentation with Mask R-CNN
To perceive pixels that lead to actionable insights, computer vision relies on deep learning to provide an understanding of the environment. Object detection is a commonly used technique to identify individual objects in a frame, such as people or cars. While object detection is beneficial for certain applications, it falls short when you want to understand objects at a pixel level..
Instance segmentation provides pixel-level accuracy in identifying an object. Segmentation is useful for applications where there is a need to delineate between objects and their background, for example in an AI-powered green screen, where you want to blur or change the background of the frame or segment roads or sky in the frame. It can also be used to improve tracker accuracy using instance masks from the output.
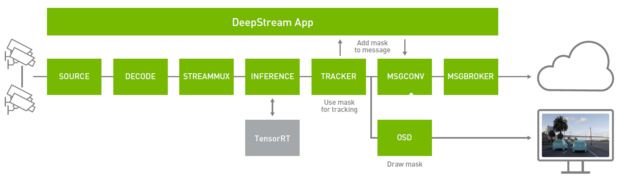
DeepStream enables instance segmentation in the pipeline with a new custom parser for post-processing, mask overlay functions in On-Screen Display (OSD) for rendering segmented masks, a new metadata type for masks, and a new message schema to identify polygons in the message converter. You can use the mask metadata in the tracker for improved tracking, rendering the masks on screen, or sending the mask metadata over a message broker for offline analytics.
To get started with Mask R-CNN, download a pretrained model from the NVIDIA-AI-IOT/deepstream_tlt_apps#tlt-models GitHub repo. This model is trained on the NVIDIA internal car dashcam image dataset to recognize cars. For more information, see Training Models on Instance Segmentation with MaskRCNN Using the NVIDIA Transfer Learning Toolkit.
DeepStream SDK includes two sample applications to demonstrate how to use a pretrained Mask R-CNN model. The Mask R-CNN model can be called from deepstream-app. The configs to configure the pipeline and the model are provided in the following directory:
$DEEPSTREAM_DIR/samples/configs/tlt_pretrained_models/
Here are the key config files to run for the Mask R-CNN model:
$DEEPSTREAM_DIR/samples/configs/tlt_pretrained_models/deepstream_app_source1_mrcnn.txt

$DEEPSTREAM_DIR/samples/configs/tlt_pretrained_models/config_infer_primary_mrcnn.txt
/deepstream_app_source1_mrcnn.txt is the main config file used by deepstream-app and configures the parameter for the entire video analytic pipeline. For more information, see Reference Application Configuration. Here are the key parameters that you must modify based on your model. Under [OSD], change the display-mask option to 1, which overlays masks over the object.
[osd]
enable=1
gpu-id=0
border-width=3
text-size=15
text-color=1;1;1;1;
text-bg-color=0.3;0.3;0.3;1
font=Serif
display-mask=1
display-bbox=0
display-text=0
The /config_infer_primary_mrcnn.txt file is an inference config file that sets parameters for Mask R-CNN inference. This file is referenced by the main deepstream_app_source1_mrcnn.txt config under the [primary-gie] section. Here are the key parameters required to run Mask R-CNN:
[property]
gpu-id=0
net-scale-factor=0.017507
offsets=123.675;116.280;103.53
model-color-format=0
tlt-model-key=
tlt-encoded-model=
output-blob-names=generate_detections;mask_head/mask_fcn_logits/BiasAdd
parse-bbox-instance-mask-func-name=NvDsInferParseCustomMrcnnTLT
custom-lib-path=/opt/nvidia/deepstream/deepstream-5.0/lib/libnvds_infercustomparser.so
network-type=3 ## 3 is for instance segmentation network
labelfile-path=
int8-calib-file=
infer-dims=
num-detected-classes=<# of classes if different than default>
uff-input-blob-name=Input
batch-size=1
0=FP32, 1=INT8, 2=FP16 mode
network-mode=2
interval=0
gie-unique-id=1
no cluster
0=Group Rectangles, 1=DBSCAN, 2=NMS, 3= DBSCAN+NMS Hybrid, 4 = None(No clustering)
MRCNN supports only cluster-mode=4; Clustering is done by the model itself
cluster-mode=4
output-instance-mask=1
The parse-bbox-instance-mask-func-name option sets the custom post-processing function to parse the output of the inference. This function is built in to the .so file specified by custom-lib-path. The source of this library is provided in the following directory:
$DEEPSTREAM_DIR/sources/libs/nvdsinfer_customparser/nvdsinfer_custombboxparser.cpp.
To run the app, run the following command:
deepstream-app -c deepstream_app_source1_mrcnn.txt
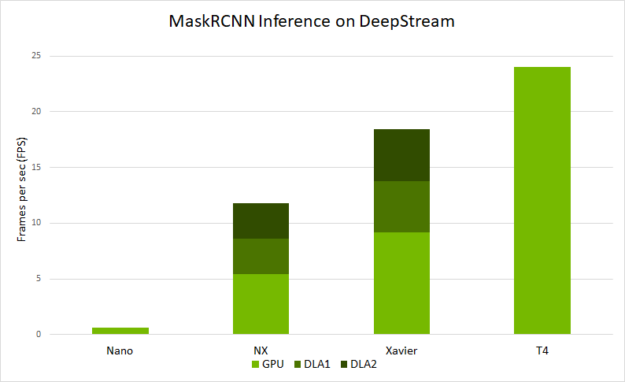
This runs on the clip that is provided in the SDK. To try on your own source, modify [source0] in /deepstream_app_source1_mrcnn.txt. Figure 9 shows the end-to-end performance that you can expect with deepstream-app across various platforms. The performance is measured in frames per sec (FPS) that are processed by deepstream-app:
- On Jetson Nano and on DLAs, this is run with a batch size of 1.
- On Jetson AGX Xavier and Xavier NX, this is run with a batch size of 2.
- On T4, this is run with a batch size of 4.
Although it’s good to visually see the output, the real use case could be to send the metadata to a different process or to the cloud. This information can be consumed by a different application either on the edge or on the cloud for further analytics.
With DeepStream, you can send mask metadata using one of the supported message broker protocols such as Kafka or MQTT using the defined schema for mask polygon. DeepStream ships with an edge-to-cloud example for MaskRCNN model. For more information about how to prepare event metadata and send mask information using a message broker, see the following app:
$DEEPSTREAM_DIR/sources/apps/sample_apps/deepstream-mrcnn-app
Build to deploy
DeepStream 5.0 offers many great features that make it easy to start developing AI applications for edge deployment. You can use Python API actions and Triton Server to quickly prototype and create IVA pipelines with minimal effort.
AI models can be deployed natively in the training frameworks with Triton Server for added flexibility. You can use tons of great IoT features to create manageable IVA applications. Messages can be securely sent from edge to the cloud using two-way TLS authentication. The bi-directional communication between the edge and the cloud offers better manageability of applications. This can be used to update AI models on the edge, record events of interest, or use it to retrieve information from the device.
Download the DeepStream 5.0 to get started today. For more information, see the following resources:
- DeepStream SDK
- Training with Custom Pretrained Models Using the NVIDIA Transfer Learning Toolkit post
- Transfer Learning Toolkit
- The DeepStream Developer Forums or TLT Developer Forums for questions or feedback
- Learn more about Jetson developer community projects using DeepStream and TLT