
To convert pixels to actionable insights, computer vision relies on deep learning to provide an understanding of the environment. Object detection is a commonly used technique to identify individual objects in a frame such as to identify people or cars. While object detection is beneficial for certain applications, it falls short when you want to understand objects at a pixel level.
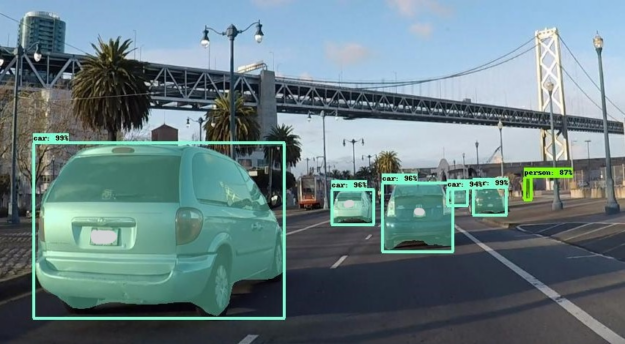
Instance segmentation is a popular computer vision technique that helps to identify each instance of multiple objects in a frame at the pixel level. In addition to the bounding boxes, instance segmentation also creates a fine-grained segmentation mask. Segmentation helps delineate between objects and background, such as in an AI-powered green screen, where you want to blur or change the background of the frame or segmenting roads or sky in the frame. Or you may want to pin-point manufacturing defects or nuclei segmentation in microscopy. Figure 1 shows an example of segmentation masks over detected objects.

Transfer learning is a common practice in training specialized deep neural network (DNN) models. Transfer learning is made easier with NVIDIA TAO Toolkit, a zero-coding framework to train accurate and optimized DNN models. With the release of TAO Toolkit 2.0, NVIDIA added training support for instance segmentation, using Mask R-CNN. You can train Mask R-CNN models using one of the several ResNet backbones. Pretrained weights trained for ResNet10/18/50/101 are provided in the NGC and can be used as a starting point for transfer learning.
In this post, I show you how to train a 90-class COCO Mask R-CNN model with TAO Toolkit and deploy it on the NVIDIA DeepStream SDK using TensorRT. You learn how to access and use pretrained models from NGC, train a Mask R-CNN model with minimal effort, and deploy it for inference on a GPU. These steps can be used to build any custom Mask R-CNN model.
Mask R-CNN is natively integrated with the DeepStream SDK, a streaming analytic toolkit for building intelligent video analytic applications. For more information about how Mask R-CNN integrates with DeepStream, see Building Intelligent Video Analytics Apps Using NVIDIA DeepStream 5.0 (Updated for GA).
Training a Mask R-CNN model using COCO
Mask R-CNN is a two-stage, object detection and segmentation model introduced in 2017. It’s an excellent architecture due to its modular design and is suitable for various applications. In this section, I walk you through reproducible steps to take pretrained models from NGC and an open-source COCO dataset and then train and evaluate the model using TAO Toolkit.
To get started, set up a NVIDIA NGC account and then pull the TAO Toolkit container:
docker pull nvcr.io/nvidia/tlt-streamanalytics:v2.0_py3
Next, download the pretrained model. Use the NGC command to list the available models:
ngc registry model list nvidia/tlt_instance_segmentation:*
To download the desired model, use the following command. For this post, I used the ResNet50 backbone, but you are free to use any of the supported backbones.
ngc registry model download-version nvidia/tlt_instance_segmentation:resnet50 --dest $model_path
The entire workflow consists of the following steps:
- Preparing the data.
- Configuring the spec file.
- Training the model.
- Verifying the model.
- Exporting the model.
- Deploying with DeepStream.
Preparing the data
Mask R-CNN expects a directory of images for training and validation and annotation in COCO format. TFRecords is used to manage the data and help iterate faster. To download the COCO dataset and convert it to TFRecords, the Mask R-CNN iPython notebook in the TAO Toolkit container provides a script called download_and_preprocess_coco.sh. If you are using a custom dataset, you must convert the annotation to COCO before using it with TAO Toolkit. For more information, see COCO data format.
Download the COCO dataset and convert to TFRecords:
bash download_and_preprocess_coco.sh $DATA_DIR
This downloads the raw COCO17 dataset and converts it to TFRecords in $DATA_DIR.
Configuring the spec file
The next step is to configure the spec file for training. The experiment spec file is essential, as it compiles all the necessary hyperparameters for achieving a good model. The Mask R-CNN spec file has three major components: top-level experiment configs, data_config, and maskrcnn_config. The format of the spec file is a protobuf text (prototxt) message, and each of its fields can be either a basic data type or a nested message.
The top-level experiment configs include basic parameters for an experiment; for example, learning rate, number of iterations, whether to use mixed-precision training, and so on. An encrypted checkpoint is saved per the num_steps_per_eval value and then you run evaluation on the validation set.
The init_learning_rate value is set here for an 8-GPU training job. If you are using a different number of GPUs, adjust the learning rate following the linear scaling rule.
use_amp: False
warmup_steps: 1000
checkpoint: "$PRETRAINED_MODEL_PATH"
learning_rate_steps: "[60000, 80000, 90000]"
learning_rate_decay_levels: "[0.1, 0.01, 0.001]"
total_steps: 100000
train_batch_size: 3
eval_batch_size: 8
num_steps_per_eval: 10000
momentum: 0.9
l2_weight_decay: 0.00002
warmup_learning_rate: 0.0001
init_learning_rate: 0.02
The data_config value specifies the input data source and dimension. The augment_input_data is only applied during training and is recommended to achieve higher accuracy. The num_classes value is the number of categories in your ground truth plus 1 for the background class. Input images are resized and padded to image_size while keeping the aspect ratio.
data_config{
        image_size: "(832, 1344)"
        augment_input_data: True
        eval_samples: 5000
        training_file_pattern: "
$DATA_DIR/train*.tfrecord"
        validation_file_pattern: "$DATA_DIR/val*.tfrecord"
        val_json_file: "$DATA_DIR/annotations/instances_val2017.json"
        num_classes: 91
        skip_crowd_during_training: True
}
The maskrcnn_config value specifies the model structure and loss function–related hyperparameters. Currently, Mask R-CNN supports all ResNet backbones in TAO Toolkit. In this experiment, you choose ResNet50 as the backbone, its first two convolutional blocks frozen, and all batch normalization (BN) layers frozen, as specified with freeze_bn: True and freeze_blocks: "[0,1]". With a frozen convolutional layer, the weights do not change in a downstream task. This is especially helpful in transfer learning, where generic features are already captured in the shallow layers. You not only reuse the learned features, but also reduce training time. For more information about each field, see the TAO Toolkit Getting Started Guide.
maskrcnn_config {
        nlayers: 50
        arch: "resnet"
        freeze_bn: True
        freeze_blocks: "[0,1]"
        gt_mask_size: 112

        # Region Proposal Network
        rpn_positive_overlap: 0.7
        rpn_negative_overlap: 0.3
        rpn_batch_size_per_im: 256
        rpn_fg_fraction: 0.5
        rpn_min_size: 0.

        # Proposal layer.
        batch_size_per_im: 512
        fg_fraction: 0.25
        fg_thresh: 0.5
        bg_thresh_hi: 0.5
        bg_thresh_lo: 0.

        # Faster-RCNN heads.
        fast_rcnn_mlp_head_dim: 1024
        bbox_reg_weights: "(10., 10., 5., 5.)"

        # Mask-RCNN heads.
        include_mask: True
        mrcnn_resolution: 28

        # training
        train_rpn_pre_nms_topn: 2000
        train_rpn_post_nms_topn: 1000
        train_rpn_nms_threshold: 0.7

        # evaluation
        test_detections_per_image: 100
        test_nms: 0.5
        test_rpn_pre_nms_topn: 1000
        test_rpn_post_nms_topn: 1000
        test_rpn_nms_thresh: 0.7

        # model architecture
        min_level: 2
        max_level: 6
        num_scales: 1
        aspect_ratios: "[(1.0, 1.0), (1.4, 0.7), (0.7, 1.4)]"
        anchor_scale: 8

        # localization loss
        rpn_box_loss_weight: 1.0
        fast_rcnn_box_loss_weight: 1.0
        mrcnn_weight_loss_mask: 1.0
}
Training the model
When the data and spec file are ready, you can start the training with the following command:
tlt-train mask_rcnn -e $spec_file_path -r $experiment_dir -k $KEY --gpus N
Training with more GPUs allows networks to ingest more data faster, saving you precious time during the development process. TAO Toolkit supports multi-GPU training so that you can train the model with several GPUs in parallel. If automatic mixed-precision (AMP) training is enabled by setting enable_amp to True, you can expect a 20–50% speed boost compared to F32 training. During training, a detailed log records training loss every five iterations and evaluation metrics on the validation set.
throughput: 34.4 samples/sec
==================== Metrics =====================
FastRCNN box loss: 0.27979
FastRCNN class loss: 0.11633
FastRCNN total loss: 0.39612
L2 loss: 0.83087
Learning rate: 0.00014
Mask loss: 1.3277
RPN box loss: 0.03868
RPN score loss: 0.60576
RPN total loss: 0.64443
Total loss: 3.19912
If, for any reason, the training process is interrupted, you can resume training by executing the same command. It automatically picks up from the last saved checkpoint.
Evaluating the model
To evaluate the model, use the following command:
tlt-evaluate mask_rcnn -e $spec_file_path -m $model_path -k $KEY
Mask R-CNN reports COCO’s detection evaluation metrics. For example, AP50 means the average precision (AP) when IoU is set at 50%.
All the detection frameworks use mAP as a shared metric, adopted from Pascal VOC and comparable to AP50. The classification model enables various metrics, including Top K Accuracy, Precision and Recall, and Confusion Matrix.
After training for 100K iterations using 8 GPUs, you can observe the following metrics:
=========== Metrics ===========
AP: 0.334154785
AP50: 0.539312243
AP75: 0.358969182
APl: 0.453923374
APm: 0.354732722
APs: 0.181649670
ARl: 0.661920488
ARm: 0.533207536
ARmax1: 0.297426522
ARmax10: 0.477609098
ARmax100: 0.503548384
ARs: 0.317135185
mask_AP: 0.307278961
mask_AP50: 0.505144179
mask_AP75: 0.325496018
mask_APl: 0.432014465
mask_APm: 0.327025950
mask_APs: 0.151430994
mask_ARl: 0.626315355
mask_ARm: 0.492682129
mask_ARmax1: 0.281772077
mask_ARmax10: 0.439913362
mask_ARmax100: 0.461205393
mask_ARs: 0.271702766
The KPI is obtained by fine-tuning the pretrained model from NGC, which was originally trained on a subset of the Open Images dataset. If you train using ImageNet pretrained weights or train with larger iterations, the KPI might be different.
Verifying the model
Now that you’ve trained the model, run inference and verify the predictions. To verify the model visually with TAO Toolkit, use the tlt-infer command. The tlt-infer command supports inference on the .tlt model, as well as the TensorRT engine. tlt-infer generates annotated images with bounding boxes rendered on them. Optionally, you can also visualize the segmentation masks or serialize the output metadata in COCO JSON format. For example, to run an inference with a .tlt file, run the following command:
tlt-infer mask_rcnn -i $input_images_dir -o $annotated_images_dir -e $spec_file -m $tlt_model -l $json_label -t $threshold --include_mask
Figure 2 shows an example of the original image compared to the annotated output shown in Figure 3. As you can see, the model is robust to an image that is different from the COCO training data.

Exporting the model
Inference throughput and how quickly you can create an efficient model are two key metrics for deploying deep learning applications because they directly affect the time to market and the cost of deployment. TAO Toolkit includes a tlt-export command to export and prepare TAO Toolkit models for deployment. The tlt-export command can optionally generate the calibration cache for running inference at INT8 precision. For more information, see Deploying Deep Neural Networks with NVIDIA TensorRT.
The model is exported as a .etlt (encrypted TLT) file. The file is consumable by the DeepStream SDK, which decrypts the model and converts it to a TensorRT engine. Exporting the model decouples the training process from inference and allows conversion to TensorRT engines outside the TAO Toolkit environment. TensorRT engines are specific to each hardware configuration and should be generated for each unique inference environment.
For example, to export the model in INT8, use the following command:
tlt-export mask_rcnn -m $model_path -o $int8_etlt_file -e $spec_file -k $KEY --cal_image_dir $calibration_image_dir --batch_size N --batches $num_cal_batches --cal_cache_file $calibration_table --cal_data_file $calibration_data_cache --data_type int8
This generates an INT8 calibration table and .etlt file. To quantize the model to INT8, you must provide a dataset on which to calibrate, which is provided by the --cal_image_dir and --cal_data_file arguments. These arguments specify the image directory and the tensorfile needed for calibration. The number of batches in the tensorfile is obtained from batches and batch_size values. Make sure that the directory mentioned in --cal_image_dir has at least (batch_size * batches) images in it.
Deploying with DeepStream
Integrating a Mask R-CNN model in DeepStream is straightforward, as DeepStream 5.0 supports instance segmentation networks by default. The configuration file and label file for the model are provided in the SDK. These files can be used with the generated model as well as your own trained model. A sample Mask R-CNN model trained on a one-class dataset is provided in GitHub. The config and label file should work by default for that model. For the model that you trained in this post, minor modifications are required.
Start by downloading and installing the DeepStream SDK. The instructions to run TAO Toolkit models with DeepStream are provided in the README:
/opt/nvidia/deepstream/deepstream-5.0/samples/configs/tlt_pretrained_models
Here are the key config files to run the Mask R-CNN model:
/opt/nvidia/deepstream/deepstream-5.0/samples/configs/tlt_pretrained_models/deepstream_app_source1_mrcnn.txt

/opt/nvidia/deepstream/deepstream-5.0/samples/configs/tlt_pretrained_models/config_infer_primary_mrcnn.txt
The /deepstream_app_source1_mrcnn.txt file is the main config used by deepstream-app. This file configures the parameter for the entire video analytic pipeline. For more information, see Reference Application Configuration. For more information about the Mask R-CNN inference pipeline in DeepStream, see Building Intelligent Video Analytics Apps Using NVIDIA DeepStream 5.0 (Updated for GA).
The /config_infer_primary_mrcnn.txt file is an inference config file that sets parameters for Mask R-CNN inference. This file is called by the main deepstream_app_source1_mrcnn.txt config. Here are the key parameters that you modify based on your model:
tlt-model-key=
tlt-encoded-model=
labelfile-path=
int8-calib-file=
infer-dims=
num-detected-classes=<# of classes if different than default>
Here is an example:
[property]
gpu-id=0
net-scale-factor=0.017507
offsets=123.675;116.280;103.53
model-color-format=0
tlt-model-key=
tlt-encoded-model=
output-blob-names=generate_detections;mask_head/mask_fcn_logits/BiasAdd
parse-bbox-instance-mask-func-name=NvDsInferParseCustomMrcnnTLT
custom-lib-path=/opt/nvidia/deepstream/deepstream-5.0/lib/libnvds_infercustomparser.so
network-type=3 ## 3 is for instance segmentation network
labelfile-path=
int8-calib-file=
infer-dims=
num-detected-classes=<# of classes if different than default>
uff-input-blob-name=Input
batch-size=1
0=FP32, 1=INT8, 2=FP16 mode
network-mode=2
interval=0
gie-unique-id=1
no cluster
0=Group Rectangles, 1=DBSCAN, 2=NMS, 3= DBSCAN+NMS Hybrid, 4 = None(No clustering)
MRCNN supports only cluster-mode=4; Clustering is done by the model itself
cluster-mode=4
output-instance-mask=1
This runs on the clip that is provided in the SDK. To try on your own source, modify [source0] in /deepstream_app_source1_mrcnn.txt.
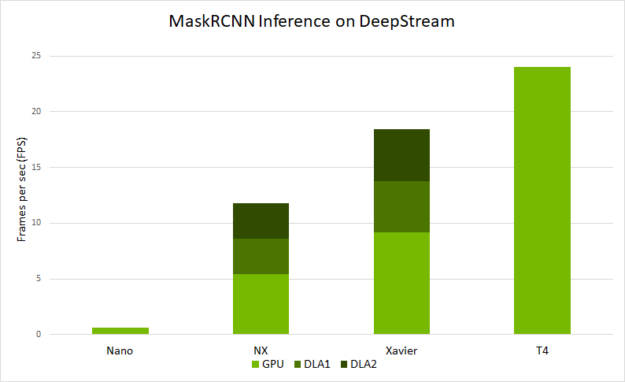
Figure 4 shows the end-to-end performance that you can expect with deepstream-app across various platforms. The performance is measured in frames per sec (FPS) that are processed by deepstream-app.
- Ran with inference resolution of 1344×832
- On NVIDIA Jetson Nano and on DLAs, this is run with a batch size of 1.
- On Jetson AGX Xavier and Xavier NX, this is run with a batch size of 2.
- On T4, this is run with a batch size of 4.
Conclusion
In this post, you learned about training instance segmentation models using the Mask R-CNN architecture with TAO Toolkit. The post showed taking an open-source COCO dataset with one of the pretrained models from NGC and training and optimizing with TAO Toolkit to deploying the model on the edge using the DeepStream SDK.
You can apply these steps to train and deploy your own custom networks. Training can be done on multiple GPUs to parallelize the runs and train faster. You can also generate INT8 calibration files to run inference at INT8 precision. Running at INT8 precision improves inference performance on your edge devices.
For more information, see the following resources:
- TAO Toolkit and pretrained models
- DeepStream SDK
- Building Intelligent Video Analytics Apps Using NVIDIA DeepStream 5.0 (Updated for GA) post
- The TAO Toolkit Developer Forums or DeepStream Developer Forums for questions or feedback
- Jetson developer community projects using TAO Toolkit and DeepStream
