NVIDIA Metropolis Microservices for Jetson has been renamed to Jetson Platform Services, and is now part of NVIDIA JetPack SDK 6.0.
NVIDIA Metropolis Microservices for Jetson provides a suite of easy-to-deploy services that enable you to quickly build production-quality vision AI applications while using the latest AI approaches.
This post explains how to develop and deploy generative AI–powered applications with Metropolis Microservices on the NVIDIA Jetson edge AI platform by walking through a reference example that can be used as a general recipe for nearly any model.
The reference example uses a stand-alone zero-shot detection NanoOwl application and integrates it with Metropolis Microservices for Jetson, so that you can quickly prototype and deploy it in production.
Transform your applications with generative AI
Generative AI is a new class of machine learning that enables models to understand the world in a more open way than previous methods.
At the heart of most generative AI is a transformer-based model that has been trained on internet-scale data. These models have a much broader understanding across domains, enabling them to be used as a backbone for a variety of tasks. This flexibility enables models like CLIP, Owl, Llama, GPT, and Stable Diffusion to comprehend natural language inputs. They are capable of zero or few-shot learning.

For more information about generative AI models for Jetson, see the NVIDIA Jetson Generative AI Lab and Bringing Generative AI to Life with NVIDIA Jetson.
Metropolis Microservices for Jetson
Metropolis Microservices can be used to rapidly build production-ready AI applications on Jetson. Metropolis Microservices are a set of modular and easily deployable Docker containers for camera management, system monitoring, IoT device integration, networking, storage, and more. These can be brought together to create powerful applications. Figure 2 shows the available microservices.
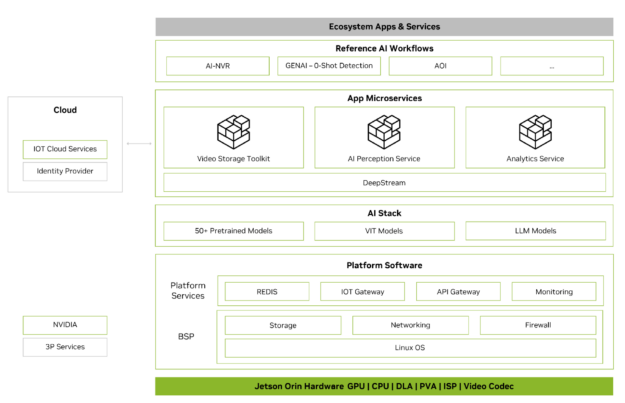
For more information, see the Metropolis Microservices for Jetson whitepaper.
Integrating generative AI apps with Metropolis Microservices
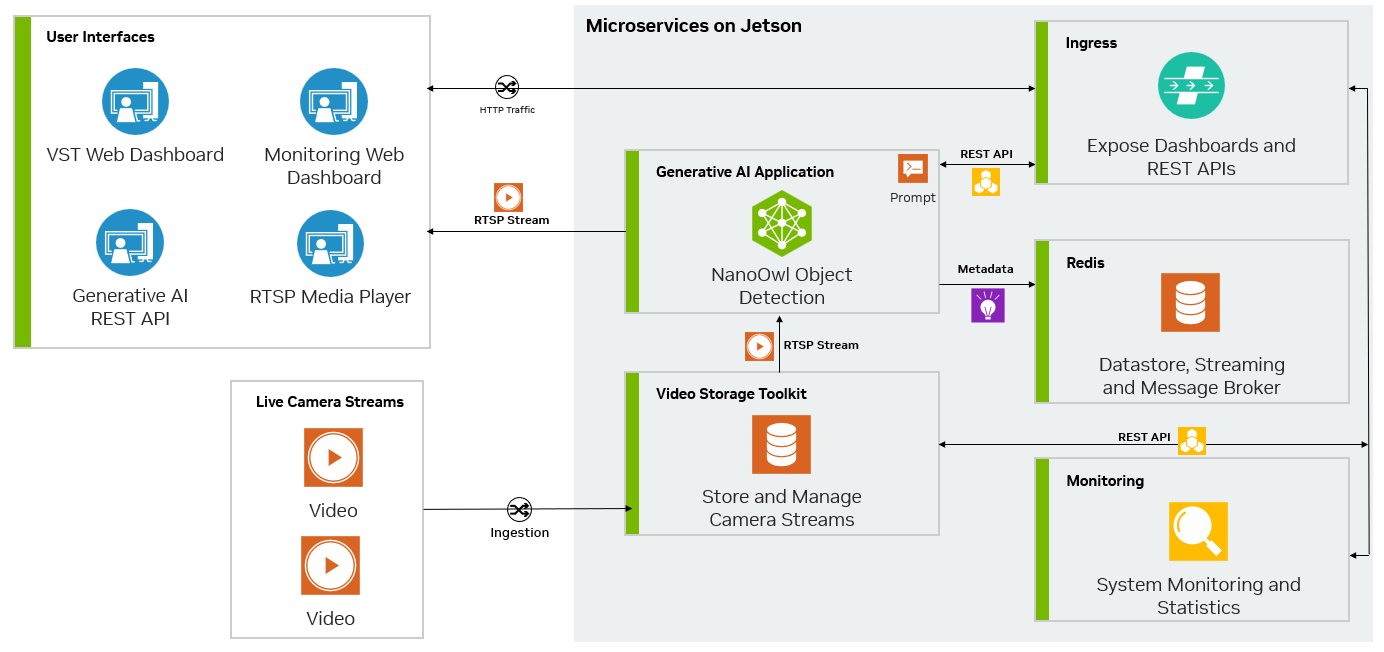
Metropolis Microservices and generative AI can be combined to take advantage of models that require little to no training. Figure 3 shows a diagram of the NanoOwl reference example that can be used as a general recipe to build generative AI–powered applications with Metropolis Microservices on Jetson.
Application customization with Metropolis Microservices
There are many open-source generative AI models available on GitHub and some have been optimized to run specifically on Jetson. You can find several of these models in the Jetson Generative AI Lab.
Most of these models have a lot in common. As inputs, they can typically accept text and an image. These models must first be loaded into memory with any configuration options. Then, the model can be called with an inference function where the image and text are passed in to produce an output.
In the Python reference example, we used NanoOwl as the generative AI model. However, the general recipe of the reference example can be applied to nearly any generative AI model.
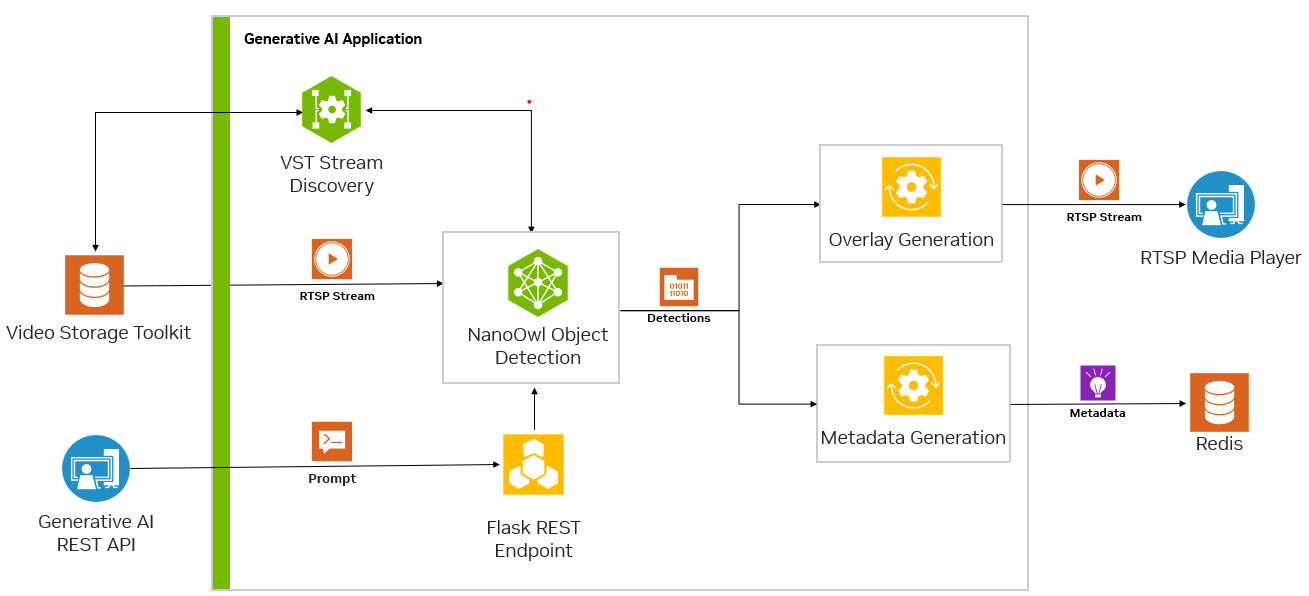
To run any generative AI model with Metropolis Microservices, you must first align the input and output from other microservices (Figure 4).
For streaming video, the input and output uses the RTSP protocol. RTSP is streamed from Video Storage Toolkit (VST), a video ingestion and management microservice. The output is streamed over RTSP with the overlaid inference output. The output metadata is sent to a Redis stream where other applications can read the data. For more information, see the Video Storage Toolkit with Metropolis Microservices demo videos.
Second, as a generative AI application requires some external interface such as prompts, you need the application to take REST API requests.
Lastly, the application must be containerized to integrate seamlessly with other microservices. Figure 5 shows an example of NanoOwl object detection and metadata output on Redis.
Prepare the generative AI application
This reference example uses NanoOwl. However, you can follow these steps for any model that has a load and inference function callable from Python. There are several Python code examples shown in this post to highlight the main ideas of how to combine generative AI with Metropolis Microservices but some code is omitted to focus on the general recipe. For more information about the full implementation, see the reference example on the /NVIDIA-AI-IOT/mmj_genai GitHub project.
To prepare a generative AI model for integration with Metropolis Microservices, take the following steps:
- Call the
predictfunction for model inference - Add RTSP I/O using the
jetson-utilslibrary. - Add a REST endpoint for prompt updates with Flask.
- Use
mmj_utilsto generate overlays. - Use
mmj_utilsto interact with VST to get streams. - Use
mmj_utilsto output metadata to Redis.
Call the predict function for model inference
NanoOwl wraps the generative AI model in an OwlPredictor class. When this class is instantiated, it loads the model into memory. To make an inference on an image and text input, call the predict function to get the output.
In this case, the output is a list of bounding boxes and labels for the detected objects.
import PIL.Image
import time
import torch
from nanoowl.owl_predictor import OwlPredictor

image = PIL.Image.open("my_image.png")
prompt = ["an owl", "a person"]

#Load model
 predictor = OwlPredictor(
       "google/owlvit-base-patch32",
        image_encoder_engine="../data/owlvit_image_encoder_patch32.engine"
    )
#Embed Text
text_encodings = predictor.encode_text(text)

#Inference
output = predictor.predict(
image=image,
        	text=prompt,
        	text_encodings=text_encodings,
       	 threshold=0.1,
        	pad_square=False)
Most generative AI models have similar Python interfaces. There is image and text input, the model must be loaded, and then the model can infer from the prompt and image to get some output. To bring in your own generative AI model, you can wrap it in a class and implement an interface similar to the OwlPredictor class.
Add RTSP I/O using the jetson-utils library
You can add RTSP video stream input using the jetson-utils library. This library provides videoSource and videoOutput classes that can be used to capture frames from an RTSP stream and output frames on a new RTSP stream.
from jetson_utils import videoSource, videoOutput

stream_input = "rtsp://0.0.0.0:8554/input"
stream_output = "rtsp://0.0.0.0:8555/output"

#Create stream I/O
v_input = videoSource(stream_input)
v_output = videoOutput(stream_output)

while(True):
	image = v_input.Capture() #get image from stream
	output = predictor.predict(image=image, text=prompt, ...)

	new_image = postprocess(output)

	v_output.Render(new_image) #write image to stream
This code example captures frames from an RTSP stream, which can then be passed to a model inference function. A new image is created from the model outputs and rendered to an output RTSP stream.
Add a REST endpoint for prompt updates with Flask
Many generative AI models accept some kind of prompt or text input. To enable a user or another service to update the prompt dynamically, add a REST endpoint using Flask that accepts prompt updates and passes them to the model.
To make the Flask server integrate more easily with your model, create a wrapper class that can be called to launch a Flask server in its own thread. For more information, see the /NVIDIA-AI-IOT/mmj_genai GitHub project.
from flask_server import FlaskServer

#Launch flask server and connect queue to receive prompt updates
flask_queue = Queue() #hold prompts from flask input
flask = FlaskServer(flask_queue)
flask.start_flask()

while(True):
	...

	if not flask_queue.empty(): #get prompt update
            prompt = flask_queue.get()

	output = predictor.predict(image=image, text=prompt, ...)
	...
Connect your main script and the Flask endpoint through a queue that holds any incoming prompt updates. When a GET request is sent to the REST endpoint, the Flask server places the updated prompt in a queue. Your main loop can then check the queue for new prompts and pass it to the model for inference on the updated classes.
Use mmj_utils to generate overlays
For computer vision tasks, it is nice to see a visual overlay of the model output (Figure 6). In the case of object detection models, you can overlay the bounding boxes and labels generated by the model on the input image to view where the model detected each object.
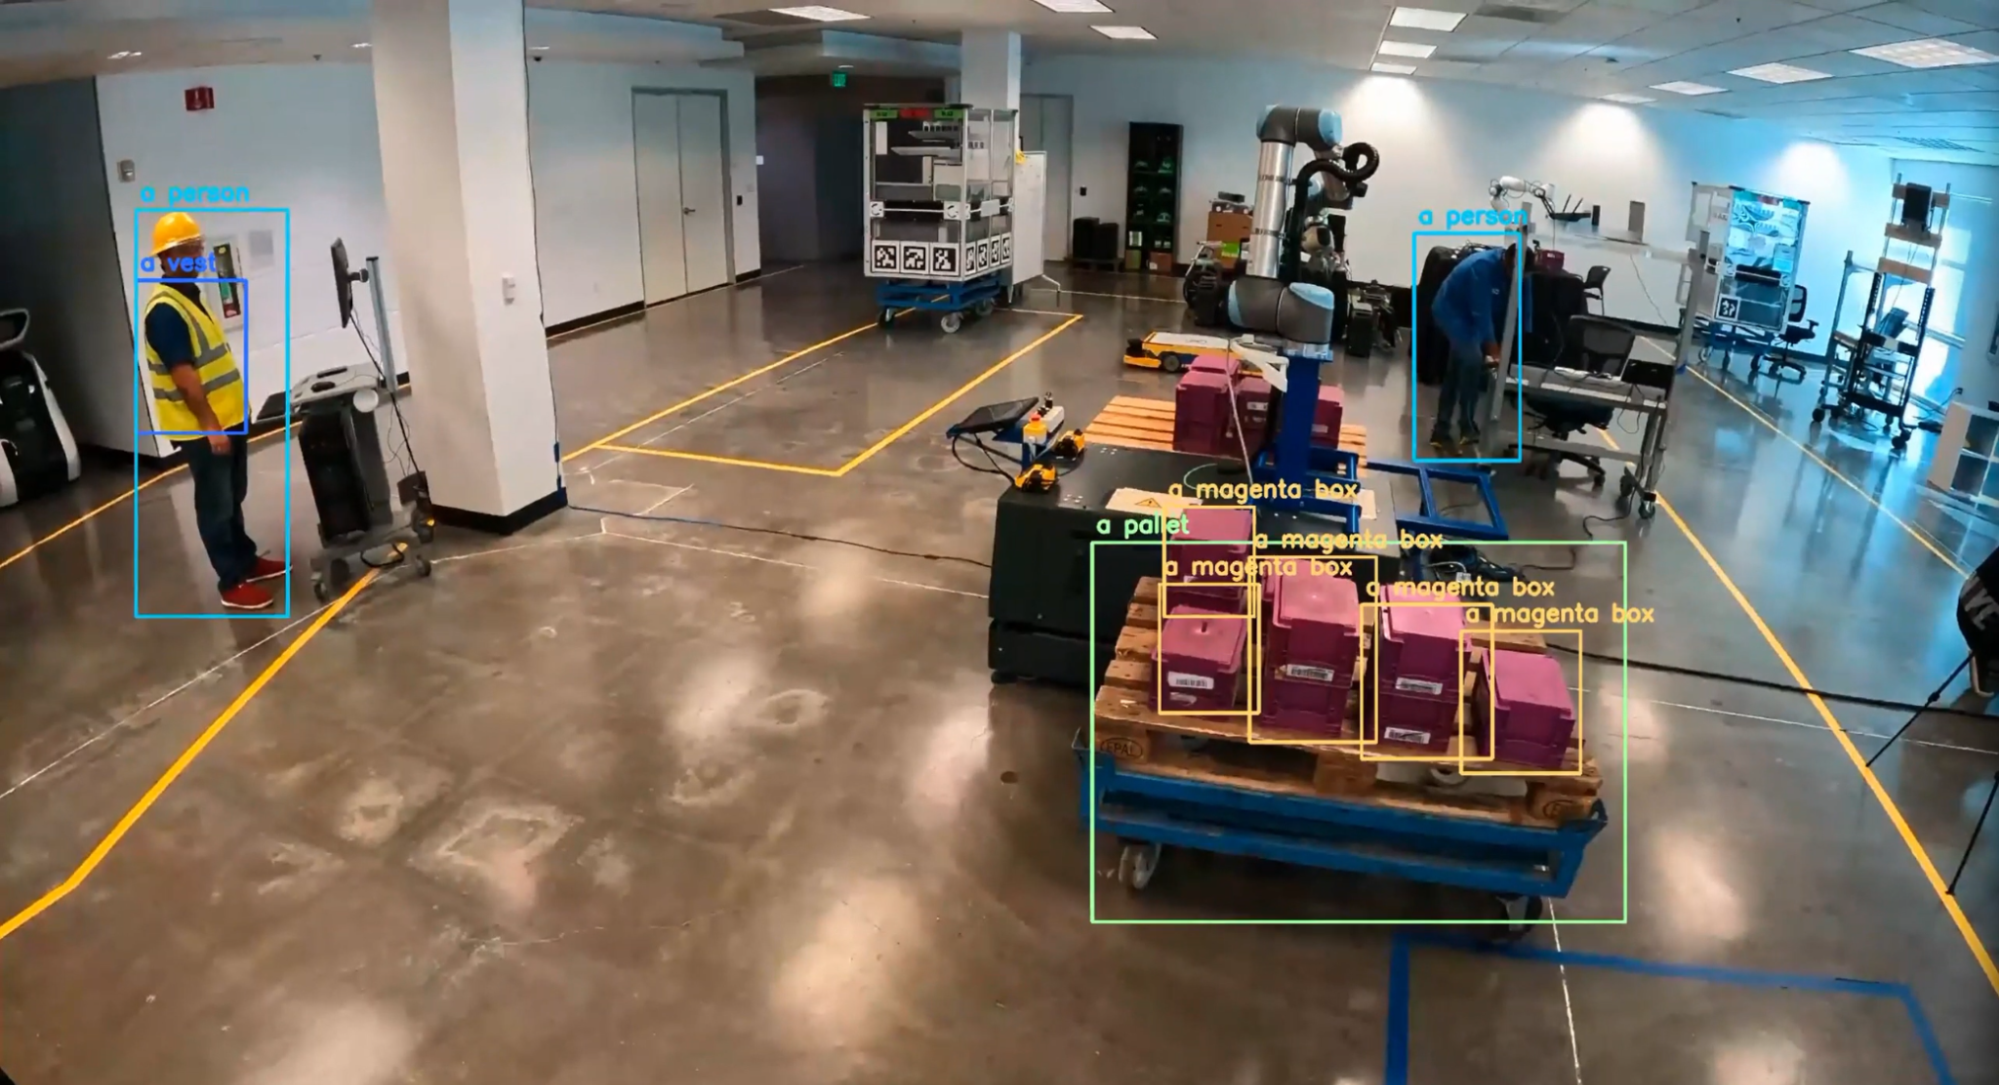
To do this, use the utility class called DetectionGenerationCUDA from the mmj_utils library. This library depends on jetson_utils, which provides CUDA-accelerated functions used to generate the overlay.
from mmj_utils.overlay_gen import DetectionOverlayCUDA

overlay_gen = DetectionOverlayCUDA(draw_bbox=True, draw_text=True, text_size=45) #make overlay object

while(True):
	...

	output = predictor.predict(image=image, text=prompt, ...)

	#Generate overlay and output
       text_labels = [objects[x] for x in output.labels]
       bboxes = output.boxes.tolist()
       image = overlay_gen(image, text_labels, bboxes)#generate overlay
       v_output.Render(image)
You can instantiate the DetectionGenerationCUDA object with several keyword arguments to adjust the text size, bounding box size, and colors to suit your needs. For more information about overlay generation with mmj_utils, see /NVIDIA-AI-IOT/mmj_utils GitHub repo.
To generate the overlay, call the object and pass the input image, list of labels, and bounding boxes generated by the model. It then draws the labels and bounding boxes on the input image and returns the modified image with the overlay. This modified image can then be rendered out on the RTSP stream.
Use mmj_utils to interact with VST to get streams
VST can help manage your RTSP streams and provide a nice web UI to view the input and output streams. To integrate with VST, use the VST REST API directly or the VST class from mmj_utils, which wraps around the VST REST API.
Instead of hardcoding the RTSP input stream in the Python script, grab an RTSP stream link from VST. This link could come from IP cameras or other video stream sources managed through VST.
from mmj_utils.vst import VST

vst = VST("http://0.0.0.0:81")
vst_rtsp_streams = vst.get_rtsp_streams()
stream_input = vst_rtsp_streams[0]

v_input = videoSource(stream_input)
...
This connects to VST and grabs the first valid RTSP link. More complex logic could be added here to connect to a specific source or change the inputs dynamically.
Use mmj_utils to output metadata to Redis
Generative AI models generate metadata that can be used downstream by other services for generating analytics and insights.
In this case, NanoOwl outputs bounding boxes on detected objects. You can output this information in Metropolis Schema on a Redis stream, which can be captured by an analytic service. In the mmj_utils library, there is a class to help produce detection metadata on Redis.
from mmj_utils.schema_gen import SchemaGenerator


schema_gen = SchemaGenerator(sensor_id=1, sensor_type="camera", sensor_loc=[10,20,30])
schema_gen.connect_redis(aredis_host=0.0.0.0, redis_port=6379, redis_stream="owl")

while True:
	...
	output = predictor.predict(image=image, text=prompt, ...)

	#Output metadata
       text_labels = [objects[x] for x in output.labels]
schema_gen(text_labels, bboxes)
You can instantiate a SchemaGenerator object with information about the input camera stream and connect to Redis. The object can then be called by passing in text labels and bounding boxes produced by the model. The detection information gets converted to Metropolis Schema and output to Redis to be used by other microservices.
Application deployment
To deploy the application, you can set up platform services like Ingress and Redis. Then, combine your custom generative AI container with the application services such as VST through docker compose.
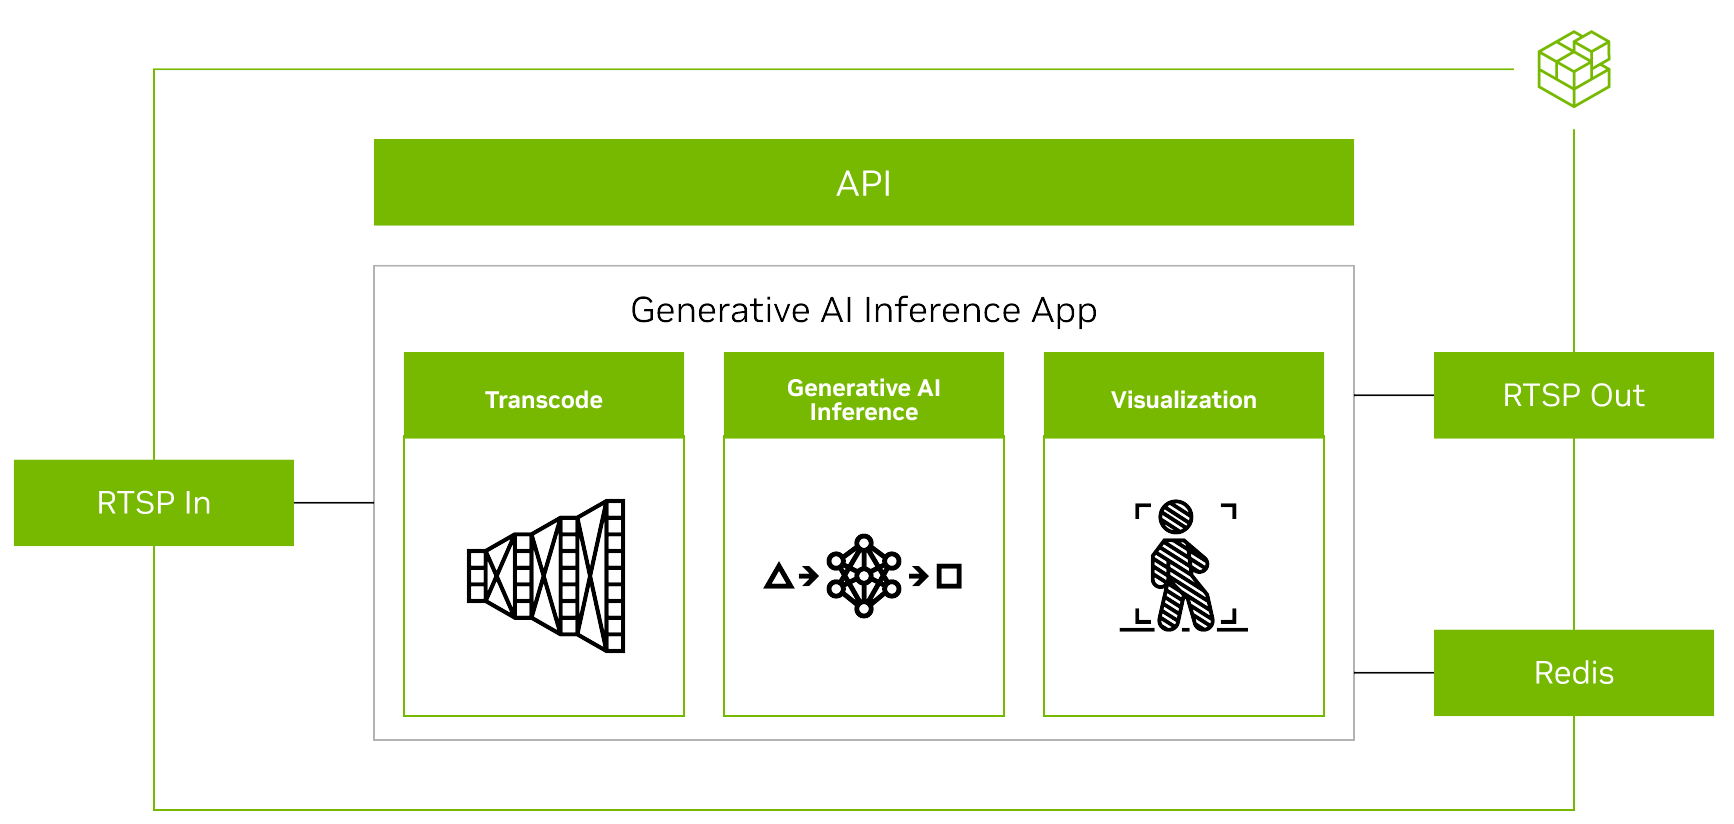
With the main application prepared with all the necessary I/O and microservice integration (Figure 7), you can deploy the application and connect with Metropolis Microservices.
- Containerize the generative AI application.
- Set up the necessary platform services.
- Launch the application with
docker compose. - View outputs in real time.
Containerize the generative AI application
The first step for deployment is to containerize the generative AI application using Docker.
An easy way to do this is to use the jetson-containers project. This project provides an easy way to build Docker containers for Jetson to support machine learning applications including generative AI models. Use jetson-containers to make a container with the necessary dependencies and then customize the container further to include the application code and any other packages needed to run your generative AI model.
For more information about how to build the container for the NanoOwl example, see the /src/readme file in the GitHub project.
Set up the necessary platform services
Next, set up the necessary platform services provided by Metropolis Microservices. These platform services provide many features needed to deploy an application with Metropolis Microservices.
This reference generative AI application only requires the Ingress, Redis, and Monitoring platform services. Platform services can be quickly installed through APT and launched with systemctl.
For more information about how to install and launch the necessary platform services, see the Metropolis Microservices for Jetson Quickstart Guide.
Launch the application with docker compose
With the application containerized and the necessary platform services set up, you can launch your application along with other application services like VST or Analytics using docker compose.
To do this, create a docker-compose.yaml file that defines the containers to be launched along with any necessary launch options. After you define the docker compose file, you can start or stop your application using the docker compose up and docker compose down commands.
For more information about docker deployment, see the /deploy/readme file in the GitHub project.
View outputs in real time
After the application is deployed, you can add an RTSP stream through VST and interact with the generative AI model through the REST API to send prompt updates and view the detections change in real time by watching the RTSP output. You can also see the metadata output on Redis.
Conclusion
This post explained how to take a generative AI model and integrate it with Metropolis Microservices for Jetson. With generative AI and Metropolis Microservices, you can rapidly build intelligent video analytic applications that are both flexible and accurate.
For more information about the provided services, see the Metropolis Microservices for Jetson product page. To view the full reference application and more detailed steps about how to build and deploy it for yourself, see the /NVIDIA-AI-IOT/mmj_genai GitHub project.
