NVIDIA Metropolis Microservices for Jetson has been renamed to Jetson Platform Services, and is now part of NVIDIA JetPack SDK 6.0.
NVIDIA Metropolis microservices provide powerful, customizable, cloud-native APIs and microservices to develop vision AI applications and solutions. The framework now includes NVIDIA Jetson, enabling developers to quickly build and productize performant and mature vision AI applications at the edge.
APIs enhance flexibility, interoperability, and efficiency in software development by enabling seamless communication and integration between different applications and services. Two of the common functionalities for building video analytics applications are video streaming and AI-based generation of insights and analytics.
This post features the API workflow for building vision AI applications and integrating them into any client application. We explain three key steps for building your applications:
- Stream video from the edge to any device through WebRTC using APIs.
- Generate insights and alerts for people/object movement using tripwire functionality, accessed through APIs.
- Use the reference cloud for secure, remote device API access.
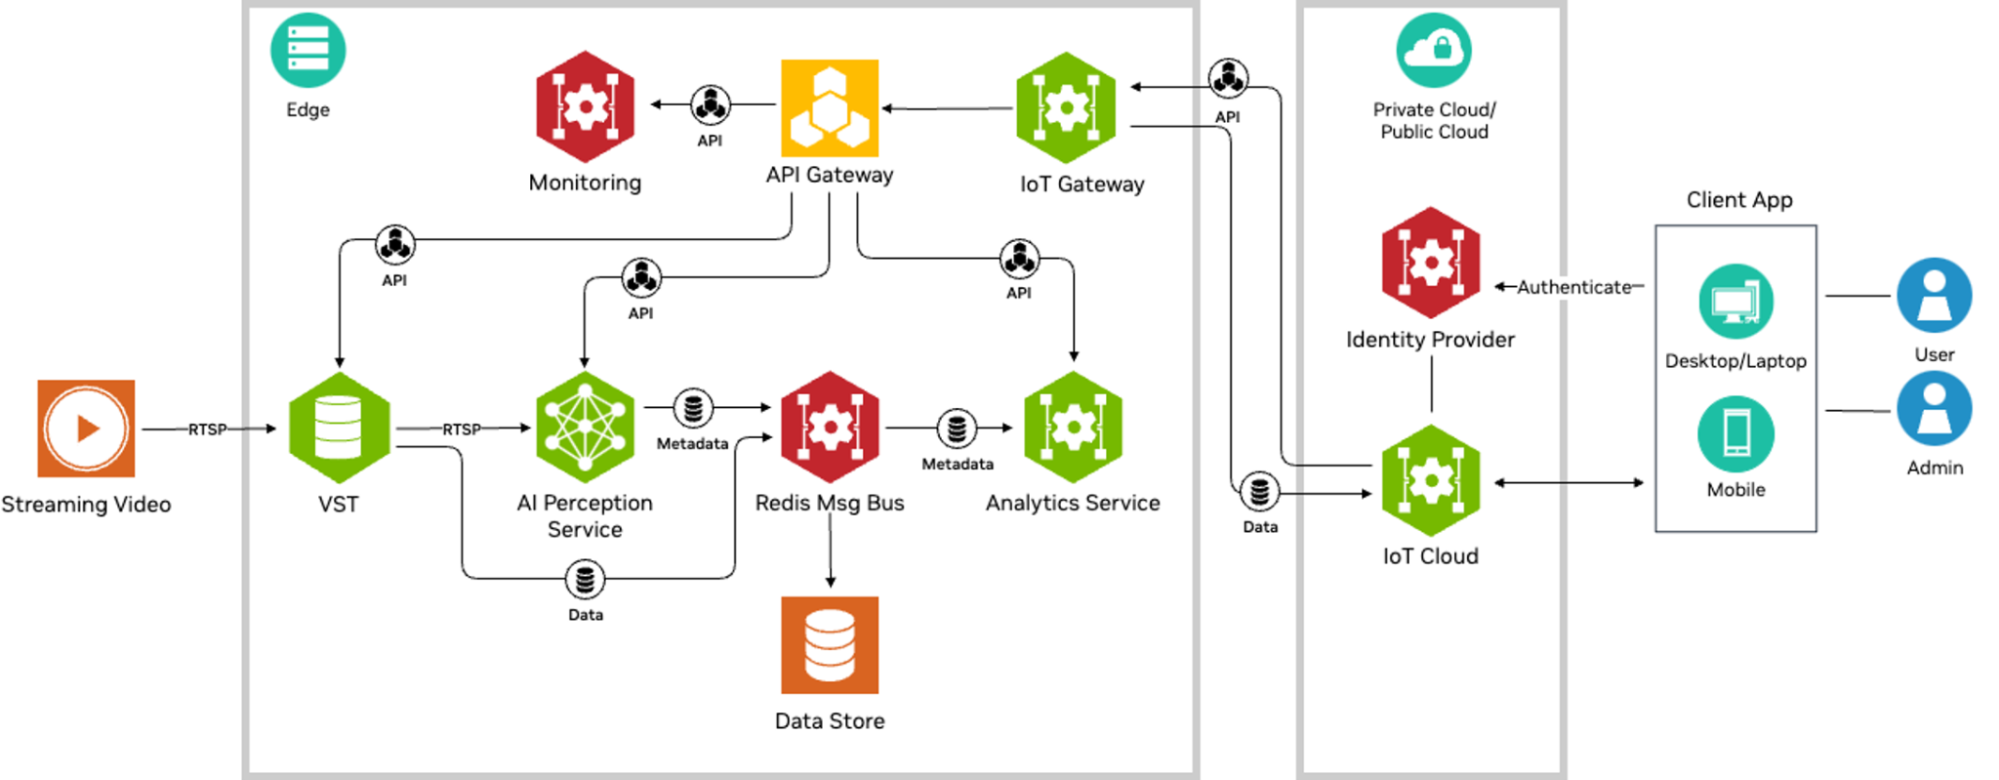
Modular architecture
NVIDIA Metropolis microservices for Jetson provide a modular architecture with a large collection of software, including customizable, reusable microservices for building vision AI applications. The suite also offers platform services for infrastructural capabilities and a reference cloud. Various microservices include Video Storage Toolkit (VST), an AI perception service based on NVIDIA DeepStream, and an Analytics service. Each provides APIs to configure and access the functionality of the microservices.
These APIs are presented externally to the system using the Ingress platform service, based on a standard pattern used in cloud-native architectures to expose APIs within a system using a single gateway. Client applications exercise microservice functionality by invoking the respective APIs through the Ingress service. Further, NVIDIA Metropolis microservices provide an IoT cloud module that enables clients to be authenticated and authorized when accessing these APIs remotely.
Video streaming through WebRTC
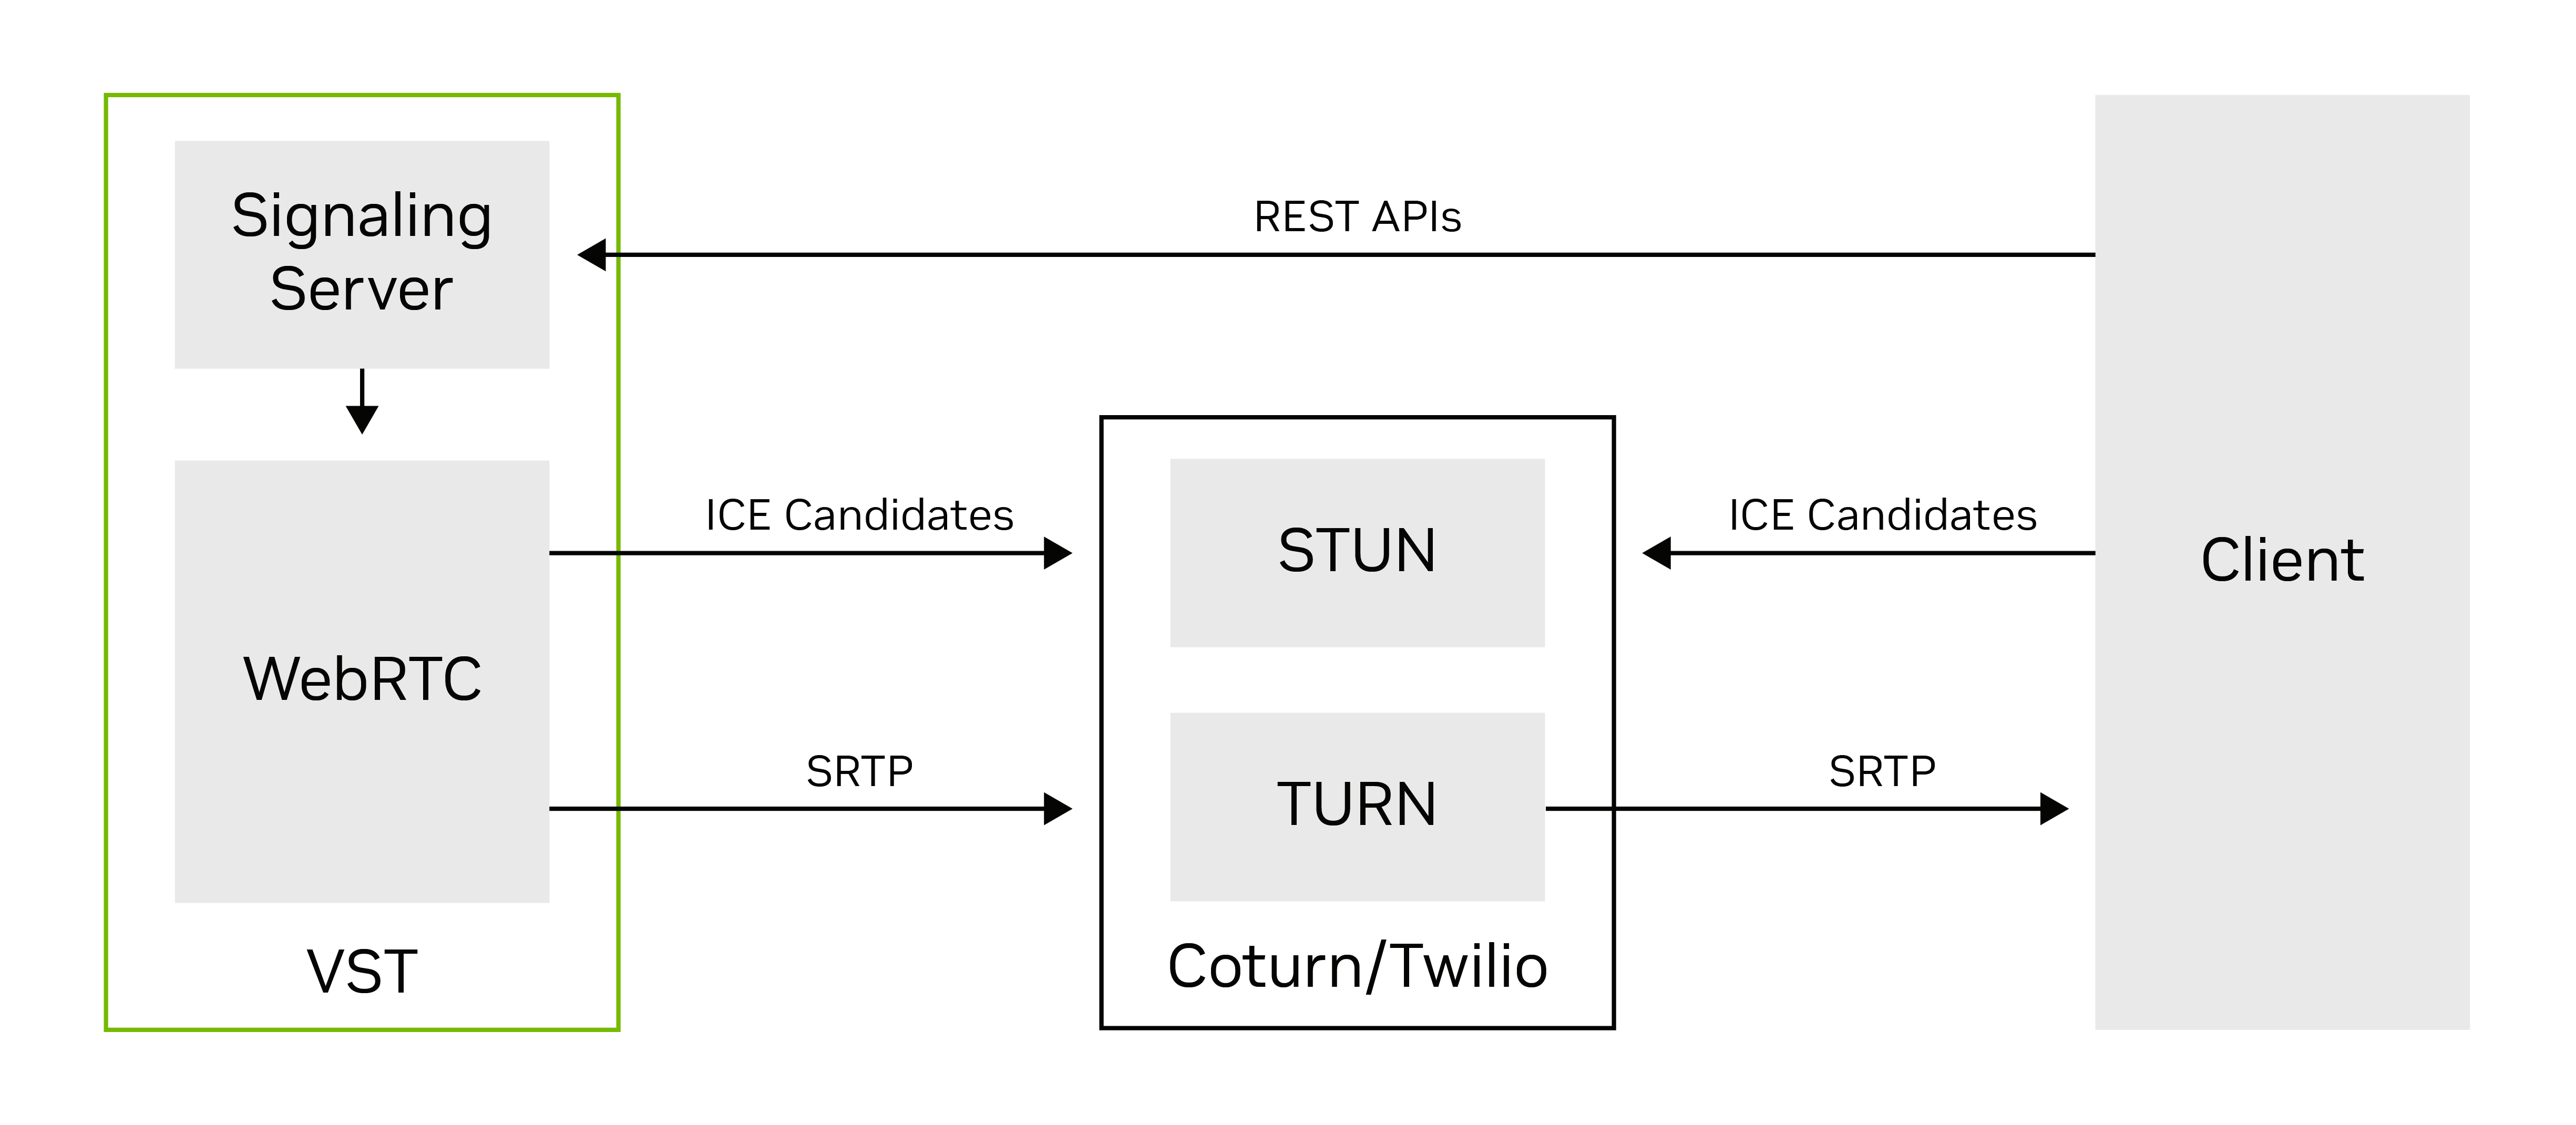
Viewing video streams from cameras connected to a system using a client app such as a mobile app or browser is a common requirement for video analytics systems. This functionality is supported through a standardized call flow based on the VST APIs. The VST microservice supports remote streaming using the WebRTC (Web Real-Time Communication) protocol, which is designed for reliable, peer-to-peer delivery of video and other data over the Internet.
This section presents an overview of the salient concepts underlying the WebRTC protocol, and using VST APIs to enable WebRTC-based streaming. WebRTC is a powerful open-source project that enables real-time communication directly between two peers, such as a web browser and a Jetson device running VST.
Entities for WebRTC streaming
A typical WebRTC session involves a few different entities, which are listed below:
User agent: Represents the mobile, browser, or web application initiating the communication using the VST APIs.
Signaling server: A web server implemented within the VST involved in the establishment of communication channels for the WebRTC session.
ICE (Interactive Connectivity Establishment) server: A logical module implemented within the VST-WebRTC stack to determine the best connection path between peers. This is necessary for traversing firewalls and NATs (Network Address Translators).
STUN (Session Traversal Utilities for NAT) server: A type of ICE server that helps in discovering public IP addresses and Ports. It’s necessary when peers are using private (NAT-based) IP addresses. This is a third-party entity hosted on a public cloud network.
TURN (Traversal Using Relays around NAT) server: Acts as a relay if direct peer-to-peer communication fails and is only needed when peers are on different networks. This is supported through third-party services such as Twilio.
WebRTC session stages
WebRTC sessions use control paths and data paths to enable session creation and streaming.
A control path enables setting up and managing sessions between peers whose stages include initialization, signaling, ICE candidate exchange, and connection establishment. VST enables user agents to perform these operations remotely through its APIs.
A data path enables real-time media data transfer along with adaptation and quality control, and finally closing the connection.
Enabling WebRTC streaming through VST APIs
Figure 3 shows the call flow between clients and VST capturing the control and data paths for enabling WebRTC sessions.
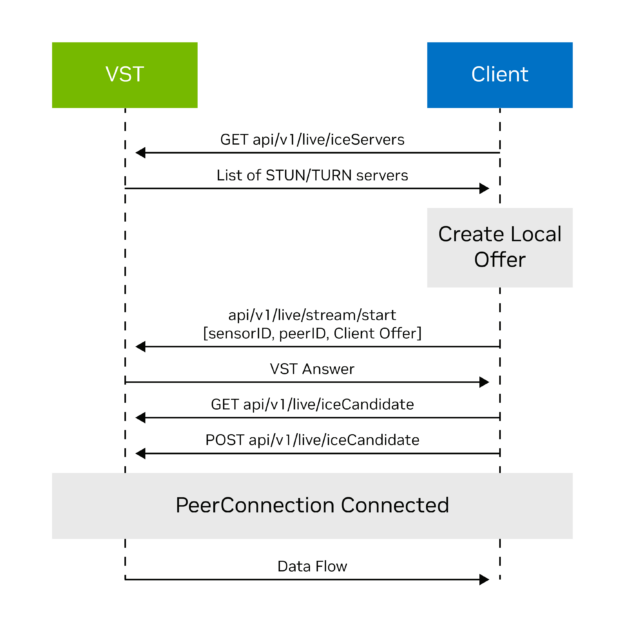
The call flow starts with a client discovering various video streams using the api/v1/sensor/list API.
The control and data paths are implemented based on the following call flow:
- Client calls
GET api/v1/live/iceServers or api/v1/replay/iceServersto get the list of ICE servers from VST. - Client creates a local offer and sends the offer to VST using
POST api/v1/live/stream/start or api/v1/replay/stream/start. - VST creates an answer for the client and returns it as a response.
- Client completes the ICE exchange using
GETandPOSTrequests forapi/v1/live/iceCandidateorapi/v1/replay/iceCandidatewith thepeeridas query parameter. - Video data starts flowing when the peer connection is complete.
When streaming is underway, the client can control streaming using the following stream APIs:
- Pause the video pipeline:
api/v1/replay/stream/pause
- Resume the video pipeline:
api/v1/replay/stream/resume
- Find a specific time in the video:
api/v1/replay/stream/seek
Build client applications
These concepts can be applied to add video streaming capability to browser-based web applications by invoking VST APIs over HTTP in JavaScript, while leveraging WebRTC support in JavaScript supported by most browsers. Similar concepts can be applied to building native WebRTC client applications as well.
To set up WebRTC streaming with JavaScript, follow these steps:
Initialize a peer connection
Create a new RTCPeerConnection object with appropriate configuration settings.
Handle the track addition
- Set up an event listener for the
ontrackevent. - When a new track is added, update the remote video element to display the incoming video stream.
Generate an offer
- Use the
createOffermethod to generate an offer for the peer connection. - Set the local description of the peer connection to the generated offer.
Send the offer to VST
- Obtain the local description (offer) using
peerConnection.localDescription. - Send the offer to the VST using the appropriate start API; for example,
api/v1/live/stream/start.
Receive an answer from VST
When an answer SDP is received from VST as the start API response, set it as the remote description using peerConnection.setRemoteDescription.
Handle ICE candidates
- Exchange ICE candidates using
GETandPOSTrequests of theapi/v1/live/iceCandidateAPI. - Add the received ICE candidates to the peer connection using
peerConnection.addIceCandidate.
Generate spatial insights and alerts for object movement
The Analytics microservice supports three people or objects analytics modules:
- Field of View (FOV): Count people or objects in the camera’s field of view.
- Tripwire: Detect people or objects crossing across user-defined tripwire line segments.
- Region of Interest (ROI): Count people or objects in the defined region of interest.
In combination, these modules provide a powerful set of tools to understand the movement of people or objects across physical spaces, with use cases ranging across retail warehouses, security, and safety. Client applications use APIs to identify sensor lists, create tripwires, and retrieve counts and alerts for each of these functionalities.
This section walks through an end-to-end example of these operations for tripwires. A similar methodology can be used to enable FOV and ROI. For each case, invoke the HTTP APIs in the programming language or HTTP client of your choice.
Retrieve the sensor list
As a first step, retrieve the name of the sensor for which the tripwire is to be configured.
Invoke the VST API for listing all the sensors. Identify the sensor of interest from the returned list. The name attribute of the sensor object is to be used as the sensor ID in subsequent steps to configure and retrieve tripwire counts and alerts. Replace <device-ip> with the IP address of your device.
http://<device-ip>:30080/vst/api/v1/sensor/list
Create a tripwire configuration
In this step, configure a tripwire to specify which lines you wish to count the people crossing.
When configuring a tripwire, specify the following properties:
- Sensor ID: Identification of the sensor for which the tripwire is to be configured.
- Tripwire ID: Identification of the tripwire. A sensor may have multiple definitions. Each tripwire needs to have a unique identifier.
- Wire: A sequence of points representing the line segments comprising the tripwire.
- Direction: A vector (two points) depicting the directionality of crossing (entry/exit).
Note that the coordinates for points are in the camera coordinates (image plane). The top left corner is (0,0).
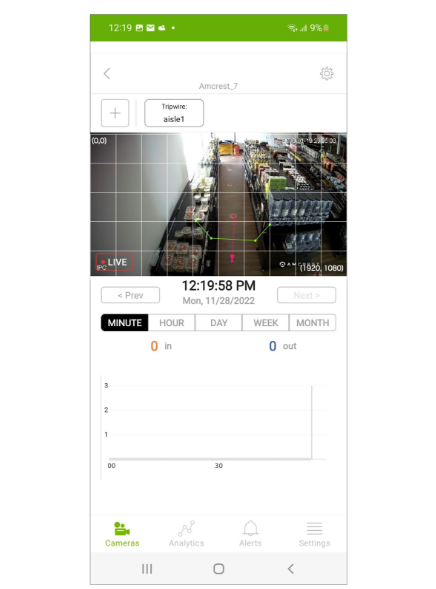
Client applications like the reference mobile app provided with NVIDIA Metropolis microservices offer a visual aid to select a point without needing to determine the (x, y) locations manually. Figure 4 shows an example of a tripwire created and rendered through the mobile app. The user selects the tripwire anchor points using the touch interface in the app to draw the tripwire (green lines), along with directionality (red arrow).
To configure a tripwire with Id = main_door for a sensor with Id = Amcrest_3, invoke the following HTTP API call in the programming language of your choice:
http://<device-ip>:30080/emdx/api/config/tripwire?sensorId=Amcrest_3
{
  "deleteIfPresent": false,
  "tripwires": [
    {
        "direction": {
          "entry": {
            "name": "Inside the room"
          },
          "exit": {
            "name": "Outside of the room"
          },
          "p1": { "x": 753, "y": 744},
          "p2": { "x": 448, "y": 856}
        },
        "id": "main_door",
        "name": "Main door",
        "wire": [
          { "x": 321, "y": 664 },
          { "x": 544, "y": 648 },
          { "x": 656, "y": 953 },
          { "x": 323, "y": 1067}
        ]
      }
  ],
  "sensorId": "Amcrest_3"
}
Configure tripwire alert rule (optional)
It is optional to configure an alert rule for a given tripwire. Alert rules are specific conditions which when met result in an alert event being generated.
To configure an alert rule that will raise an alert whenever one person crosses the tripwire (main door) in the direction of entry, invoke the following API request:
http://<device-ip>:30080/emdx/api/config/rule/alerts/tripwire
{
  "sensorId": "Amcrest_3",
  "rules": [
    {
      "rule_id": "cd2218f6-e4d2-4ad4-9b15-3396e4336064",
      "id": "main_door",
      "type": "tripwire",
      "rule_type": "increment",
      "time_interval": 1,
      "count_threshold": 1,
      "direction": "entry"
    }
  ]
}
Retrieve tripwire counts and alerts
This step explains how to retrieve the counts of the people crossing the tripwire defined previously. Optionally, you can also retrieve the alerts generated based on configured alert rules for that tripwire.
The counts can be queried for a particular tripwire (sensorId, tripwireId), for a time range (fromTimestamp, toTimestamp) and aggregated to a specified time window (fixedInterval). Optionally, you can retrieve alerts and counts by setting the alerts query parameter to true:
http://<device-ip>:30080/emdx/api/metrics/tripwire/histogram?sensorId=Amcrest_3&tripwireId=main_door&fromTimestamp=2020-10-30T20:00:00.000Z&toTimestamp=2020-10-30T20:01:00.000Z&fixedInterval=1000&alerts=true
{
    "alerts": [
     {
            "count": 1,
            "description": "1 people entered tripwire",
            "duration": 1.000,
            "startTimestamp": "2020-10-30T20:00:59.000Z",
            "endTimestamp": "2020-10-30T20:01:00.000Z",
            "id": "unique-alert-id",
            "rule_type": "increment",
            "rule_id": "cd2218f6-e4d2-4ad4-9b15-3396e4336064",
            "sensorId": "Amcrest_3",
            "type": "tripwire",
            "direction": "entry",
            "directionName": "Inside the room",
            "attributes": [..],
        }
     ],
    "counts": [
      {
        "agg_window": "1 sec",
        "histogram": [
          {
            "end": "2020-10-30T20:00:01.000Z",
            "start": "2020-10-30T20:00:00.000Z",
            "sum_count": 1
          }
        ],
        "attributes": [...],
        "sensorId": "Amcrest_3",
        "type": "exit"
      },
      {
        "agg_window": "1 sec",
        "histogram": [
          {
            "end": "2020-10-30T20:00:01.000Z",
            "start": "2020-10-30T20:00:00.000Z",
            "sum_count": 0
          },
          …..
        ],
        "attributes": [.. ],
        "sensorId": "Amcrest_3",
        "type": "entry"
      }
    ]
  }
The histograms are returned for each direction separately. The entire time range is divided into time windows of fixedInterval. Crossings for each time window start,end are reported as sum_count.
Retrieve tripwire alerts
To retrieve all the alerts for a given sensor, invoke the following API:
http://<device-ip>:30080/emdx/api/alerts?sensorId=Amcrest_3&fromTimestamp=2020-10-30T20:00:00.000Z&toTimestamp=2020-10-31T01:00:00.000Z
Secure, remote, cloud-based API access
APIs enable clients to access device configuration and functionality remotely using the HTTP protocol. While in the development stage, API invocation is recommended by directing HTTP requests to the device IP address. However, in production scenarios, the IP addresses of devices would typically be unknown to clients.
In addition, Jetson devices might be located behind firewalls, rendering them unreachable, or they may use NAT-based IP addresses that may not be valid externally. The IoT cloud facilitates product-grade remote API invocation by providing a mechanism to forward requests from network-separated clients to devices in a secure manner.
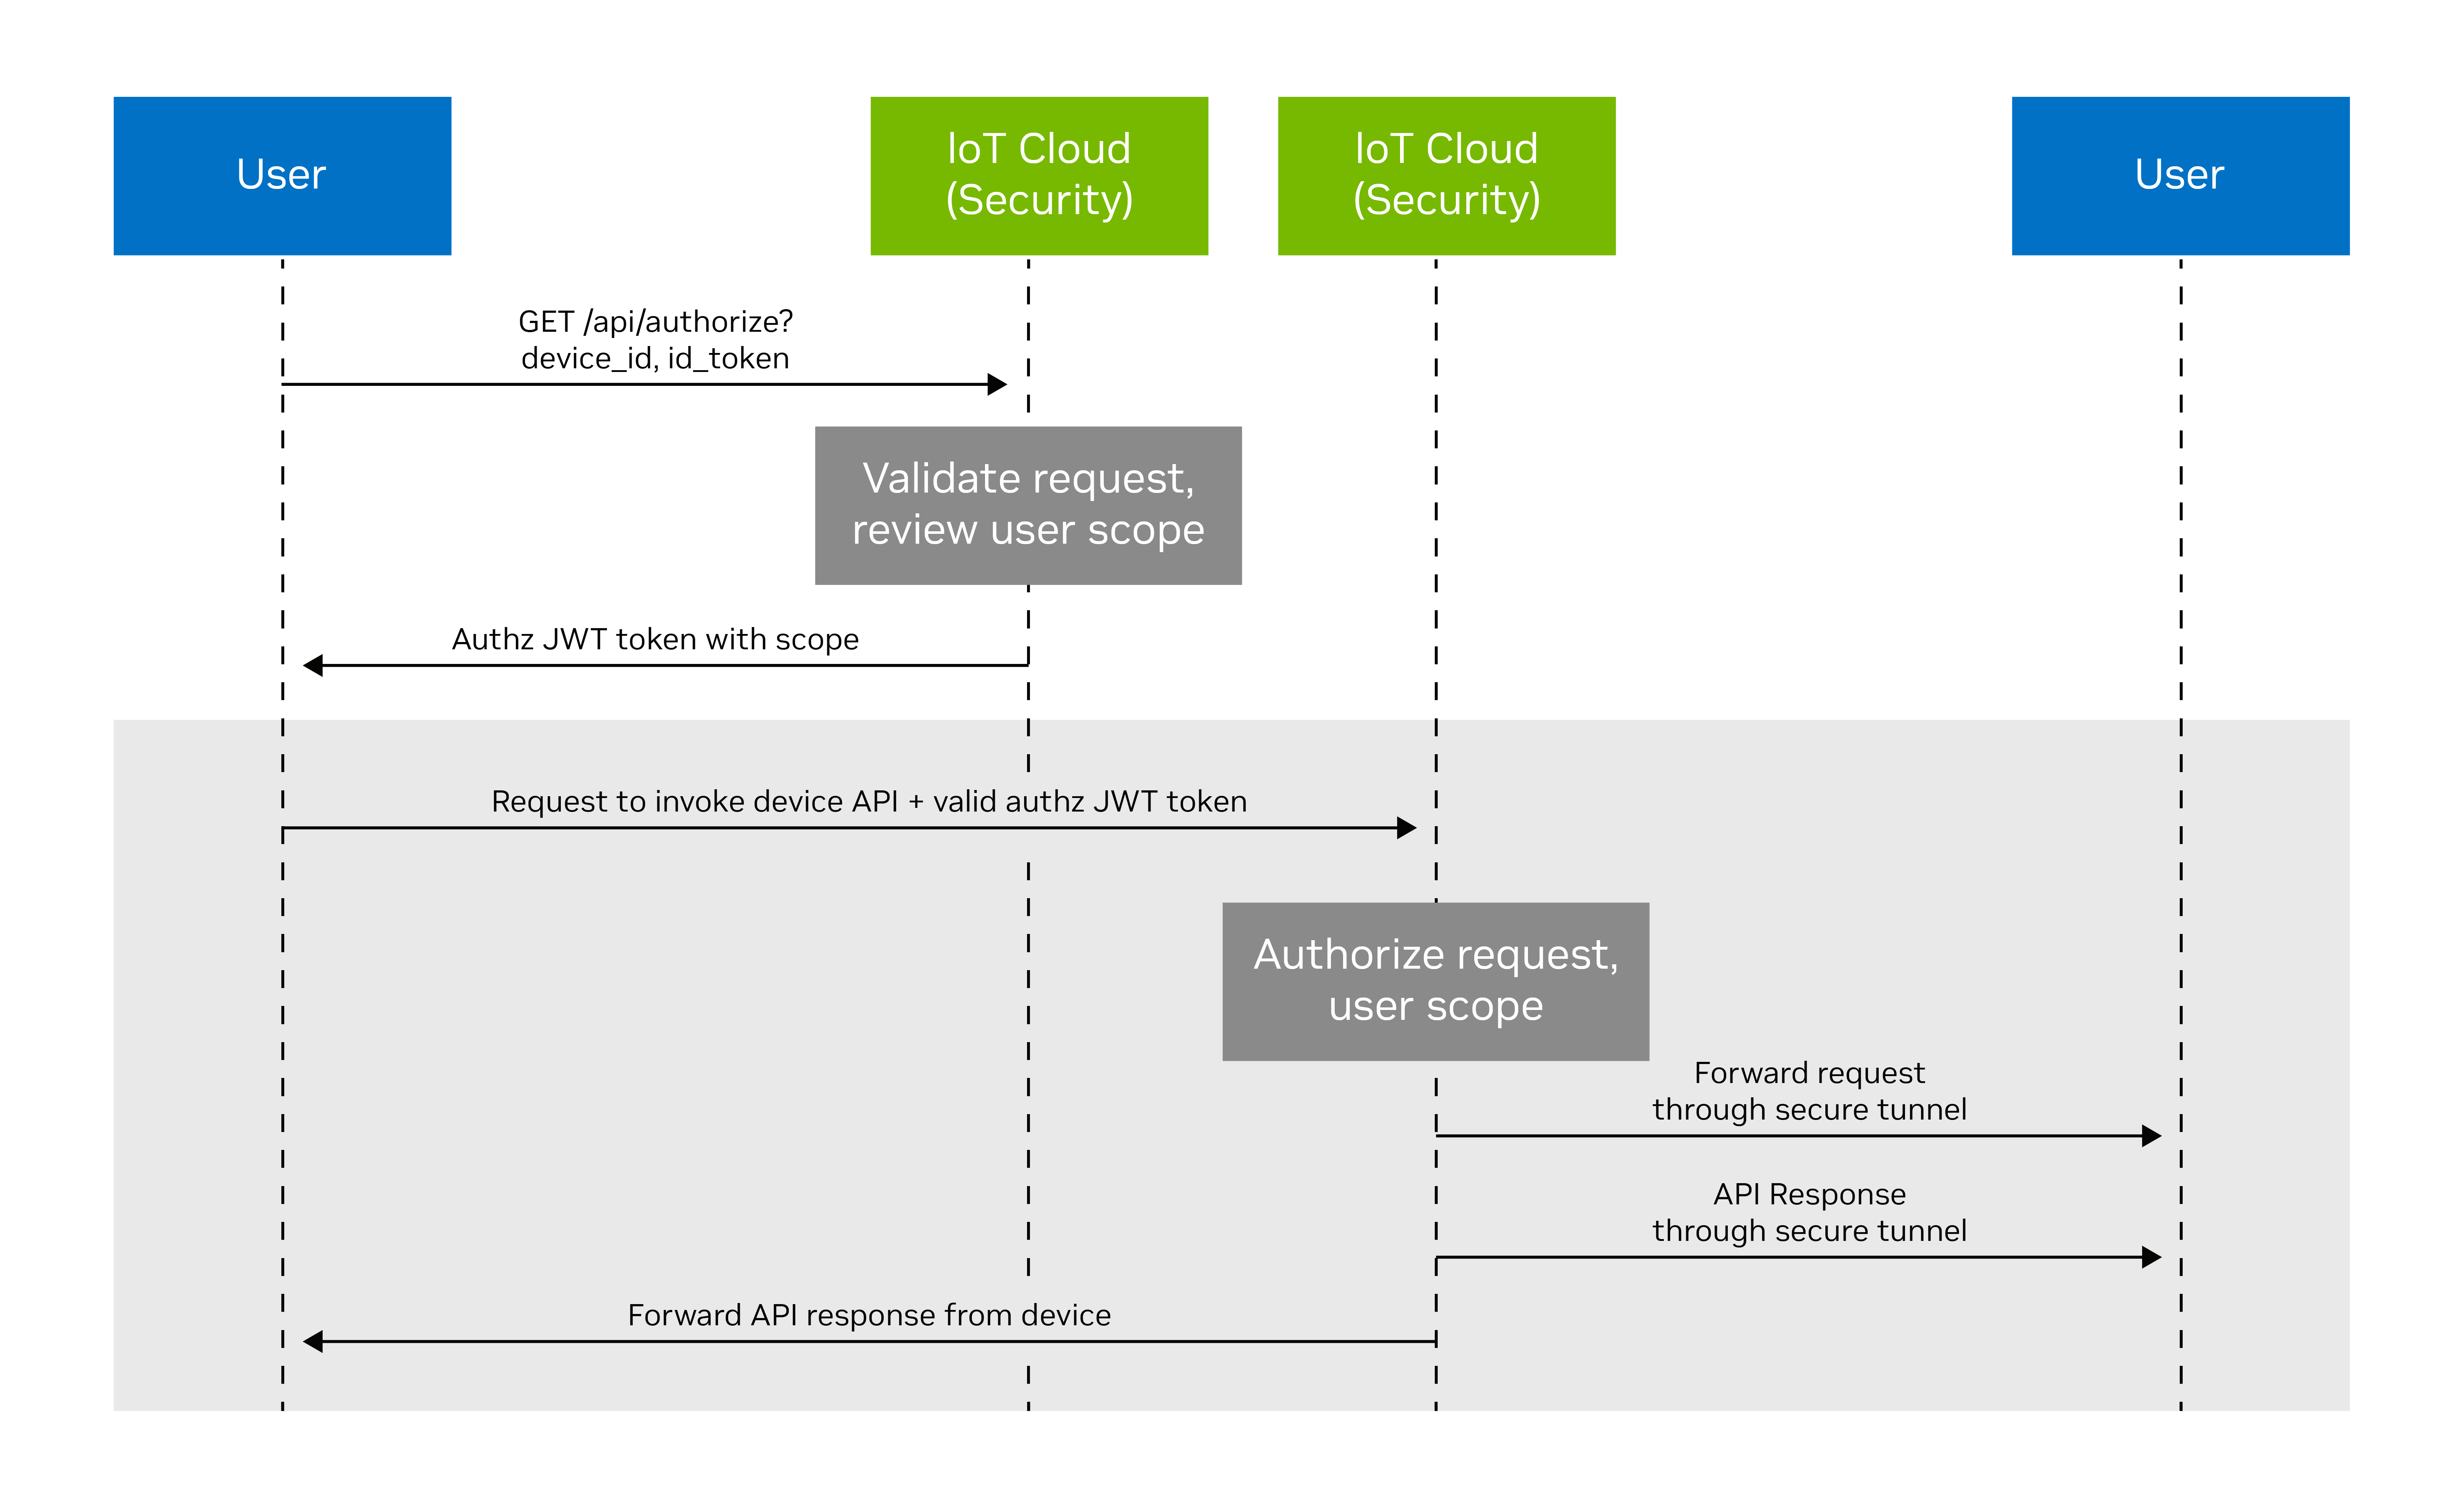
This section describes the mechanism by which clients can obtain security tokens and use them to make HTTP through the cloud, to be forwarded to the appropriate device.
While the focus of this section is to showcase how clients can invoke device APIs through the cloud, note that cloud architecture provides a secure ‘device claim’ mechanism for authorized access to specific devices through the cloud. All user device access through the cloud goes through authentication and authorization, and users can only access devices that they have previously claimed.
This functionality is designed with high customizability, enabling seamless integration with Original Design Manufacturers (ODM) and Original Equipment Manufacturers (OEM) operators’ existing security frameworks and cloud backend infrastructures.
Workflow for device API invocation through the IoT Cloud
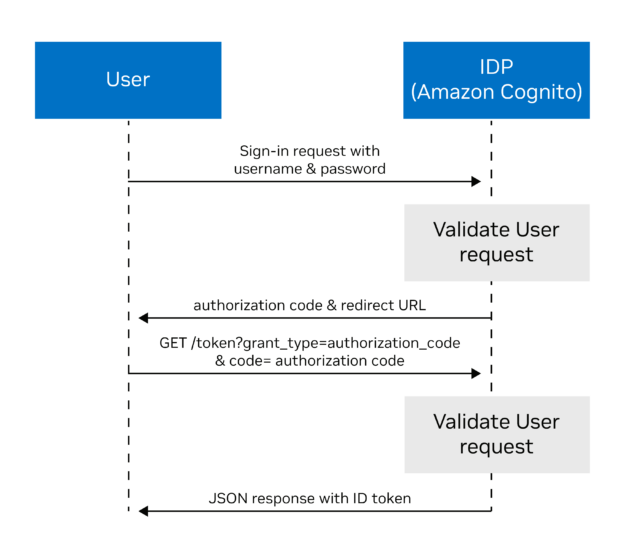
The reference IoT cloud implementation uses Amazon Cognito as the identity provider (IdP), but users are welcome to use any third-party identity provider. To access the device APIs through cloud endpoints, use the authentication and authorization call flow outlined below.
Authenticate with the Amazon Cognito
Sign in to the login URI page using a web console to be authenticated with Amazon Cognito. With successful authentication, Amazon Cognito returns a unique authorization code. Using authorization code, makes a request to Amazon Cognito to issue a time-bound ID token. Present this ID token while invoking IoT cloud security APIs.
Generate a JWT token and invoke device APIs
To access the IoT device APIs, first request an authorization token from the IoT cloud security. Upon a valid request, the IoT cloud security issues an ephemeral signed authorization JWT token. Use this token to then invoke device APIs through the IoT cloud transport, which validates it and forwards the request to the device.
Note that an unauthorized HTTP error code is returned if the user does not have rights to perform the operation based on the device claim.
Summary
Build powerful, market-ready vision AI applications at the edge with NVIDIA Metropolis APIs and microservices. APIs provide a standardized, secure, and distributed means of exercising the capabilities of various NVIDIA Metropolis microservices. The reference mobile application included as part of this release showcases a mature end-user application built using these APIs with a user-friendly interface capturing configuration, video streaming, analytics, alerts, cloud integration, and device claim. This application includes source code, with a walkthrough of the various modules in the mobile app section of the release documentation.
Download NVIDIA Metropolis microservices for Jetson. And register to join us for the two-part webinar, Accelerate Edge AI Development With Metropolis APIs and Microservices for Jetson (Part 1) and How to Build With Metropolis Microservices for Jetson (Part 2).
