So, you have a ton of data pipelines today and are considering investing in GPU acceleration through NVIDIA Base Command Platform. What steps should you take? Use workflow management to integrate NVIDIA Base Command into your existing pipeline.
A workflow manager enables you to easily manage your pipelines, and connect to Base Command to leverage NVIDIA compute power. This example uses Apache Airflow, which comes with a rich open-source community, is well established, and widely adopted.
What is workflow management and why is it important?
Workflow management enables you to connect and manage all tasks in a pipeline. It accomplishes this by creating, documenting, and monitoring all steps required to complete necessary tasks. It streamlines your workflow by making sure that everything is completed correctly and efficiently.
A business often has a BizOps team, MLOps team, and DevOps team working on various tasks to reach a given goal. For a simple workflow, many people complete various tasks, some are related or dependent upon each other, while others are completely independent. Workflow management can provide invaluable support for reaching the final outcome, particularly in complex situations.
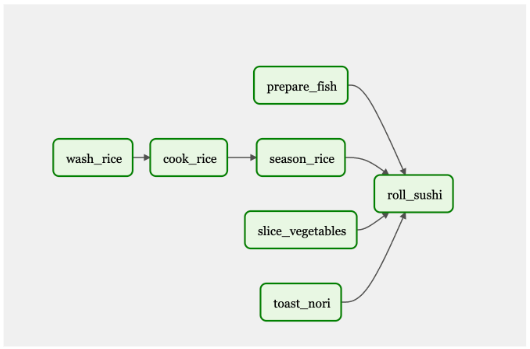
To provide an analogy, imagine you are at your favorite sushi restaurant, and you place an order for your favorite roll. In the kitchen, there are several chefs working on various tasks to prepare your sushi. One is preparing the fish, the next is carefully slicing vegetables, the third is making the rice (cooking, washing, seasoning), and the fourth is toasting the nori over an open flame.
Only after each chef has completed their task can a master sushi chef assemble the roll. Here we see multiple roles with different expertise, required to accomplish various tasks in order to complete the end goal.
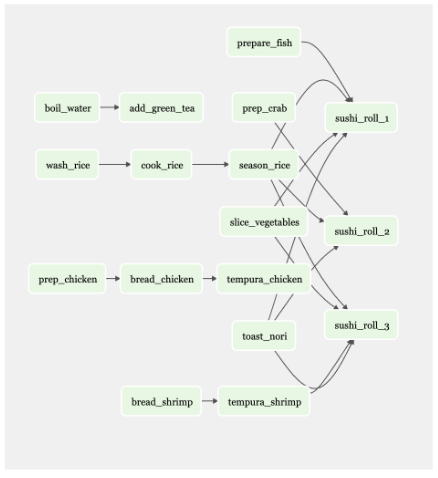
If the sushi restaurant offers 50 different menu items, there will be at least 50 different workflows. Figure 2 shows a workflow that includes just several menu items.
Now think of a food hall with 20 restaurants, each with their own menus and workflows.
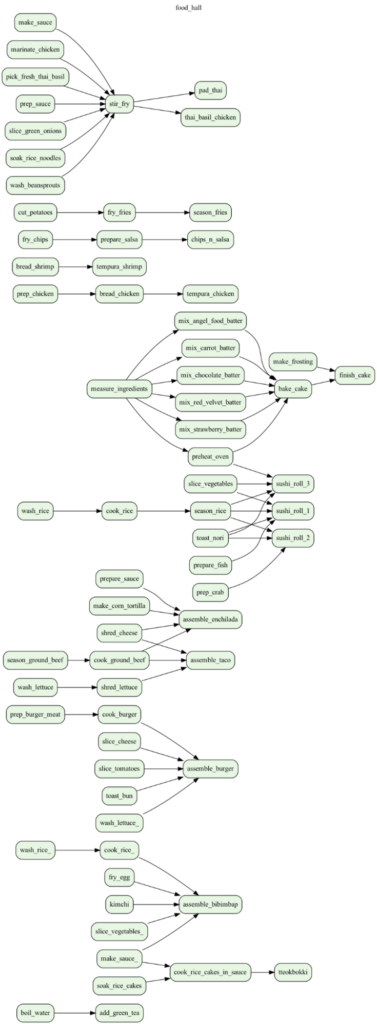
You can see how this situation becomes too much for a human to organize. Digital tools help organize and execute complex tasks—tools like Apache Airflow.
If you need to maintain current processes while also adding new steps, workflow management is key. Managing workflows is an established problem, and as AI adoption accelerates, it is clear that bringing AI tasks and outcomes into existing workflows becomes the next challenge.
Apache Airflow
What does it mean to include AI as part of a bigger workflow for deploying applications? In 2015, Airbnb had trouble managing their complex data pipelines, so they created Airflow. After doing market research, they found that most people were using cron schedulers or internal workflow tools. These tools were not very sophisticated, and did not anticipate future needs. They were “make it up as you go” kind of tools.
Airflow was made to be scalable and dynamic. It was open sourced in 2016 and became part of the Apache Foundation. This made Airflow increasingly popular and led to its rich open-source community.
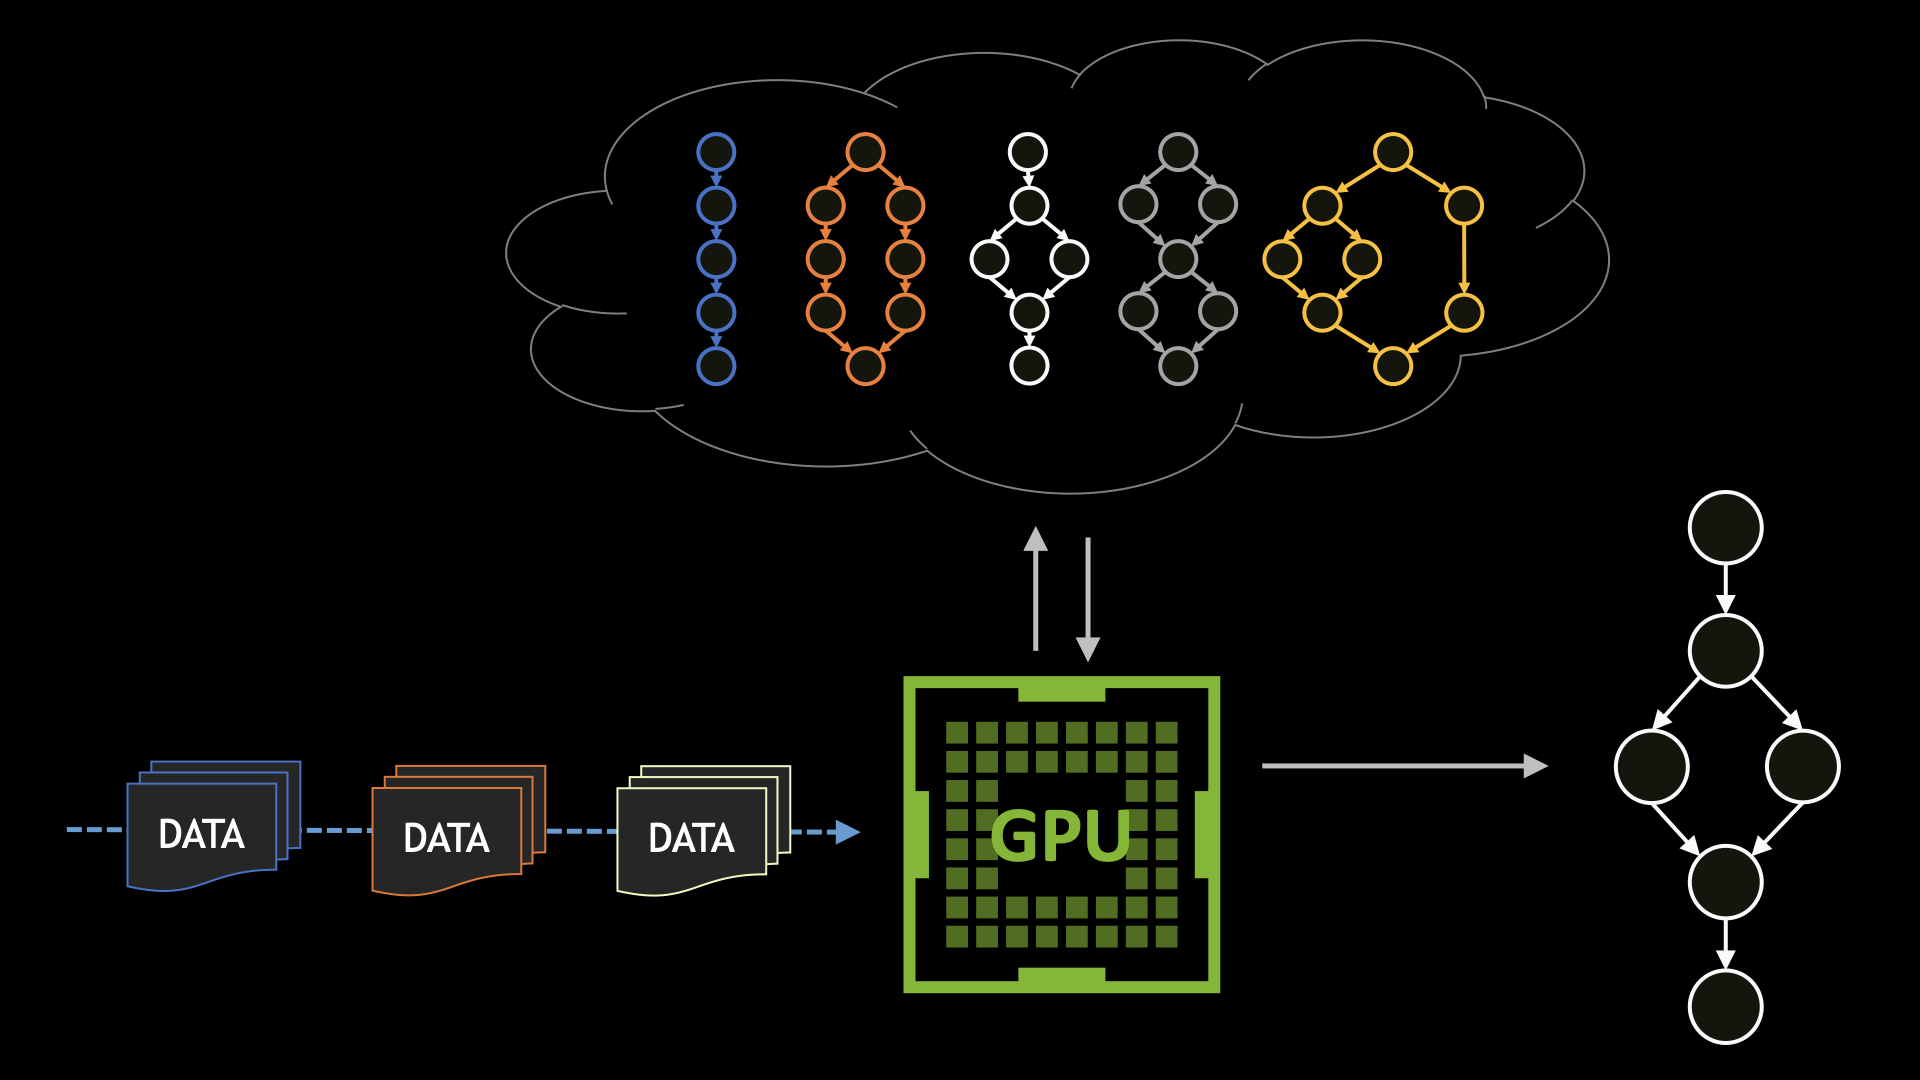
NVIDIA Base Command Platform
NVIDIA Base Command Platform is an AI training platform that enables businesses and scientists to accelerate AI development. NVIDIA Base Command enables you to train AI with NVIDIA GPU acceleration. NVIDIA Base Command, in combination with NVIDIA-accelerated AI infrastructure, provides a cloud-hosted solution for AI development so you can avoid the overhead and pitfalls of deploying and running a do-it-yourself platform.
NVIDIA Base Command efficiently configures and manages AI workloads, delivers integrated dataset management, and executes them on right-sized resources ranging from a single GPU to large-scale, multi-node clusters.
Apache Airflow plus NVIDIA Base Command Platform
Having a tool like Apache Airflow schedule and run jobs, as well as monitor their progress, helps streamline the model training process. Additionally, once the model is trained and ready for production, you can use Airflow to get the results from Base Command Platform and use it in NVIDIA Fleet Command for production. Airflow reaches across platforms to make an end to end pipeline easier to operate. Adding AI with Base Command to a new or existing pipeline is made easier with a workflow management tool.
Key Airflow features for MLOPs
Airflow is a popular, well-established tool with a large user community. Many companies already use it, and abundant resources are available. It is open source and one of the first well-known workflow management tools. Cron schedulers have their place, but make it difficult to manage a pipeline when a job fails. Workflow tools (like Airflow) help resolve dependencies, when another job depends on the output of a failed task.
Workflow management tools have more features; for example, alerting team members if a task/job fails so that someone can fix it and rerun jobs. Applying workflow management tools can benefit many people in the workflow, including data engineers doing ETL jobs, data scientists doing model training jobs, analysts doing reporting jobs, and more.
Tasks and DAGs
Airflow uses Directed Acyclic Graphs (DAGs) to run a workflow. DAGs are built in Python. You set up your tasks and dependencies, and Airflow returns a graph depicting your workflow. Airflow triggers jobs to run once their dependencies have been fully met.
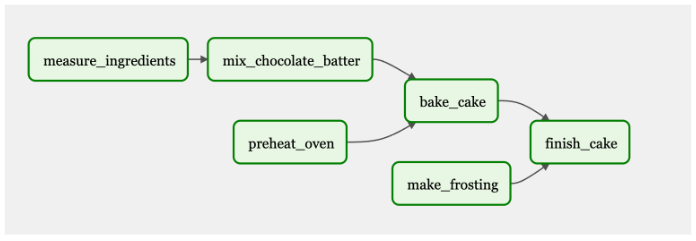
Figure 4 shows a DAG workflow to bake and frost a cake. Some of the tasks are dependent, such as measuring and mixing the ingredients, to bake the cake. Other tasks, such as ‘preheat oven,’ are necessary to complete the final goal: a frosted cake. Everything needs to be connected to complete the final product.
In this DAG, ‘measure ingredients,’ ‘preheat oven,’ and ‘make frosting’ would be triggered and executed first. When those tasks are completed, the next steps will be run in accordance to their dependencies.
Airflow UI
The Airflow UI is intuitive and easy to use. It can be used to trigger your DAGs, as well as monitor the progress of tasks and DAGs. You can also view logs, which can be used for troubleshooting.
Dynamic jobs
Dynamic jobs enable you to run the same job, while changing a few parameters. These jobs will run in parallel, and you are able to add variables instead of coding the same job with minor changes multiple times.
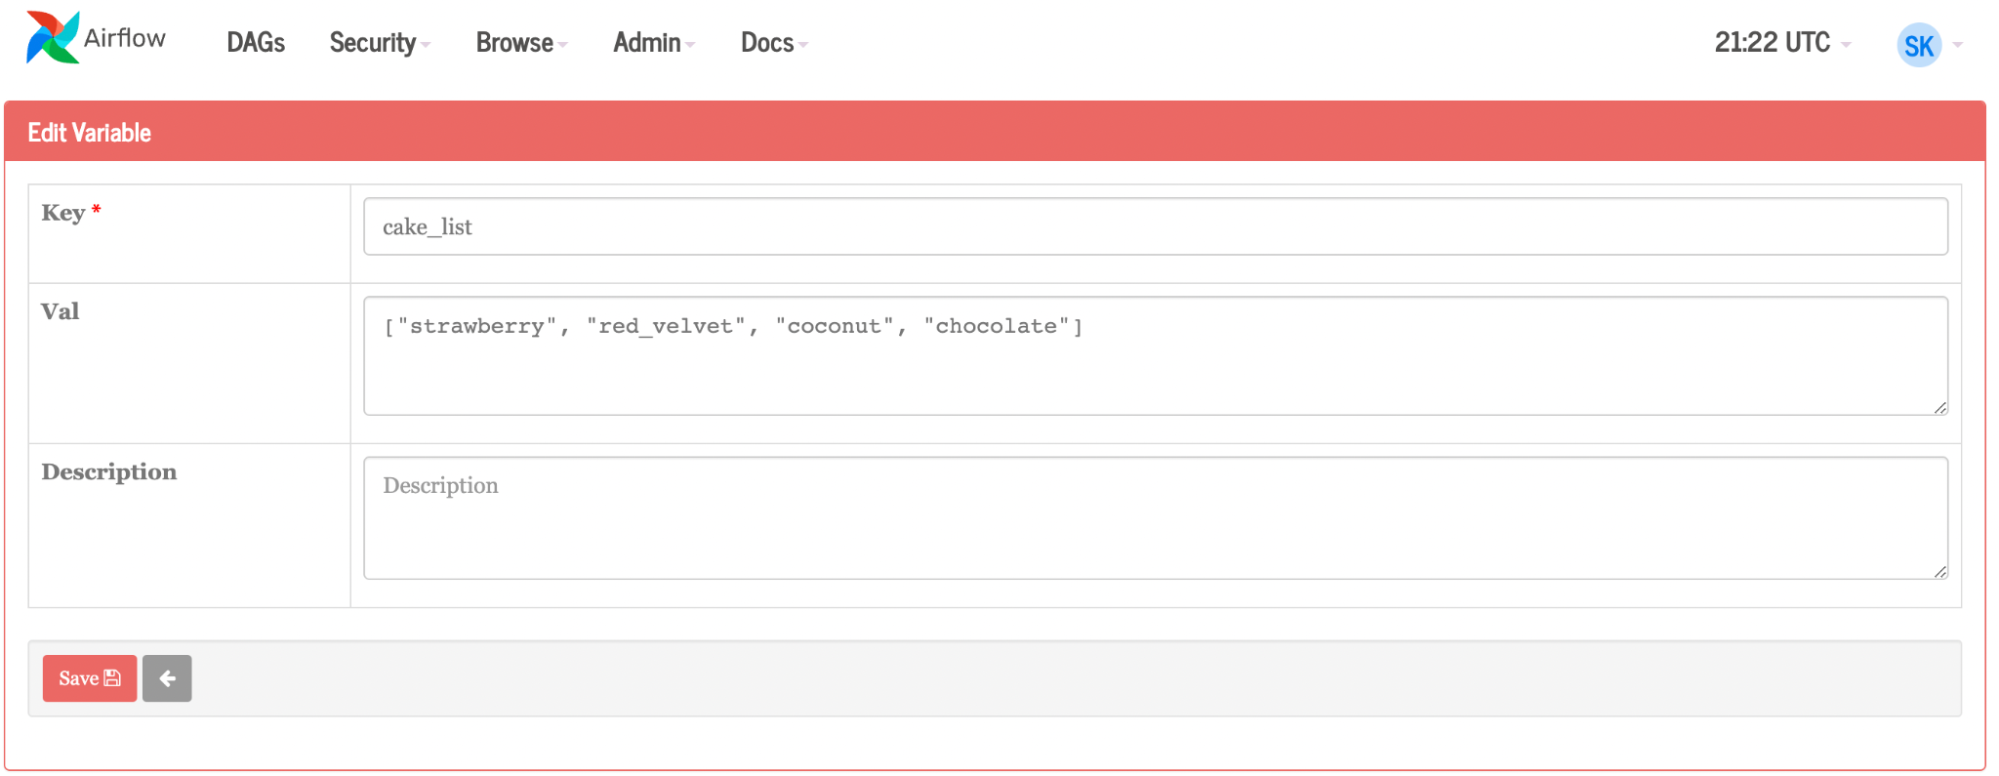
Continuing with the cake example, suppose you set out to make a single chocolate cake, but then decide to start a bakery. Instead of manually creating tasks for each separate cake, you can give Airflow a list of cakes: strawberry, coconut, and red velvet (Figure 5). You can do this through the UI or by uploading a JSON file. Airflow will dynamically create three more jobs to make three more cake flavors, instead of manually recreating the process for each new cake flavor. If someone is allergic to coconut, you can remove it from the list. Or you could have a flavor of the week and programmatically change the variables (cake flavors) weekly.

If you apply this approach to an ML pipeline, you can imagine all that can be accomplished. The updates can be programmatic and automated as part of a larger pipeline. Combined with a more complex Base Command job, such as running some framework and possibly only changing one simple variable or set of variables per container, then compare the results of all of the different job runs to make a decision.
Airflow could then be configured to kick off an additional multi-node training run based on the results, or the winning model could be uploaded to the private registry and further workloads or tasks could be integrated with Fleet Command to take it to production.
How to use Airflow
First, make sure you have a Kubernetes environment, with Helm installed. Helm is a package manager for Kubenetes used to find, share, and use software. If you are working from a Mac, Homebrew can help with installing Helm.
helm repo add apache-airflow https://airflow.apache.org
helm repo update
kubectl create namespace airflow
helm upgrade --install airflow apache-airflow/airflow --namespace airflow --debug
Next, generate a secret for the webserver:
Generate Secret for UX
python3 -c 'import secrets; print(secrets.token_hex(16))'
helm show values apache-airflow/airflow > values.yaml
Open the file
When inside file, change: ‘webserverSecretKey: <secret_key>’
helm upgrade --install airflow apache-airflow/airflow -n airflow -f values.yaml --debug
Airflow stores DAGs in a local file system. A more scalable and straightforward way to keep DAGs is in a GitHub repository. Airflow checks for new/updated DAGs in your file system, but using GitSync, Airflow looks at a GitHub repository which is easier to maintain and change.
Next, configure GitSync. When you add the key to your GitHub repository, be sure to enable write access.
ssh-keygen -t ed25519 -C “airflow-git-ssh”
  When asked where to save, press enter
  When asked for a passcode, press enter (do NOT put in a passcode, it will break)
Copy/Paste public key into private github repository
Repository > settings > deploy key > new key
kubectl create secret generic airflow-git-ssh \
 --from-file=gitSshKey=/Users/skropp/.ssh/id_ed25519 \
 --from-file=known_hosts=/Users/skropp/.ssh/known_hosts \
 --from-file=id_ed25519.pub=/Users/skropp/.ssh/id_ed25519.pub \
 -n airflow
edit values.yaml (see below)
helm upgrade --install airflow apache-airflow/airflow -n airflow -f values.yaml —-debug
Original:
gitSync:
 enabled: false
 # git repo clone url
 # ssh examples ssh://git@github.com/apache/airflow.git
 # https example: https://github.com/apache/airflow.git
 repo: https://github.com/apache/airflow.git
 branch: v2-2-stable
 rev: HEAD
 depth: 1
 # the number of consecutive failures allowed before aborting
 maxFailures: 0
 # subpath within the repo where dags are located
 # should be "" if dags are at repo root
 subPath: "tests/dags"
 # if your repo needs a user name password
 # you can load them to a k8s secret like the one below
 # ___
 # apiVersion: vI
 # kind: Secret
 # metadata:
 #    name: git-credentials
 # data:
 #    GIT_SYNC_USERNAME: <base64_encoded_git_username>
 #    GIT_SYNC_PASSWORD: <base64_encoded_git_gat)words
 # and specify the name of the secret below
 # credentialsSecret: git-credentials
 # If you are using an ssh clone url, you can load
 # the ssh private key to a k8s secret like the one below
 # ___
 # apiVersion: vI
 # kind: Secret
 # metadata;
 #    name: airflow-ssh-secret
 # data:
 #    key needs to be gitSshKey
 #    gitSshKey: <base64_encoded_data>
 # and specify the name of the secret below
 # sshKeySecret: airflow-ssh-secret
With changes:
gitSync:
 enabled: True
 # git repo clone url
 # ssh examples ssh://git@github.com/apache/airflow.git
 # https example: https://github.com/apache/airflow.git
 repo: ssh://git@github.com/sushi-sauce/airflow.git
 branch: main
 rev: HEAD
 depth: 1
 # the number of consecutive failures allowed before aborting
 maxFailures: 0
 # subpath within the repo where dags are located
 # should be "" if dags are at repo root
 subPath: ""
 # if your repo needs a user name password
 # you can load them to a k8s secret like the one below
 # ___
 # apiVersion: v1
 # kind: Secret
 # metadata:
 # name: git-credentials
 # data:
 # GIT_SYNC_USERNAME: <base64_encoded_git_usernames
 # GIT_SYNC_PASSWORD: <base64_encoded_git_password>
 # and specify the name of the secret below
 credentialsSecret: git-credentials
 # If you are using an ssh clone url, you can load
 # the ssh private key to a k8s secret like the one below
 # ___
 # apiVersion: v1
 # kind: Secret
 # metadata:
 # name: airflow-ssh-secret
 # data:
 # key needs to be gitSshKey
 # gitSshKey: <base64_encoded_data>
 # and specify the name of the secret below
sshKeySecret: airflow-git-ssh
Now you have Airflow running, and a place to store DAG files.
DAG examples
Below, find a simple example DAG, and one that is more complex.
Simple example DAG
A very simple DAG is shown below:
- Lines 1-3 import various tools and operators needed to run the tasks.
- Lines 5-6 create a Python function that prints a message.
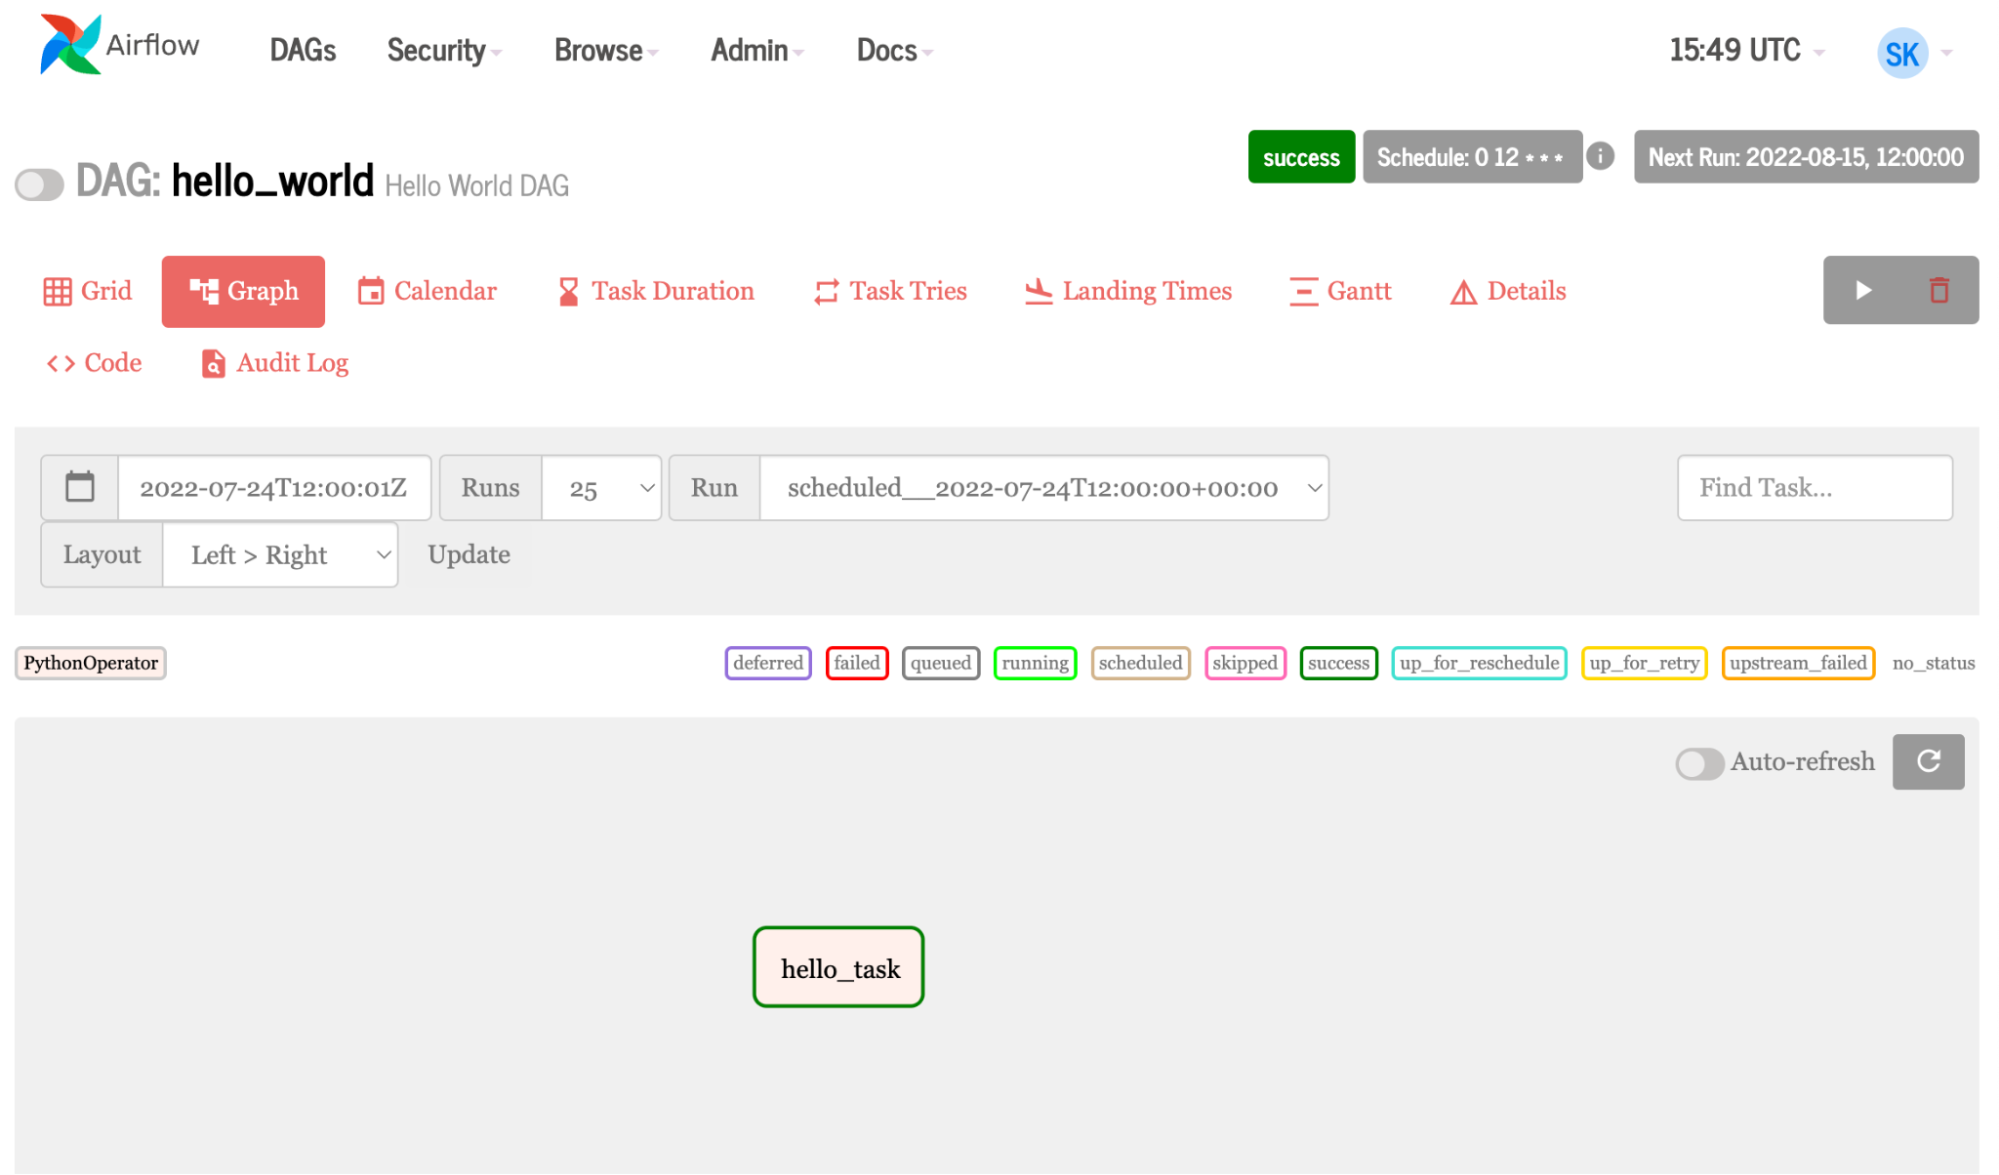
- Lines 8-10 define the DAG, giving the display name
hello_worldand a description, as well as schedule interval and start date. Schedule interval and start date are required configurations. - Line 12 defines the task,
task_idnames the task, Python callable calls the function,dag=DAGbrings in the configs set above.
1 from datetime import datetime
2 from airflow import DAG
3 from airflow.operators.python_operator import PythonOperator
4
5 def print_hello():
6 return 'Hello world from first Airflow DAG!'
7
8 dag = DAG('hello_world', description='Hello World DAG',
9		schedule interval='0 12 * * *',
10 	 	start_date=datetime (2017, 3, 20), catchup=False)
11
12 hello_operator = PythonOperator (task_id-'hello_task', python_callable=print_hello, dag=dag)
13
14 hello_operator
More complex example DAG
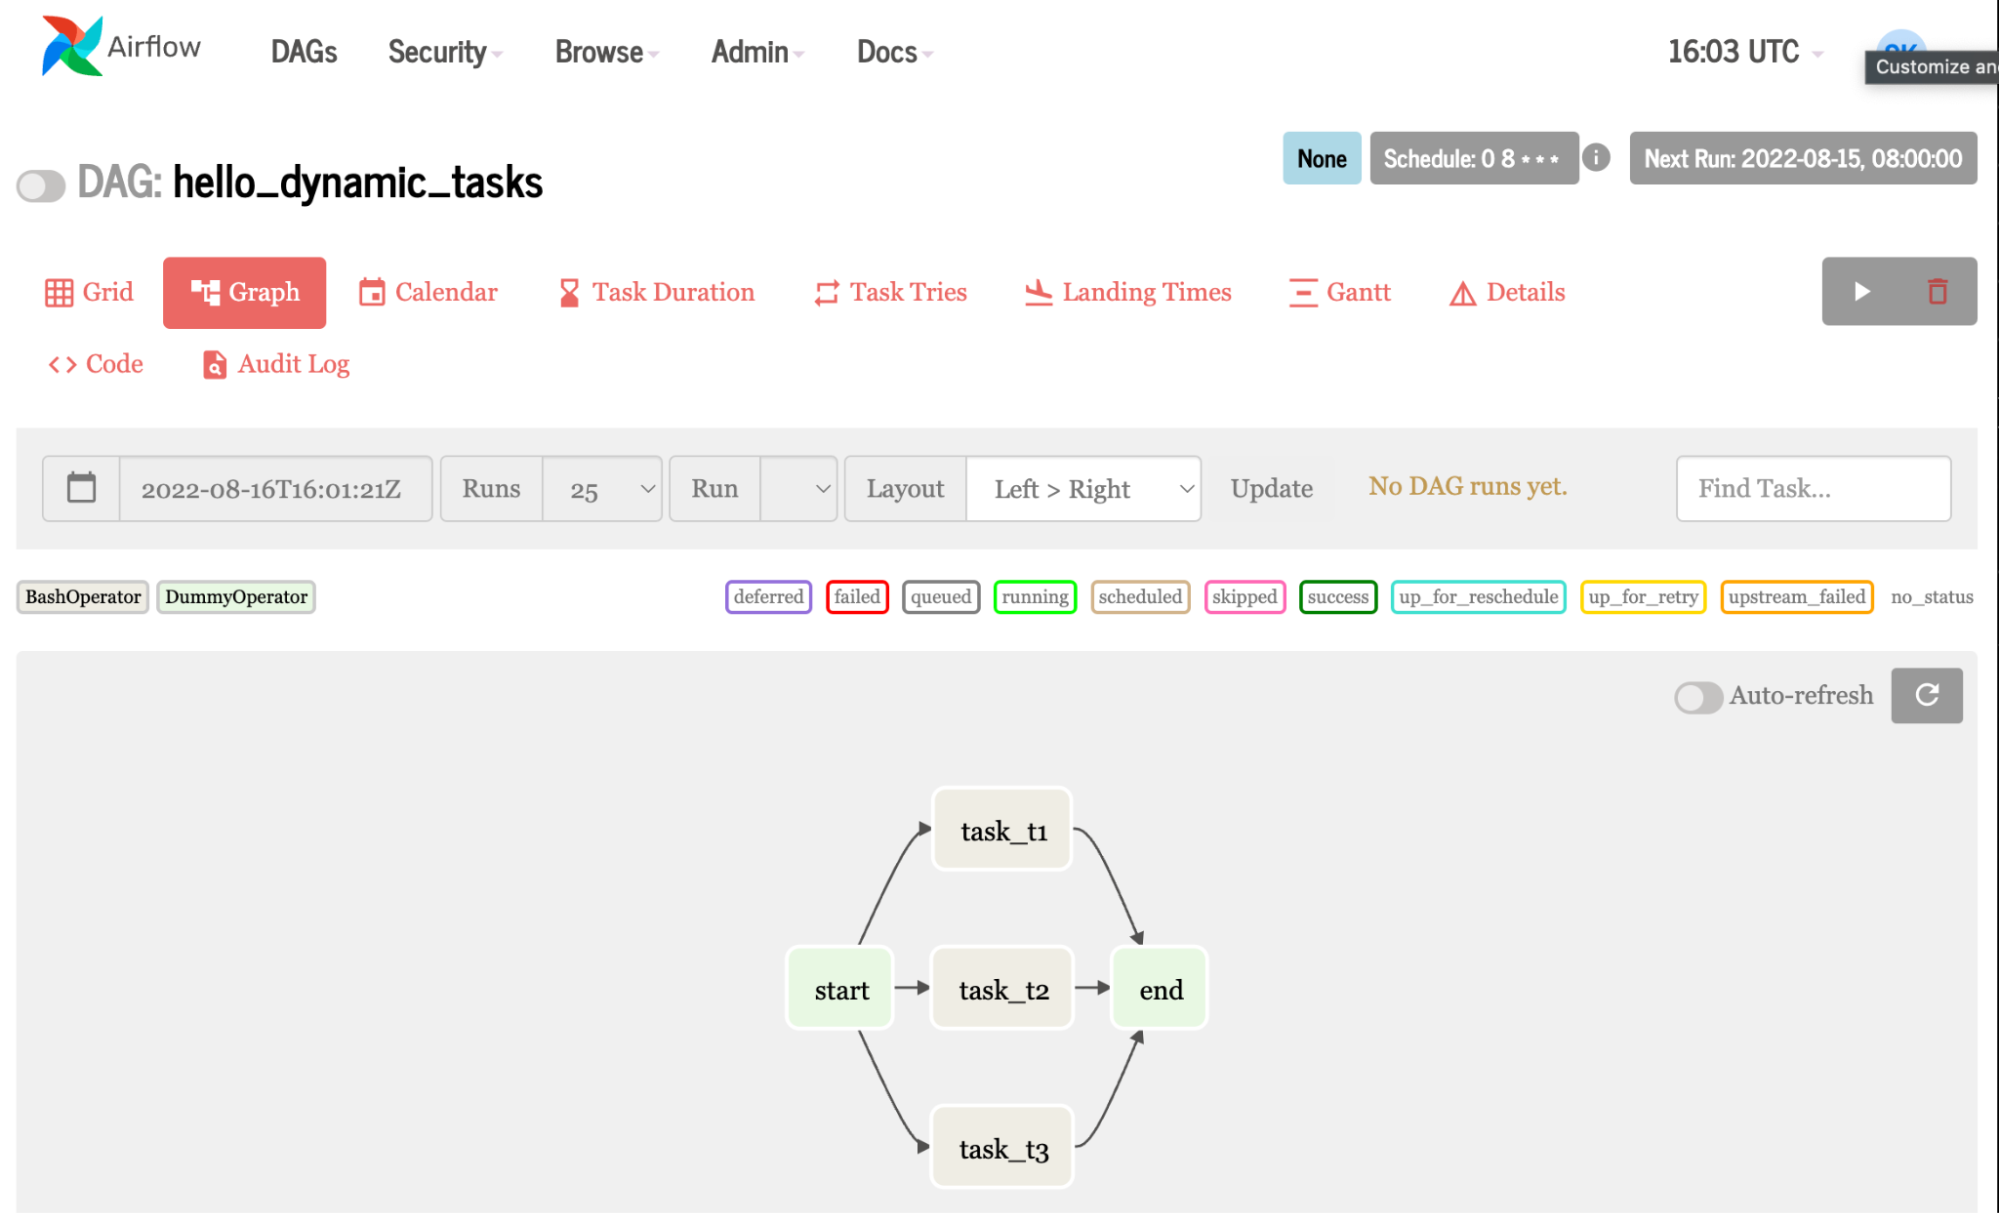
This example creates the same task three times, echoing hello from task 1, 2, and 3. It gets interesting when you use a list of variables instead of simply numbers in your loop. This means you can change pieces of your code to dynamically create different jobs.
1 from airflow import DAG
2 from airflow.operators.bash_operator import BashOperator
3 from airflow.operators. dummy_operator import DummyOperator
4 from datetime import datetime, timedelta
5
6 # Step 1 - Define the default arguments for DAG
7 default_args = {
8 	'depends_on_past': False,
9 	'start_date': datetime (2020, 12, 18),
10 	'retry_delay': timedelta(minutes=5)
11 }
12
13 # Step 2 - Declare a DAG with default arguments
14 dag = DAG( 'hello_dynamic_tasks',
15 	schedule_interval='0 8 * * *'
16 	default_args=default_args,
17 	catchup=False
18 	)
19 # Step 3 - Declare dummy start and stop tasks
20 start_task = DummyOperator(task_id='start', dag=dag)
21 end_task = DummyOperator (task_id='end', dag=dag)
22
23 # Step 4 - Create dynamic tasks for a range of numbers
24 for 1 in range(1, 4):
25 	# Step 4a - Declare the task
26 	t1 = BashOperator (
27 		task_id='task_t' + str(i),
28 		bash _command='echo hello from task: '+str(i),
29		dag=dag
30 	)
31 # Step 4b - Define the sequence of execution of tasks
32 start_task »> t1 >> end_task
While similar to the first example, this example uses the placeholder operator to create empty tasks, and a loop to create dynamic tasks.
Example DAG with NVIDIA Base Command
Airflow can leverage the Base Command API. Fleet Command uses the same API. This enables Airflow to use many NVIDIA AI platforms, making an accelerated AI pipeline easy to manage with Airflow. Let’s walk through some code from Airflow showing the tasks needed to connect to Base Command and run a job.
t1= PythonOperator(
task_id = 'api_connect'
python_callable= find_api_key,
dag = dag,
)
t2 = PythonOperator (
task_id = 'token',
python_callable = get_token,
op_kwargs=("org":org_, "team": team_),
dag = dag
)
t3 = PythonOperator (
task_id = 'get_dataset',
op kwargs=("org":org_),
python_callable = get_datasets,
dag = dag
)

t5 = PythonOperator(
task_id = 'job',
python_callable run_job,
dag = dag
)

for element in instance_v:
t4 = PythonOperator (
task_id = 'create_job_' + str(element),
op_kwargs={"org":org_. ,"team": team_, "ace": ace_, "name": name_, "command": command_ , "container": container_, "instance": str(element))},
python_callable=create_job,
dag = dag
)

t1 >> t2 >> t3 >> t4 >> t5

Key functions being used in the tasks include:

def find_api_key(ti):
        expanded_conf_file_path = os.path.expanduser("~/.ngc/config")
        if os.path.exists(expanded_conf_file_path):
            print("Config file exists, pulling API key from it")
            try:
                config_file = open(expanded_conf_file_path, "r")
                lines = config_file.readlines()
                for line in lines:
                 if "apikey" in line:
                    elements = line.split()
                    return elements[-1]

            except:
                print("Failed to find the API key in config file")
                return ''
        elif os.environ.get('API_KEY'):
            print("Using API_KEY environment variable")
            return os.environ.get('API_KEY')

        else:
            print("Could not find a valid API key")
            return ''

def get_token(ti, org,team ):
        api = ti.xcom_pull(task_ids='api_connect')
        '''Use the api key set environment variable to generate auth token'''
        scope_list = []
        scope = f'group/ngc:{org}'
        scope_list.append(scope)
        if team:
            team_scope = f'group/ngc:{org}/{team}'
            scope_list.append(team_scope)

        querystring = {"service": "ngc", "scope": scope_list}

 auth = '$oauthtoken:{0}'.format(api)
        auth = base64.b64encode(auth.encode('utf-8')).decode('utf-8')
        headers = {
          'Authorization': f'Basic {auth}',
          'Content-Type': 'application/json',
          'Cache-Control': 'no-cache',
        }
        url = 'https://authn.nvidia.com/token'
        response = requests.request("GET", url, headers=headers, params=querystring)
        if response.status_code != 200:
            raise Exception("HTTP Error %d: from %s" % (response.status_code, url))

        return json.loads(response.text.encode('utf8'))["token"]
- Task 1 finds your API key using a Python function defined in the DAG.
- Task 2 gets a token; there are two very interesting things happening here:
- To get a token, you need to give the API your key. Task 1 finds the key, but in Airflow, all the tasks are separate. (Note that I used the
xcomfeature inget_tokento pull the results of Task 1 into Task 2.xcompulls the API key found in the functionfind_api_key, intoget_tokento generate a token.) - The org and team arguments are Airflow variables. This means you can go into the Airflow UI and change the credentials depending on who is using it. This makes changing users clean and easy.
- To get a token, you need to give the API your key. Task 1 finds the key, but in Airflow, all the tasks are separate. (Note that I used the
- Task 3 gets the dataset needed for the job. Similarly, it uses the org variable defined in the Airflow UI.
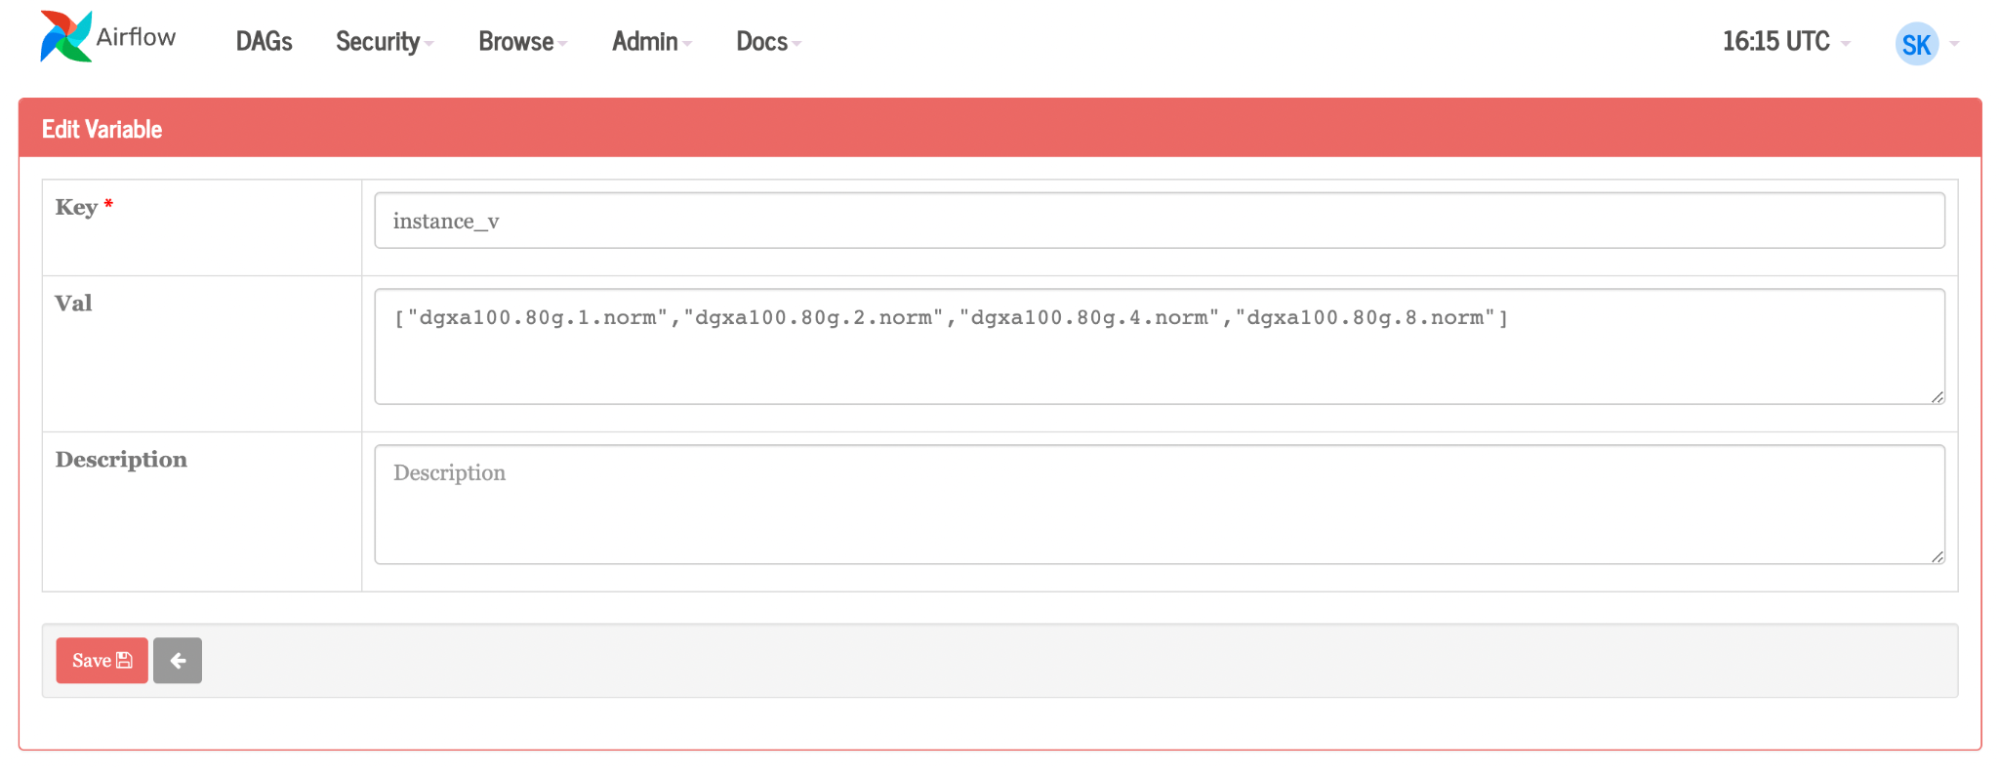
- Task 4 is the main character. For each element in the list of instances, Airflow creates a job. Variables are also used for team, org, container, name, command, and instance. If you want to change any of these components, make the change on the variable page inside of Airflow.
- Task 5 runs the job.

Conclusion
Incorporating a workflow management tool such as Apache Airflow into your data pipelines is crucial for managing and executing complex tasks efficiently. With the rapid adoption of AI in various industries, the need to integrate AI tasks into existing workflows becomes increasingly important.
Integrating Airflow with an AI platform such as NVIDIA Base Command, which leverages GPU acceleration, streamlines the process of training and deploying AI models. The automation and flexibility of Airflow, combined with NVIDIA computing power through Base Command Platform, enable efficient experimentation, model comparison, and decision making within your ML pipeline.
A well-managed, faster workflow is the end product. Base Command Platform and Airflow together empower organizations to optimize data pipelines, enhance collaboration among different teams, and facilitate the integration of accelerated AI into existing workflows. This leads to quicker AI development and deployment that is more effective, scalable, and reliable.
To learn more, watch the NVIDIA Base Command demo. And check out the related post, Simplifying AI Development with NVIDIA Base Command Platform.