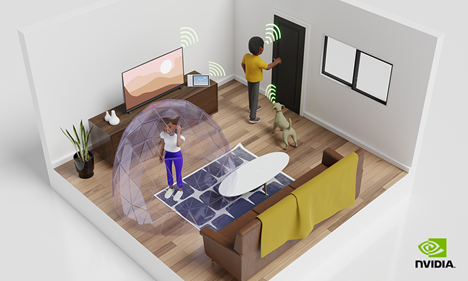
With audio and video streaming, conferencing, and telecommunication on the rise, it has become essential for developers to build applications with outstanding audio quality and enable end users to communicate and collaborate effectively. Various background noises can disrupt communication, ranging from traffic and construction to dogs barking and babies crying. Moreover, a user could talk in a large room that amplifies echoes.
NVIDIA Maxine offers an easy-to-use Audio Effects SDK with AI neural network audio quality enhancement algorithms to address poor audio quality in virtual collaboration and content creation applications. With the Audio Effects SDK, you can remove virtually any type of noise, including room echo, and build applications that enable easy-to-understand conversations and productive meetings.
In this post, you learn how to build high audio-quality applications using containers on Linux or SDK on Windows platforms. All are demonstrated with prebuilt sample applications.
Build applications with no background noise or room echo
The Maxine Audio Effects SDK enables you to integrate noise removal, and room echo removal features for narrowband, wideband, and ultra-wideband audio into your applications.
Noise Removal
As we have started working from home more, there are many potential noise sources in the background of our calls, such as the sound of keystrokes or the compressor of an air conditioner. The distractions around us become a part of our surroundings, like slamming doors, moving furniture, or vacuuming.
With the Noise Removal effect, you can remove different noise profiles from audio streams while retaining the emotional aspects of the speaker’s voice. For example, when an end user is excited and pitching the new idea in an elevated tone with an air conditioner in the background, noise removal retains only the speaker’s voice.
Room Echo Cancellation
When a person speaks in a closed room, the sound bounces off all the surrounding surfaces. How much the voice gets absorbed, dampened, or continues to reflect for multiple iterations depends upon the surfaces’ size, geometry, and material. Such continued sound wave reflections build up over time and cause reverberations.
The echo is more noticeable in large rooms with more reflective surfaces, such as concrete or stone walls. For example, think about the voice sound reverberations in a high-ceiling cathedral. Such reverberant voices are unsuitable for popularly used speech encoding methods such as linear predictive coding or code-excited linear prediction. The encoding of reverberant speech results in severe distortions, rendering voices unintelligible in extreme cases.
It is essential to remove such reverberations from the voice recording before sending it. In situations where echo removal is not possible before encoding, it is essential to remove as much of the echo as possible before rendering the decoded voice through the speaker to the listener. The Room Echo Cancellation effect eliminates unwanted echoes from speech when users talk in a reverberant environment. In addition, this feature supports wideband and ultra-wideband signals.
You can combine the noise removal and room echo removal features for better end-to-end audio quality in both directions.
Get Maxine Audio Effects SDK for Windows or Linux
Using containers with Kubernetes provides a robust and easy-to-scale deployment strategy. We offer the Maxine Audio Effects SDK for Windows and Linux platforms in addition to prepackaged containers. The benefits of using containers are high scalability and time and cost savings due to faster deployment and reduced maintenance time. In addition, because of the prepackaged nature of containers, you don’t have to worry about specific installations inside the container.
In this post, we focus on how to use the Audio Effects SDK containers. Before proceeding with the installation, make sure that you meet all the hardware requirements.
If you have considerable experience with NVIDIA TensorRT and cuDNN and want to deploy the Audio Effects SDK on a bare-metal Linux system, download the SDK for your specific platform on the Maxine Getting Started page.
Audio Effects SDK Docker containers
There are four steps to install and take advantage of high-performance Audio Effects SDK and its state-of-the-art AI models on containers:
- Download NVIDIA Drivers
- Download Docker and nvidia-docker for exposing the GPU to containers
- Log in to the NGC Registry using the NGC API Key
- Pull the Audio Effects SDK container
You need access to NVIDIA Turing, NVIDIA Volta, or NVIDIA Ampere Architecture generation data center GPUs: T4, V100, A100, A10, or A30.
Install the Audio Effects SDK on Windows
Installing the SDK on Windows is a straightforward process:
- Download the NVIDIA Graphics Driver for Windows
- Download Microsoft Visual Studio 2017 or later (Make sure to install the build tools)
- Download the latest Audio Effects SDK package from the Maxine Getting Started page
You must have an NVIDIA RTX card to benefit from the accelerated throughput and reduced latency of the Audio Effects SDK on Windows. To run this SDK on a datacenter card like A100, use the Linux package.
Using the Audio Effects SDK with prebuilt sample applications
The Audio Effects SDK comes with the prebuilt effects_demo and effects_delayed_streams_demo sample applications to demonstrate how to use the SDK. You can also build your own sample application. In this post, we focus on running the effects_demo sample application.
Real-time Audio Effects demonstration
The effects_demo application demonstrates how to use the SDK to apply effects to audio. It can be used to apply Noise Removal, Room Echo Cancellation, or both effects combined to input audio files and write the outputs to file.
To run this application, navigate to the samples/effects_demo directory and run the application using one of the following scripts:
$ ./run_effect.sh -a turing -s 16 -b 1 -e denoiser
$ ./run_effect.sh -a turing -s 48 -b 1 -e dereverb
$ ./run_effect.sh -a turing -s 16 -b 400 -e denoiser
$ ./run_effect.sh -a turing -s 48 -b 400 -e dereverb_denoiser
The run_effect.sh bash script accepts the following arguments:
-a: Architecture can be NVIDIA Turing, NVIDIA Volta, A100, or A10, depending on your GPU.-s: Sample rate to use 48/16 in KHz.-b: Batch size.-e: Effect to run:denoiser(NR)dereverb(RER)dereverb_denoiser(combined)
You can also execute the effects_demo binary by passing a configuration file as follows:
# For running denoiser on NVIDIA Turing GPU with 48kHz input and batch size 1
$ ./effects_demo -c turing_denoise48k_1_cfg.txt
This config file should contain the following parameters:
effect <denoiser/dereverb/dereverb_denoiser>sample_rate <48000/16000>model <*.trtpkg>: Models are available in the/usr/local/AudioFX/modelsdirectory within the container.real_time <0/1>: Simulates audio reception from the physical device or stream.intensity_ratio <0.0-1.0>: Specifies the denoising intensity ratio.input_wav_listoutput_wav_list
After you run the effects_demo sample application, the denoised output files are available in the same directory as the executable.
Audio Effects SDK demonstration on delayed streams
The effects_delayed_streams_demo application demonstrates handling delayed streams. In telecommunication, where the user’s audio might not reach the server in real time, we recommend applying the denoising effect in a delayed manner. In this sample application, each of the input streams fall under one of the following categories:
one_step_delay_streams: These streams have a delay of one frame. For example, if the frame size is 5 ms, these streams have a delay of 5 ms.two_step_delay_streams: These streams have a delay of two frames. For example, if the frame size is 5 ms, these streams have a delay of 10 ms.always_active_streams: These streams have no delay and are always active.
To run this application, navigate to the samples/effects_delayed_streams_demo directory and execute the binary as follows:
$ ./effects_delayed_streams_demo -c config-file
Here, -c config-file is the path to the configuration file, for example, turing_denoise48k_10_cfg.txt. The configuration file accepts the following parameters:
effect <denoiser/dereverb/dereverb_denoiser>frame_size: An unsigned integer that specifies the number of samples per frame per audio stream for the audio effect.sample_rate <48000/16000>model <*.trtpkg>: Models are available in the/usr/local/AudioFX/modelsdirectory within the container.one_step_delay_streams: Specifies the stream identifiers that belong to theone_step_delay_streamscategory.two_step_delay_streams: Specifies the stream identifiers that belong to thetwo_step_delay_streamscategory.input_wav_listoutput_wav_list
After you run the effects_delayed_streams_demo sample application, the denoised output files are available in the same directory as the executable.
Run Audio Effects features with the API
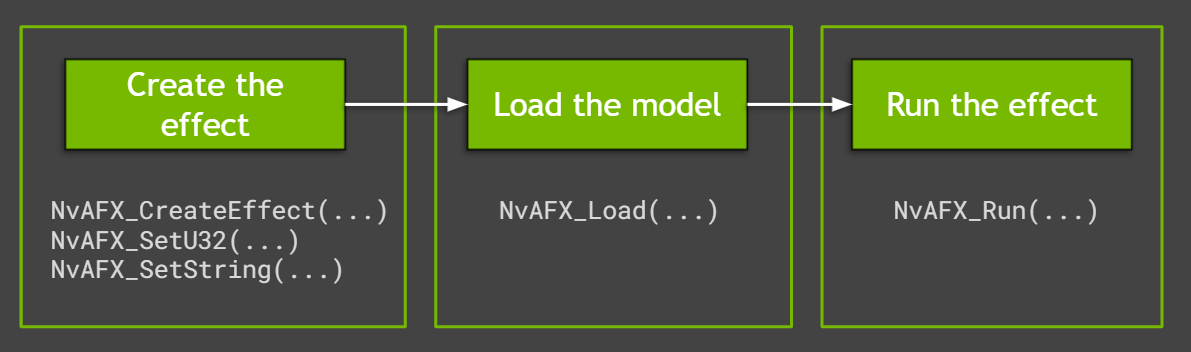
The sample applications use easy-to-use Audio Effects SDK APIs to run the effects. They capitalize on significant performance advantages and control over batching of low-level APIs. Creating and running the audio effects in Maxine is a simple three-step process (Figure 1).
The following video covers this flow with granular details discussed later in this post. All code examples in this post are available in the SDK sample applications.
Create the effect
To create the effect for either noise removal or room echo removal, call the NvAFX_CreateEffect function that takes a handle with the required parameters. This function returns the status code after creating the desired effect. Check for any errors using this status code before proceeding further.
// Create and handle

NvAFX_Handle handle;

// Call CreateEffect function and pass any one of the desired effects:
// NVAFX_EFFECT_DENOISER, NVAFX_EFFECT_DEREVERB,
// NVAFX_EFFECT_DEREVERB_DENOISER

NvAFX_Status err = NvAFX_CreateEffect(NVAFX_EFFECT_DENOISER, &handle);
Each provided model supports a specific audio sample rate that can be specified by calling NvAFX_SetU32. The sample_rate value should be an unsigned 32-bit integer value (48000/16000). Additionally, the proper model path for the GPU platform used should be passed using the NvAFX_SetString API call as follows:
// Pass parameter selector NVAFX_PARAM_SAMPLE_RATE and unsigned int
// Pass parameter selector NVAFX_PARAM_MODEL_PATH and character string
NvAFX_Status err;
err = NvAFX_SetU32(handle, NVAFX_PARAM_SAMPLE_RATE, sample_rate);
err = NvAFX_SetString(handle, NVAFX_PARAM_MODEL_PATH, model_file.c_str());
As the number of I/O audio channels and the number of samples per frame are preset for each effect, you must pass these parameters to the effects function. To get the list of supported values, call the NvAFX_GetU32 function, which returns the list of preset values.
// Pass the selector string to get specific information like:
// NVAFX_PARAM_NUM_SAMPLES_PER_FRAME,
// NVAFX_PARAM_NUM_CHANNELS,

unsigned num_samples_per_frame, num_channels;
NvAFX_Status err;
err = NvAFX_GetU32(handle, NVAFX_PARAM_NUM_SAMPLES_PER_FRAME,
&num_samples_per_frame);
err = NvAFX_GetU32(handle, NVAFX_PARAM_NUM_CHANNELS, &num_channels);
To run the effect on a GPU, you must get the list of supported devices using the NvAFX_GetSupportedDevices function, which fetches the number of supported GPUs.
// The function fills the array with the CUDA device indices of devices
// that are supported by the model, in descending order of preference,
// where the first device is the most preferred device.

int numSupportedDevices = 0;
NvAFX_GetSupportedDevices(handle, &numSupportedDevices, nullptr);
std::vector<int> ret(num);
NvAFX_GetSupportedDevices(handle, &numSupportedDevices, ret.data());
You can then set the GPU device to be used by passing the correct GPU device number, as follows:
NvAFX_SetU32(handle, NVAFX_PARAM_USE_DEFAULT_GPU, use_default_gpu_)
Load an audio effect
After the effect is created, the model must be loaded using the NvAFX_Load function. Loading an effect selects and loads a model and validates the parameters that were set for the effect. This function loads the model into the GPU memory and makes it ready for inference. To load an audio effect, call the NvAFX_Load function and specify the effect handle that was created.
NvAFX_Status err = NvAFX_Load(handle);
Run the audio effect
Finally, run the loaded audio effect to apply the desired effect on the input data. After an effect is run, the contents of the input memory buffer are read, the audio effect is applied, and the output is written to the output memory buffer. Call the NvAFX_Run function for running the loaded audio effect on the input buffer.
// Pass the effect handle, input, and output memory buffer, and the parameters of the effect

NvAFX_Status err = NvAFX_Run(handle, input, output, num_samples,num_channels);
After the audio effect is applied on the input memory buffer and is no longer required, clean up the resources using the NvAFX_DestroyEffect(handle) function call by passing the effect handle.
NvAFX_Status err = NvAFX_DestroyEffect(handle);
Summary
Now that we have explored details on Maxine Audio Effects features, shown you how to run the sample applications with appropriate parameters, and explored the easy-to-use, high-performance API, you can start integrating these amazing AI audio features into your applications using Maxine containers or bare metal on Windows, and on Linux.
For more information, see the Maxine Getting Started page. Let us know what you think or if you have any questions.