In finance, computation efficiency can be directly converted to trading profits sometimes. Quants are facing the challenges of trading off research efficiency with computation efficiency. Using Python can produce succinct research codes, which improves research efficiency. However, vanilla Python code is known to be slow and not suitable for production. In this post, I explore how to use Python GPU libraries to achieve the state-of-the-art performance in the domain of exotic option pricing.
Pricing computation overview
The Black–Scholes model can efficiently be used for pricing “plain vanilla” options with the European exercise rule. Options like the Barrier option and Basket option have a complicated structure with no simple analytical solution. The Monte Carlo simulation is an effective way to price them. To get an accurate price with a small variance, you need many simulation paths, which is computationally intensive.
Luckily, each of the simulation paths are independent and you can take advantage of the multiple-core NVIDIA GPU to accelerate the computation within a node or even expand it to multiple servers, if necessary. Using GPU can speed up the computation by orders of magnitude due to the parallelization of the independent paths.
Traditionally, the Monte Carlo simulation on GPUs is implemented in CUDA C/C++ code. Data scientists must manage the memory explicitly and write a lot of boilerplate code, which posts challenges to code maintenance and production efficiency.
Recently, the Deeply Learning Derivatives (Ryan et al, 2018) paper was introduced to approximate the option pricing model using a deep neural network. By trading off compute time for training with inference time for pricing, it achieves additional order-of-magnitude speedups for options pricing compared to the Monte Carlo simulation on GPUs, which makes live exotic option pricing in production a realistic goal.
This post is organized in two parts with all the code hosted in the gQuant repo on GitHub:
- In Part 1, I introduce Monte Carlo simulation implemented with Python GPU libraries. It combines the benefits from both CUDA C/C++ and Python worlds. In the example shown, the Monte Carlo simulation can be computed efficiently with close to raw CUDA performance, while the code is simple and easy to adopt.
- In Part 2, I experiment with the deep learning derivative method. Deep neural networks can learn arbitrarily accurate functional approximations to the expected value derived by Monte Carlo techniques, and first order Greeks (or risk sensitivities) can be accurately calculated by a backward pass through the network. Higher order Greeks can be achieved by iterating the same network backward pass process.
The method that I introduced in this post does not pose any restrictions on the exotic option types. It works for any option pricing model that can be simulated using Monte Carlo methods.
Without loss of generality, you can use the Asian Barrier Option as an example. The Asian Barrier Option is a mixture of the Asian Option and the Barrier Option. The derivative price depends on the average of underlying Asset Price S, the Strike Price K, and the Barrier Price B. Use the Down-and-Out Call Discretized Asian Barrier Option as an example.
- The option is void if the average price of the underlying asset goes below the barrier.
- The asset Spot Price S is usually modeled as Geometric Brownian motion, which has three free parameters: Spot Price, Percent Volatility, and Percent Drift.
- The price of the option is the expected profit at the maturity discount to the current value.
- The path-dependent nature of the option makes an analytic solution of the option price impossible.
This is a good sample option for pricing using the Monte Carlo simulation.
The source codes and example Jupyter notebooks for this post are hosted in the gQuant repo. You need a GPU of at least 16 GB memory to reproduce the results.
Part 1: Monte Carlo pricing by GPU Python libraries
NVIDIA GPU is designed to do parallel computations with massive number of threads. The Monte Carlo simulation is one of the algorithms that can be accelerated well in the GPU. In the following sections, see the Monte Carlo simulation in traditional CUDA code and then the same algorithm implemented in Python with different libraries.
CUDA approach
Traditionally, Monte Carlo Option pricing is implemented in CUDA C/C++. The following CUDA C/C++ code example calculates the option price by the Monte Carlo method:
#include <vector>
#include <stdio.h>
#include <iostream>
#include <chrono>
#include <cuda_runtime.h>
#include <helper_cuda.h>
#include <curand.h>

#define CHECKCURAND(expression)                         \
  {                                                     \
    curandStatus_t status = (expression);                         \
    if (status != CURAND_STATUS_SUCCESS) {                        \
      std::cerr << "Curand Error on line " << __LINE__<< std::endl;     \
      std::exit(EXIT_FAILURE);                                          \
    }                                                                   \
  }

// atomicAdd is introduced for compute capability >=6.0
#if !defined(__CUDA_ARCH__) || __CUDA_ARCH__ >= 600
#else
__device__ double atomicAdd(double* address, double val)
{
      printf("device arch <=600\n");
        unsigned long long int* address_as_ull = (unsigned long long int*)address;
          unsigned long long int old = *address_as_ull, assumed;
            do {
                    assumed = old;
                        old = atomicCAS(address_as_ull, assumed,
                                                    __double_as_longlong(val + __longlong_as_double(assumed)));
                          } while (assumed != old);
              return __longlong_as_double(old);
}
#endif

__global__ void sumPayoffKernel(float *d_s, const unsigned N_PATHS, double *mysum)
{
  unsigned idx =  threadIdx.x + blockIdx.x * blockDim.x;
  unsigned stride = blockDim.x * gridDim.x;
  unsigned tid = threadIdx.x;

  extern __shared__ double smdata[];
  smdata[tid] = 0.0;

  for (unsigned i = idx; i<N_PATHS; i+=stride)
  {
    smdata[tid] += (double) d_s[i];
  }

  for (unsigned s=blockDim.x/2; s>0; s>>=1)
  {
    __syncthreads();
    if (tid < s) smdata[tid] += smdata[tid + s];
  }

  if (tid == 0)
  {
    atomicAdd(mysum, smdata[0]);
  }
}

__global__ void barrier_option(
    float *d_s,
    const float T,
    const float K,
    const float B,
    const float S0,
    const float sigma,
    const float mu,
    const float r,
    const float * d_normals,
    const long N_STEPS,
    const long N_PATHS)
{
  unsigned idx =  threadIdx.x + blockIdx.x * blockDim.x;
  unsigned stride = blockDim.x * gridDim.x;
  const float tmp1 = mu*T/N_STEPS;
  const float tmp2 = exp(-r*T);
  const float tmp3 = sqrt(T/N_STEPS);
  double running_average = 0.0;

  for (unsigned i = idx; i<N_PATHS; i+=stride)
  {
    float s_curr = S0;
    for(unsigned n = 0; n < N_STEPS; n++){
       s_curr += tmp1 * s_curr + sigma*s_curr*tmp3*d_normals[i + n * N_PATHS];
       running_average += (s_curr - running_average) / (n + 1.0) ;
       if (running_average <= B){
           break;
       }
    }

    float payoff = (running_average>K ? running_average-K : 0.f);
    d_s[i] = tmp2 * payoff;
  }
}

int main(int argc, char *argv[]) {
  try {
    // declare variables and constants
    size_t N_PATHS = 8192000;
    size_t N_STEPS = 365;
    if (argc >= 2)  N_PATHS = atoi(argv[1]);

    if (argc >= 3)  N_STEPS = atoi(argv[2]);

    const float T = 1.0f;
    const float K = 110.0f;
    const float B = 100.0f;
    const float S0 = 120.0f;
    const float sigma = 0.35f;
    const float mu = 0.1f;
    const float r = 0.05f;


    double gpu_sum{0.0};

    int devID{0};
    cudaDeviceProp deviceProps;

    checkCudaErrors(cudaGetDeviceProperties(&deviceProps, devID));
    printf("CUDA device [%s]\n", deviceProps.name);
     printf("GPU Device %d: \"%s\" with compute capability %d.%d\n\n",  devID, deviceProps.name, deviceProps.major, deviceProps.minor);
    // Generate random numbers on the device
    curandGenerator_t curandGenerator;
    CHECKCURAND(curandCreateGenerator(&curandGenerator, CURAND_RNG_PSEUDO_MTGP32));
    CHECKCURAND(curandSetPseudoRandomGeneratorSeed(curandGenerator, 1234ULL)) ;

    const size_t N_NORMALS = (size_t)N_STEPS * N_PATHS;
    float *d_normals;
    checkCudaErrors(cudaMalloc(&d_normals, N_NORMALS * sizeof(float)));
    CHECKCURAND(curandGenerateNormal(curandGenerator, d_normals, N_NORMALS, 0.0f, 1.0f));
    cudaDeviceSynchronize();

      // before kernel launch, check the max potential blockSize
      int BLOCK_SIZE, GRID_SIZE;
      checkCudaErrors(cudaOccupancyMaxPotentialBlockSize(&GRID_SIZE,
                                                         &BLOCK_SIZE,
                                                         barrier_option,
                                                         0, N_PATHS));

      std::cout << "suggested block size " << BLOCK_SIZE
                << " \nsuggested grid size " << GRID_SIZE
                << std::endl;

      std::cout << "Used grid size " << GRID_SIZE << std::endl;

      // Kernel launch
      auto t1=std::chrono::high_resolution_clock::now();

      float *d_s;
      checkCudaErrors(cudaMalloc(&d_s, N_PATHS*sizeof(float)));

      auto t3=std::chrono::high_resolution_clock::now();
      barrier_option<<<GRID_SIZE, BLOCK_SIZE>>>(d_s, T, K, B, S0, sigma, mu, r, d_normals, N_STEPS, N_PATHS);
      cudaDeviceSynchronize();
      auto t4=std::chrono::high_resolution_clock::now();

      double* mySum;
      checkCudaErrors(cudaMallocManaged(&mySum, sizeof(double)));
      sumPayoffKernel<<<GRID_SIZE, BLOCK_SIZE, BLOCK_SIZE*sizeof(double)>>>(d_s, N_PATHS, mySum);
      cudaDeviceSynchronize();
      auto t5=std::chrono::high_resolution_clock::now();

      std::cout << "sumPayoffKernel takes "
                << std::chrono::duration_cast<std::chrono::microseconds>(t5-t4).count() / 1000.f
                << " ms\n";

      gpu_sum = mySum[0] / N_PATHS;

      auto t2=std::chrono::high_resolution_clock::now();

      // clean up
      CHECKCURAND(curandDestroyGenerator( curandGenerator )) ;
      checkCudaErrors(cudaFree(d_s));
      checkCudaErrors(cudaFree(d_normals));
      checkCudaErrors(cudaFree(mySum));

      std::cout << "price "
              << gpu_sum
              << " time "
                << std::chrono::duration_cast<std::chrono::microseconds>(t5-t1).count() / 1000.f
                << " ms\n";
  }

  catch(std::
        exception& e)
  {
    std::cout<< "exception: " << e.what() << "\n";
  }
}
The CUDA code is usually long and detailed. In general, it is performing a sequence of the following tasks:
- Allocate GPU memory to store the random number and simulation path results.
- Call cuRand library to generate random numbers.
- Launch the barrier option kernel to do parallel simulations.
- Launch the sum kernel to aggregate the terminal underlying asset prices.
- Deallocate the memory.
You must perform each step explicitly. In this code example, it evaluates the price of the Asian Barrier Option specified in the following table.
| K | B | S0 | sigma | mu | r | |
| value | 110 | 100 | 120 | 0.35 | 0.1 | 0.05 |
Table 1. Parameters of the Asian Barrier option. K is strike price, B is barrier price, S0 is spot price, sigma is percent volatility, mu is percent drift and r is the interest rate.
The maturity for this option is fixed at one year for this study. Compiling and running this CUDA code on a V100 GPU produces the correct option price $18.70 in 26.6 ms for 8.192 million paths and 365 steps. Use these numbers as the reference benchmark for later comparison. In the real world, quants usually use far fewer paths to do the Monte Carlo simulation.
A lot of tricks can be used to reduce the number of paths needed for the simulation, for example, importance sampling technique. Here, you use eight million paths to show the computation advantage of GPU. In this Jupyter notebook, I show it is useful to do batch Monte Carlo simulation, which effectively uses many paths.
Among the five steps, the critical component is step 3, where data scientists need to describe the detailed Monte Carlo simulation. Ideally, the data scientists’ efforts should be focused on this step. Luckily, after moving to Python GPU libraries, the other steps can be handled automatically without sacrificing significant performance. For example:
Step 1: The GPU memory can be automatically allocated and initialized by the CuPy array. The path results array can be defined by the following code example:
output = cupy.zeros(N_PATHS, dtype=cupy.float32)
Step 2: The CuPy random function uses the cuRAND library under the hood. The allocation and random number generation can be defined by the following code example:
randoms_gpu = cupy.random.normal(0, 1, N_PATHS * N_STEPS, dtype=cupy.float32)
Step 4: The GPU mean value computation is a built-in function in the CuPy library.
v = output.mean()
Step 5: The deallocation of the GPU memory is automatically done by the Python memory management.
For the rest of the post, I focus on step 3, using Python to run a Monte Carlo simulation for the Asian Barrier Option.
Numba library approach, single core CPU
In the Fast Fractional Differencing on GPUs using Numba and RAPIDS (Part 1) post, we discussed how to use the Numba library to accelerate Python code with GPU computing. Numba can be used to compile Python code to machine code running in CPU as well.
The following code example is an implementation of the Monte Carlo simulation optimized to run in a single core CPU:
@njit(fastmath=True)
def cpu_barrier_option(d_s, T, K, B, S0, sigma, mu, r, d_normals, N_STEPS, N_PATHS):
    tmp1 = mu*T/N_STEPS
    tmp2 = math.exp(-r*T)
    tmp3 = math.sqrt(T/N_STEPS)
    running_average = 0.0
    for i in range(N_PATHS):
        s_curr = S0
        for n in range(N_STEPS):
            s_curr += tmp1 * s_curr + sigma*s_curr*tmp3*d_normals[i + n * N_PATHS]
            running_average = running_average + 1.0/(n + 1.0) * (s_curr - running_average)
            if running_average <= B:
                break

        payoff = running_average - K if running_average>K else 0
        d_s[i] = tmp2 * payoff
The Monte Carlo simulation has two nested for-loops. The outer loop iterates through the independent paths. In the inner loop, the underlying asset price is updated step by step, and the terminal price is set to the resulting array.
I enabled the fastmath compiler optimization to speed up the computation. For the same number of simulation paths and steps, it takes 41.6s to produce the same pricing number.
Numba library approach, multiple-core CPU
To enable computation across multiple CPU cores, you parallelize the outer for-loop by changing range to prange:
@njit(fastmath=True, parallel=True)
def cpu_multiplecore_barrier_option(d_s, T, K, B, S0, sigma, mu, r, d_normals, N_STEPS, N_PATHS):
    tmp1 = mu*T/N_STEPS
    tmp2 = math.exp(-r*T)
    tmp3 = math.sqrt(T/N_STEPS)
    for i in prange(N_PATHS):
        s_curr = S0
        running_average = 0.0
        for n in range(N_STEPS):
            s_curr += tmp1 * s_curr + sigma*s_curr*tmp3*d_normals[i + n * N_PATHS]
            running_average = running_average + 1.0/(n + 1.0) * (s_curr - running_average)
            if running_average <= B:
                break
        payoff = running_average - K if running_average>K else 0
        d_s[i] = tmp2 * payoff
This code produces the same pricing result but now takes 2.34s to compute it in the 32-core, hyperthreading DGX-1 Intel CPU.
Numba library approach, single GPU
Moving from CPU code to GPU code is easy with Numba. Change njit to cuda.jit in the function decoration, and use the GPU thread to do the outer for-loop calculation in parallel.
@cuda.jit
def numba_gpu_barrier_option(d_s, T, K, B, S0, sigma, mu, r, d_normals, N_STEPS, N_PATHS):
    # ii - overall thread index
    ii = cuda.threadIdx.x + cuda.blockIdx.x * cuda.blockDim.x
    stride = cuda.gridDim.x * cuda.blockDim.x
    tmp1 = mu*T/N_STEPS
    tmp2 = math.exp(-r*T)
    tmp3 = math.sqrt(T/N_STEPS)
    running_average = 0.0
    for i in range(ii, N_PATHS, stride):
        s_curr = S0
        for n in range(N_STEPS):
            s_curr += tmp1 * s_curr + sigma*s_curr*tmp3*d_normals[i + n * N_PATHS]
            running_average += (s_curr - running_average) / (n + 1.0)
            if running_average <= B:
                break
        payoff = running_average - K if running_average>K else 0
        d_s[i] = tmp2 * payoff
By accelerating this computation in a V100 GPU, the computation time is reduced to 65 ms and produces the same result.
CuPy library approach, single GPU
CuPy provides an easy way to define GPU kernels from a raw CUDA source. The RawKernel object allows you to call the kernel with CUDA’s cuLaunchKernel interface. The following code example wraps the Barrier Option computation code inside the RawKernel object:
cupy_barrier_option = cupy.RawKernel(r'''
extern "C" __global__ void barrier_option(
    float *d_s,
    const float T,
    const float K,
    const float B,
    const float S0,
    const float sigma,
    const float mu,
    const float r,
    const float * d_normals,
    const long N_STEPS,
    const long N_PATHS)
{
  unsigned idx =  threadIdx.x + blockIdx.x * blockDim.x;
  unsigned stride = blockDim.x * gridDim.x;
  unsigned tid = threadIdx.x;

  const float tmp1 = mu*T/N_STEPS;
  const float tmp2 = exp(-r*T);
  const float tmp3 = sqrt(T/N_STEPS);
  double running_average = 0.0;

  for (unsigned i = idx; i<N_PATHS; i+=stride)
  {
    float s_curr = S0;
    unsigned n=0;
    for(unsigned n = 0; n < N_STEPS; n++){
       s_curr += tmp1 * s_curr + sigma*s_curr*tmp3*d_normals[i + n * N_PATHS];
       running_average += (s_curr - running_average) / (n + 1.0) ;
       if (running_average <= B){
           break;
       }
    }

    float payoff = (running_average>K ? running_average-K : 0.f);
    d_s[i] = tmp2 * payoff;
  }
}

''', 'barrier_option')
Launching this GPU kernel in Python and running the Monte Carlo simulation takes 29 ms, which is very close to the benchmark of 26 ms for native CUDA code.
Multiple GPU using Dask
To get a more accurate estimation of the option price, you need more paths for the Monte Carlo simulation. The single NVIDIA V100 GPU used earlier only has 16 GB of memory and you are almost hitting the memory limits to run 8M simulations.
DASK is an integrated component of RAPIDS for distributed computation on GPUs. You can take advantage of it to distribute the Monte Carlo simulation computation to multiple GPUs across multiple nodes.
First, wrap all the computation inside a function to allow the allocated GPU memory to be released at the end of the function call. The function takes an extra argument for the random number seed value so that the individual function calls each have an independent sequence of random numbers.
def get_option_price(T, K, B, S0, sigma, mu, r, N_PATHS = 8192000, N_STEPS = 365, seed=3):
    number_of_threads = 256
    number_of_blocks = (N_PATHS-1) // number_of_threads + 1
    cupy.random.seed(seed)
    randoms_gpu = cupy.random.normal(0, 1, N_PATHS * N_STEPS, dtype=cupy.float32)
    output =  cupy.zeros(N_PATHS, dtype=cupy.float32)
    cupy_barrier_option((number_of_blocks,), (number_of_threads,),
                   (output, np.float32(T), np.float32(K),
                    np.float32(B), np.float32(S0),
                    np.float32(sigma), np.float32(mu),
                    np.float32(r),  randoms_gpu, N_STEPS, N_PATHS))
    v = output.mean()
    out_df = cudf.DataFrame()
    out_df['p'] = cudf.Series([v.item()])
    return out_df
This function returns the simulation result in a cudf GPU dataframe so that it can be aggregated into a dask_cudf distributed dataframe later. Use Dask to run 1600×8 million simulations in a DGX-1 with the following code example:
x = dask_cudf.from_delayed([delayed(get_option_price)(T=1.0, K=110.0,  B=100.0, S0=120.0, sigma=0.35, mu=0.1, r=0.05, seed=3000+i) for i in  range(1600)])
x.mean().compute()
x.std().compute()
This additional computing power produces a more accurate pricing result of 18.71. Call the std function to compute that the standard deviation of the pricing with 8 million paths is 0.0073.
Part 2: Option pricing by the deep derivative method
In part 1 of this post, Python is used to implement the Monte Carlo simulation to price the exotic option efficiently in the GPU. In quantitative finance, low latency option pricing is important in the production environment to manage portfolio risk. A Monte Carlo simulation, even accelerated in the GPU, is sometimes not efficient enough.
The Deeply Learning Derivatives paper proposed using a deep neural network to approximate the option pricing model, and using the data generated from the Monte Carlo simulation to train it. It shows that the deep neural network can produce accurate pricing numbers and the inference time is orders of magnitude faster.
Inspired by this paper, I use a similar method in this post to build an approximated pricing model and speed up the inference latency. Using a high-order differentiable activation function, I show that the approximated model can calculate option Greeks efficiently by network backward passes. I boost up the inference time further by transforming the model with TensorRT to provide state of art exotic option pricing speed.
Neural network approximation
A deep neural network is known to be a good function approximator, which has a lot of success in image processing and natural language processing. Deep neural networks usually have good generalization, which is powerful for unseen datasets when the networks are trained with large amounts of data. Because the Monte Carlo simulation can be used to find the accurate price of the option, you can use it to generate as many data points as possible given the computation budgets.
One interesting finding from the Noise2Noise: Learning Image Restoration without Clean Data paper is that the model trained with noisy ground truth data can restore the clean prediction. This is because the noise in the Monte Carlo simulation is unbiased and can be cancelled out during the stochastic gradient training.
This is also shown in the Deeply Learning Derivatives paper: the prediction from the model is better than the result calculated from the Monte Carlo simulation with the same number of paths.
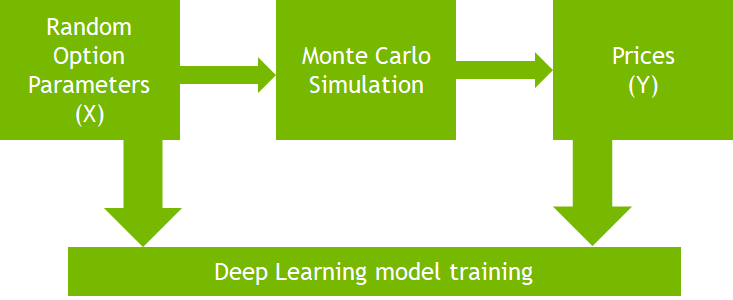
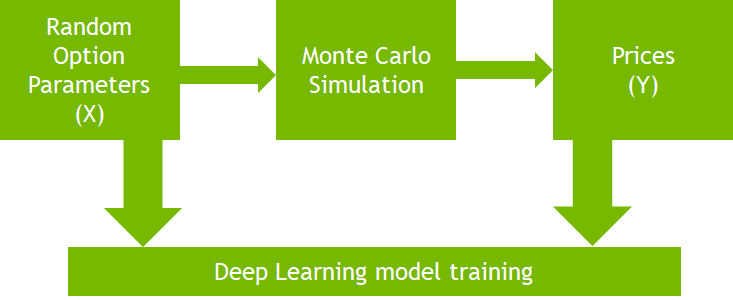
Figure 1 depicts the plan. You generate random option parameters (X independent variables), feed them to the Monte Carlo simulation in GPU and calculate the ground truth option prices (Y dependent variables). This large generated dataset is then used to train a deep neural network to learn option pricing as a nonlinear regression problem.
Data generation
In part 1 of this post, I showed you that the distributed calculation can be done easily with Dask. Here, you use Dask to generate a large dataset in a distributed manner:
futures = []
for i in range(0, 100):
    future = client.submit(gen_data, 5, 16, i)
    futures.append(future)
results = client.gather(futures)
The gen_data function runs in a single GPU to generate a set of data points and save them in the local storage. You can use any of the Python GPU Monte Carlo simulation methods described in part 1. This example code runs gen_data 100 times with different seed numbers and distributes the computation in the multiple-GPU environment.
Sample the six option parameters uniformly in the range specified in the following table:
| K | B | S0 | sigma | mu | r | |
| range | [0, 200] | [0, 198] | [0, 200] | [0, 0.4] | [0, 0.2] | [0, 0.2] |
Table 2. Range of each of the parameters of the Asian Barrier option in dataset generation.
In total, 10 million training data points and 5 million validation data points are generated by running the Monte Carlo simulation in distribution. For each Monte Carlo simulation, you use 8.192 million paths to calculate the option price. As shown in part 1, 8.192 million paths have the standard deviation of 0.0073 in the price of that particular option parameter set.
Neural network model
As you have no structural information about the six option parameters, choose the generic multiple layer perceptron neural network as the pricing model. The network architecture is shown in Figure 3.
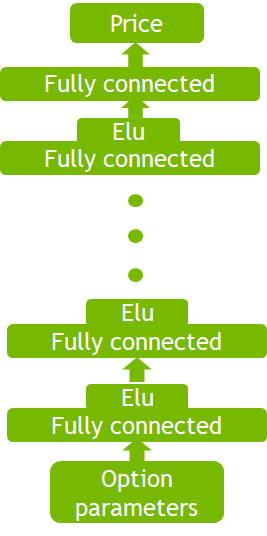
The difference from the Deeply Learning Derivatives paper is using Elu as the activation function, to compute the high order differentiation of the parameters. If you use ReLu as in the original paper, the second order differentiation is always zero.
As you know the range of the generated random option parameters, the input parameters are first scaled back to a range of (0-1) by dividing them by (200.0, 198.0, 200.0, 0.4, 0.2, 0.2). Then they are projected five times to the hidden dimension of 1024. The last layer is a linear layer that maps the hidden dimension to the predicted option price. The following code example is the detailed model implementation in PyTorch:
import torch.nn as nn
import torch.nn.functional as F
import torch


class Net(nn.Module):

    def __init__(self, hidden=1024):
        super(Net, self).__init__()
        self.fc1 = nn.Linear(6, hidden)
        self.fc2 = nn.Linear(hidden, hidden)
        self.fc3 = nn.Linear(hidden, hidden)
        self.fc4 = nn.Linear(hidden, hidden)
        self.fc5 = nn.Linear(hidden, hidden)
        self.fc6 = nn.Linear(hidden, 1)
        self.register_buffer('norm',
                             torch.tensor([200.0,
                                           198.0,
                                           200.0,
                                           0.4,
                                           0.2,
                                           0.2]))

    def forward(self, x):
        # normalize the parameter to range [0-1]
        x = x / self.norm
        x = F.elu(self.fc1(x))
        x = F.elu(self.fc2(x))
        x = F.elu(self.fc3(x))
        x = F.elu(self.fc4(x))
        x = F.elu(self.fc5(x))
        return self.fc6(x)
Neural network training
In the gQuant GitHub repo, I provide two ways to train the neural network by using either Ignite or Neural Modules (NeMo). Both are high-level DL libraries to make train models easy. I show it is easy to turn on the mixed precision training and multiple GPUs training to speed up the training. Use MSELoss as the loss function, Adam as the optimizer and CosineAnnealingScheduler as the learning rate scheduler. For more information, see the Python notebooks in the GitHub repo.
Inference, Greeks, and implied volatility calculation
After the training is converged, the best performing model is saved in local storage. Now you can load the model parameters and use it to run inference:
checkpoint = torch.load('check_points/512/model_best.pth.tar')
model = Net().cuda()
model.load_state_dict(checkpoint['state_dict'])
inputs = torch.tensor([[110.0, 100.0, 120.0, 0.35, 0.1, 0.05]])
start = time.time()
inputs = inputs.cuda()
result = model(inputs)
end = time.time()
print('result %.4f inference time %.6f' % (result,end- start))
When you feed in the same option parameters as in part 1, which is not used in the training dataset, the model produces the accurate option price $18.714. Best of all, it only takes 0.8 ms to do the calculation compared with 26 ms done by the Monte Carlo method in CUDA. This is a 32x speedup.
The approximated option pricing model is fully differentiable, which means that you can calculate any order of differentiation with respect to input parameters. In finance, this is used to compute Greeks in the option.
Calculating the Greeks with the Monte Carlo simulation method is challenging, due to the noise in price evaluation. The numerical difference method can be noisy. However, after you have the neural network approximation model, take advantage of the auto-grad feature in PyTorch to compute the differentiation. It computes efficiently as the gradient is computed by the backward pass of the network.
The following code example shows an example of calculating the first order differentiation for parameters K, B, S0, sigma, mu, r‘:
inputs = torch.tensor([[110.0, 100.0, 120.0, 0.35, 0.1, 0.05]]).cuda()
inputs.requires_grad = True
x = model(inputs)
x.backward()
first_order_gradient = inputs.grad
For higher order differentiation, use the PyTorch autograd.grad method multiple times. The following code example computes the second order differentiation:
from torch import Tensor
from torch.autograd import Variable
from torch.autograd import grad
from torch import nn

inputs = torch.tensor([[110.0, 100.0, 120.0, 0.35, 0.1, 0.05]]).cuda()
inputs.requires_grad = True
x = model(inputs)

# instead of using loss.backward(), use torch.autograd.grad() to compute gradients
# https://pytorch.org/docs/stable/autograd.html#torch.autograd.grad
loss_grads = grad(x, inputs, create_graph=True)
drv = grad(loss_grads[0][0][2], inputs)
drv
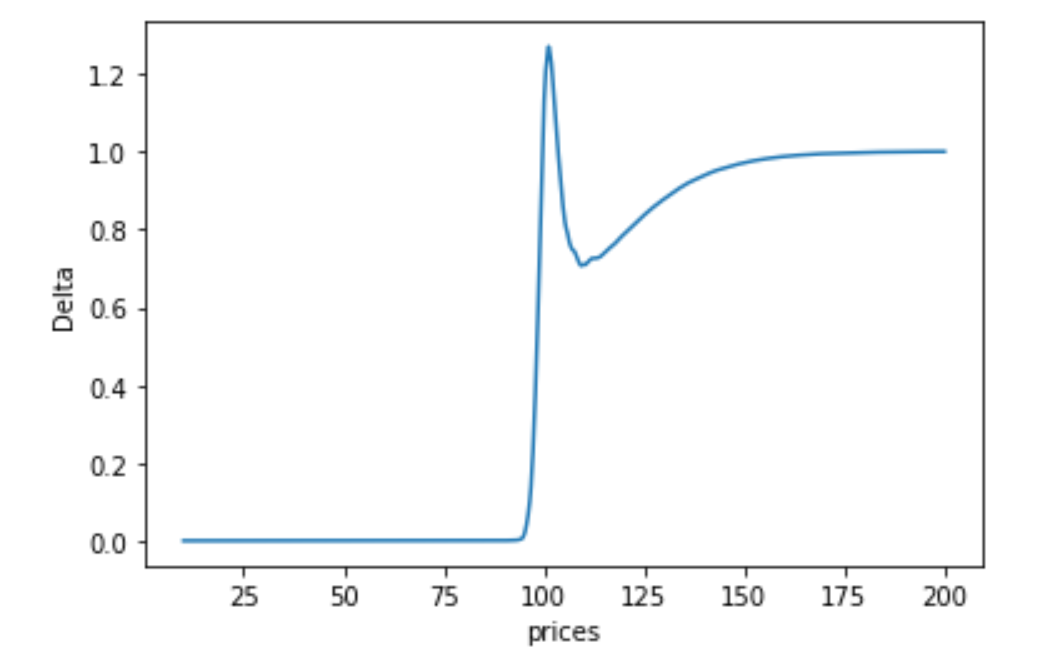
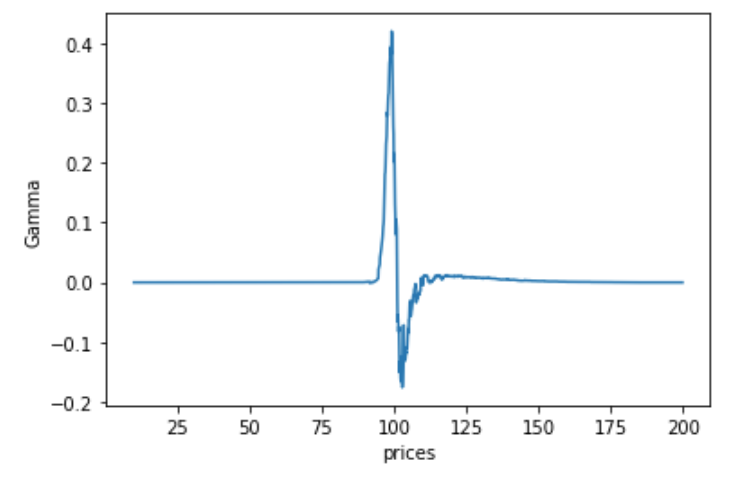
You can generate the delta and gamma Greek graphs as a function of the underlying price:
Implied volatility is the forecasted volatility of the underlying asset based on the quoted prices of the option. It is the reverse mapping of price to the option parameter given the model which is hard to do with the Monte Carlo simulation approach. But if you have a deep learning pricing model, it is an easy task. Given the prices P, the implied volatility is the root of the function `compute_price` as in the following code example:
def compute_price(sigma):
    inputs = torch.tensor([[110.0, 100.0, 120.0, sigma, 0.1, 0.05]]).cuda()
    x = model(inputs)
    return x.item()
Any numerical root-finding methods can be used, for example, the Brent algorithm is efficient to compute the root.
TensorRT inference speed-up
After training the deep learning network, the next step is usually to deploy the model to production. The most straightforward way is to put the PyTorch model in inference mode. The inference runs a forward pass from input to the output. As shown earlier, it runs quickly to get accurate results in 0.8 ms. However, you can do much better.
NVIDIA provides a powerful inference model optimization tool, TensorRT, which includes a deep learning inference optimizer and runtime that delivers low latency and high-throughput for deep learning inference applications. It made NVIDIA win the MLPerf Inference benchmark.
In this post, TensorRT helps to accelerate the BERT natural language understanding inference to 2.2 ms on the T4 GPU. Inspired by it, you can convert the trained Asian Barrier Option model to the TensorRT inference engine to get significant acceleration. For more information about the conversion, see the Jupyter notebook.
When you have the TensorRT engine file ready, use it for inference work.
- Load the serialized engine file.
- Allocate the CUDA device array.
- Asynchronously copy the input from host to device.
- Launch the TensorRT engine to compute the result.
- Asynchronously copy the output from device to host.
The following code example runs inference with the TensorRT engine:
import tensorrt as trt
import time
import numpy as np
import pycuda
import pycuda.driver as cuda
import pycuda.autoinit

TRT_LOGGER = trt.Logger(trt.Logger.WARNING)

with open("opt.engine", "rb") as f, trt.Runtime(TRT_LOGGER) as runtime:
    engine = runtime.deserialize_cuda_engine(f.read())

h_input = cuda.pagelocked_empty((1,6,1,1), dtype=np.float32)
h_input[0, 0, 0, 0] = 110.0
h_input[0, 1, 0, 0] = 100.0
h_input[0, 2, 0, 0] = 120.0
h_input[0, 3, 0, 0] = 0.35
h_input[0, 4, 0, 0] = 0.1
h_input[0, 5, 0, 0] = 0.05
h_output = cuda.pagelocked_empty((1,1,1,1), dtype=np.float32)
d_input = cuda.mem_alloc(h_input.nbytes)
d_output = cuda.mem_alloc(h_output.nbytes)
stream = cuda.Stream()
with engine.create_execution_context() as context:
    start = time.time()
    cuda.memcpy_htod_async(d_input, h_input, stream)
    input_shape = (1, 6, 1, 1)
    context.set_binding_shape(0, input_shape)
    context.execute_async(bindings=[int(d_input), int(d_output)], stream_handle=stream.handle)
    cuda.memcpy_dtoh_async(h_output, d_output, stream)
    stream.synchronize()
    end = time.time()
print('result %.4f inference time %.6f' % (h_output,end- start))
It produces accurate results in a quarter of the inference time (0.2 ms) compared to the non-TensorRT approach.
Summary
In part 1, I showed you that the traditional way of implementing the Monte Carlo Option pricing in CUDA C/C++ is a little complicated, but that it has the best absolute performance. Using Python GPU libraries, the exact same Monte Carlo simulation can be implemented in succinct lines of Python code without a significant performance penalty.
Additionally, after moving the simulation code to Python, you can use other helpful Python libraries to improve the outcome. By using RAPIDS/Dask, the large-scale Monte Carlo simulation can be easily distributed across multiple nodes and multiple GPUs to achieve higher accuracy.
In part 2, I reproduced the results of the Deeply Learning Derivatives paper. I showed several benefits when using a neural network to approximate the exotic option price model. It can speed up the option price by a factor of 35x with accurate results. The differentiable neural network makes option Greeks calculation easy. You can use TensorRT to further improve the network inference time and achieve state-of-the-art performance.
Acknowledgements
I want to thank the NVIDIA Financial Service Industry team members Patrick Hogan, John Ashley, Alex Volkov, David Willians, Preet Gandhi and Mark Bennett. They are working in the field with FSI customers and provided useful comments and suggestions for this post.
