Large scale language models (LSLMs) such as BERT, GPT-2, and XL-Net have brought about exciting leaps in state-of-the-art accuracy for many natural language understanding (NLU) tasks. Since its release in Oct 2018, BERT1 (Bidirectional Encoder Representations from Transformers) remains one of the most popular language models and still delivers state of the art accuracy at the time of writing2.
BERT provided a leap in accuracy for NLU tasks that brought high-quality language-based services within the reach of companies across many industries. To use the model in production, you need to consider factors such as latency, in addition to accuracy, which influences end user satisfaction with a service. BERT requires significant compute during inference due to its 12/24-layer stacked multi-head attention network. This has posed a challenge for companies to deploy BERT as part of real-time applications until now.
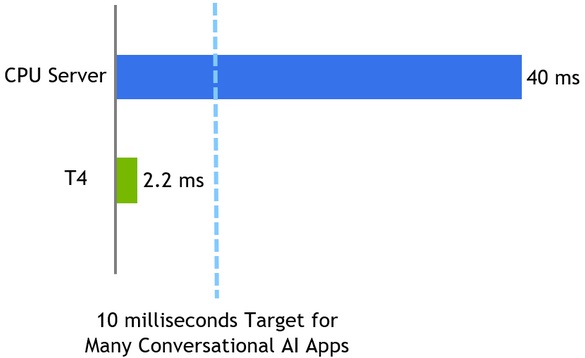
Today, NVIDIA is releasing new TensorRT optimizations for BERT that allow you to perform inference in 2.2 ms* on T4 GPUs. This is 17x faster than CPU-only platforms and is well within the 10ms latency budget necessary for conversational AI applications. These optimizations make it practical to use BERT in production, for example, as part of a conversation AI service.
TensorRT is a platform for high-performance deep learning inference which includes an optimizer and runtime that minimizes latency and maximizes throughput in production. With TensorRT, you can optimize models trained in all major frameworks, calibrate for lower precision with high accuracy, and finally deploy in production.
All optimizations and code for achieving this performance with BERT are being released as open source in this TensorRT sample repo. We have optimized the Transformer layer, which is a fundamental building block of the BERT encoder so you can adapt these optimizations to any BERT-based NLP task. BERT is applied to an expanding set of speech and NLP applications beyond conversational AI, all of which can take advantage of these optimizations.
Question Answering(QA) or Reading Comprehension is a very popular way to test the ability of models to understand context. The SQuAD leaderboard3 tracks the top performers for this task, for a dataset and test set that they provide. There has been rapid progress in QA ability in the last few years, with global contributions from academia and companies. In this article, we will demonstrate how to create a simple question answering application using Python, powered by TensorRT-optimized BERT code that we have released today. The example provides an API to input passages and questions, and it returns responses generated by the BERT model.
Let’s start with a brief review of the steps to perform training and inference using TensorRT for BERT.
BERT Training and Inference Pipeline
A major problem faced by NLP researchers and developers is scarcity of high-quality labeled training data for their specific NLP task. To overcome the problem of learning a model for the task from scratch, recent breakthroughs in NLP leverage the vast amounts of unlabeled text and decompose the NLP task into two parts: 1) learning to represent the meaning of words, relationship between them, i.e. building up a language model using auxiliary tasks and a large corpus of text and 2) specialize the language model to the actual task by augmenting the language model with a relatively small task-specific network that is trained in a supervised manner.
These two stages are typically referred to as pre-training and fine-tuning. This paradigm enables use of the pre-trained language model to a wide range of tasks without any task-specific change to the model architecture. In our example, BERT provides a high-quality language model that is fine-tuned for question answering, but is suitable for other tasks such as sentence classification and sentiment analysis.
To pre-train BERT, you can either start with the pretrained checkpoints available online (Figure 1 (left)) or pre-train BERT on your own custom corpus (Figure 1 (right)). You can also initialize pre-training from a checkpoint and then continue on custom data. While pre-training with custom or domain specific data may yield interesting results (e.g. BioBert5), it is computationally intensive and requires massively parallel compute infrastructure to complete within a reasonable amount of time. GPU-enabled multi-node training is an ideal solution for such scenarios. Learn more about how NVIDIA developers were able to train BERT in less than an hour in the Training BERT with GPUs blog.
In the fine-tuning step, the task-specific network based on the pre-trained BERT language model is trained using the task-specific training data (for question answering this is (paragraph, question, answer) triples). Note that, compared to pre-training, fine-tuning is generally far less computationally demanding.
To perform inference using a QA neural network:
- Create a TensorRT engine by passing the fine-tuned weights and network definition to the TensorRT builder.
- Start the TensorRT runtime with this engine.
- Feed a passage and a question to the TensorRT runtime and receive as output the answer predicted by the network.
This entire workflow is outlined in Figure 2.


Let’s Run the Sample!
Set up your environment to perform BERT inference with the steps below:
- Create a Docker image with the prerequisites
- Compile TensorRT optimized plugins
- Build the TensorRT engine from the fine-tuned weights
- Perform inference given a passage and a query
We use scripts to perform these steps, which you can find in the TensorRT BERT sample repo. While we describe several options you can pass to each script, you could also execute the code below at the command prompt to get started quickly:
# Clone the TensorRT repository, check out the specific release, and navigate to the BERT demo directory
git clone --recursive https://github.com/NVIDIA/TensorRT && cd TensorRT/ && git checkout release/5.1 && cd demo/BERT

# Create and launch the Docker image
sh python/create_docker_container.sh

# Build the plugins and download the fine-tuned models
cd TensorRT/demo/BERT && sh python/build_examples.sh

# Build the TensorRT runtime engine
python python/bert_builder.py -m /workspace/models/fine-tuned/bert_tf_v2_base_fp16_384_v2/model.ckpt-8144 -o bert_base_384.engine -b 1 -s 384 -c /workspace/models/fine-tuned/bert_tf_v2_base_fp16_384_v2
Now, give it a passage and see how much information it can decipher by asking it a few questions.
python python/bert_inference.py -e bert_base_384.engine -p "TensorRT is a high performance deep learning inference platform that delivers low latency and high throughput for apps such as recommenders, speech and image/video on NVIDIA GPUs. It includes parsers to import models, and plugins to support novel ops and layers before applying optimizations for inference. Today NVIDIA is open sourcing parsers and plugins in TensorRT so that the deep learning community can customize and extend these components to take advantage of powerful TensorRT optimizations for your apps." -q "What is TensorRT?" -v /workspace/models/fine-tuned/bert_tf_v2_base_fp16_384_v2/vocab.txt -b 1

Passage: TensorRT is a high performance deep learning inference platform that delivers low latency and high throughput for apps such as recommenders, speech and image/video on NVIDIA GPUs. It includes parsers to import models, and plugins to support novel ops and layers before applying optimizations for inference. Today NVIDIA is open sourcing parsers and plugins in TensorRT so that the deep learning community can customize and extend these components to take advantage of powerful TensorRT optimizations for your apps.

Question: What is TensorRT?

Answer: 'a high performance deep learning inference platform'
—- Given the same passage with a different question —-
Question: What is included in TensorRT?

Answer: 'parsers to import models, and plugins to support novel ops and layers before applying optimizations for inference'
The answers provided by the model are accurate based on the text of the passage that was provided. The sample uses FP16 precision for performing inference with TensorRT. This helps achieve the highest performance possible on Tensor Cores in NVIDIA GPUs. In our tests we measured the accuracy of TensorRT to be comparable to in-framework inference with FP16 precision.
Lets review the options available with the scripts. The create_docker_container.sh script builds the Docker image using the Dockerfile supplied in the BERT sample and is based on the TensorRT container in NGC. It installs all necessary packages and launches the image created, bert_tensorrt, as a functioning container. Execute the script as:
sh create_docker_container.sh
After creating the environment, download fine-tuned weights for BERT. Note that you do not need the pre-trained weights to create the TensorRT engine (just the fine-tuned weights). Along with the fine-tuned weights, use the associated configuration file, which specifies parameters such as number of attention heads, number of layers, and the vocab.txt file, which contains the learned vocabulary from the training process. These are packaged with the fine-tuned model downloaded from NGC; download them using the build_examples.sh script. As part of this script, you can specify the particular set of fine-tuned weights for the BERT model you wish to download. The command line parameters control the exact BERT model that will be used later for model building and inference and can be used as follows:
Usage: sh build_examples.sh [base | large] [ft-fp16 | ft-fp32] [128 | 384]
- base | large – determine whether to download a BERT-base or BERT-large model to optimize
- ft-fp16 | ft-fp32 – determine whether to download a BERT model fine-tuned with precision FP16 or FP32
- 128 | 384 – determine whether to download a BERT model for sequence length 128 or 384
Examples:
# Running with default parameters
sh build_examples.sh

# Running with custom parameters (BERT-large, FP132 fine-tuned weights, 128 sequence length)
sh build_examples.sh large ft-fp32 128
This script will first use the code from the sample’s repository and build the TensorRT plugins for BERT inference. Next, it downloads and installs the NGC CLI to download a fine-tuned model from NVIDIA’s NGC model repository. The command line arguments for build_examples.sh specify the model that you would like to optimize with TensorRT. By default, it downloads fine-tuned BERT-base, with FP16 precision and a sequence length of 384.
In addition to the fine-tuned model, we use the configuration file enumerating model parameters and the vocabulary file used to convert BERT model output to a textual answer. After the model and configuration information have been downloaded for the chosen model, BERT plugins for TensorRT will be built. The shared object files for these plugins are placed in the build directory of the BERT inference sample.
Next, we can build the TensorRT engine and use it for a question-and-answering example (i.e. inference). The script bert_builder.py builds the TensorRT engine for inference based on the downloaded BERT fine-tuned model. It uses the custom TensorRT plugins built in the previous step as well as the fine-tuned model and configuration files that were downloaded. Make sure the sequence length provided to this script matches the sequence length of the model that was downloaded. Use the script as so:
Usage:python bert_builder.py -m <checkpoint> -o <bert.engine> -b <batch size> -s <sequence length> -c <config file_directory>
- -m, – checkpoint file for the fine-tuned model
- -o, – path for the output TensorRT engine file (i.e. bert.engine)
- -b, – batch size for inference (default=1)
- -s, – sequence length matching the downloaded BERT fine-tuned model
- -c, – directory containing configuration file for BERT parameters (attention heads, hidden layers, etc.)
Example:
python python/bert_builder.py -m /workspace/models/fine-tuned/bert_tf_v2_base_fp16_384_v2/model.ckpt-8144 -o bert_base_384.engine -b 1 -s 384 -c /workspace/models/fine-tuned/bert_tf_v2_base_fp16_384_v2
You should now have a TensorRT engine (i.e. bert.engine) to use in the inference script (bert_inference.py) for QA. We describe the process to build the TensorRT engine in subsequent sections. You can now provide a passage and a query to bert_inference.py and see if the model is able to answer your queries correctly. There are few ways to interact with the inference script: The passage and question can be provided as command line arguments (using the –passage and –question flags) or they can be passed in from a given file (using the –passage_file and –question_file flags). If neither of these flags are given during execution, the user will be prompted to enter the passage and question after the execution has begun. Parameters for the bert_inference.py script are below:
Usage: python bert_inference.py --bert_engine <bert.engine> [--passage | --passage_file] [--question | --question_file] --vocab_file <vocabulary file> --batch_size <batch_size>
- -e, –bert_engine – path to the TensorRT engine created in the previous step
- -p, –passage – text for paragraph/passage for BERT QA
- -pf, –passage_file – file containing text for paragraph/passage
- -q, –question – text for query/question for BERT QA
- -qf, –question_file – file containing text for query/question
- -v, –vocab_file – file containing entire dictionary of words
- -b, –batch_size – batch size for inference
BERT Inference with TensorRT
Refer to the Python script bert_inference.py and the detailed Jupyter notebook BERT_TRT.ipynb in the sample folder for a step-by-step description and walkthrough of the inference process. Let’s review a few key parameters and concepts to perform inference with TensorRT in this section.
BERT (more specifically the Encoder layer) uses the following parameters to govern its operation:
- Batch size
- Sequence Length
- Number of attention heads
The value of these parameters, which depend on the BERT model chosen, are used to set the configuration parameters for the TensorRT plan file (execution engine).
For each encoder, also specify the number of hidden layers and the attention head size. You can also read all the above parameters from the Tensorflow checkpoint file.
As the BERT model we are using has been fine-tuned for a downstream task of Question Answering on the SQuAD dataset, the output for the network (i.e. the output fully connected layer) will be a span of text where the answer appears in the passage (referred to as h_output in the sample). Once we generate the TensorRT engine, we can serialize it and use it later with TensorRT runtime.
During inference, we perform memory copies from CPU to GPU and vice versa asynchronously to get tensors into and out of the GPU memory, respectively. Asynchronous memory copy operation hides latency of memory transfer by overlapping computations with memory copy operation between device and host. The asynchronous memory copies and kernel execution is shown in Figure 3.

The inputs to the BERT model, which are shown in Figure 3, include:
input_ids: tensor with token ids of paragraph concatenated along with question that is used as input for inferencesegment_ids: distinguishes between passage and questioninput_mask: indicates which elements in the sequence are tokens, and which ones are padding elements
The outputs (start_logits)andend_logits represent the span of the answer, which the network predicts inside the passage based on the question.
In the Jupyter notebook, we use accelerated and efficient implementations of layers implemented as TensorRT plugins. Refer to the TensorRT documentation to learn more about TensorRT plugins and how to import custom layers in TensorRT.
Optimizing BERT for Inference
Let’s walk through the key optimizations implemented in the TensorRT-optimized BERT.
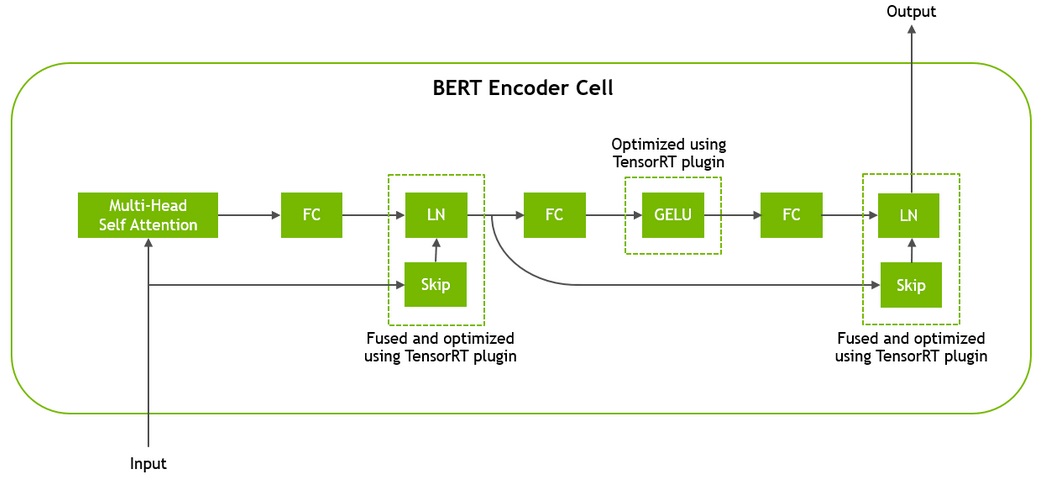
The BERT architecture is based on Transformer4 and consists of 12 Transformer cells for BERT-base and 24 for BERT-large. Before being processed by the Transformer, input tokens are passed through an embeddings layer that looks up their vector representations and encodes their position in the sentence. Each Transformer cell consists of two consecutive residual blocks, each followed by layer normalization. The first residual block replaces the first fully connected (FC) layer and activation by a multi-head self-attention mechanism and the second residual block uses the Gaussian Error Linear Unit (GELU6) activation. Figure 4 illustrates the structure of a Transformer cell.
To optimize BERT with TensorRT, we focused on optimizing the transformer cell. Since several Transformer cells are stacked in BERT, we were able to achieve significant performance gains through this set of optimizations.
To use these optimizations in TensorRT, we use custom plugins that accelerate key operations in the Transformer Encoder elements in a BERT model. The plugins fuse multiple operations into a sub-graph in a single CUDA kernel. Each sub-graph consists of several elementary computations, each of which requires a read and write to the global memory of the GPU (i.e. the slowest on-device memory). By fusing the elementary operations together into a single CUDA kernel we allow for the computation to happen on a larger sub-graph while visiting the global memory a minimal amount of times. Let’s look at these plugins in more detail.
The Gelu Activation performs the following elementwise computation where a, b and c are some scalar constants:
gelu(x) = a * x * (1 + tanh( b * (x + c * x^3) ))
A naive implementation using elementary layers in TensorRT would require the following operations:
Result =  x^3
Result =  c * Result
Result =  x + Result
Result =  b * Result
Result = tanh(Result)
Result = x * Result
Result = a * Result
For k layers, the naive implementation would require. k-1 unnecessary global memory roundtrips, which we merge into element-wise computations in a single CUDA kernel. Refer to geluPlugin.cu within the plugins directory for more details.
The Skip and Layer-Normalization(LN) layers occur twice per Transformer layer and are fused in a single kernel. See the implementation of this fused operation in skipLayerNormPlugin.cu within the plugins directory.
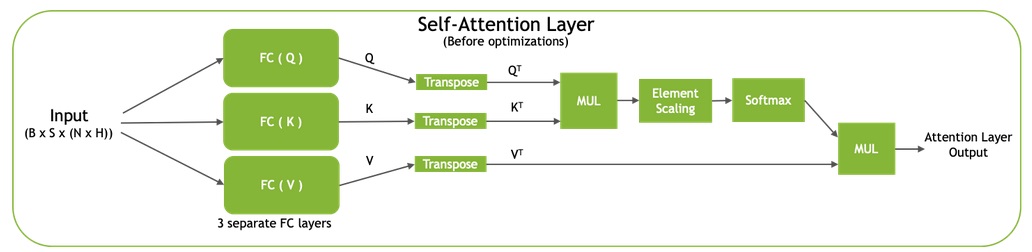
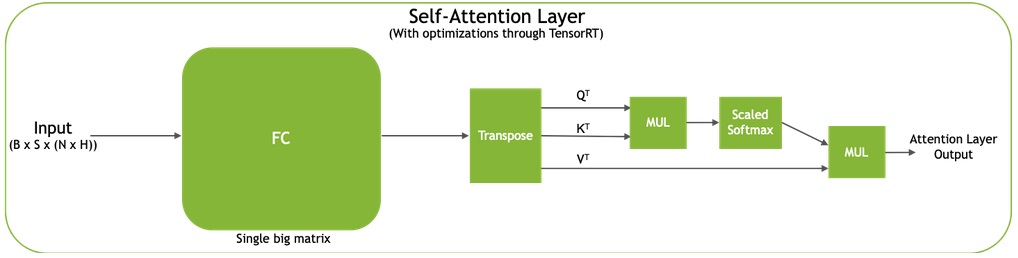
The self-attention mechanism in Transformer (Figure 5) computes representations for query (Q), key (K), and value (V) based on the input embedding using fully-connected (FC) layers. Input and output dimensions for all these FC layers are B x S x (N * H), where B is batch size, S is sequence length, N is number of attention heads, and H is hidden layer size. The output to each one of the FC layers is then transposed to form a resulting matrix of size B x N x S x H. Combining the 3 FC layers into a single larger layer results in an output dimension of B x S x (3 * N * H).
After the fused FC layers, there are three transpose operations that can be fused into a single, larger transpose resulting in an output dimension of 3 x B x N x S x H. By fusing the FC layers and then performing a single transpose on the larger tensor, the Q, K, and V representations are placed contiguously in memory for the operations following them. This results in faster memory access, increasing the throughput of the model.
We also fuse the element-wise scaling and softmax layers (right side of Figure 5a and 5b).
Refer to qkvToContextPlugin.cu within the plugins directory for the self-attention implementation.
Benchmarking BERT Inference Performance
BERT can be applied both for online and offline use cases. Online NLU applications, such as conversational AI, place tight latency budgets during inference. Several models need to execute in a sequence in response to a single user query. When used as a service, the total time a customer experiences includes compute time as well as input and output network latency. Longer times lead to a sluggish performance and a poor customer experience.
While the exact latency available for a single model can vary by application, several real-time applications need the language model to execute in under 10 ms. Using a Tesla T4 GPU, BERT optimized with TensorRT can perform inference in 2.2 ms for a QA task similar to available in SQuAD with batch size =1 and sequence length = 128. Using the TensorRT optimized sample, you can execute up to a batch size of 8 for BERT-base and even higher batch sizes for models with fewer Transformer layers within the 10 ms latency budget. It took 40 ms to execute the same task with highly optimized code on a CPU-only platform for batch size = 1, while higher batch sizes did not run to completion and exit with errors.

The benchmark measures the compute-only latency time for executing the network on a QA task between passing tensors as input and gathering logits as output. You can find the code used to benchmark the sample in sampleBERT.cpp.
Conclusion
NVIDIA is open sourcing several optimizations that make it possible to perform BERT inference in 2.2 ms using TensorRT on T4 GPUs. The code for the optimizations are available as an open source sample in the TensorRT open source repo. To run this example on GCP, you can access it from Google Cloud AI Hub. The repo shows how to optimize a Transformer layer, which is the core building block for BERT and several other language models available today. We wish to make it easy for you to customize these building blocks to suit your custom models and applications. This article gives an overview of how to use the TensorRT sample, key optimizations and performance results. We further describe a workflow of how to use the BERT sample as part of a simple application and Jupyter notebook where you can pass a paragraph and ask questions related to it.
The new optimizations and performance achievable makes it practical for the first time to use BERT in production for applications with tight latency budgets, such as conversational AI. In the coming months we wish to share more examples showing how to use BERT as part of other workflows.
We are always looking for new ideas for new examples and applications to share. What NLP applications do you use BERT for and what examples would you like to see from us in the future?
If you have questions regarding the TensorRT sample repo, check the NVIDIA TensorRT Developer Forum to see if other members of the TensorRT community have a resolution first. NVIDIA Registered Developer Program can also file bugs at https://developer.nvidia.com/nvidia-developer-program.
- CPU-only specifications: Gold 6240@2.60GHz 3.9GHz Turbo (Cascade Lake) HT Off, Single node, Single Socket, Number of CPU Threads = 18, Data=Real, Batch Size=1; Sequence Length=128; nireq=1; Precision=FP32; Data=Real; OpenVINO 2019 R2
GPU-server specification: Gold 6140@2GHz 3.7GHz Turbo (Skylake) HT On, Single node, Dual Socket, Number of CPU Threads = 72, Tesla T4 16GB, Driver Version 418.67 (r418_00), BERT-base, Batch Size=1; Number of heads = 12, Size per head = 64; 12 layers; Sequence Length=128; Precision=FP16; XLA=Yes; Data=Real; TensorRT 5.1
References:
- [Devlin et al 2018] BERT: Pre-training of Deep Bidirectional Transformers for Language Understanding. Jacob Devlin, Ming-Wei Chang, Kenton Lee, Kristina Toutanova
- [Y Liu 2019] RoBERTa: A Robustly Optimized BERT Pretraining Approach
- SQuAD leaderboard
- [Vaswani et al 2017] Attention Is All You Need Ashish Vaswani, Noam Shazeer, Niki Parmar, Jakob Uszkoreit, Llion Jones, Aidan N. Gomez, Lukasz Kaiser, Illia Polosukhin
- [Jinhyuk Lee et al 2019] BioBERT: a pre-trained biomedical language representation model for biomedical text mining Jinhyuk Lee, Wonjin Yoon, Sungdong Kim2, Donghyeon Kim1, Sunkyu Kim1, Chan Ho So3 and Jaewoo Kang
- [Dan et al 2016] Gaussian Error Linear Units (GELUs) Dan Hendrycks, Kevin Gimpel