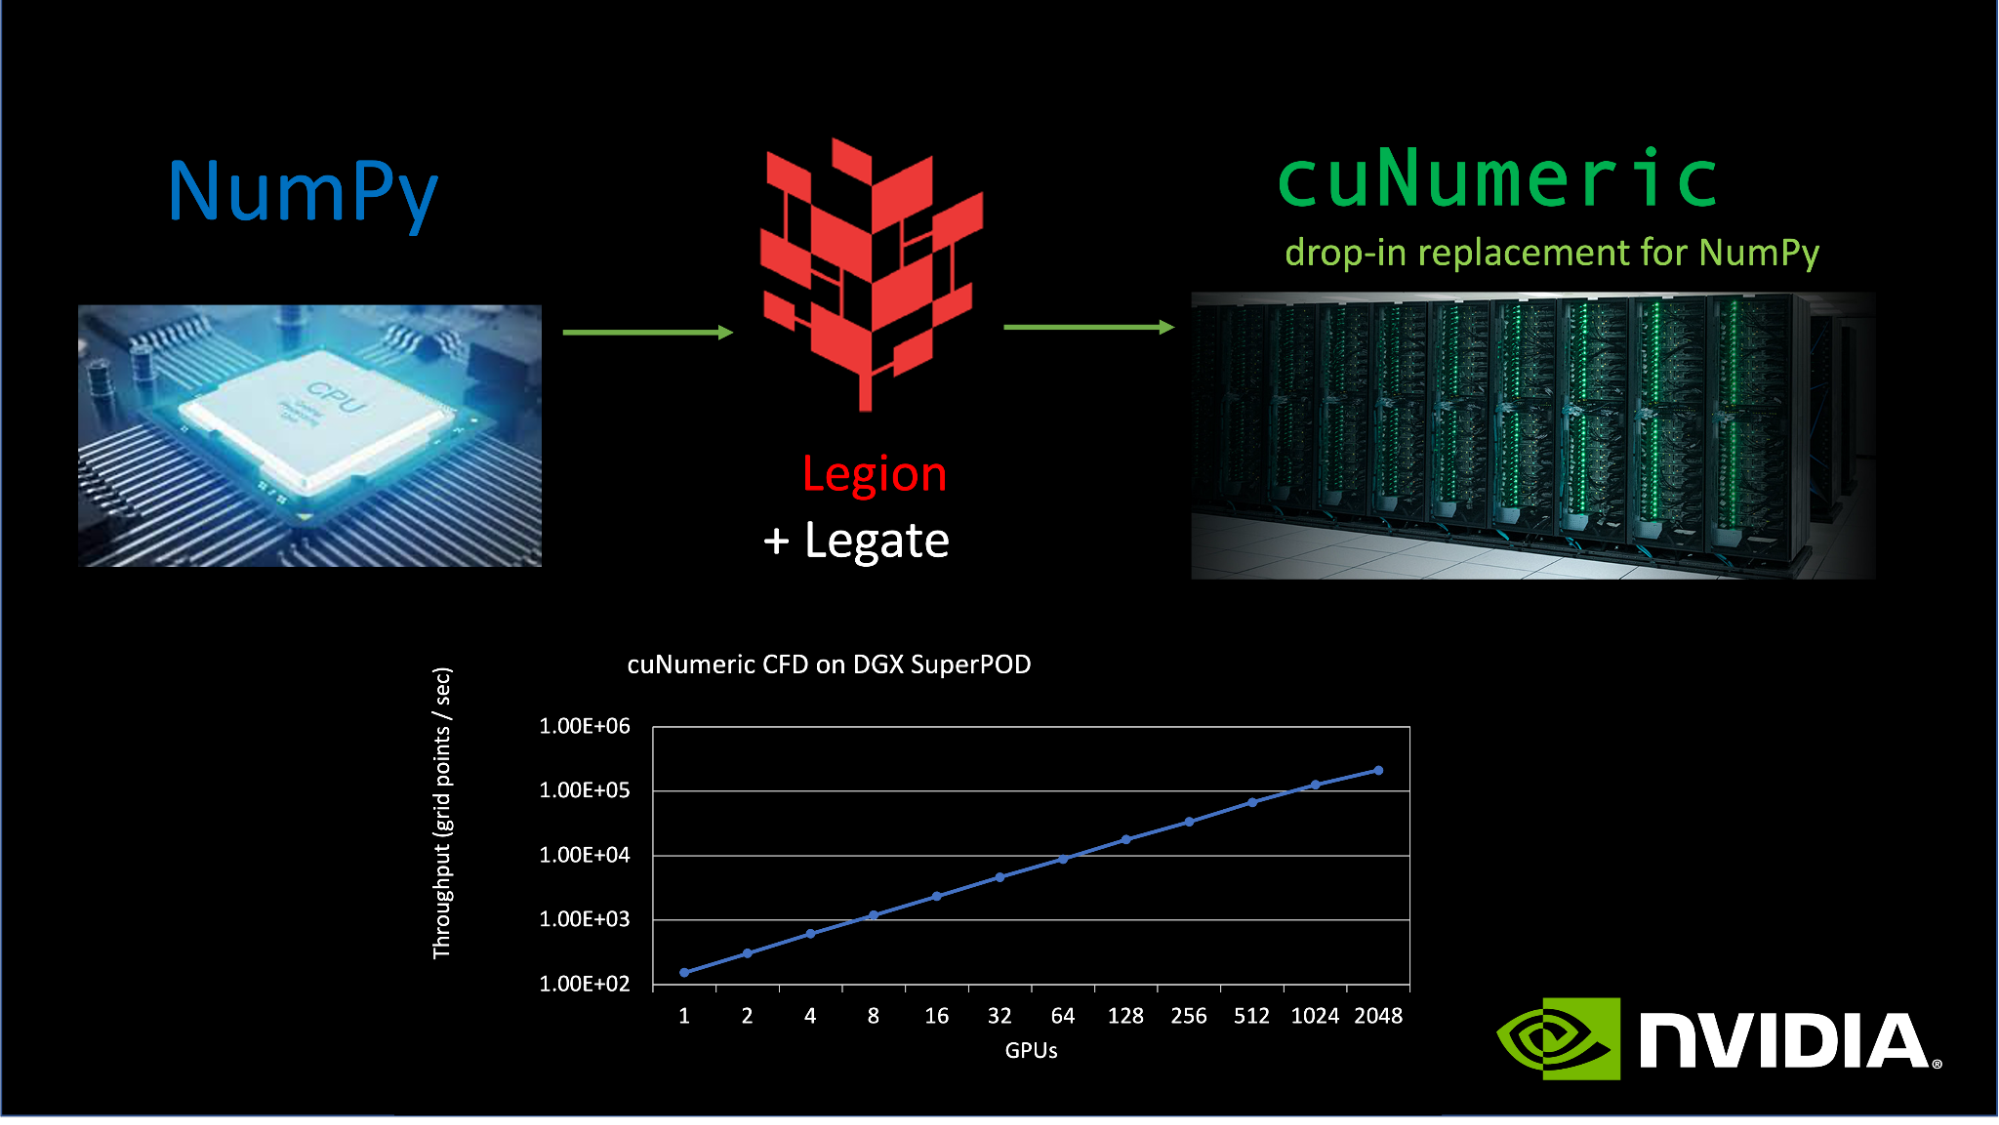
cuNumeric is a library that aims to provide a distributed and accelerated drop-in replacement for the NumPy API that supports all NumPy features, such as in-place updates, broadcasting, and full indexing view semantics. This means that any Python code that uses NumPy to operate on large datasets can be automatically parallelized to leverage the power of large clusters of CPUs and GPUs when switched to using cuNumeric.
NumPy is the fundamental Python library in Scientific Computing that performs array-based numerical computations. The canonical implementation of NumPy used by most programmers runs on a single CPU core and only a few operations are parallelized across cores. This restriction to single-node CPU execution limits both the size of data that can be processed and the speed with which problems can be solved.
To date, several accelerated drop-in replacement libraries for NumPy are available (CuPy and NumS, for example). However, none of them provides transparent distributed acceleration across multinode machines with many CPUs and GPUs while still supporting all of the important features of NumPy.
Before cuNumeric, NumPy code had to be significantly altered for execution on multiple nodes/GPUs. These modifications regularly included manual code parallelization and distribution logic that is often error-prone and not always performant, with a potential loss in functionality.
cuNumeric was created to give developers both the productivity of NumPy and the performance of accelerated and distributed GPU computing without compromise. Using cuNumeric, computational and data scientists can develop and test programs on moderately-sized datasets on local machines. It is then possible to immediately scale up to larger datasets deployed on many nodes on a supercomputer using the same code.
cuNumeric was first announced during GTC 2022. For more details, see NVIDIA Announces Availability for cuNumeric Public Alpha. Updates since then include increasing API coverage from 20% to 60% of NumPy API, support for Jupyter notebooks, and improved performance. cuNumeric is now in beta release and is ready for wider adoption.
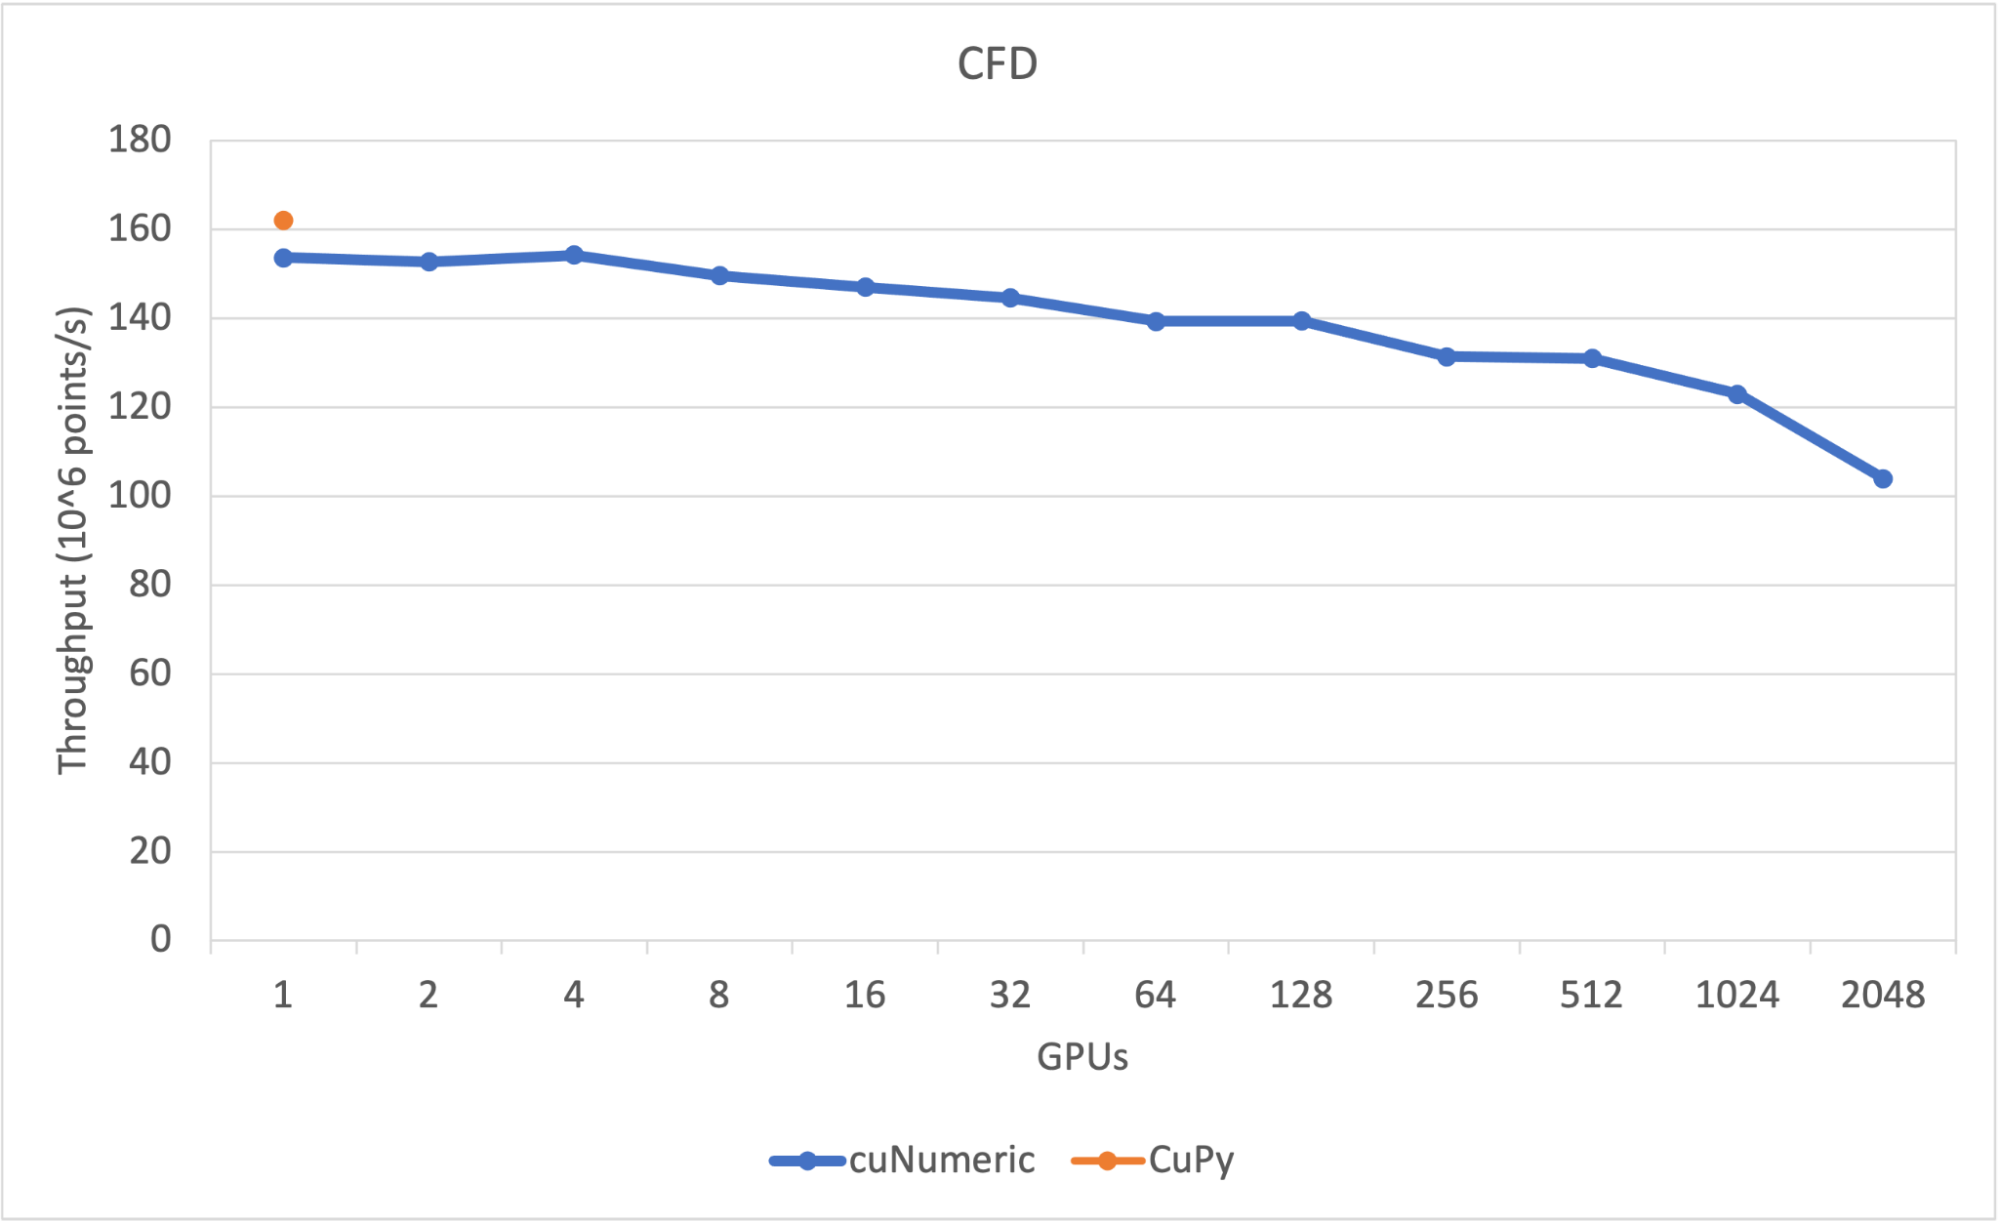
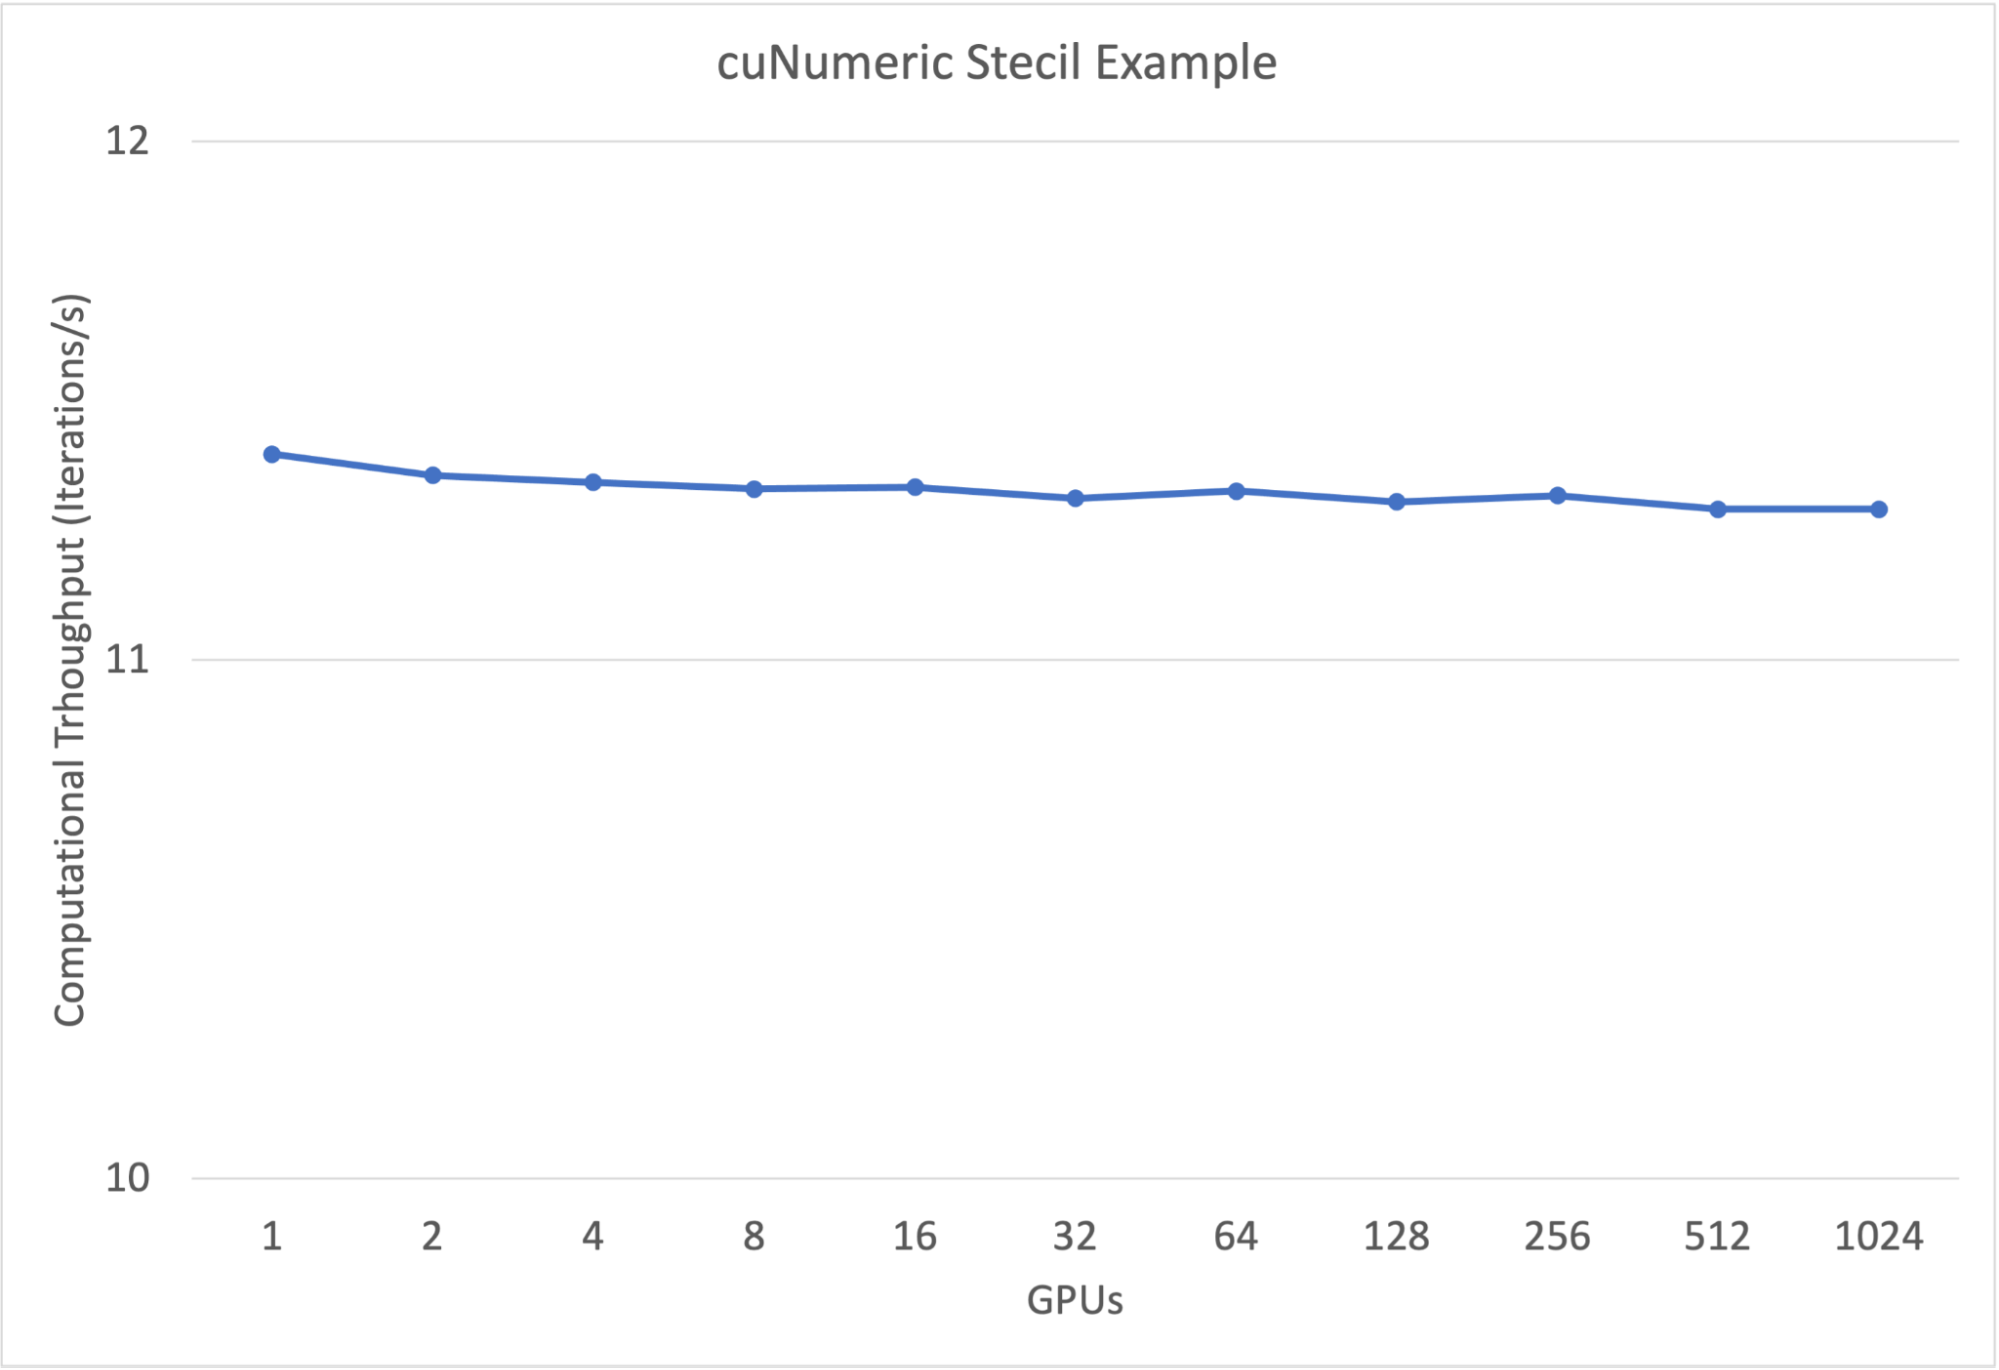
cuNumeric has demonstrated that it scales up to thousands of GPUs. For example, the CFD code excerpted from CFDPython on GitHub shows good scaling results when switched to use cuNumeric (Figure 1).
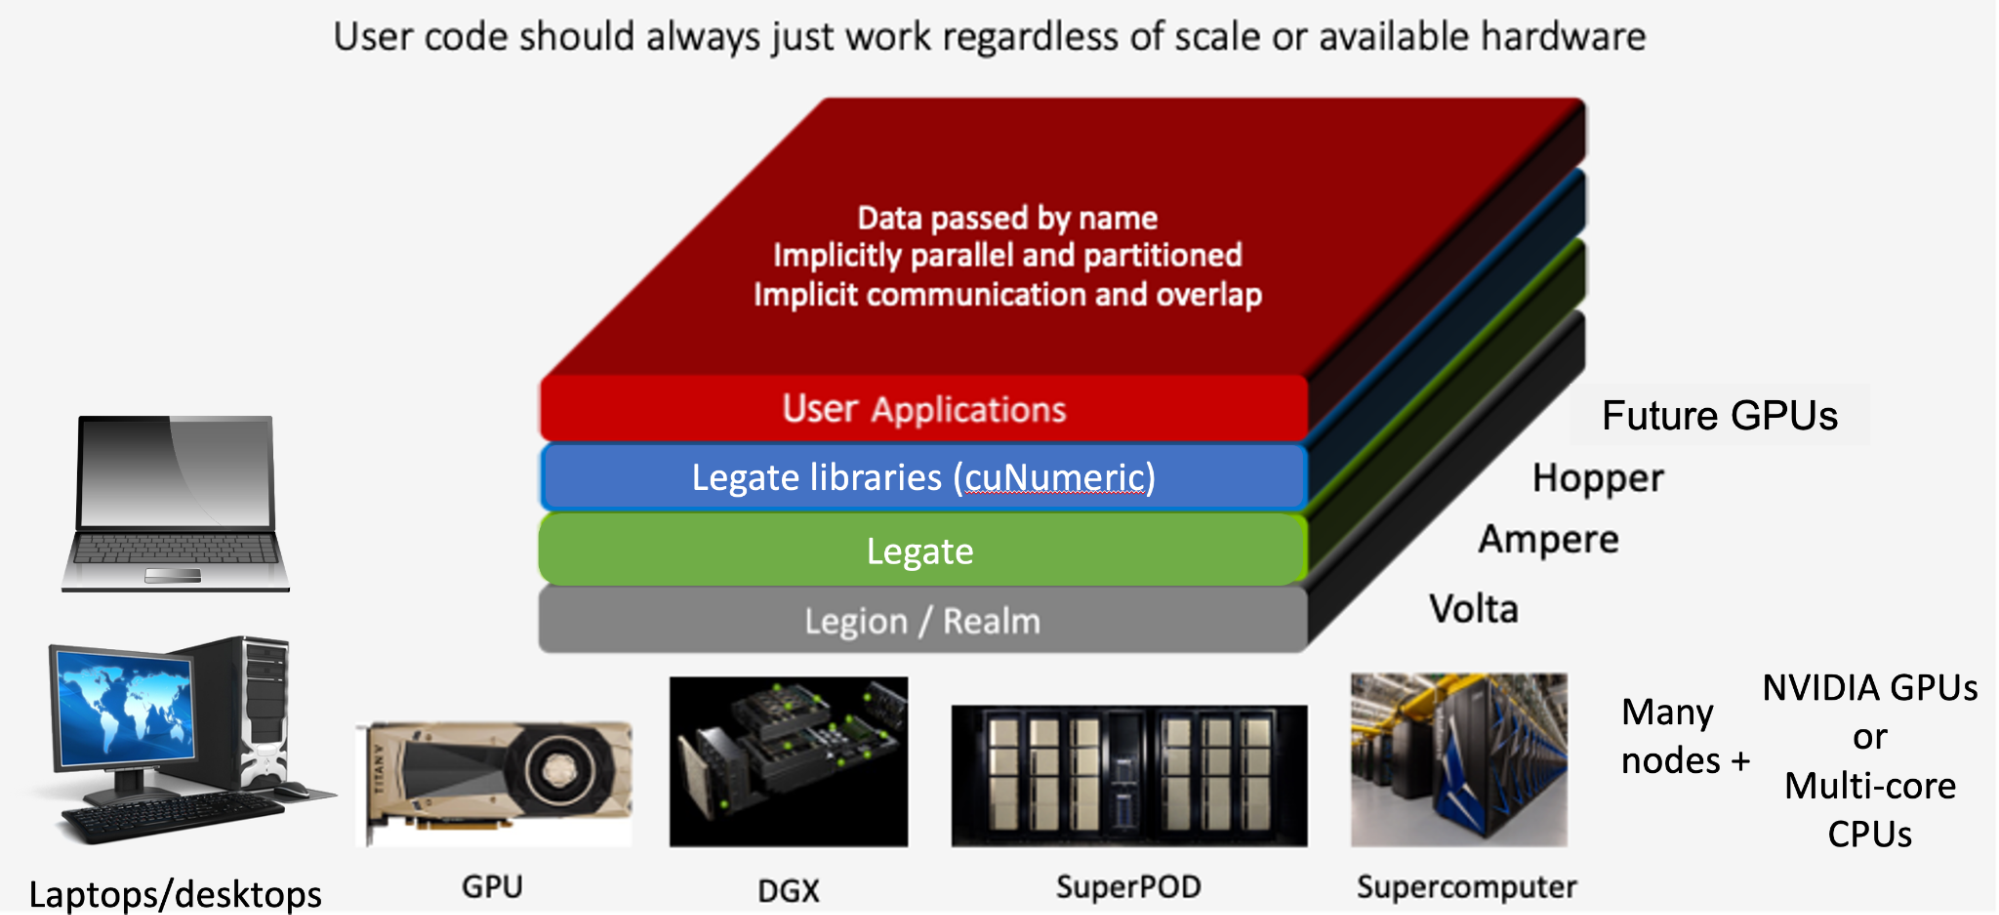
Implicit data distribution and parallelization in cuNumeric is implemented through Legate.
Legate is a productivity layer, making it easier to build composable layers on top of the Legion runtime for execution on heterogeneous clusters. cuNumeric is part of the Legate ecosystem, meaning that cuNumeric programs can transparently pass objects to and from other libraries within the ecosystem without incurring unnecessary synchronization or data movement, even in distributed settings.
Using cuNumeric
Using cuNumeric simply requires replacing import numpy as np with import cunumeric as np in a NumPy code and using the Legate driver script to execute the program.
A simple example of cuNumeric code is presented below:
import cunumeric as np
a = np.arange(10000, dtype =int)
a = a.reshape((100,100,))
b = np.arange(10000, dtype =int)
b = b.reshape((100,100,))
c = np.multiply(a, b)
print(c)
print(type(c))
[[ 0 1 4 ... 9409 9604 9801]
[ 10000 10201 10404 ... 38809 39204 39601]
[ 40000 40401 40804 ... 88209 88804 89401]
...
[94090000 94109401 94128804 ... 95981209 96000804 96020401]
[96040000 96059601 96079204 ... 97950609 97970404 97990201]
[98010000 98029801 98049604 ... 99940009 99960004 99980001]]
<class 'cunumeric.array.ndarray'>Only the first import change needs to migrate from NumPy to cuNumeric. The code now executes on multiple GPUs. Arrays a, b, and c are partitioned across the GPUs so that arange, reshape, and multiply operations are performed asynchronously on different shards of a. See the section below on cuNumeric automatic data partitioning for more details.
cuNumeric automatic data partitioning
cuNumeric implicitly partitions its data objects, taking into consideration the computations that will access the data, the ideal data size to be consumed by different processor kinds, and the available number of processors. Coherence of subpartitions is automatically managed by Legion, regardless of the scale of the machine.
Figure 3 shows a visualization of an equal partitioning of a cuNumeric 2D array between four processes. When executing a data-parallel operation, such as add, differently colored tiles will be processed asynchronously by separate tasks.
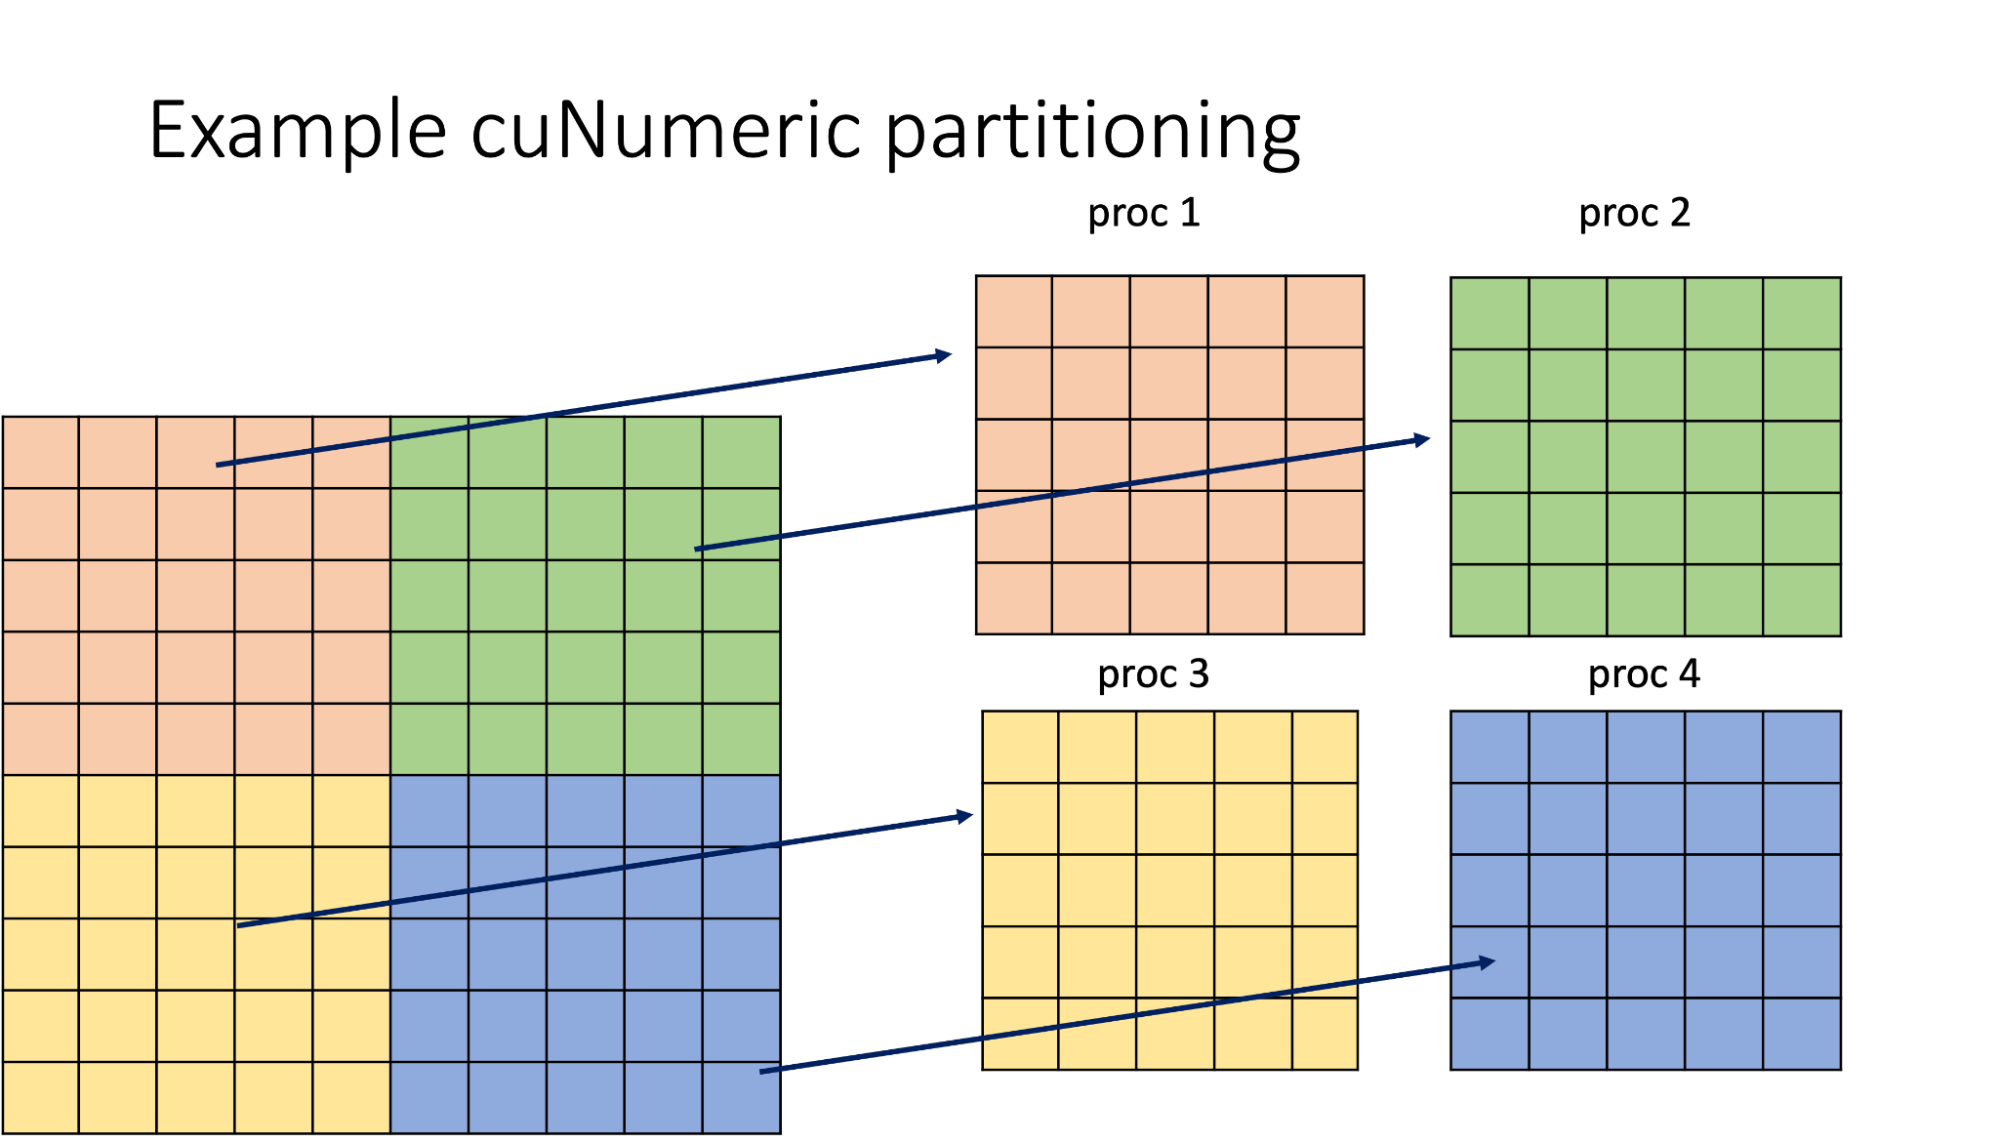
Note that different cuNumeric APIs can reuse existing partitions or request a different partition to fit specific needs. Multiple partitions are allowed to coexist, and are kept in sync automatically. Legion will copy and reformat data only if needed and will try to do this in the most efficient way possible.
Asynchronous execution with cuNumeric
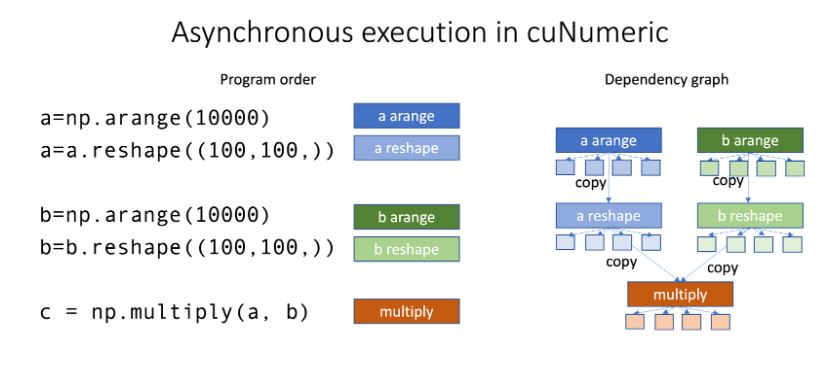
Along with asynchronous execution of computations on different pieces of partitioned arrays for each task, cuNumeric may also perform asynchronous task and/or operation execution if resources are available. The underlying runtime will create a dependency graph and then execute operations in a distributed out-of-order manner, while preserving data dependencies.
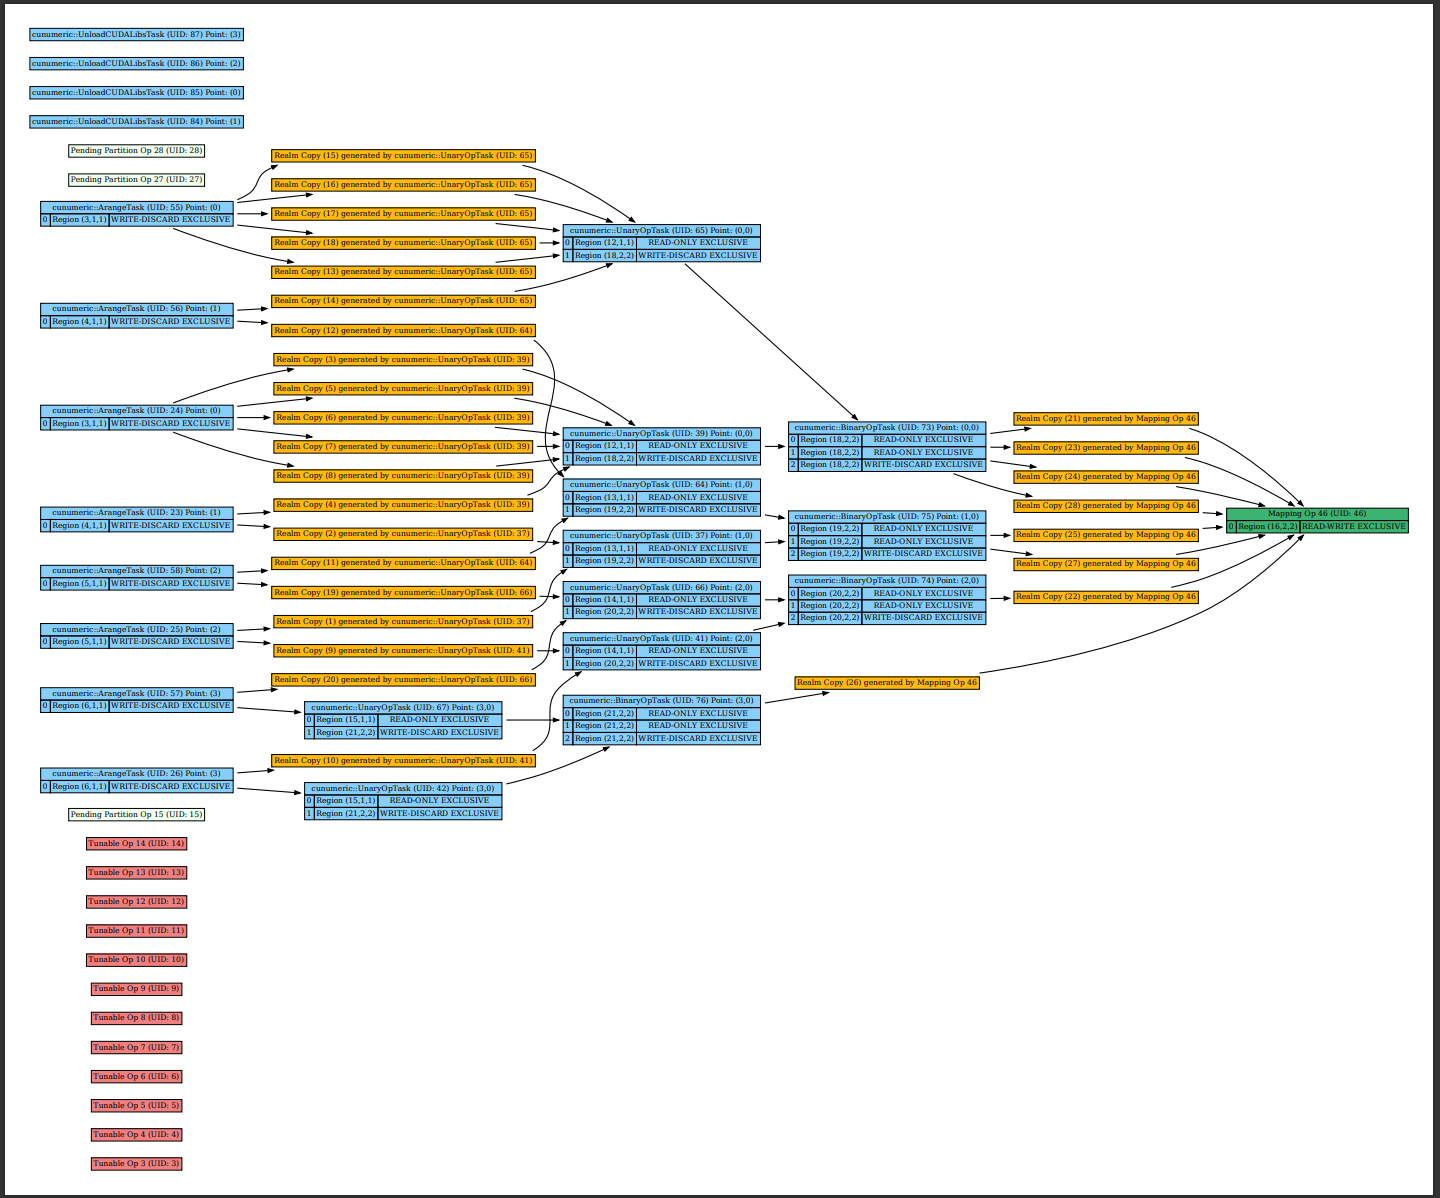
Figure 4 visualizes the dependency graph for the first example executed on four GPUs (single node). Here, arange, reshape tasks, and copy operations for array a can be performed in parallel with those for array b. Note that each of the array-wide operations is also split into four suboperations.
Single-node installation and execution
cuNumeric is available on Anaconda. To install cuNumeric, execute the following script:
conda install -c nvidia -c conda-forge -c legate cunumericThe conda package is compatible with CUDA >= 11.4 (CUDA driver version >= r470), and NVIDIA Volta or later GPU architectures.
Note that there is currently no support for Mac OS in the cuNumeric conda package. If you are installing on Mac OS, see the section below on multinode installation and execution for instructions on manual installation of cuNumeric.
cuNumeric programs are run using Python or the Legate driver script described in the Legate documentation:
python cunumeric_program.pyor:
legate cunumeric_program.pyThe following run-time options can be used to control the number of devices:
  --cpus CPUS                Number of CPUs to use per rank
  --gpus GPUS                Number of GPUs to use per rank
  --omps OPENMP              Number of OpenMP groups to use per rank
  --ompthreads               Number of threads per OpenMP group
You can familiarize yourself with these resource flags as described in the Legate documentation, or by passing --help to the Legate driver script. These flags can be passed to the Legate driver script at run-time, or set through LEGATE_ARGS:
Legate –gpus 8 cunumeric_program.pyor:
LEGATE_ARGS=”--gpus 8” python cunumeric_program.pyThe requirement on using Legate driver script for Legate-based codes should be lifted in the near future. (cuNumeric codes will work with the standard Python interpreter.)
Jupyter notebook and cuNumeric
cuNumeric can also be used with the Jupyter notebook, when installed on a system.
To change the default number of devices used in the Jupyter notebook, set LEGATE_ARGS. For example, to run cuNUmeric in Jupyter Notebook on eight GPUs, use the following script:
LEGATE_ARGS = “--gpus 8”Multinode installation and execution
To support multinode execution, cuNumeric must be installed manually. Manual execution consists of the following steps:
1) Clone Legate from GitHub using the following code:
git clone git@github.com:nv-legate/legate.core.git
cd legate.core
2) Install Legate and cuNumeric dependencies.
The primary method of retrieving dependencies is through conda. Use the scripts/generate-conda-envs.py script from Legtate to create a conda environment file listing all the packages that are required to build, run, and test Legate Core and all downstream libraries on the target system. For example:
$ ./scripts/generate-conda-envs.py --python 3.10 --ctk 11.7 --os linux --compilers --openmpi
--- generating: environment-test-linux-py310-cuda-11.7-compilers-openmpi.yaml
After the environment file is generated, install the required packages by creating a new conda environment using the following script:
conda env create -n legate -f <env-file>.yaml3) Install Legate
The Legate Core repository comes with a helper install.py script in the top-level directory that will build the C++ parts of the library and install the C++ and Python components under the currently active Python environment.
To add GPU support, use the --cuda flag:
./install.py --cudaIf CUDA was not found during the installation, set the CUDA_PATH variable to the correct location. For example:
CUDA_PATH=/usr/local/cuda-11.6/lib64/stubs ./install.py --cudaFor multinode execution, Legate uses GASNet, which can be requested using the --network flag. You also need to specify the interconnect network of the target machine using the --conduit flag when using GASNet. For example, the following code would be an installation for a DGX SuperPOD:
./install.py -–network gasnet1 --conduit ibv –cuda4) Clone and install cuNumeric using the following call:
git clone git@github.com:nv-legate/cunumeric.git
cd cunumeric
./install.py
For more details on cuNumeric install options, including multinode configuration setup, visit nv-legate/cunumeri#build on GitHub.
If Legate is compiled with networking support that allows multinode execution, it can be run in parallel by using the --nodes option followed by the number of nodes to be used. Whenever the --nodes option is used, Legate will be launched using mpirun, even with --nodes 1. Without the --nodes option, no launcher will be used.
Legate currently supports mpirun, srun, and jsrun as launchers and additional launcher kinds may be added. You can select the target kind of launcher with –launcher. For example, the following command will execute cuNumeric code on 64 nodes, eight GPUs per node:
legate --nodes 64 --gpus 8 cunumeric_program.pycuNumeric example
cuNumeric has several example codes in its repository that can be used to familiarize yourself with the library. This post starts with the Stencil example for simplicity.
Stencil computation with cuNumeric
The Stencil code demonstrates how to write and execute cuNumeric codes at different scales. Stencil codes can be found at the core of many numerical solvers and physical simulation codes and are therefore of particular interest to scientific computing research. This section explains the implementation of a simple stencil code example in cuNumeric.
First, create and initialize the grid using the following script:
import cunumeric as np

N = 1000 # number of elements in one dimension
I = 100 # number of iterations

def initialize(N):
	print("Initializing stencil grid...")
	grid = np.zeros((N + 2, N + 2))
	grid[:, 0] = -273.15
	grid[:, -1] = -273.15
	grid[-1, :] = -273.15
	grid[0, :] = 40.0
	return grid
This ‘initialize’ function will allocate (N+2)x(N+2) 2D matrix of zeros and fill boundary elements.
Next, perform Stencil computations:
def run_stencil():
	grid = initialize(N)

	center = grid[1:-1, 1:-1]
	north = grid[0:-2, 1:-1]
	east = grid[1:-1, 2:]
	west = grid[1:-1, 0:-2]
	south = grid[2:, 1:-1]

	for i in range(I):
    	average = center + north + east + west + south
    	average = 0.2 * average
    	center[:] = average

run_stencil()
This code is completely parallelized by cuNumeric across all available resources. It can be executed on a single node using the following call:
legate --gpus 8 examples/stencil.pyIt can be executed on multiple nodes using the following call:
legate --nodes 128 --gpus 8 examples/stencil.pyTo see the original code for this example, visit nv-legate/cunumeric on GitHub.
Stencil example performance results
Figure 5 shows weak-scaling results for the Stencil code. The number of grid points per GPU is kept constant (12264004 points per GPU), increasing the total size of the problem. As shown in the figure, the example scales almost perfectly on a large system without any help from the programmer.
Profiling cuNumeric codes
After developing a functional cuNumeric application, it is usually necessary to profile and tune for performance. This section covers different options for profiling cuNumeric codes.
Legate prof
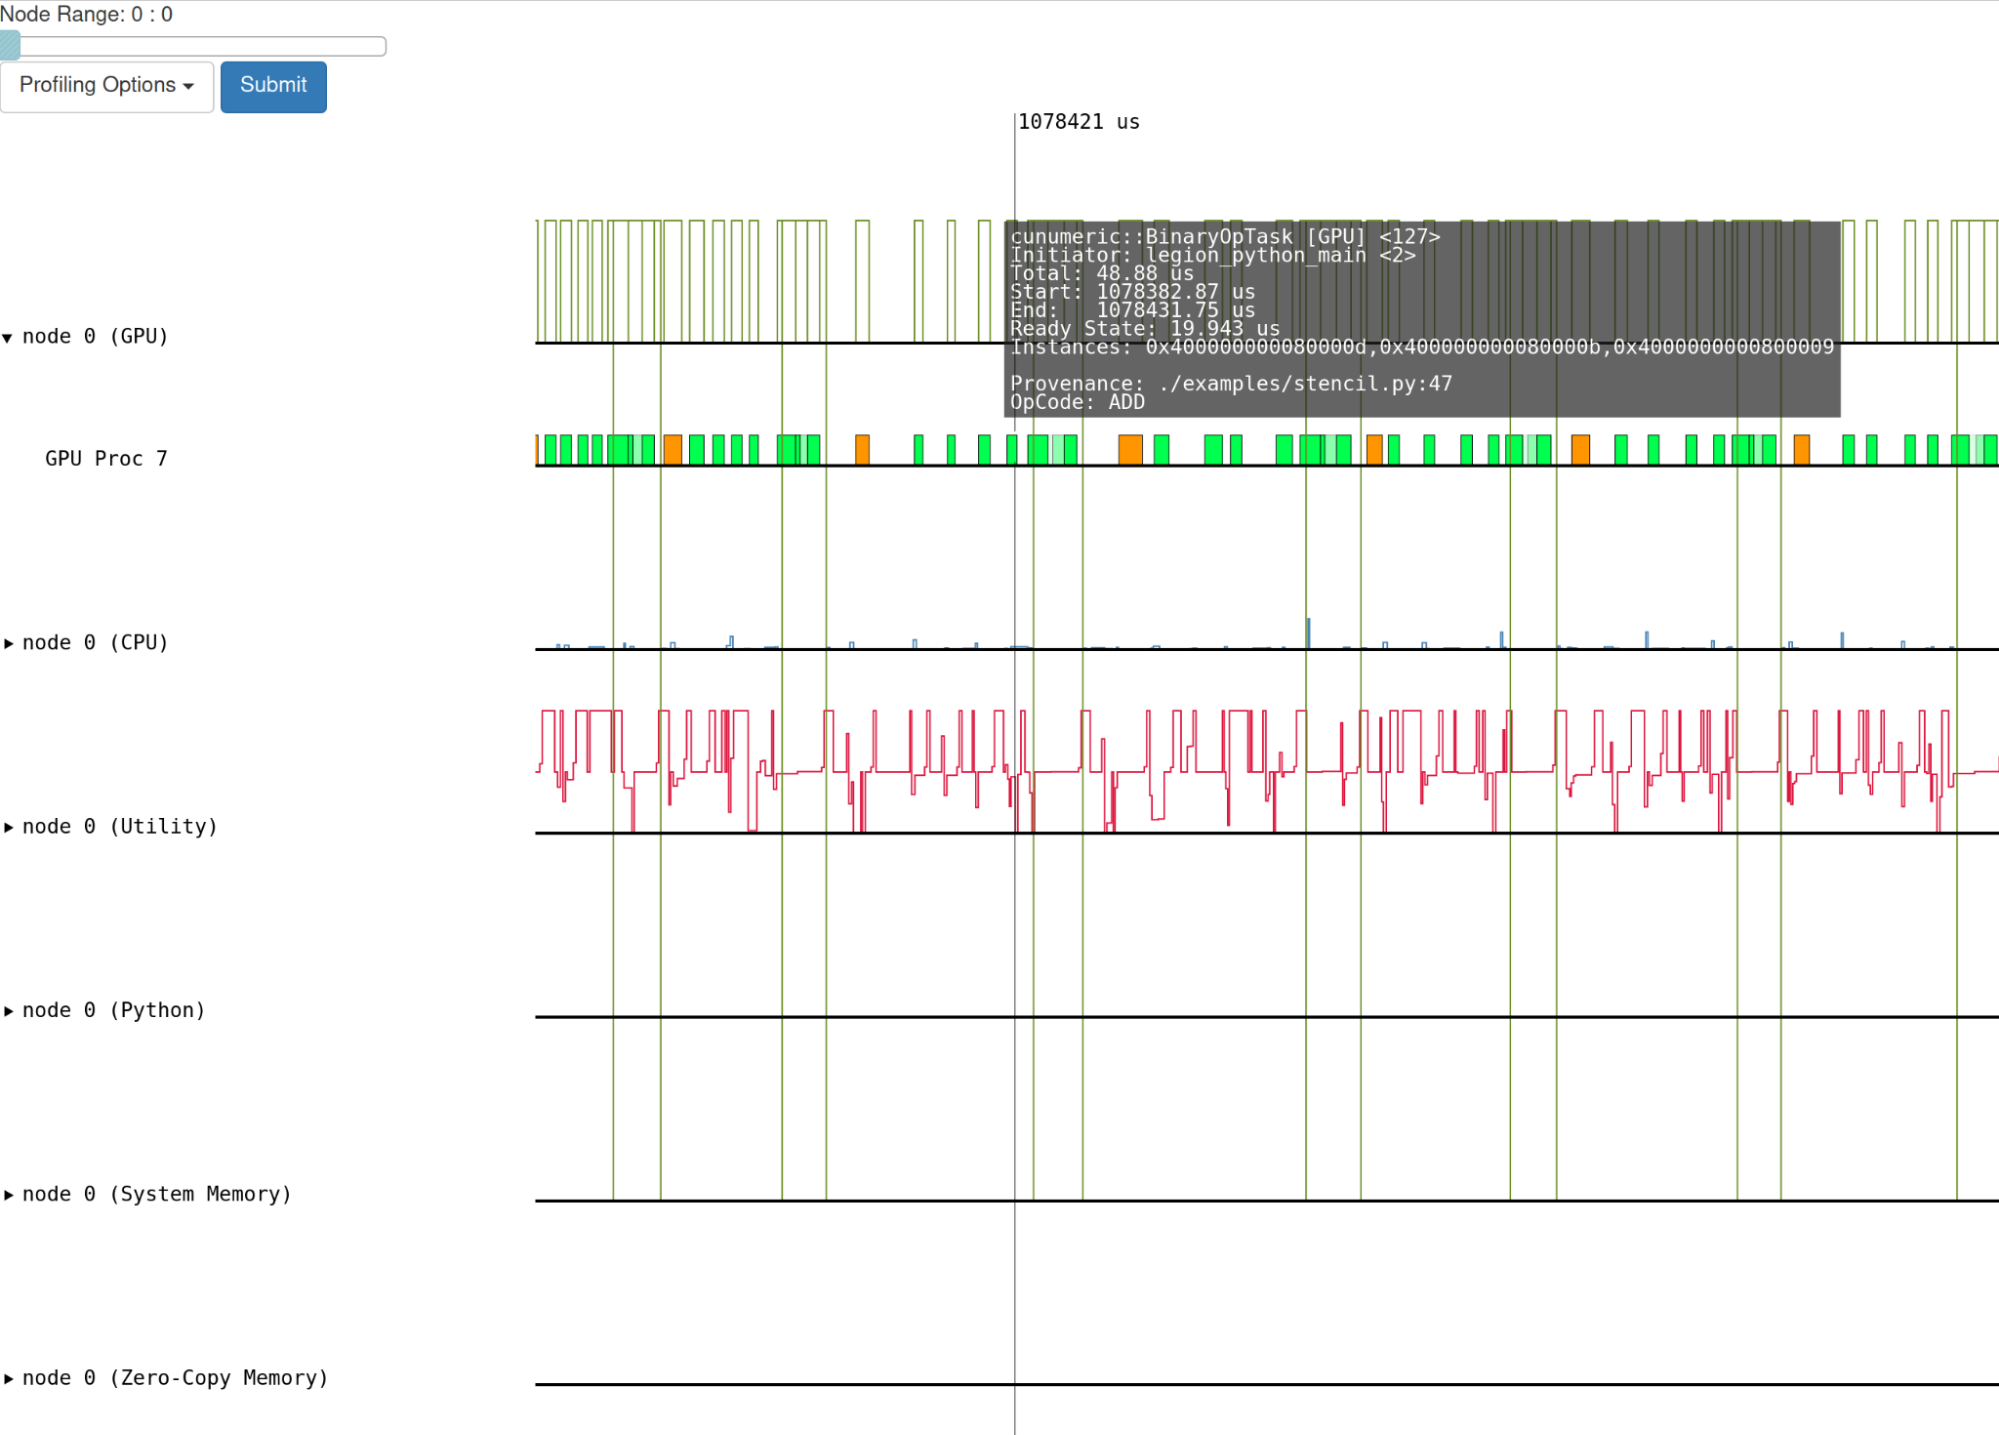
To get Legion-level profiling output, pass the –profile flag when executing cuNumeric code. At the end of execution there will be a legate_prof directory created. This directory contains a web page that can be viewed in any web browser that displays a timeline of the program’s execution. Note that it might be necessary to enable local JavaScript execution if you are viewing the page from your local machine (depending on your browser).
Figure 6 shows the profiling output from an execution of the Stencil example.
NVIDIA Nsight Systems
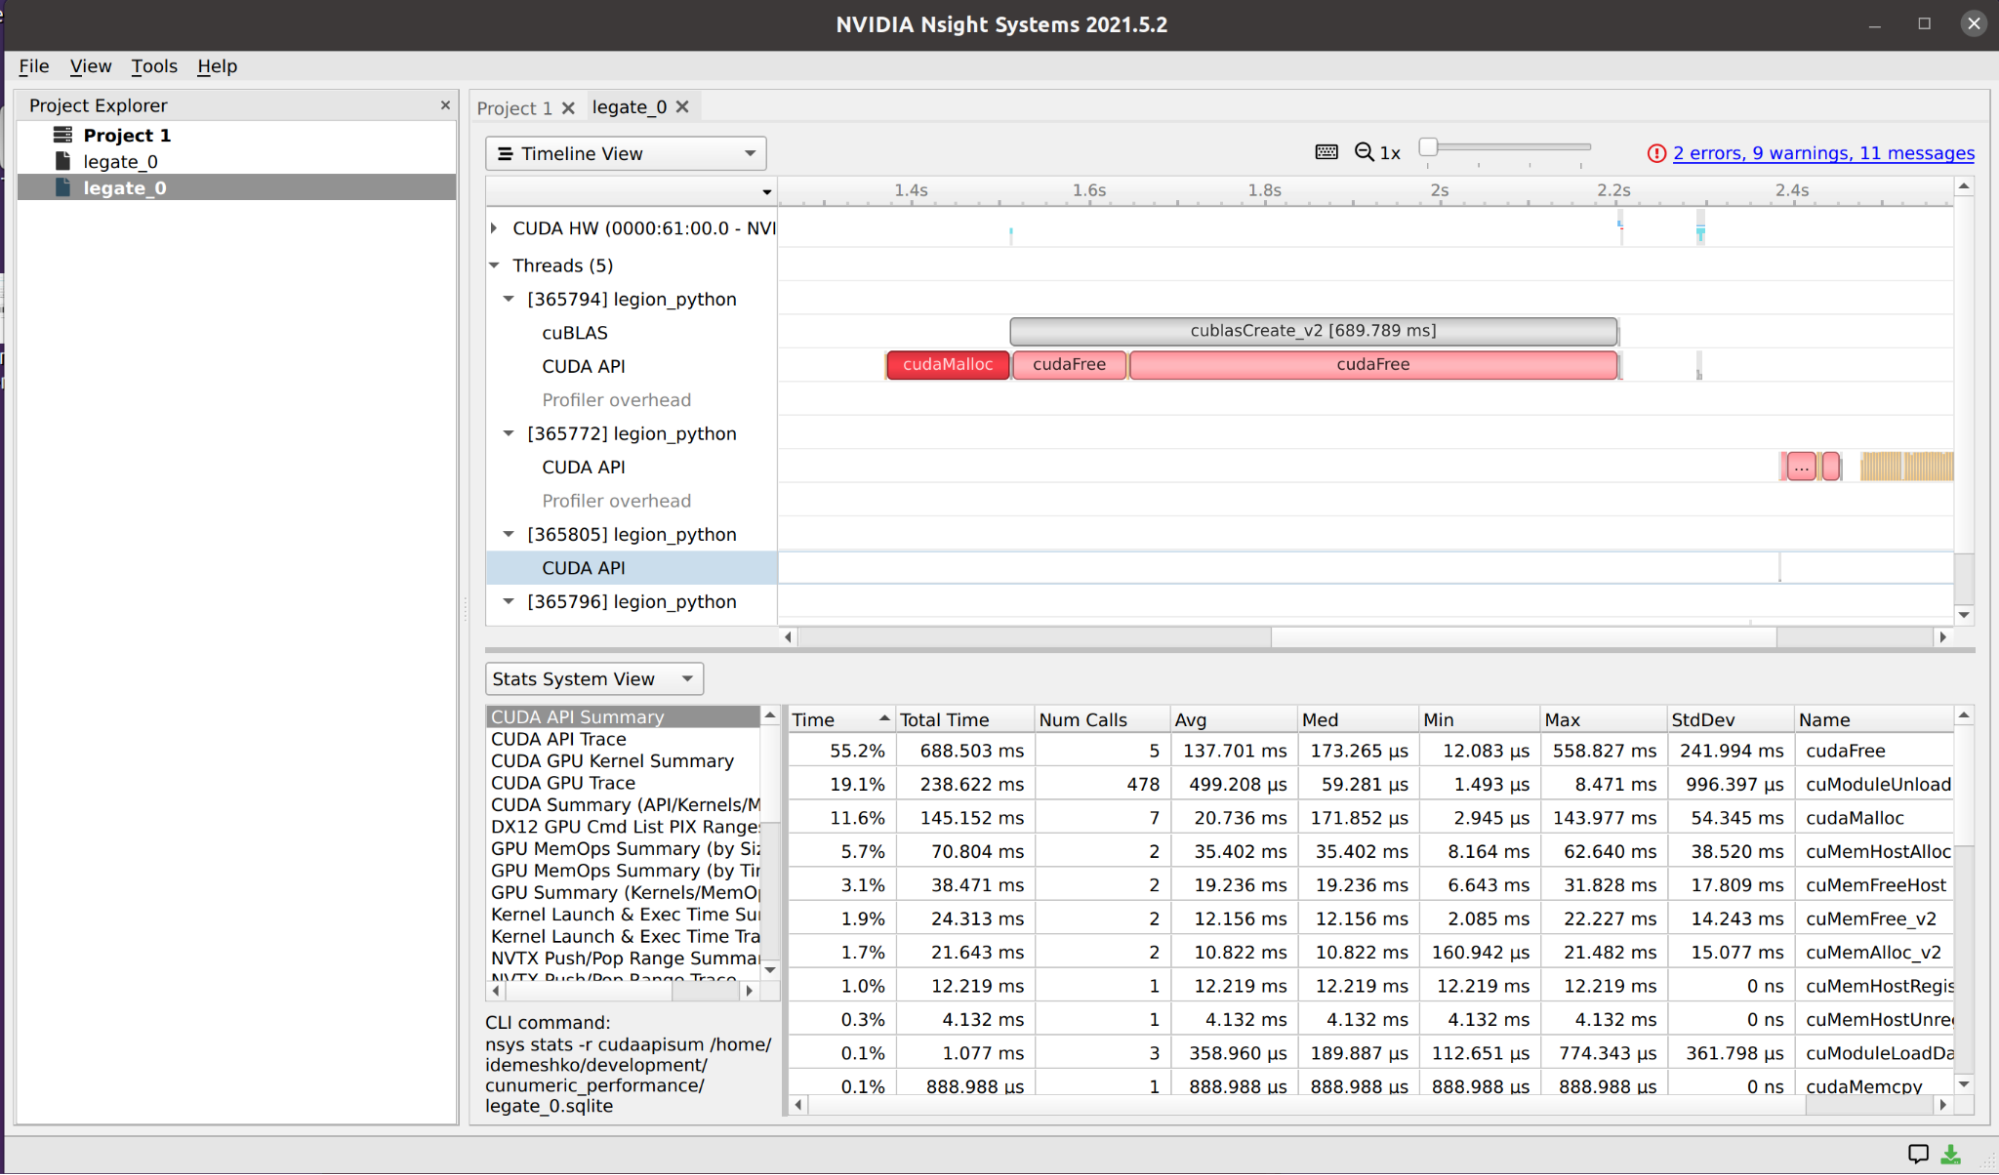
A run-time flag is used to get NVIDIA Nsight Systems profiler output for the Stencil cuNumeric code: --nsys. When this flag is passed, an output file will be generated that can be loaded into the Nsight Systems UI. Visualization of the nsys file generated by cuNumeric is shown in Figure 7.
Debugging cuNumeric codes
Legate provides facilities for inspecting the data flow and event graphs constructed by Legion during the run of a cuNumeric application. Constructing these graphs requires that you have an installation of GraphViz available on your machine.
To generate a data flow graph for your program, pass the --dataflow flag to the legate script. After your run is complete, the library will generate a dataflow_legate PDF file containing the dataflow graph of your program. To generate a corresponding event graph, pass the --event flag to the legate.py script to generate an event_graph_legate PDF file.
Figures 6 and 7 show data flow and event graphs generated when the simple example from the section on using cuNumeric (above) is executed on four GPUS.

cuNumeric status and future plans
cuNumeric is currently a work in progress. Support for not-implemented NumPy operators is being added gradually. Between the alpha and beta releases of cuNumeric, API coverage increased from 25% to 60%. For APIs that are currently unsupported, a warning is provided and canonical NumPy is called. A complete list of available features is provided in the API reference.
While cuNumeric beta (v23.05) provides good weak scaling results for many cuNumeric applications, it is known that some improvements will result in peak performance for some APIs/use cases. The next several releases will focus on improving performance, working toward full API coverage in 2023.
Summary
This post has provided an introduction to cuNumeric, an endeavoring drop-in replacement for NumPy based on the Legion programming system. It transparently accelerates and distributes NumPy programs to machines of any scale and capability, typically by changing a single module import statement. cuNumeric achieves this by translating the NumPy application interface into the Legate programming model and leveraging the performance and scalability of the Legion runtime.
