From building cars to helping surgeons and delivering pizzas, robots not only automate but also speed up human tasks manyfold. With the advent of AI, you can build even smarter robots that can better perceive their surroundings and make decisions with minimal human intervention.
Take, for instance, an autonomous robot used in warehouses to move payloads from one place to another. It must perceive the free space around it, detect and avoid any obstacles in its path, and make “on-the-fly” decisions to pick a new path without any delay.
Therein lies the challenge. This means building an application powered by an AI model that has been trained and optimized to work in this environment. It requires collecting copious amounts of high-quality data and developing a highly accurate AI model to power the application. These are the key barriers when it comes to moving applications from the lab into a production environment.
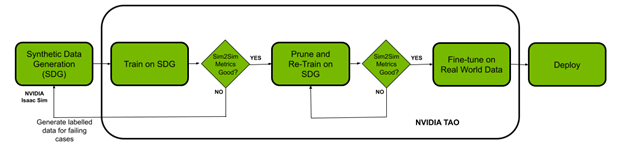
In this post, we show how you can solve both your data challenge and model creation challenge with the NVIDIA Isaac platform and the TAO framework. You use NVIDIA Isaac Sim, a robotics simulation application to create virtual environments and generate synthetic data. The NVIDIA TAO Toolkit is a low-code AI model development solution with built-in transfer learning to fine-tune a pretrained model with a fraction of the data, compared to training from scratch. Finally, deploy the optimized model using NVIDIA Isaac ROS onto a robot and put it to work in the real world.
Prerequisites
Before you start, you must have the following resources for training and deploying:
- NVIDIA GPU Driver version: >470
- NVIDIA Docker: 2.5.0-1
- NVIDIA GPU in the cloud or on-premises:
- NVIDIA A100
- NVIDIA V100
- NVIDIA T4
- NVIDIA RTX 30×0 (NVIDIA Isaac Sim supports NVIDIA RTX 20 series as well)
- NVIDIA Jetson Xavier, Jetson Xavier NX, or the Jetson Orin series
- NVIDIA TAO Toolkit: 4.22. For more information, see the TAO Toolkit Quick Start guide
- NVIDIA Isaac Sim and Isaac ROS
Synthetic data generation with NVIDIA Isaac Sim
In the section, we outline the steps for generating synthetic data in NVIDIA Isaac Sim. Synthetic data is annotated information that computer simulations or algorithms generate. Synthetic data can help solve data challenges when real data is difficult or expensive to acquire.
NVIDIA Isaac Sim provides three methods for generating synthetic data:
- Replicator composer
- Python scripts using Isaac Replicator
- GUI
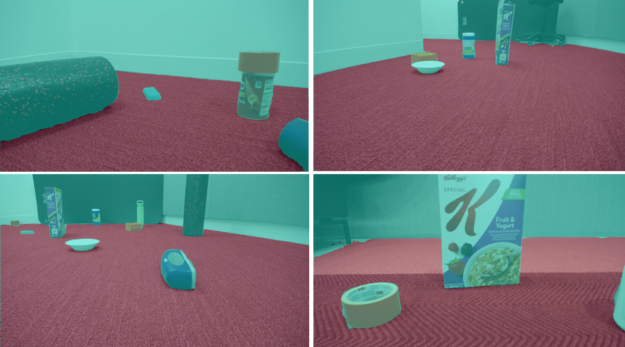
For this experiment, we chose to use Python scripts using Isaac Replicator to generate data with domain randomization. Domain randomization varies the parameters that define a scene in the simulation environment, including the position, scale of various objects in a scene, the lighting of the simulated environment, the color and texture of objects, and more.
Adding domain randomization to simultaneously vary many parameters of the scene improves the dataset quality and enhances the model’s performance by exposing it to a wide variety of domain parameters seen in the real world.
In this case, you use two environments for training data: a warehouse and a small room. Next steps include adding objects into the scene that obey the laws of physics. We used sample objects from NVIDIA Isaac Sim, which also includes everyday objects from the YCB dataset.
After installing NVIDIA Isaac Sim, the Isaac Sim App Selector provides an option for Open in Folder, which contains a python.sh script. This is used to run the scripts for data generation.
Follow the steps listed to generate the data.
Select the environment and add a camera to the scene
def add_camera_to_viewport(self):
  # Add a camera to the scene and attach it to the viewport
  self.camera_rig = UsdGeom.Xformable(create_prim("/Root/CameraRig", "Xform"))
  self.camera = create_prim("/Root/CameraRig/Camera", "Camera")
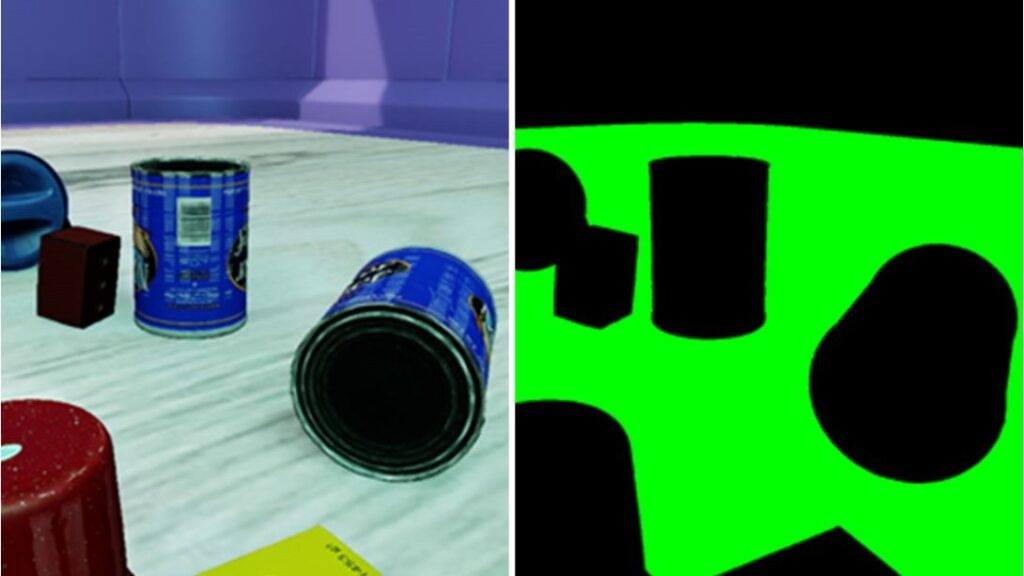
Add a semantic ID to the floor:
def add_floor_semantics(self):
  # Get the floor from the stage and update its semantics
  stage = kit.context.get_stage()
  floor_prim = stage.GetPrimAtPath("/Root/Towel_Room01_floor_bottom_218")
  add_update_semantics(floor_prim, "floor")
Add objects in the scene with Physics:
def load_single_asset(self, object_transform_path, object_path, usd_object):
  # Random x, y points for the position of the USD object
  translate_x , translate_y = 150 * random.random(), 150 * random.random()
  # Load the USD Object
  try:
      asset = create_prim(object_transform_path, "Xform",
               position=np.array([150 + translate_x, 175 + translate_y, -55]),
               orientation=euler_angles_to_quat(np.array([0, 0.0, 0]),
               usd_path=object_path)
	# Set the object with correct physics
      utils.setRigidBody(asset, "convexHull", False)
Initialize domain randomization components using Isaac Replicator:
def setup_replicator(self):
  #  A range of values to move and rotate the camera
  camera_tranlsate_min_range, camera_translate_max_range = (-4.39, -1.3, 0.2)
(-1.3, 20, 0.3)
  camera_rotate_min_range, camera_rotate_max_range = (0, 0, 0), (0, 360, 0)

  # Retrieve camera prim
  camera = rep.get.prims(path_pattern=str(self.camera.GetPath()))

  with self.rep.new_layer():
     with self.rep.trigger.on_frame():

       with camera:
         rep.modify.pose(
position=rep.distrubution.uniform(camera_translate_min_range,
camera_translate_max_range),
rotation = rep.distrubution.uniform(camera_rotate_min_range,
                                    camera_rotate_max_range)
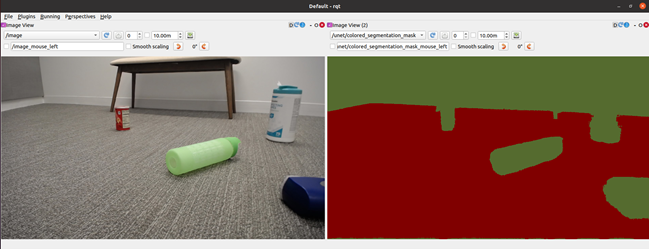
Make sure that the camera position and properties in the simulation are similar to the real-world attributes. Adding a semantic ID to the floor is necessary for generating the correct free space segmentation masks. As mentioned earlier, domain randomization was applied to help with the sim2real performance of the model.
The Offline Data Generation sample provided in the NVIDIA Isaac Sim documentation is the starting point for our scripts. Changes have been made for this use case that include adding objects to a scene with physics, updating domain randomization, and adding semantics to the floor. We have generated nearly 30,000 images with their corresponding segmentation masks for the dataset.
Train, adapt, and optimize with the TAO Toolkit
In this section, you use the TAO Toolkit to fine-tune the model with the generated synthetic data. For this task, we chose to experiment with UNET models available from NGC.
!ngc registry model list nvidia/tao/pretrained_semantic_segmentation:*
Set up your data, spec file (TAO specifications), and experiment directories:
%set_env KEY=tlt_encode
%set_env GPU_INDEX=0
%set_env USER_EXPERIMENT_DIR=/workspace/experiments
%set_env DATA_DOWNLOAD_DIR=/workspace/freespace_data
%set_env SPECS_DIR=/workspace/specs
The next step is to pick the model.
Picking the right pretrained model
A pretrained AI and deep learning model is one that has been trained on representative datasets and fine-tuned with weights and biases. You can quickly and easily fine-tune a pretrained model by applying transfer learning with only a fraction of data compared to training from scratch.
Within the realm of pretrained models, there are models that perform a specific task like detecting people, cars, license plates, and so on.
We first picked a U-Net model with ResNet10 and ResNet18 backbones. The results obtained from the models showed the walls and the floor merged as a single entity on real-world data, instead of two separate entities. This was true even though the performance of the model on simulation images showed high levels of accuracy.
| BackBone | Pruned | Dataset Size | Image Size | Training Evaluations | ||||
| Train | Val | F1 Score | mIoU (%) | Epochs | ||||
| RN10 | NO | 25K | 4.5K | 512×512 | 89.2 | 80.1 | 50 | |
| RN18 | NO | 25K | 4.5K | 512×512 | 91.1 | 83.0 | 50 | |
We experimented with different backbones and image sizes to observe the trade-off of latency (FPS) to accuracy. All models in the table are the same (UNET); only the backbones are different.
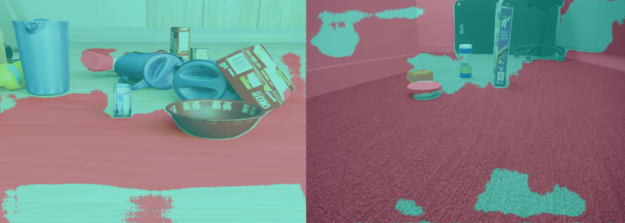
Based on the results, it was evident that we needed a different model that better fit the use case. We picked the PeopleSemSeg model available in the NGC catalog. The model was pretrained on five million objects for the “person” class with the dataset consisting of a mix of camera heights, crowd density, and field-of-view (FOV). This model also can segment the background and the free space as two separate entities.
After training this model with the same dataset, the mean IOU increased by more than 10% and the resulting images clearly show better segmentation between floor and walls.
| BackBone | Pruned | Dataset Size | Image Size | Training Evaluations | |||
| Train | Val | F1 Score | mIoU (%) | Epochs | |||
| PeopleSemSegNet | NO | 25K | 4.5K | 512×512 | 98.1 | 96.4 | 50 |
| PeopleSemSegNet | NO | 25K | 4.5K | 960×544 | 99.0 | 98.1 | 50 |
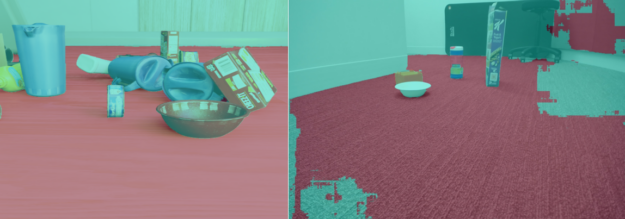
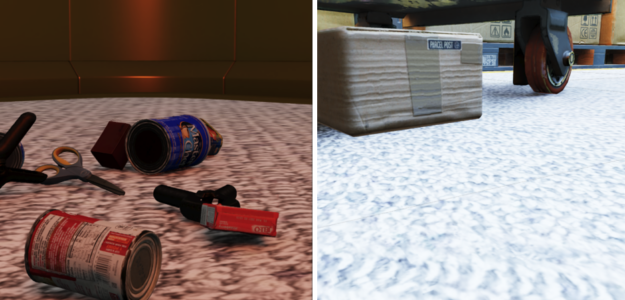
Figure 4 shows free space identification on the simulation image and the real-world images from the robot’s perspective before fine-tuning on the PeopleSemSeg model with real-world data. That is, with models trained on purely NVIDIA Isaac Sim data.
The key takeaway is that while there may be many pretrained models that can do the task, it is important to pick one that is closest to your current application. This is where TAO’s purpose-built models are useful.
!tao unet train --gpus=1 --gpu_index=$GPU_INDEX \
              -e $SPECS_DIR/spec_vanilla_unet.txt \
              -r $USER_EXPERIMENT_DIR/semseg_experiment_unpruned \
              -m $USER_EXPERIMENT_DIR/peoplesemsegnet.tlt  \
              -n model_freespace \
              -k $KEY
After the model is trained, evaluate the model performance on validation data:
!tao unet evaluate --gpu_index=$GPU_INDEX -e$SPECS_DIR/spec_vanilla_unet.txt \
-m $USER_EXPERIMENT_DIR/semseg_experiment_unpruned/weights/model_freespace.tlt \
    -o $USER_EXPERIMENT_DIR/semseg_experiment_unpruned/ \
    -k $KEY
When you are satisfied with the model performance on NVIDIA Isaac Sim data and the Sim2Sim validation performance, prune the model.
To run this model with minimal latency, optimize it to run on the target GPU. There are two ways to achieve this:
- Pruning: The pruning feature in the TAO Toolkit automatically removes the unwanted layers and neurons, effectively reducing the size of the model. You must retrain the model to recover the accuracy lost during pruning.
- Post-training quantization: Another feature in the TAO toolkit enables the model size to be further reduced. This changes its precision from FP32 to INT8, enhancing performance without sacrificing its accuracy.
First, prune the model:
!tao unet prune \
    -e $SPECS_DIR/spec_vanilla_unet.txt \
    -m $USER_EXPERIMENT_DIR/semseg_experiment_unpruned/weights/model_freespace.tlt \
    -o $USER_EXPERIMENT_DIR/unet_experiment_pruned/model_unet_pruned.tlt \
     -eq union \
     -pth 0.1 \
     -k $KEY
Re-train and prune the model:
!tao unet train --gpus=1 --gpu_index=$GPU_INDEX \
              -e $SPECS_DIR/spec_vanilla_unet_retrain.txt \
              -r $USER_EXPERIMENT_DIR/unet_experiment_retrain \
              -m $USER_EXPERIMENT_DIR/unet_experiment_pruned/model_unet_pruned.tlt \
              -n model_unet_retrained \
              -k $KEY
When you are satisfied with the Sim2Sim validation performance of the pruned model, go to the next step to fine-tune on real-world data.
!tao unet train --gpus=1 --gpu_index=$GPU_INDEX \
              -e $SPECS_DIR/spec_vanilla_unet_domain_adpt.txt \
              -r $USER_EXPERIMENT_DIR/semseg_experiment_domain_adpt \
              -m $USER_EXPERIMENT_DIR/semseg_experiment_retrain/model_unet_pruned.tlt\
              -n model_domain_adapt \
              -k $KEY
Results
Table 1 shows a summary of the results between unpruned and pruned models. The final pruned and quantized model, chosen for deployment, was 17x smaller and delivered an inference performance 5x faster compared to the original model, measured on NVIDIA Jetson Xavier NX.
| Model | Dataset | Training Evaluations | Inference Performance | ||||
| Pruned | Fine-Tune on Real World Data |
Training Set | Validation Set | F1 Score (%) | mIoU (%) | Precision | FPS |
| NO | NO | Sim | Sim | 0.990 | 0.981 | FP16 | 3.9 |
| YES | NO | Sim | Sim | 0.991 | 0.982 | FP16 | 15.29 |
| YES | NO | Sim | Real | 0.680 | 0.515 | FP16 | 15.29 |
| YES | YES | Real | Real | 0.979 | 0.960 | FP16 | 15.29 |
| YES | YES | Real | Real | 0.974 | 0.959 | INT8 | 20.25 |
The training dataset for the sim data consists of 25K images, whereas training data for real-world images for fine-tuning, consists of 44 images only. The validation dataset of real images consists of 56 images only. For real-world data, we collected a dataset in three different indoor scenarios. The input image size for the model is 960×544. The inference performance is measured using the NVIDIA TensorRT trtexec tool.
Deployment with NVIDIA Isaac ROS
In this section, we show the steps to take the trained and optimized model and deploy it using NVIDIA Isaac ROS on iRobot’s Create 3 robot powered by Jetson Xavier NX. Both Create 3 and the NVIDIA Isaac ROS image segmentation node run on ROS2.
This example uses the /isaac_ros_image_segmentation/isaac_ros_unet GitHub repo for deploying free space segmentation.
To use the free space segmentation model, perform the following steps from the /NVIDIA-ISAAC-ROS/isaac_ros_image_segmentation GitHub repo.
Create a Docker interactive workspace:
$isaac_ros_common/scripts/run_dev.sh your_ws
Clone all the package dependencies:
isaac_ros_dnn_encodersisaac_ros_nvengine_interfaces- Inference packages (you can pick either one)
isaac_ros_tensor_rtisaac_ros_triton
Build and source the workspace:
$cd /workspaces/isaac_ros-dev
$colcon build && . install/setup.bash
Download the trained free space identification (.etlt) model from your work machine:
$scp <your_machine_ip>:<etlt_model_file_path> <ros2_ws_path>
Convert the encrypted TLT model (.etlt) and format to the TensorRT engine plan. Run the following command for the FP16 model:
tao converter -k tlt_encode  \
               -e  trt.fp16.freespace.engine \
               -p input_1,1x3x544x960,1x3x544x960,1x3x544x960 \
               unet_freespace.etlt
Follow the walkthrough from Isaac ROS image segmentation:
- Keep the TensorRT model engine file in right directory.
- Create
config.pbtxt. - Update the model engine path and name in the
isaac_ros_unetlaunch file. - Rebuild and run the following commands:
$ colcon build --packages-up-to isaac_ros_unet && . install/setup.bash
$ ros2 launch isaac_ros_unet isaac_ros_unet_triton.launch.py
Summary
In this post, we showed you an end-to-end workflow starting with synthetic data generation in NVIDIA Isaac Sim, fine-tuning with the TAO Toolkit, and deploying the model with NVIDIA Isaac ROS.
Both NVIDIA Isaac Sim and TAO Toolkit are solutions that abstract away the AI framework complexity, enabling you to build and deploy AI-powered robotic applications in production, without the need for any AI expertise.
Get started with this experiment by pulling the /NVIDIA-AI-IOT/robot_freespace_seg_Isaac_TAO GitHub project.
