Conversational AI solutions such as chatbots are now deployed in the data center, on the cloud, and at the edge to deliver lower latency and high quality of service while meeting an ever-increasing demand. The strategic decision to run AI inference on any or all these compute platforms varies not only by the use case but also evolves over time with the business. Hence, a consistent deployment approach is necessary to simplify the workflow and increase DevOps and IT productivity.
From training to optimization to inference to deployment
In this post, we show you how to deploy the BERT QA model on Kubernetes and run inference with NVIDIA Triton Inference Server. If you’re new to any of these tools, you may want to see previous posts for more detailed instructions:
- Jump-start AI Training with NGC Pretrained Models On-Premises and in the Cloud
- Optimizing and Accelerating AI Inference with the TensorRT Container from NVIDIA NGC
- Simplifying AI Inference with NVIDIA Triton Inference Server from NVIDIA NGC
Why Kubernetes and Helm?
Kubernetes enables consistent deployment across data center, cloud, and edge platforms and scales with the demand by automatically spinning up and shutting down nodes. Additionally, Kubernetes has a self-healing feature that automatically restarts containers, ensuring that the users are continuously served, without any disruption.
However, configuring a Kubernetes cluster can be quite tedious and time consuming, which is where helm charts can help. Helm charts can consistently spin up Kubernetes clusters with specified resources and multiple containers with a single command.
NGC
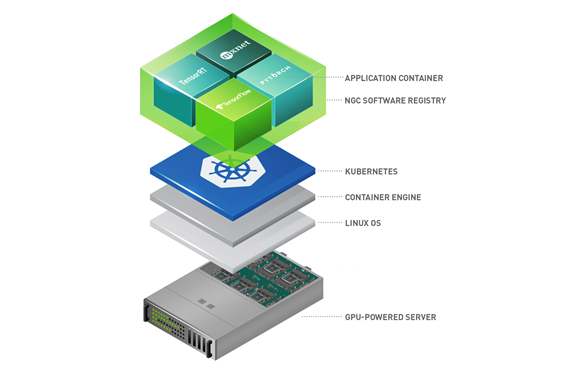
The NGC Catalog is a hub for AI, HPC, and data analytics software. It also offers a variety of helm charts, including GPU Operator to install drivers, runtimes, and monitoring tools, application framework like NVIDIA Clara to launch medical imaging AI software, and third-party ISV software. This post uses the Triton Inference Server helm chart and its Docker image from NGC to deploy a BERT QA model for inference on Kubernetes cluster.
Deploying BERT Q&A on Kubernetes
Using examples, we walk you through a step-by-step process of deploying a TensorRT-optimized BERT Question-Answering model with Triton on Google Kubernetes Engine. However, the steps can be easily adapted to the platform of your choice: on-premises system, edge server, or GPU-instance provided by other cloud service providers.
Prerequisites
You need a TensorRT-optimized BERT QA model, also called a TRT engine. After it’s created, you can upload the engine to Google Cloud Storage for Triton to access. For more information about how Triton serves the models for inference, see Simplifying AI Inference with NVIDIA Triton Inference Server from NVIDIA NGC. Triton needs the model repository in a specific structure, and it should look like the following code example:
triton-inference-server-repository
    |--bert
       |--1
          |--model.plan
To avoid permission issues, make the repository public or generate a credential file. For more information, see IAM permissions for Cloud Storage. To keep this post brief, we have made the bucket public.
Fetch and modify the helm chart
In the NGC catalog, you can browse the helm charts tab and find one for Triton Inference Server.
In Google Cloud Shell, execute the following command:
$ helm fetch https://helm.ngc.nvidia.com/nvidia/charts/tritoninferenceserver-1.0.0.tgz$ tar -xvf tritoninferenceserver-1.0.0.tgz
The untarred directory contains files and folders as follows:
tritoninferenceserver
    |--Chart.yaml
    |--values.yaml
    |--templates
       |--deployment.yaml
       |--service.yaml
Look at each file and make changes accordingly to deploy the BERT QA model.
chart.yaml
The chart.yaml file defines the name, description, and version. It may look like the following code:
apiVersion: v1
appVersion: "1.0"
description: Triton Inference Server
name: triton-inference-server
version: 1.0.0
values.yaml
The values.yaml file defines the appropriate version of the Triton Inference Server image from NGC, the location of the model repository, and the number of replicas. The imageName value calls for the 20.08 release of the Triton from the NGC catalog, and modelRepositoryPath points to the Google storage bucket where you uploaded the BERT QA model file. Modify the file to read as follows:
replicaCount: 1
image:
  imageName: nvcr.io/nvidia/tritonserver:20.08-py3
  pullPolicy: IfNotPresent
  modelRepositoryPath: gs://triton-inference-server-repository/triton
  numGpus: 1

service:
  type: LoadBalancer
templates/deployment.yaml
The templates/deployment.yaml file defines the deployment configuration, including the execution commands to launch Triton inside the container along with the ports to be opened for inference. You can refer to Triton documents online to pass different arguments as necessary in args. Most of the content shown in the following code example is like the original but pay attention to the securityContext and initialDelaySeconds options that may cause the failure of the pod if wrongly set.
apiVersion: apps/v1
kind: Deployment
metadata:
  name: {{ template "triton-inference-server.fullname" . }}
  namespace: {{ .Release.Namespace }}
  labels:
    app: {{ template "triton-inference-server.name" . }}
    chart: {{ template "triton-inference-server.chart" . }}
    release: {{ .Release.Name }}
    heritage: {{ .Release.Service }}
spec:
  replicas: {{ .Values.replicaCount }}
  selector:
    matchLabels:
      app: {{ template "triton-inference-server.name" . }}
      release: {{ .Release.Name }}
  template:
    metadata:
      labels:
        app: {{ template "triton-inference-server.name" . }}
        release: {{ .Release.Name }}

    spec:
      securityContext:
        fsGroup: 1000
      containers:
        - name: {{ .Chart.Name }}
          image: "{{ .Values.image.imageName }}"
          imagePullPolicy: {{ .Values.image.pullPolicy }}
          resources:
            limits:
              nvidia.com/gpu: {{ .Values.image.numGpus }}
          args: ["tritonserver", "--model-repository={{ .Values.image.modelRepositoryPath }}", "--strict-model-config=false", "--log-verbose=1", "--log-info=1", "--allow-gpu-metrics=false"]
          ports:
            - containerPort: 8000
              name: http
            - containerPort: 8001
              name: grpc
            - containerPort: 8002
              name: metrics
          livenessProbe:
            failureThreshold: 30
            initialDelaySeconds: 100
            periodSeconds: 5
            httpGet:
              path: /v2/health/live
              port: http
          readinessProbe:
            failureThreshold: 30
            initialDelaySeconds: 100
            periodSeconds: 5
            httpGet:
              path: /v2/health/ready
              port: http
          securityContext:
            runAsUser: 1000
templates/service.yaml
The templates/service.yaml file provides the configurations of the service to be created and typically does not require many changes. For this example, replace old references of Triton with the new ones.
apiVersion: v1
kind: Service
metadata:
  name: {{ template "triton-inference-server.fullname" . }}
  namespace: {{ .Release.Namespace }}
  labels:
    app: {{ template "triton-inference-server.name" . }}
    chart: {{ template "triton-inference-server.chart" . }}
    release: {{ .Release.Name }}
    heritage: {{ .Release.Service }}
spec:
  type: {{ .Values.service.type }}
  ports:
    - port: 8000
      targetPort: http
      name: http-inference-server
    - port: 8001
      targetPort: grpc
      name: grpc-inference-server
    - port: 8002
      targetPort: metrics
      name: metrics-inference-server
  selector:
    app: {{ template "triton-inference-server.name" . }}
    release: {{ .Release.Name }}
Create a cluster
You are ready to create a cluster on GKE. Start by exporting the variables that you will repeatedly refer to in future commands. Execute the following command in the Cloud Shell:
$ export PROJECT_ID=<your google proj id>$ export ZONE=<zone of your choice, ex) us-west1-a >$ export REGION=<region of your choice, ex) us-west1>$ export DEPLOYMENT_NAME=<deployment name, ex) v100-bert-gke>
Now execute the following command to create a cluster:
$ gcloud beta container clusters create ${DEPLOYMENT_NAME} \--addons=HorizontalPodAutoscaling,HttpLoadBalancing,Istio,CloudRun,NodeLocalDNS \--machine-type=n1-standard-4 \--cluster-version=1.18.9-gke.1501 --zone=${ZONE} \--release-channel rapid \--node-locations=${ZONE} \--subnetwork=default \--enable-stackdriver-kubernetes \--scopes cloud-platform \--num-nodes 1
The Cloud Shell may print output as follows to show the request was successfully fulfilled.
kubeconfig entry generated for v100-bert-gke.
NAME LOCATION MASTER_VERSION MASTER_IP MACHINE_TYPE NODE_VERSION NUM_NODES STATUS
v100-bert-gke us-west1-a 1.18.9-gke.1501 35.204.80.0 n1-standard-4 1.18.9-gke.1501 1 RUNNING
Create node pools
Now add a node pool, a group of nodes that share the same configuration, to the cluster. The following command calls for NVIDIA V100 GPUs for each node’s accelerator, and you may choose to use NVIDIA T4 GPU as well. The BERT QA TRT engine that you created in the previous steps should have used the same GPU, as the engines are specific to GPU types. You also enable the automatic scaling feature with the minimum and maximum number nodes specified, as shown in the following command:
$ gcloud container node-pools create <node-pool name ex) demo> \--project ${PROJECT_ID} \--zone ${ZONE} \--cluster ${DEPLOYMENT_NAME} \--num-nodes 1 \--accelerator type=nvidia-tesla-v100, count=1 \--enable-autoscaling --min-nodes 1 --max-nodes 3 \--enable-autorepair \--machine-type n1-highmem-8 \--disk-size=100 \--scopes cloud-platform \--verbosity error
To show that the request was successfully fulfilled, the Cloud Shell may print output as follows:
Creating node pool demo...done.
Created [https://container.googleapis.com/v1/projects/dl-tme/zones/europe-west4-c/clusters/james-bert-gke/nodePools/demo].
NAME MACHINE_TYPE DISK_SIZE_GB NODE_VERSION
demo n1-highmem-8 100 1.18.9-gke.1501
Install NVIDIA GPU drivers to the nodes
When you have the node pool created, apply the NVIDIA driver installer daemonset to the nodes with the following command:
$ kubectl apply -f https://raw.githubusercontent.com/GoogleCloudPlatform/container-engine-accelerators/master/nvidia-driver-installer/cos/daemonset-preloaded.yamlInstall Triton with the helm chart
To make sure you have the proper control over the cluster, you may want to run the following command first:
$ kubectl create clusterrolebinding cluster-admin-binding \--clusterrole cluster-admin --user "$(gcloud config get-value account)"
Now, you are ready to deploy the service using helm. Run the following command:
$ cd tritoninferenceserver$ helm install bert-triton .
You should see the service deployed with the following message:
NAME: bert-triton
LAST DEPLOYED: Mon Oct 26 19:45:12 2020
NAMESPACE: default
STATUS: deployed
REVISION: 1
TEST SUITE: None
Test the deployed service and scale out
The deployed service exposes an external IP address that can be used to send the inference request to the Triton server serving the BERT QA model. For more information about the process of inference, including preprocessing questions and contexts, creating the request to the Triton endpoint, and post-processing to obtain the answer in words, see the Bert/Triton GitHub repo or BERT/GCP collection on NGC, where you can find the code for the previous steps. In this post, you focus more on the ‘at scale’ aspect of the deployment.
Check service readiness
You can run a few commands to check the status of the service and pod, as well as the readiness of Triton.
$ kubectl get services NAME TYPE CLUSTER-IP EXTERNAL-IP PORT(S) AGE bert-triton-triton-inference-server LoadBalancer 10.3.254.32 34.91.78.11 8000:31520/TCP,8001:32578/TCP,8002 :30733/TCP 2m37s kubernetes ClusterIP 10.3.240.1 <none> 443/TCP 14m$ kubectl get pods NAME READY STATUS RESTARTS AGE bert-triton-triton-inference-server-57f66f64d8-bhgpw 1/1 Running 0 6m51sTo see if Triton is up and running, you can also ping it directly using the external IP address of the service:
$ curl -v <External IP of service>:8000/v2/health/ready * Expire in 0 ms for 6 (transfer 0x55d99777efb0) * Trying 34.91.72.139... * TCP_NODELAY set * Expire in 200 ms for 4 (transfer 0x55d99777efb0) * Connected to 34.91.72.139 (34.91.72.139) port 8000 (#0) > GET /v2/health/ready HTTP/1.1 > Host: 34.91.72.139:8000 > User-Agent: curl/7.64.0 > Accept: */* > < HTTP/1.1 200 OK < Content-Length: 0 < Content-Type: text/plain < * Connection #0 to host 34.91.72.139 left intactIf you saw the 200 response from the curl request, you are ready to go.
Create an autoscaler
Create a YAML file called autoscaling/hpa.yaml inside the \tritoninferenceserver folder that you created earlier. The configuration file should read as follows:
apiVersion: autoscaling/v2beta1
kind: HorizontalPodAutoscaler
metadata:
    name: triton
    namespace: default
    labels:
          app: triton
spec:
    minReplicas: 1
    maxReplicas: 4
    metrics:
    - type: External
    external:
         metricName: kubernetes.io|container|accelerator|duty_cycle
         targetAverageValue: 60
   scaleTargetRef:
         apiVersion: apps/v1
         kind: Deployment
         name: bert-triton-triton-inference-server
The autoscaler monitors the GPU duty cycle and creates replicas if the metric goes over 60%. After you create the file, execute the following command at the home directory of the Cloud Shell:
$ kubectl create -f tritoninferenceserver/auto_scaling/hpa.yaml horizontalpodautoscaler.autoscaling/triton createdSee it in action with Triton perf_client
To see the service and autoscaler working in action, use perf_client, included in the Triton Client SDK container available from the NGC catalog. For more information, see Optimization. Perf_client is often used to measure and optimize the performance. In this case, you use it to load the GPU and see the autoscaler provisioning another pod. You can run the client wherever you want, but we chose to run it locally.
Pull the Triton Client SDK from the NGC catalog:
$ docker pull nvcr.io/nvidia/tritonserver:20.08-py3-clientsdkLaunch the container with Docker:
$ docker run -it --rm --net=host nvcr.io/nvidia/tritonserver:20.08-py3-clientsdkRun perf_client:
$ perf_client -m bert -x 1 -v -i gRPC -u <External IP>:8001 -z --concurrency-range 32:64You can adjust the concurrency-range value to control the workload. After running the client for a while, you can see the GPU duty cycle hitting above 80% from the GKE dashboard.
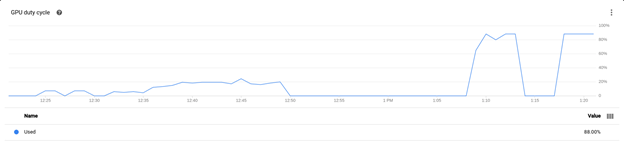
At the same time, you can see the autoscaler provisioning another pod from the GKE dashboard.
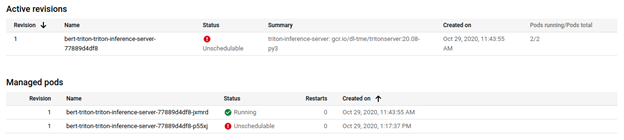
After some time, you can see the second pod running and ready to serve inference requests.
$ kubectl get pods NAME READY STATUS RESTARTS AGE bert-triton-triton-inference-server-77889d4df8-jxmrd 1/1 Running 0 102m bert-triton-triton-inference-server-77889d4df8-p55xj 1/1 Running 0 9m1sSummary
In this post, we shared with you how to deploy an AI service with Triton on Kubernetes with a helm chart from the NGC catalog. Choose from a wide variety of models and resources hosted on the NGC catalog today and deploy at scale to serve your inference applications with Triton Inference Server on Kubernetes.
