NetworkX states in its documentation that it is “…a Python package for the creation, manipulation, and study of the structure, dynamics, and functions of complex networks.” Since its first public release in 2005, it’s become the most popular Python graph analytics library available. This may explain why NetworkX amassed 27M PyPI downloads just in September of 2023.
How is NetworkX able to achieve such mass appeal? Are there use cases where NetworkX falls short, and if so, what can be done to address those? I examine these questions and more in this post.
NetworkX: Easy graph analytics
There are several reasons NetworkX is so popular among data scientists, students, and many others interested in graph analytics. NetworkX is open-source and backed by a large and friendly community, eager to answer questions and help. The code is mature and well-documented, and the package itself is easy to install and requires no additional dependencies. But most of all, NetworkX has a plethora of algorithms that cover something for everyone (including plotting!) with an easy-to-use API.
With just a few lines of simple code, you can load and analyze graph data using any of the algorithms provided. Here is an example of finding the shortest weighted path of a simple four-node graph:

>>> import networkx as nx
>>> G = nx.Graph()
>>> G.add_edge("A", "B", weight=4)
>>> G.add_edge("B", "D", weight=2)
>>> G.add_edge("A", "C", weight=3)
>>> G.add_edge("C", "D", weight=4)
>>> nx.shortest_path(G, "A", "D", weight="weight")
['A', 'B', 'D']
In just a few lines, easily typed at a Python prompt, you can interactively explore your graph data.
So what’s missing?
While NetworkX provides a tremendous amount of usability right out of the box, performance and scalability for medium-to-large-sized networks are far from best-in-class and can significantly limit a data scientist’s productivity.
To get an idea of how graph size and algorithm options impact runtime, here’s an interesting analytic that answers questions about a real-world dataset.
Examining influential U.S. patents using betweenness centrality
The , provided by the Stanford Network Analysis Platform (SNAP), is a citation graph of patents granted between 1975 and 1999, totaling 16,522,438 citations. If you know which patents are more central than others, you may get an idea of their relative importance.
The citation graph can be processed using the pandas library to create a DataFrame containing graph edges. The DataFrame has two columns: one for the source node and another for the destination node for each edge. NetworkX can then take this DataFrame and create a graph object, which can then be used to run betweenness centrality.
Betweenness centrality is a metric that quantifies the extent to which nodes act as intermediaries between other nodes, as determined by the number of shortest paths they are a part of. In the context of patent citations, it may be used to measure the extent to which a patent connects other patents.
Using NetworkX, you can run betweenness_centrality to find these central patents. NetworkX selects k nodes at random for the shortest path analysis used by the betweenness centrality computation. A higher value of k leads to more accurate results at the cost of increased computation time.
The following code example loads the citation graph data, creates a NetworkX graph object, and runs betweenness_centrality.
###############################################################################
# Run Betweenness Centrality on a large citation graph using NetworkX
import sys
import time

import networkx as nx
import pandas as pd

k = int(sys.argv[1])

# Dataset from https://snap.stanford.edu/data/cit-Patents.txt.gz
print("Reading dataset into Pandas DataFrame as an edgelist...", flush=True,
      end="")
pandas_edgelist = pd.read_csv(
    "cit-Patents.txt",
    skiprows=4,
    delimiter="\t",
    names=["src", "dst"],
    dtype={"src": "int32", "dst": "int32"},
)
print("done.", flush=True)
print("Creating Graph from Pandas DataFrame edgelist...", flush=True, end="")
G = nx.from_pandas_edgelist(
    pandas_edgelist, source="src", target="dst", create_using=nx.DiGraph
)
print("done.", flush=True)

print("Running betweenness_centrality...", flush=True, end="")
st = time.time()
bc_result = nx.betweenness_centrality(G, k=k)
print(f"done, BC time with {k=} was: {(time.time() - st):.6f} s")
Pass a k value of 10 when you run the code:
bash:~$ python nx_bc_demo.py 10
Reading dataset into Pandas DataFrame as an edgelist...done.
Creating Graph from Pandas DataFrame edgelist...done.
Running betweenness_centrality...done, BC time with k=10 was: 97.553809 s
As you can see, running betweenness_centrality on a moderately large graph with just a value of k=10 and a fast, modern CPU (Intel Xeon Platinum 8480CL) takes almost 98 seconds. Achieving a higher level of accuracy that aligns with your expectations for a graph of this scale would necessitate significantly increasing the value of k. However, this would result in considerably longer runtimes, as highlighted in the benchmark results later in this post, where execution times extend to several hours.
RAPIDS cuGraph: Speed and NetworkX interoperability
The RAPIDS cuGraph project was created to bridge the gap between fast, scalable, GPU-based graph analytics and NetworkX ease-of-use. For more information, see RAPIDS cuGraph adds NetworkX and DiGraph Compatibility.
cuGraph was designed with NetworkX interoperability in mind, which can be seen when you replace only the betweenness_centrality call from the prior example with cuGraph’s betweenness_centrality and leave the rest of the code as-is.
The result is a greater-than-12x speedup with only a few lines of code changed:
###############################################################################
# Run Betweenness Centrality on a large citation graph using NetworkX
# and RAPIDS cuGraph.
# NOTE: This demonstrates legacy RAPIDS cuGraph/NetworkX interop. THIS CODE IS
# NOT PORTABLE TO NON-GPU ENVIRONMENTS! Use nx-cugraph to GPU-accelerate
# NetworkX with no code changes and configurable CPU fallback.
import sys
import time

import cugraph as cg
import pandas as pd

k = int(sys.argv[1])

# Dataset from https://snap.stanford.edu/data/cit-Patents.txt.gz
print("Reading dataset into Pandas DataFrame as an edgelist...", flush=True,
      end="")
pandas_edgelist = pd.read_csv(
    "cit-Patents.txt",
    skiprows=4,
    delimiter="\t",
    names=["src", "dst"],
    dtype={"src": "int32", "dst": "int32"},
)
print("done.", flush=True)
print("Creating Graph from Pandas DataFrame edgelist...", flush=True, end="")
G = cg.from_pandas_edgelist(
    pandas_edgelist, source="src", destination="dst", create_using=cg.Graph(directed=True)
)
print("done.", flush=True)

print("Running betweenness_centrality...", flush=True, end="")
st = time.time()
bc_result = cg.betweenness_centrality(G, k=k)
print(f"done, BC time with {k=} was: {(time.time() - st):.6f} s")
When you run the new code on the same machine with the same k value, you can see that it’s over 12x faster:
bash:~$ python cg_bc_demo.py 10
Reading dataset into Pandas DataFrame as an edgelist...done.
Creating Graph from Pandas DataFrame edgelist...done.
Running betweenness_centrality...done, BC time with k=10 was: 7.770531 s
This example showcases cuGraph interoperability with NetworkX quite well. However, there are instances that require you to make more significant changes when adding cuGraph to your code.
Many differences are intentional (different options to better map to GPU implementations for performance reasons, options not supported, and so on), while others are unavoidable (cuGraph has fewer algorithms implemented, cuGraph requires a GPU, and so on). These differences require you to add special case code to convert options or check if the code is running on a cuGraph-compatible system and call the equivalent NetworkX API if they intend to support environments without GPUs or cuGraph.
cuGraph is an easy-to-use Python library on its own, but it’s not intended to be a drop-in replacement for NetworkX.
Meanwhile, NetworkX adds dispatching…
NetworkX has recently added the ability to dispatch API calls to different analytic backends provided by third parties. These backends can provide alternate implementations for various NetworkX APIs that can greatly improve performance.
Backends can be specified by either an additional backend=keyword argument on supported APIs or by setting the NETWORKX_AUTOMATIC_BACKENDS environment variable.
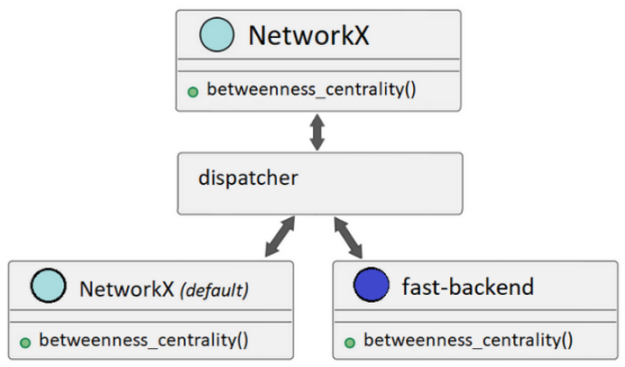
If a NetworkX API call is made and a backend isn’t available to support that call, NetworkX can be configured to raise an informative error or automatically fall back to its default implementation to satisfy the call (Figure 2).
Dispatching is opt-in. Even when backends are installed and available, NetworkX uses the default implementation if you don’t specify one or more backends to use.
By enabling other graph libraries to easily extend NetworkX through backends, NetworkX becomes a standard graph analytics frontend. This means more users can use the capabilities of other graph libraries without the learning curve and integration time associated with a new library.
Library maintainers also benefit from NetworkX dispatching because they can reach more users without the overhead of maintaining a user-facing API. Instead, they can just focus on delivering a backend.
GPU-accelerated NetworkX using nx-cugraph
NetworkX dispatching opened the door for the RAPIDS cuGraph team to create nx-cugraph, a new project that adds a backend for NetworkX based on the graph analytic engine provided by RAPIDS cuGraph.
This approach also enables nx-cugraph to have fewer dependencies and avoid code paths that the cuGraph Python library adds for efficient integration with RAPIDS cuDF, which is not needed for NetworkX.
With nx-cugraph, NetworkX users can finally have everything: ease of use, portability between GPU and non-GPU environments, and performance, all without code changes.
But maybe best of all, you can now unlock use cases that were not practical before due to excessive runtime, just by adding GPUs and nx-cugraph. For more information, see the benchmark section later in this post.
Installing nx-cugraph
Assuming NetworkX version 3.2 or later has been installed, nx-cugraph can be installed using either conda or pip.
conda
conda install -c rapidsai-nightly -c conda-forge -c nvidia nx-cugraph
pip
python -m pip install nx-cugraph-cu11 --extra-index-url https://pypi.nvidia.com
Nightly wheel builds are not available until the 23.12 release, therefore the index URL for the stable release version is being used in the pip install command.
For more information about installing any RAPIDS package, see Quick Local Install.
Revisiting NetworkX betweenness centrality with nx-cugraph
When you install nx-cugraph and specify the cugraph backend, NetworkX dispatches the betweenness_centrality call to nx-cugraph. You don’t have to change your code to see the benefits of GPU acceleration.
The following runs were done on the same system used in the benchmark section later in this post. These demonstrations also did not include a warmup run, which can improve performance, but the benchmarks shown later did.
Here’s the initial NetworkX run on the U.S. Patent dataset with k=10:
bash:~$ python nx_bc_demo.py 10
Reading dataset into Pandas DataFrame as an edgelist...done.
Creating Graph from Pandas DataFrame edgelist...done.
Running betweenness_centrality...done, BC time with k=10 was: 97.553809 s
With no changes to the code, set the environment variable NETWORKX_AUTOMATIC_BACKENDS to cugraph to use nx-cugraph for the betweenness_centrality run and observe a 6.8x speedup:
bash:~$ NETWORKX_AUTOMATIC_BACKENDS=cugraph python nx_bc_demo.py 10
Reading dataset into Pandas DataFrame as an edgelist...done.
Creating Graph from Pandas DataFrame edgelist...done.
Running betweenness_centrality...done, BC time with k=10 was: 14.286906 s
Larger k values result in a significant slowdown for the default NetworkX implementation:
bash:~$ python nx_bc_demo.py 50
Reading dataset into Pandas DataFrame as an edgelist...done.
Creating Graph from Pandas DataFrame edgelist...done.
Running betweenness_centrality...done, BC time with k=50 was: 513.636750 s
Using the cugraph backend on the same k value results in a 31x speedup:
bash:~$ NETWORKX_AUTOMATIC_BACKENDS=cugraph python nx_bc_demo.py 50
Reading dataset into Pandas DataFrame as an edgelist...done.
Creating Graph from Pandas DataFrame edgelist...done.
Running betweenness_centrality...done, BC time with k=50 was: 16.389574 s
As you can see, when you increase k, you see the speedup increase. The larger k value has little impact on the runtime when using the cugraph backend due to the high parallel processing capability of the GPU.
In fact, you can go much higher with k to increase accuracy with little difference to the overall runtime:
bash:~$ NETWORKX_AUTOMATIC_BACKENDS=cugraph python nx_bc_demo.py 500
Reading dataset into Pandas DataFrame as an edgelist...done.
Creating Graph from Pandas DataFrame edgelist...done.
Running betweenness_centrality...done, BC time with k=500 was: 18.673590 s
Setting k to 500 when using the default NetworkX implementation takes over an hour but adds only a few seconds when using the cugraph backend. For more information, see the next section on benchmarks.
Benchmarks
Benchmark results for NetworkX with and without nx-cugraph are shown in Tables 1-3 using the following dataset and system hardware configuration:
- Dataset: directed graph, 3.7M nodes, 16.5M edges
- CPU: Intel Xeon Platinum 8480CL, 2TB
- GPU: NVIDIA H100, 80 GB
These benchmarks were run using pytest with the pytest-benchmark plugin. Each run includes a warmup step for both NetworkX and nx-cugraph, which improves performance for the measured run.
The benchmark code is available in the cuGraph Github repo.
nx.betweenness_centrality(G, k=k)
| k=10 | k=20 | k=50 | k=100 | k=500 | k=1000 | |
| NetworkX | 97.28 s | 184.77 s | 463.15 s | 915.84 s | 4,585.96 s | 9,125.48 s |
| nx-cugraph | 8.71 s | 8.26 s | 8.91 s | 8.67 s | 11.31 s | 14.37 s |
| speedup | 11.17 X | 22.37 X | 51.96 X | 105.58 X | 405.59 X | 634.99 X |
nx.edge_betweenness_centrality(G, k=k)
| k=10 | k=20 | k=50 | k=100 | k=500 | k=1000 | |
| NetworkX | 112.22 s | 211.52 s | 503.57 s | 993.15 s | 4,937.70 s | 9,858.11 s |
| nx-cugraph | 19.62 s | 19.93 s | 21.26 s | 22.48 s | 41.65 s | 57.79 s |
| speedup | 5.72 X | 10.61 X | 23.69 X | 44.19 X | 118.55 X | 170.59 X |
nx.community.louvain_communities(G)
| NetworkX | 2834.86 s |
| nx-cugraph | 21.59 s |
| speedup | 131.3 X |
Conclusion
NetworkX dispatching is a new chapter in the evolution of NetworkX, which will result in the adoption of NetworkX by even more users for use cases not previously feasible.
Interchangeable, third-party backends enable NetworkX to become a standardized frontend, where you no longer have to rewrite your Python code to use different graph analytic engines. nx-cugraph adds cuGraph-based GPU acceleration and scalability directly to NetworkX, so you can finally have the speed and scalability missing from NetworkX without code changes.
Because both NetworkX and nx-cugraph are open-source projects, feedback, suggestions, and contributions are welcome. If there’s something you’d like to see, such as specific algorithms in nx-cugraph or additional dispatchable NetworkX APIs, leave a suggestion with the appropriate GitHub project:
To learn more about accelerating NetworkX on GPUs with nx-cugraph, register for the AI and Data Science Virtual Summit.

