
Watch NVIDIA founder and CEO Jensen Huang’s GTC keynote address streaming on Nov. 9 and in replay. Tune in to a healthcare special address by Kimberly Powell, NVIDIA VP of healthcare, on Nov. 9 at 10:30 a.m. Pacific. Subscribe to NVIDIA healthcare news.
NVIDIA Clara Holoscan is the AI computing platform for medical devices that combines hardware systems for low-latency sensor and network connectivity, optimized libraries for data processing and AI, and core microservices to run streaming, imaging, and other applications, from embedded to edge to cloud.
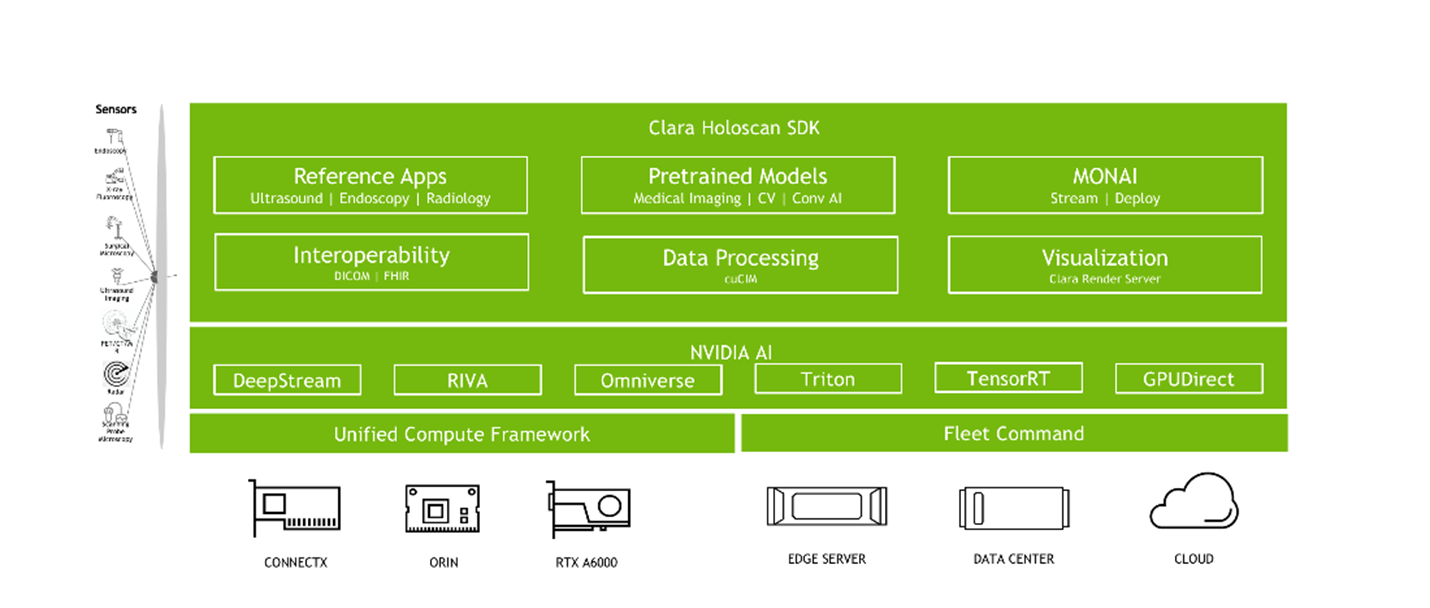
NVIDIA Clara Holoscan seamlessly bridges smart instruments with the data center, supporting signal processing, AI inference, and visualization workflows for software-defined medical devices. Use cases span radiology, minimally invasive surgery, robotic surgery, patient monitoring, and beyond. It is a fully accelerated framework for developing real-time multimodal applications with optimized microservice containers, no-code design tools, and sample applications.
NVIDIA Clara Holoscan is a scalable architecture, extending from embedded devices and NVIDIA-Certified edge servers to NVIDIA DGX systems in the data center or the cloud. The platform enables you to add as much or as little compute and input/output capability in your medical device as needed, balanced against the demands of latency, cost, space, power, and bandwidth.
Radiation therapy
An important use case for NVIDIA Clara Holoscan is radiation therapy, where image processing is needed to segment the organ and tumor being treated. Furthermore, segmenting the adjacent organs individually can help to identify a tumor and its volume. It also enables doctors to create a detailed and accurate 3D map that can plot the optimal trajectory for the beam of radiation to pass through other organs with the least impact.
With a 3D model, the radiation therapy system can even adjust, in real time, to changes in patient anatomy. Multiorgan segmentation is time-consuming to do manually but can be dramatically accelerated using AI. Figure 2 shows the deployment architecture of a 3D multiorgan segmentation application using NVIDIA Clara Holoscan.

The following section describes how to build and deploy a 3D multiorgan segmentation application based on UNETR, a transformer-based 3D segmentation model.
MONAI Deploy UNETR application
The novelty of the UNEt TRansformer (UNETR) model architecture is that the transformer-based encoder can learn the sequence representations of the input volume and effectively capture the global multiscale information. The transformer encoder is directly connected to a decoder through skip connections at different resolutions to compute the final semantic segmentation output.
The effectiveness of the UNETR model was tested on the Multi-Atlas Labeling Beyond the Cranial Vault (BTCV) dataset, which consists of 30 subjects with abdominal computed tomography (CT) scans where 13 organs were annotated by interpreters under the supervision of clinical radiologists at Vanderbilt University Medical Center. The multiorgan segmentation problem is formulated as a 13-class segmentation task with 1-channel input.
We used the MONAI Deploy App SDK to build and deploy the UNETR model on the NVIDIA Clara AGX developer kit, which combines the efficient Jetson AGX Xavier embedded Arm SoC, the powerful NVIDIA RTX 6000 GPU, and the 100 GbE connectivity of the ConnectX-6 SmartNIC.
The developer kit provides an easy-to-use platform for developing software-defined, AI-enabled real-time point of care medical devices. The MONAI Deploy App SDK offers a framework and associated tools to design, verify, and analyze the performance of AI inference pipelines for use in healthcare applications.
The following highlights the steps to build and deploy the UNETR application:
- Set up your environment and install the MONAI Deploy App SDK package.
- Create the UNETR model specific segmentation operator.
- Create the Application class by adding MONAI App Deploy SDK DICOM domain-specific operators and connect them with the UNETR operator.
- Package the UNETR app.
For more information, see the following resources:
- For MONAI Deploy sample applications and the MONAI Deploy App SDK architecture, see Getting Started.
- For building and deploying an application using MONAI Deploy App SDK, see Developing with SDK.
- For the example of building a segmentation application, see Creating a Segmentation App.
Visualization with NVIDIA Clara Render Service
To visualize the segmentation output from the MONAI Deploy application, we use the NVIDIA Clara Render Server application containers, available for download from NGC.
The Render Service consists of three containers: Render Server, Dataset Service, and Dashboard.
Render Server container
The Render Server container handles live stream and rendering of the datasets.
Pull the Render Server container with the following command:
docker pull nvcr.io/nvidia/clara/renderserver_ng:0.8.1-2108.1
Run the Render Server container with the following command:
nvidia-docker run -it --rm -d \--name renderserver \--network claranet \-p 2050:2050 \-v `pwd`/input:/app/datasets \nvcr.io/nvidia/clara-renderserver:linux-x86-0.8.1
Dataset Service container
The Dataset Service container handles datasets. It currently only supports MHD, RAW, JSON, and META files.
Pull the Dataset Service container with the following command:
docker pull nvcr.io/nvidia/clara/clara-datasetservice:0.8.1-2108.1
The files required by each dataset are located under the folder /datasets and they are generated by the UNETR application. Here’s the list of files generated:
config.meta config_render.json img0066.nii.gz img0066.output.mhd img0066.output.raw
- config.meta—Defines basic information and the configuration that a dataset should use.
- config_render.json—Defines the default rendering settings (Lights, Camera, Transfer Function, and so on) that a dataset uses with the Render Server when loaded.
- img0066.nii.gz—The original image converted from DICOM.
- img0066.output.mhd—The mask image in MHD format. The .raw file contains the actual pixels.
Start the Dataset Service container with the following command:
export ARGS_SERVICE_RSDS_PORT=50055 # Port number of Dataset Service

export ARGS_SERVICE_RSNG_IP=xxx.xxx.xxx.xxx # IP address of Render Service

export ARGS_SERVICE_RSNG_PORT=2050 # Port number of Render Service

export ARGS_SERVICE_RSUI_IP=xxx.xxx.xxx.xxx # IP address of Dashboard

export ARGS_SERVICE_RSUI_PORT=8080 # Port number of Dashboard

docker run -it --rm -d \-v `pwd`:/app/datasets \-p ${ARGS_SERVICE_RSDS_PORT:-50055}:50055 \-e SERVICE_RSNG_IP=${ARGS_SERVICE_RSNG_IP:-renderserver} \-e SERVICE_RSNG_PORT=${ARGS_SERVICE_RSNG_PORT:-2050} \-e SERVICE_RSUI_IP=${ARGS_SERVICE_RSUI_IP:-dashboard} \-e SERVICE_RSUI_PORT=${ARGS_SERVICE_RSUI_PORT:-8080} \--name clara-datasetservice \nvcr.io/clara/clara-datasetservice:0.8.1
_RSNG_IP=xxx.xxx.xxx.xxx # IP address of Render Service
Dashboard container
The Dashboard container is a web application and API server. The components are written in JavaScript, using React and Node.js, with backward compatibility support for the legacy WebUI written in Angular.
Pull the Dashboard container with the following command:
docker pull nvcr.io/nvidia/clara/clara-dashboard:0.8.1-2108.1
Start the Dashboard container with the following command:
 docker run -it --rm -d
-p ${ARGS_SERVICE_RSUI_PORT:-8080}:8080
-e SERVICE_RSDS_IP=${ARGS_SERVICE_RSDS_IP:-datasetservice}
-e SERVICE_RSDS_PORT=${ARGS_SERVICE_RSDS_PORT:-50055}
-e SERVICE_RSNG_IP=${ARGS_SERVICE_RSNG_IP:-renderserver}
-e SERVICE_RSNG_PORT=${ARGS_SERVICE_RSNG_PORT:-2050}
-e NODE_ENV=${ARGS_NODE_ENV:-standalone}
--name clara-dashboard
nvcr.io/clara/clara-dashboard:
To start a live interaction stream, select an item from the dataset list in the Render Service application menu (Figure 3).
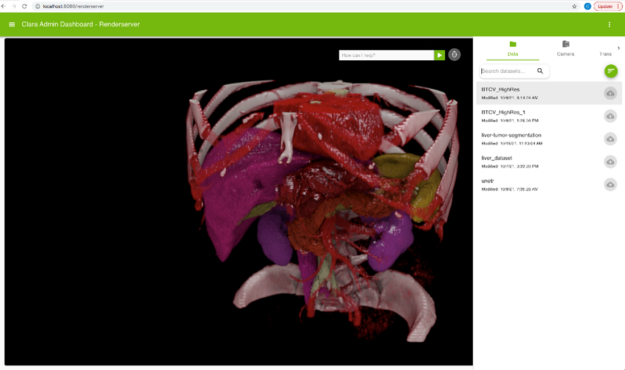
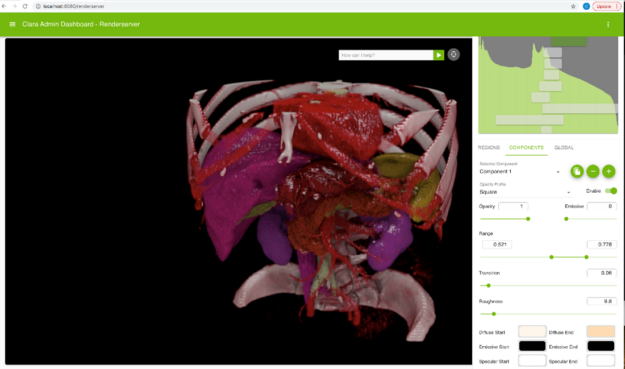
To upload changes in the render settings, choose the update icon next to the dataset name. The icon is inactive when you first load the dataset, but it is enabled after any subsequent changes to the render settings (for example, changing the view position, camera settings, or transfer function settings). On update, the dataset render settings are uploaded to the dataset service database.
Adding voice commands to NVIDIA Clara Render Server
You can interact with the NVIDIA Clara Render Server using voice commands and text queries. Do this by integrating the Riva Speech Server and a Zero-shot dialog Manager Server that can serve clients through REST API calls over HTTP. For more information, see NVIDIA Riva Speech Skills.
After installing the three containers (Dashboard, Render Server, and Dataset Service), you must access the Riva server with automatic speech recognition (ASR) and text-to-speech (TTS) services enabled. The Zero-shot Dialog Manager Server should be running on an edge server (Figure 2).
You can add different voice commands for live stream interactions, like “zoom in/out” and “pan left/right” or more complex voice commands, like “remove ribs.”
Integrating the Zero-shot Dialog Manager Server with NVIDIA Clara Dashboard
To integrate the Zero-shot Dialog Manager with NVIDIA Clara, follow these steps:
- Add user interface fields to get the text commands from the user.
- Add code in the dashboard to send an HTTP GET request to the Zero-shot Dialog Manager server with user text. The Zero-shot GET request must be in the following format:
http://<Zero Shot Server IP>:<PORT>/<Project Name>/process_query?query=<user entered text> - Add code in the dashboard to handle the response from the Zero-shot server.
- After you identify a particular intent (for example: “zoom in/out”), the dashboard must implement a way to request that the dashboard backend performs the corresponding action. The dashboard reaches the Render Server and the Dataset Service by calling the appropriate gRPC API.
Integrating the Riva ASR and TTS services with the NVIDIA Clara dashboard
To add the ASR services available through Riva, perform the following steps:
- Add code to the dashboard user interface to request microphone access.
- Reference the Riva ASR samples and implement streaming capabilities for user audio input to the Dashboard backend. You can use Web Audio API and Socket.IO.
- Modify the dashboard backend so that when you receive requests from the user interface, appropriate calls to the Riva server are made and a response is returned. This mainly involves importing the Riva proto files. For more information, see gRPC & Protocol Buffers.
After the dashboard user interface receives the transcribed response from the dashboard backend, it then forwards it to the Zero-shot Dialog Manager server, which returns the corresponding response. The dashboard performs appropriate steps and makes calls to Riva TTS with the Zero-shot Dialog manager response so that the user interface gets audio that can be played in response.
Similarly, integrating Riva TTS services with the NVIDIA Clara Dashboard involves the following steps:
- Implement a way in the user interface to play out received audio from Riva TTS.
- Add code to the dashboard user interface to send the zero-shot response text to dashboard backend.
- Add all gRPC client logic to the dashboard backend so that it can connect to the Riva TTS server. On success, send back the speech response to the dashboard user interface for playing out.
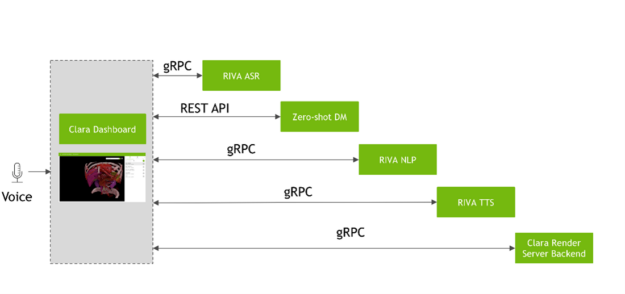
Figure 5 shows, sequentially, the API calls between NVIDIA Clara Dashboard and Riva and the Zero-shot Dialog Manager.
Deployment using NVIDIA Fleet Command
NVIDIA Fleet Command brings secure edge AI to enterprises of any size. From the cloud, you can deploy and manage applications from the NGC Catalog or NGC Private Registry, update system software over the air, and manage systems remotely with nothing but a browser and internet connection. For more information, see Developing Your Application for Fleet Command.
To deploy the NVIDIA Clara Holoscan application with Fleet Command, you create a Helm chart for the application. Helm is a package manager for deploying containerized applications in Kubernetes, remarkably like what Debian/RPM is for Linux or Jar/War is for Java-based applications.
A package in the Helm world is called a chart, a collection of files inside a particular directory tree that describes a related set of templates. The directory name is the name of the chart without versioning information. When charts are packaged as archives, these chart directories are packaged into a TGZ file with their filename containing their version, using the SemVer2 versioning format. The following is an example format for a NVIDIA Clara archive name:
clara-renderserver {semVer2}.tgz
You can create a new Helm chart with the following command:
helm create clara-renderserver
This command creates the clara-renderserver chart directory along with the common files and directories used in the chart. Specifically, this is the tree structure of the chart directory:
|-- Chart.yaml # A YAML file containing information about the chart
|-- templates # A directory of templates that, when combined with values ,will generate valid Kubernetes manifest files.
|   |-- _helpers.tpl
|   |-- cache-volume-claim.yaml
|   |-- cache-volume.yaml
|   |-- deployment.yaml
|   |-- svc.yaml
|   |-- volume-claim.yaml
|   `-- volume.yaml
`-- values.yaml # The default configuration values for this chart
# A YAML file containing information about the chart
The deployment.yaml file, located inside the /templates directory, defines the structure of a deployment object in Kubernetes:
apiVersion: apps/v1
kind: Deployment
metadata:
  name: {{ include "clara-renderer.fullname" . }}
  labels:
{{ include "clara-renderer.labels" . | indent 4 }}
spec:
  replicas: {{ .Values.replicaCount }}
  selector:
    matchLabels:
      app.kubernetes.io/name: {{ include "clara-renderer.name" . }}
      app.kubernetes.io/instance: {{ .Release.Name }}
  template:
    metadata:
     [metadata info]
      spec:
    {{- with .Values.images.pullSecrets }}
      imagePullSecrets:
        {{- toYaml . | nindent 8 }}
    {{- end }}
      containers:
      - name: ui-{{ .Chart.Name }}
        image: "{{ .Values.images.namespace }}/{{ .Values.images.renderui }}:{{ .Values.images.tag }}"
        imagePullPolicy: {{ .Values.images.pullPolicy }}
        env:
        - name: SERVICE_RSDS_IP
          value: "0.0.0.0"
        - [more env variable assignment]
        ports:
          - name: "{{ .Values.ui.portName }}"
            containerPort: {{ .Values.ui.port }}
            hostPort: {{ .Values.ui.hostPort }}
            protocol: TCP
      - name: renderer-{{ .Chart.Name }}
        image: "{{ .Values.images.namespace }}/{{ .Values.images.renderserver }}:{{ .Values.images.tag }}"
        imagePullPolicy: {{ .Values.images.pullPolicy }}
        ports:
          - name: "{{ .Values.rsng.portName }}"
            containerPort: {{ .Values.rsng.port }}
            protocol: TCP
        env:
        - name: CUDA_CACHE_PATH
          value: "/cache/CudaCache"
        - name: OPTIX_CACHE_PATH
          value: "/cache/OptixCache"
        volumeMounts:
        [volume mount information]
      - name: dataset-service-{{ .Chart.Name }}
        image: "{{ .Values.images.namespace }}/{{ .Values.images.datasetservice }}:{{ .Values.images.tag }}"
        imagePullPolicy: {{ .Values.images.pullPolicy }}
        env:
        - name: DATASET_REPO_PATH
          value: "/datasets"
        -[dataset env variable assignment]
To validate your Helm chart, run the following command:
helm lint clara-renderserver
Next, package the Helm chart:
helm package clara-renderserver
For more information about publishing your Helm chart on NGC, see NGC Helm Charts.
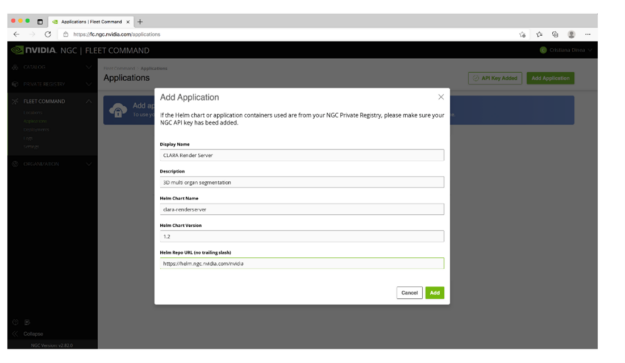
To deploy with NVIDIA Fleet Command, create an application based on the Helm chart that you created:
The next step is to add a deployment for the application:
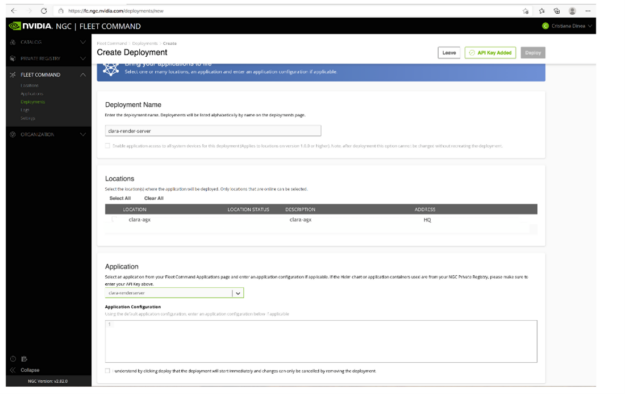
When you create the deployment, your application is deployed on the paired edge site in Fleet Command. To change the configuration of the application, use the Helm upgrade command.
Some system updates may require a reboot. If a reboot is needed, the Fleet Command Stack automatically restarts applications after the system is running. Your NVIDIA Clara Holoscan application should be able to recover gracefully and persist through system updates or system reboots.
Summary
For more information about getting started, see the NVIDIA Clara Holoscan product page. Learn more about AI in healthcare at NVIDIA GTC, running online through Nov. 11.
For more information, see the following resources:
