Transferring 3D data between applications has long been a challenge, especially with proprietary formats such as native computer-aided design (CAD) files. CAD models are vital for engineering and manufacturing physical products, yet they’re not designed for the complex, collaborative, and simulation-heavy environments crucial for physical AI applications such as robotics or autonomous vehicles (AVs).
This is where OpenUSD (Universal Scene Description) becomes essential. OpenUSD is an open, extensible ecosystem for describing, composing, simulating, and collaborating within 3D worlds. By converting precise CAD data into OpenUSD, developers can unlock their physical designs for advanced AI simulations, streamlining workflows and ensuring consistency across tools. This process is key to bringing physical AI concepts from design to reality.
This post walks you through a complete interoperable workflow for converting a CAD model into a pipeline-ready USD asset, highlighting the strength of OpenUSD for nondestructive editing and seamless collaboration. It also explains how the Omniverse Kit SDK makes these workflows even more accessible. This process serves as a high-level demonstration of a possible workflow, and your exact steps will likely differ based on your specific software and asset complexity.
OpenUSD in modern 3D pipelines
Converting from an open CAD format to a usable, enriched USD asset can be a learning experience. While converters provide a solid starting point, the real power comes from understanding OpenUSD structure and tailoring the data to your specific data pipeline needs.
The ability to layer changes, add custom data, and script interactions with Python makes OpenUSD incredibly robust for tackling the complex challenge of data interoperability. It’s not always a push-button solution because there are many workstreams that use the OpenUSD flexible framework.
OpenUSD provides the framework to address the challenge of transferring 3D data with two key features: data interoperability and collaboration through data aggregation.
Data interoperability
OpenUSD improves interoperability by providing numerous built-in schemas for 3D data. These schemas function as standardized blueprints, defining how to represent common concepts like meshes, cameras, and lights. Additionally, the extensible framework enables developers to incorporate new or unmapped data models, allowing powerful workflows like the conversion of different file formats for use in 3D environments.
Since OpenUSD was first open sourced, schemas like UsdPhysics and UsdSemantics have introduced support for rigid body physics and semantic labeling. For developers, these schemas create a common language that allow applications to read the data as well as understand its intent.
This consistent structure unlocks specialized toolsets, data validation, and true semantic interoperability far beyond visual representation alone. This extensibility enables powerful custom integrations, like allowing developers to add attributes that link CAD parts to records in a PLM system, enriching the model in a way that the original data alone cannot.
Collaboration through data aggregation
OpenUSD architecture is particularly effective for assembling large, intricate scenes. It allows teams to work on separate components in parallel, which are then aggregated into a larger scene using References and Payloads. This approach avoids data duplication and allows updates to propagate smoothly through the entire pipeline. Additionally, the OpenUSD nondestructive layering system enables powerful collaborative workflows so teams can build on each other’s work without overwriting it.
For more information, see How to Use OpenUSD and check out the NVIDIA Deep Learning Institute self-paced course, Learn OpenUSD: Creating Composition Arcs.
CAD to USD example workflow
This example workflow begins with exporting the CAD data as a Jupiter Tessellation (JT) file. JT is a widely used International Organization for Standardization (ISO) standard for 3D visualization and collaboration. It’s good at representing complex assemblies and part metadata, but it’s not natively USD.
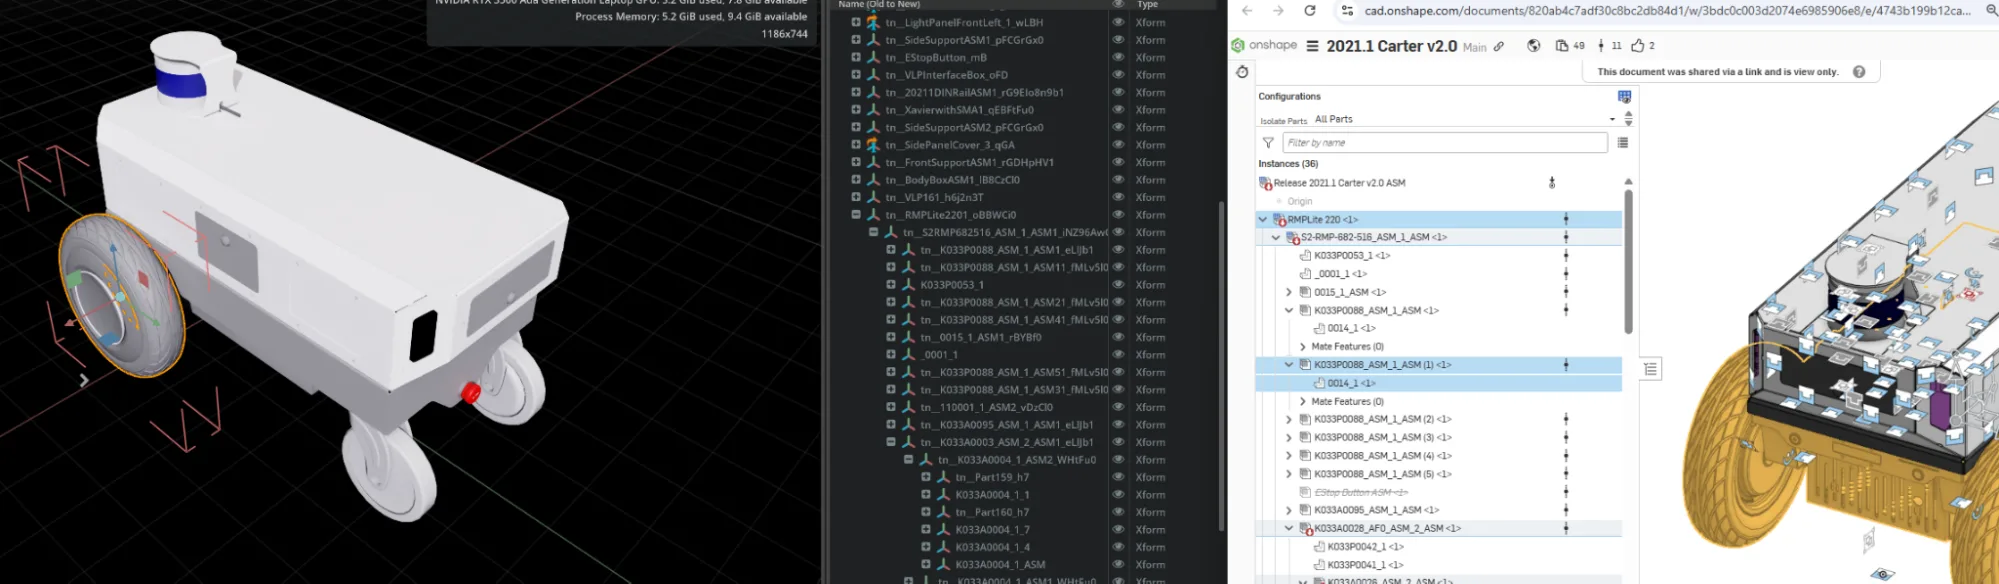
Start with a CAD asset, such as a Nova Carter hosted on OnShape, and export it to a JT file.

Converting the file to USD
Next, the JT files are converted into USD files. There are several commercial and some emerging open source tools for this step. This example uses the Kit extensions, omni.kit.conveter.cad and the omni.kit.convert.jt_core, to convert the JT file to USD. This, along with several other CAD converters, are built using NVIDIA’s OpenUSD Exchange SDK. A headless method was used to export, but you can also use the Omniverse GUI.
This example follows the Omniverse CAD Converter CLI instructions to convert the JT asset:
- Enable the extensions in the Extension Manager.
- Navigate to the directory with the Kit executable.
- Add omni.services.convert.cad = {} in the dependencies section.
- Build the application and run the following command. Make sure to adjust filepaths if you run this command yourself.
./kit.exe `
--allow-root `
--enable omni.kit.converter.jt_core `
--exec `
--/app/fastShutdown=1 `
'"C:\Users\juslin\AppData\Local\ov\data\Kit\Justine_Composer\0.1\exts\3\omni.services.convert.cad-506.2.3+107.3.0.u353/omni/services/convert/cad/services/process/jt_main.py" --input-path "C:\Users\juslin\Downloads\Release2021.1Carterv2.0ASM.jt" --output-path "C:\Users\juslin\Downloads\NovaCarter.usd" --config-path "C:\Users\juslin\Downloads\jt_config.json"'`
--info
Analyzing the conversion
When the conversion is complete, a brand new USD file is created. This new file can be opened by loading it into an Omniverse Kit application. You can build the application using the Kit App Template GitHub repo to compare the resulting scene graph with the original JT assembly structure. The core essence of the CAD model should be intact, and now wearing a new USD-native suit.
What was converted cleanly
The structure and substance of the design—the most critical information—were converted without any loss of information or metadata.
Preserved hierarchy
The single most important success in this example is the preservation of the assembly’s tree structure. The nested hierarchy of the original JT file is perfectly mirrored in the USD stage. When expanding the top-level assembly prim, RMPLite2201, all of the same subassemblies and parts are listed inside, just as they were in the source CAD data. This is crucial, as it maintains the design intent and logical grouping of components.

Prim equivalencies
There is a clear and predictable relationship between the source and the output. For each component instance in the original JT model, the converter generates a corresponding prim in the USD stage. This one-to-one mapping makes the data predictable and scriptable, forming a solid foundation for any downstream work like applying materials or animations.
Recognizable naming
While the names aren’t identical (more on that below), the core name of each prim is derived directly from the original CAD component name. This makes the scene graph immediately human-readable and easy to navigate. Note that to see the original component names from the CAD model, navigate to the Stage tab menu and enable Show Display Names. This makes it easier to compare the native and USD versions.
Differences: The transcoding fingerprint
In this example, the differences are less about errors and more about the “fingerprint” left by the automated transcoding process. These changes are artifacts of how USD works and how the converter ensures a valid, high-performance scene.
Naming prefixes and suffixes
Every prim name is altered:
tn_prefix: All prims are prefixed withtn_. This is common practice for converters like omni.transcoding to create a namespace, making it easy to identify which parts of a scene were automatically generated versus those that might be added or modified manually later.- Identifier suffixes: Prim names also have seemingly random strings of characters appended to them (
tn_Bolt_A_Xform_01_2aef1d, for example). These are also part of the encoded string that omni.transcoding writes. - Strings: There are several types of strings that still aren’t allowed in OpenUSD prims and other identifiers. For more information, see Bi-Directional Transcoding of Invalid Identifiers.
Scene graph USD instancing
Scene graph USD instancing is the most significant and beneficial difference in this example. The original JT file contains many duplicate parts, like bolts and fasteners. Instead of creating a full copy of the bolt geometry for every single instance, the converter takes advantage of instancing—one of the most powerful USD features. A single, efficient mesh is created for the bolt geometry and then lightweight prims are created that simply “point” to that mesh, each with its own unique position and orientation.
This is a massive optimization that dramatically reduces file size and memory usage, making the scene much more performant in real-time applications. These purposeful structuring techniques create a clean USD scene by using instancing to efficiently represent duplicate parts.

Raw data to production asset: Optimization, materials, and structuring
The initial conversion from JT to USD provides a structurally sound but raw asset. The geometry moves over as a dense, straight-from-CAD tessellation, materials are not more than simple colors, and the entire dataset is one monolithic chunk.
How is this data prepared for real-time rendering, simulation, or collaborative workflows? It needs to be optimized, enriched, and structured using some of the most powerful OpenUSD features, like Payloads and References, along with Omniverse features such as the Scene Optimizer.
Optimization
CAD geometry converted to polygonal meshes is often notoriously dense. The converted model contained millions of polygons, making it far too heavy for efficient real-time use. The solution is to create optimized versions of the geometry using a scene optimizer, such as the omni.scene.optimizer extension, available as a core technology in Omniverse Kit. This extension provides a powerful Python API that can programmatically process the heavy USD file and generate a lightweight version.
Within the Omniverse Kit application, there is a built-in script editor. This enables optimization in three main Scene Optimizer operations, configured with:
Merge_params: Merges all meshes that share the same materials. This is a huge performance win for CAD models, which often have many separate parts using the same material. Apart from instancing, this is another way to reduce a scene’s prim count, which can improve performance.Hidden_mesh_params: Identifies and removes internal meshes usingfindHiddenMeshesthat are completely occluded from view. This is perfect for CAD models, which often contain complex internal components that are never seen but still consume memory and processing power.Decimation_params: Reduces tessellation density for mesh prims. Amax_mean_errorset to 0.1 ensures that the simplified mesh surface will not deviate more than 0.1 scene units (typically centimeters) from the original high-poly model, preserving visual fidelity.
import omni.usd
import omni.kit.commands
import omni.scene.optimizer.core
import time
import json
import carb

# Get the UsdContext, which manages the application's scenes.
usd_context = omni.usd.get_context()
# Get the stage that is currently open in the application.
stage = usd_context.get_stage()

if not stage:
    carb.log_error("No stage is open. Please open your USD file first and run this script again.")
else:
    optimizer_interface = None
    try:
        # Get the optimizer interface.
        optimizer_interface = omni.scene.optimizer.core.acquire_interface()

        # Create the execution context.
        execution_context = omni.scene.optimizer.core.ExecutionContext()

        # Get the unique ID of the currently open stage.
        stage_id = usd_context.get_stage_id()
        execution_context.usdStageId = stage_id
        # -----------------------------------------

        # Define parameters.
        merge_params = {
            "merge_materials": True,
            "merge_visuals_only": True
        }

        hidden_mesh_params = {
            "operation": "findHiddenMeshes",
            "paths": [],
            "gridResolution": 100.0,
            "action": 0, #This flag '0' sets the mesh to deactivate
            "useGpu": False
        }

        # Max mean error prevents the new mesh surface from deviating more than this amount from the original.
        decimation_params = {
            "decimation_filter_prim_type": "Mesh",
            "max_mean_error": 0.1
        }

        carb.log_info("Context prepared. Executing operations...")

        # --- Execute Step 1: Merge Meshes ---
        carb.log_info("Running Step 1: Merge Meshes...")
        result = optimizer_interface.execute_operation("merge", execution_context, json.dumps(merge_params))

        if not result[0]:
            carb.log_error(f"Merge operation failed: {result[1]}")
        else:
            carb.log_info(f"Merge operation successful. Log: {result[1]}")

            # --- Execute Step 2: Find Hidden Meshes ---
            carb.log_info("Running Step 2: Find Hidden Meshes...")
            result = optimizer_interface.execute_operation("findHiddenMeshes", execution_context, json.dumps(hidden_mesh_params))

            if not result[0]:
                print("Find hidden meshes operation failed: ", result[1])
            else:
                print("Find hidden meshes successful. Log: ", result[1])
                # --- Execute Step 3: Decimate Meshes by Error ---
                carb.log_info("Running Step 3: Decimate Meshes...")
                result = optimizer_interface.execute_operation("decimateMeshes", execution_context, json.dumps(decimation_params))

                if not result[0]:
                    carb.log_error(f"Decimate meshes operation failed: {result[1]}")
                else:
                    carb.log_info(f"Decimate meshes successful. Log: {result[1]}")

print("--- Script finished. ---")
After running this script for this example, seven merged meshes could be created. The first step of this optimization process identified hundreds of individual mesh prims that all shared the same material and combined them into seven highly efficient meshes. This dramatically reduces the number of objects the renderer had to process, which ramps up the scene’s performance.
[INFO] merge: Created 7 Merged Meshes
The optimizer then found and deactivated 17 internal meshes that were completely occluded from view, freeing up additional memory and processing resources with no impact on the model’s visual appearance:
[INFO] findHiddenMeshes: Found 17 hidden meshes
Decimation also provides a boost to performance by reducing the geometric complexity of the model by a staggering 82% (in terms of vertices). These improvements make assets viable for real-time applications.
[INFO] decimateMeshes:
VertexCount: 309164 -> 54374 (82.412567)
FaceCount: 253304 -> 106740 (57.860912)
Assigning vMaterials for realism
The initial conversion maps the basic part colors from the JT file to simple displayColor attributes or basic UsdPreviewSurface materials. But to achieve photorealistic results requires stepping things up with physically based materials.
Instead of building materials from scratch, leverage the NVIDIA vMaterial library in the Kit Material Browser, a collection of high-quality, physically accurate PBR materials. This can be done nondestructively using USD layering capabilities, and it’s built right into the Omniverse Kit SDK, making it easy to drag and drop the materials into a scene in a Kit-based application.

Running the following script applies Aluminum Brushing to the body of the Nova Carter:
import omni.usd
from pxr import Sdf, Usd, UsdGeom, UsdShade
import carb

#The full path to the parent prim
TARGET_PRIM_PATH = "/tn__Release20211Carterv20ASM_WPDKOkCO/tn__BodyBoxASM1_lB8CzCl0/tn__BodyBoxEnclosure_qG8"

#The full path to the material prim
MATERIAL_PRIM_PATH = "/tn__Release20211Carterv20ASM_WPDKOkCO/Looks/Aluminum_Brushed_Light_Brushing"

def apply_material_to_prim_and_children(target_path: str, material_path: str):
    """Finds a prim and applies a material to all geometry descendants."""

    stage = omni.usd.get_context().get_stage()
    parent_prim = stage.GetPrimAtPath(target_path)
    material_prim = stage.GetPrimAtPath(material_path)
    material_to_bind = UsdShade.Material(material_prim)

    # --- Iterate and Bind ---
    bound_count = 0
    for prim in Usd.PrimRange(parent_prim):
        if prim.IsA(UsdGeom.Mesh):
            # Bind the specific material object, not the generic prim.
            UsdShade.MaterialBindingAPI.Apply(prim).Bind(material_to_bind)
            carb.log_info(f"Successfully bound material to: {prim.GetPath()}")
            bound_count += 1
    if bound_count > 0:
        carb.log_info(f"--- Process Complete. Applied material to {bound_count} geometry prim(s). ---")
    else:
        carb.log_warning(f"--- Script Finished, but no geometry (Gprims) were found under '{target_path}'. ---")
# --- Run the main function with your configuration ---
if __name__ == "__main__":
    apply_material_to_prim_and_children(
        target_path=TARGET_PRIM_PATH,
        material_path=MATERIAL_PRIM_PATH
    )

Payloads and asset structure for performance and collaboration
Making an asset truly production-ready requires structuring the scene for performance and collaboration, which is precisely where the USD composition excels. Leveraging composition enables implementing a highly scalable solution that separates concerns into distinct layers: one to house the complete geometric data, and a new, lightweight layer that acts as an interface for the asset.
Geometry layer (NovaCarter.usd)
The file used for converting and optimizing now takes on a new role as a dedicated geometry layer. Its sole responsibility is to contain the heavy visual data—the optimized meshes, complex hierarchy, and fidelity variants.
Asset interface layer (nova.usd)
A new, extremely lightweight file was then created, called nova.usd for this example. This is the slim asset interface layer.
- Purpose: The job of this file is to provide a clean, high-level interface for the entire robot asset. It contains no heavy data (actual 3D model geometry and textures), which means it loads instantly.
- Structure: Inside this file, a single parent prim is defined (for example, /nova_carter). This prim acts as the hook for the entire robot. A Payload is then applied to this prim, which is a special pointer to the NovaCarter.usd file.
The interface layer now acts as a lightweight proxy. Users can reference nova.usd and move /nova_carter around the scene without paying the memory cost of loading the full robot geometry until it’s absolutely needed for a final render.
An additional win is that destructive changes, such as deleting core geometry, overwriting material assignments, or altering the model’s default hierarchy, cannot be mistakenly made to the converted Nova Carter data.
from pxr import Usd, Sdf

# 1. Define the path to your heavy geometry layer.
geometry_layer_path = './NovaCarter.usd'

# 2. Define the name for the new, slim interface layer we are creating.
# Note: make sure to adjust filepaths if you run this yourself
interface_layer_path = 'C:/Users/juslin/Downloads/nova.usd'

# Create a new, empty USD stage for our interface layer
stage = Usd.Stage.CreateNew(interface_layer_path)

# Define the main prim that will act as the "handle" for our robot
robot_prim_path = '/nova_carter'
robot_prim = stage.DefinePrim(robot_prim_path)

# Get the 'payloads' API on the prim
payloads_api = robot_prim.GetPayloads()

# Add the payload reference. This points to the geometry layer but does not
# load it immediately.
payloads_api.AddPayload(assetPath=geometry_layer_path)
print(f"Created interface layer and set payload to '{geometry_layer_path}'.")

# (Optional) Set the default variant to use when the payload is loaded.
variant_set = robot_prim.GetVariantSets().AddVariantSet('fidelity')
variant_set.SetVariantSelection('lightweight')
print("Set default variant to 'lightweight'.")

# Save the new interface layer. It will be a very small text file.
stage.GetRootLayer().Save()
print(f"Slim asset interface layer '{interface_layer_path}' created successfully.")

/nova_carter is managed as an OpenUSD PayloadThe key advantage here is that /nova_carter is managed as a Payload, keeping its heavy geometry unloaded until it is needed for the scene. This provides two major benefits: immediate performance gains for the application, and a more efficient pipeline. At massive scales, such as building a digital twin of a factory, this workflow is essential. Individual components or entire assembly lines can be managed as Payloads, ensuring both high performance and that teams can work in parallel.
Get started with OpenUSD
Watch our OpenUSD Insiders livestream to see experts dive into how to build CAD to USD Workflows with NVIDIA Omniverse.
Take the next step in your 3D development career with the new OpenUSD Development certification.
Get started with developer starter kits to quickly develop and enhance your own applications and services.
Stay up to date by subscribing to NVIDIA news and following NVIDIA Omniverse on Discord and YouTube.
- Visit our Omniverse developer page to get all the essentials you need to get started
- Access a collection of OpenUSD resources, including the new self-paced Learn OpenUSD training curriculum
- Tune into upcoming OpenUSD Insiders livestreams and connect with the NVIDIA Developer Community
