字符串数据的高效处理对于许多数据科学应用至关重要。为了从字符串数据中提取有价值的信息, RAPIDS libcudf 提供了加速字符串数据转换的强大工具。 lib cuDF 是一个 C ++ GPU DataFrame 库,用于加载、连接、聚合和过滤数据。
在数据科学中,字符串数据表示语音、文本、遗传序列、日志记录和许多其他类型的信息。在为机器学习和特征工程处理字符串数据时,必须经常对数据进行规范化和转换,然后才能将其应用于特定用例。 lib cuDF 提供了通用 API 和设备端实用程序,以支持广泛的自定义字符串操作。
本文演示了如何使用 lib cuDF 通用 API 巧妙地转换字符串列。您将获得关于如何使用自定义内核和 lib cuDF 设备端实用程序解锁峰值性能的新知识。本文还向您介绍了如何最好地管理 GPU 内存和有效地构造 lib cuDF 列以加快字符串转换的示例。

介绍字符串列的箭头格式
lib cuDF 使用 Arrow format 将字符串数据存储在设备内存中,它将字符串列表示为两个子列: chars and offsets (图 1 )。
chars列将字符串数据保存为 UTF-8 编码的字符字节,并连续存储在内存中。
offsets列包含递增的整数序列,这些整数是字节位置,用于标识字符数据数组中每个单独字符串的开头。最后一个 offset 元素是 chars 列中的字节总数。这意味着第i行的单个字符串的大小定义为(offsets[i+1]-offsets[i])。
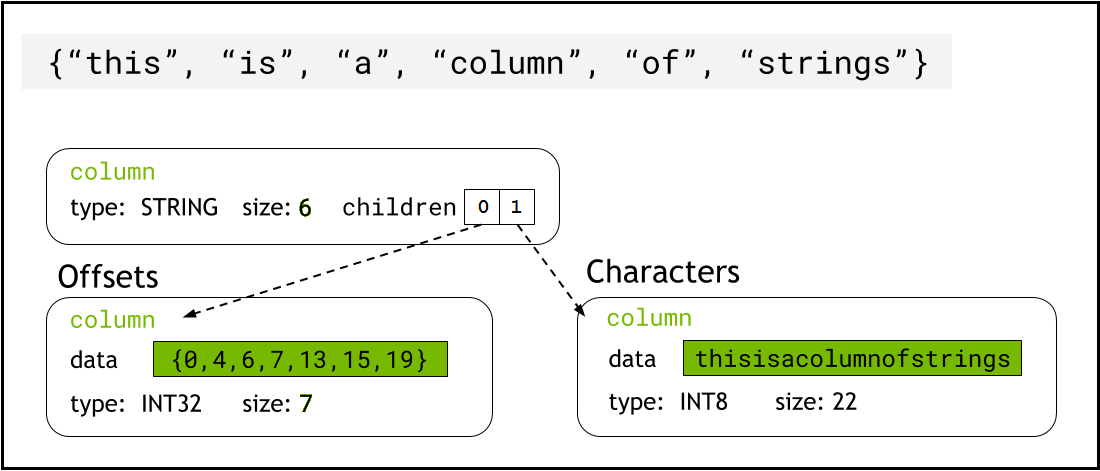
chars和offsets子列表示字符串列的示意图字符串编校函数示例
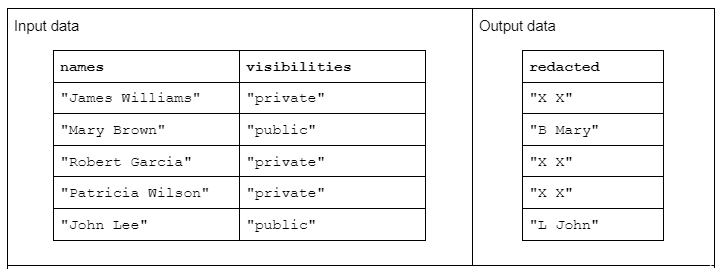
要演示字符串转换的示例,请考虑一个函数,该函数接收两个输入字符串列,并生成一个经过修订的输出字符串列。
输入数据的格式如下:一个“名称”列包含由空格分隔的名字和姓氏,另一个“可见性”列包含“公共”或“私有”状态
我们建议使用“ redact ”函数对输入数据进行操作,以生成由姓氏的首字母加上空格和整个名字组成的输出数据。但是,如果相应的可见性列为“ private ”,则输出字符串应完全修订为“ X X ”
使用 lib cuDF API 转换字符串
首先,可以使用 libcudf strings API 完成字符串转换。通用 API 是比较性能的良好起点和基线。
API 函数操作整个字符串列,每个函数至少启动一个内核,每个字符串分配一个线程。每个线程跨 GPU 并行处理一行数据,并输出一行作为新输出列的一部分。
要使用通用 API 完成修订示例函数,请执行以下步骤:
- 使用
contains将“可见性”字符串列转换为布尔列 - 每当布尔列中相应的行条目为“ false ”时,通过复制“ X X ”从名称列创建新的字符串列
- 将“修订”列拆分为名字和姓氏列
- 将姓氏的第一个字符切成姓氏首字母
- 通过用空格(“”)分隔符连接最后一个缩写列和第一个名字列来构建输出列。
// convert the visibility label into a boolean
auto const visible = cudf::string_scalar(std::string("public"));
auto const allowed = cudf::strings::contains(visibilities, visible);

// redact names
auto const redaction = cudf::string_scalar(std::string("X X"));
auto const redacted = cudf::copy_if_else(names, redaction, allowed->view());

// split the first name and last initial into two columns
auto const sv = cudf::strings_column_view(redacted->view())
auto const first_last  = cudf::strings::split(sv);
auto const first = first_last->view().column(0);
auto const last  = first_last->view().column(1);
auto const last_initial = cudf::strings::slice_strings(last, 0, 1);

// assemble a result column
auto const tv = cudf::table_view({last_initial->view(), first});
auto result = cudf::strings::concatenate(tv, std::string(" "));
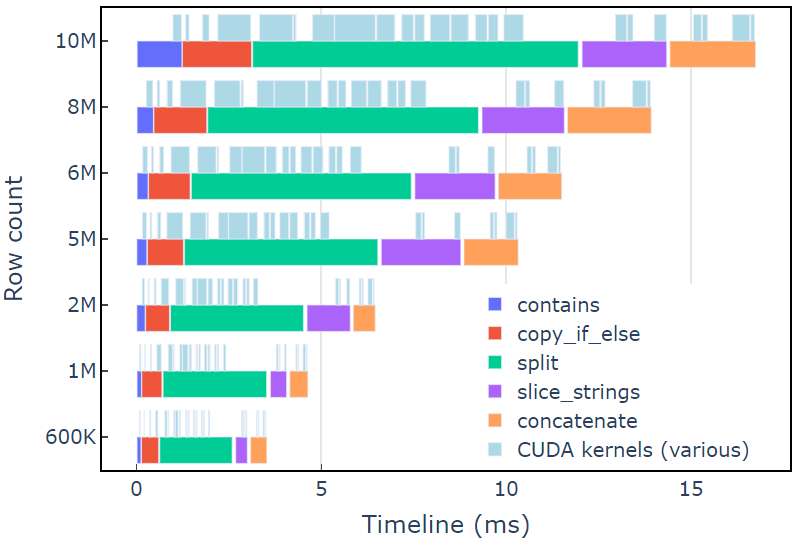
在具有 600K 行数据的 A6000 上,此方法大约需要 3.5 毫秒。本例使用contains、copy_if_else, split, slice_strings和concatenate完成自定义字符串转换。使用 Nsight Systems 进行的分析表明,split函数花费的时间最长,其次是和concatenate。
图 2 显示了修订示例的 Nsight Systems 的分析数据,显示了每秒最多 6 亿个元素的端到端字符串处理。这些区域对应于与每个功能相关联的 NVTX 范围。浅蓝色范围对应 CUDA 内核运行的周期。
使用自定义内核转换字符串
lib cuDF strings API 是一个快速高效的字符串转换工具包,但有时性能关键型函数需要运行得更快。 lib cuDF strings API 中额外工作的一个关键来源是在全局设备内存中为每个 API 调用创建至少一个新的字符串列,这为将多个 API 调用合并到自定义内核提供了机会。
内核 malloc 调用的性能限制
首先,我们将构建一个自定义内核来实现编校示例转换。在设计这个内核时,我们必须记住 lib cuDF strings 列是不可变的。
不能就地更改字符串列,因为字符字节是连续存储的,对字符串长度的任何更改都会使偏移量数据无效。因此,redact_kernel自定义内核通过使用 lib cuDF 列工厂来构建offsets和chars子列,从而生成一个新的字符串列。
在第一种方法中,使用内核内的 malloc 调用在 dynamic device memory 中创建每行的输出字符串。自定义内核输出是一个指向每行输出的设备指针向量,该向量用作字符串列工厂的输入。
自定义内核接受 cudf::column_device_view 以访问字符串列数据,并使用element方法返回 cudf::string_view 表示指定行索引处的字符串数据。内核输出是一个cudf::string_view类型的向量,它保存指向设备内存的指针,其中包含输出字符串和该字符串的字节大小。
cudf::string_view类类似于 std :: string _ view 类,但它是专门为 lib cuDF 实现的,并将固定长度的字符数据包装在编码为 UTF-8 的设备内存中。它与std对应物具有许多相同的特性(例如find和[EZX 43]函数)和限制(无空终止符)。cudf::string_view表示存储在设备内存中的字符序列,因此我们可以在这里使用它来记录输出向量的 malloc 内存。
麦芽糖核
// note the column_device_view inputs to the kernel

__global__ void redact_kernel(cudf::column_device_view const d_names,
                              cudf::column_device_view const d_visibilities,
                              cudf::string_view redaction,
                              cudf::string_view* d_output)
{
  // get index for this thread
  auto index = threadIdx.x + blockIdx.x * blockDim.x;
  if (index >= d_names.size()) return;

  auto const visible = cudf::string_view("public", 6);

  auto const name = d_names.element<cudf::string_view>(index);
  auto const vis  = d_visibilities.element<cudf::string_view>(index);
  if (vis == visible) {
    auto const space_idx    = name.find(' ');
    auto const first        = name.substr(0, space_idx);
    auto const last_initial = name.substr(space_idx + 1, 1);
    auto const output_size  = first.size_bytes() + last_initial.size_bytes() + 1;

    char* output_ptr = static_cast<char*>(malloc(output_size));

    // build output string
    d_output[index]  = cudf::string_view{output_ptr, output_size};
    memcpy(output_ptr, last_initial.data(), last_initial.size_bytes());
    output_ptr += last_initial.size_bytes();
    *output_ptr++ = ' ';
    memcpy(output_ptr, first.data(), first.size_bytes());
  } else {
    d_output[index] = cudf::string_view{redaction.data(), redaction.size_bytes()};
  }
}

__global__ void free_kernel(cudf::string_view redaction, cudf::string_view* d_output, int count)
{
  auto index = threadIdx.x + blockIdx.x * blockDim.x;
  if (index >= count) return;

  auto ptr = const_cast<char*>(d_output[index].data());
  if (ptr != redaction.data()) free(ptr); // free everything that does match the redaction string
}
在测量内核性能之前,这似乎是一种合理的方法。在具有 600K 行数据的 A6000 上,这种方法大约需要 108 毫秒,比上面使用 lib cuDF 字符串 API 提供的解决方案慢 30 倍以上。
redact_kernel         60.3ms
free_kernel           45.5ms
make_strings_column    0.5ms
这里的主要瓶颈是两个内核中的malloc/free调用。 CUDA 动态设备内存需要同步内核中的malloc/free调用,导致并行执行退化为顺序执行。
预先分配工作内存以消除瓶颈
在启动内核之前,用预先分配的工作内存替换内核中的malloc/free调用,从而消除malloc/free瓶颈。
对于编校示例,此示例中每个字符串的输出大小不应大于输入字符串本身,因为逻辑只删除字符。因此,可以使用与输入缓冲区大小相同的单个设备内存缓冲区。使用输入偏移定位每行位置。
访问字符串列的偏移量涉及使用cudf::strings_column_view包装cudf::column_view并调用其 offsets_begin方法。也可以使用chars_size方法访问chars子列的大小。然后在调用内核以存储字符输出数据之前预先分配rmm::device_uvector。
auto const scv = cudf::strings_column_view(names);
auto const offsets = scv.offsets_begin();
auto working_memory = rmm::device_uvector<char>(scv.chars_size(), stream);
预分配内核
__global__ void redact_kernel(cudf::column_device_view const d_names,
                              cudf::column_device_view const d_visibilities,
                              cudf::string_view redaction,
                              char* working_memory,
                              cudf::offset_type const* d_offsets,
                              cudf::string_view* d_output)
{
  auto index = threadIdx.x + blockIdx.x * blockDim.x;
  if (index >= d_names.size()) return;

  auto const visible = cudf::string_view("public", 6);

  auto const name = d_names.element<cudf::string_view>(index);
  auto const vis  = d_visibilities.element<cudf::string_view>(index);
  if (vis == visible) {
    auto const space_idx    = name.find(' ');
    auto const first        = name.substr(0, space_idx);
    auto const last_initial = name.substr(space_idx + 1, 1);
    auto const output_size  = first.size_bytes() + last_initial.size_bytes() + 1;

    // resolve output string location
    char* output_ptr = working_memory + d_offsets[index];
    d_output[index]  = cudf::string_view{output_ptr, output_size};

    // build output string into output_ptr
    memcpy(output_ptr, last_initial.data(), last_initial.size_bytes());
    output_ptr += last_initial.size_bytes();
    *output_ptr++ = ' ';
    memcpy(output_ptr, first.data(), first.size_bytes());
  } else {
    d_output[index] = cudf::string_view{redaction.data(), redaction.size_bytes()};
  }
}
内核输出cudf::string_view对象的矢量,该矢量被传递给 cudf::make_strings_column 工厂功能。此函数的第二个参数用于标识输出列中的空条目。本文中的示例没有空条目,因此使用了 nullptr 占位符cudf::string_view{nullptr,0}。
auto str_ptrs = rmm::device_uvector<cudf::string_view>(names.size(), stream);

redact_kernel<<<blocks, block_size, 0, stream.value()>>>(*d_names,
                                                         *d_visibilities,
                                                         d_redaction.value(),
                                                         working_memory.data(),
                                                         offsets,
                                                         str_ptrs.data());

auto result = cudf::make_strings_column(str_ptrs, cudf::string_view{nullptr,0}, stream);
在具有 600K 行数据的 A6000 上,此方法大约需要 1.1 毫秒,因此比基线高出 2 倍以上。大致细分如下:
  redact_kernel            66us
make_strings_column 400us剩余时间花在cudaMalloc, cudaFree, cudaMemcpy,上,这是管理rmm::device_uvector临时实例的典型开销。如果保证所有输出字符串的大小都与输入字符串相同或更小,则此方法很有效。
总的来说,使用 RAPIDS RMM 切换到批量工作内存分配是一个显著的改进,也是自定义字符串函数的一个很好的解决方案。
优化列创建以加快计算时间
有没有办法进一步改进这一点?现在的瓶颈是cudf::make_strings_column工厂函数,它从cudf::string_view对象的矢量构建两个字符串列组件offsets和chars。
在 libcudf 中,包含了许多工厂函数来构建字符串列。前面示例中使用的工厂函数获取cudf::string_view对象的cudf::device_span,然后通过对底层字符数据执行gather来构造列,以构建偏移量和字符子列。rmm::device_uvector可自动转换为cudf::device_span,而无需复制任何数据。
但是,如果直接构建字符矢量和偏移矢量,则可以使用不同的工厂函数,它只需创建字符串列,而不需要聚集来复制数据。
sizes_kernel首先传递输入数据,以计算每个输出行的确切输出大小:
Optimized kernel: Part 1
__global__ void sizes_kernel(cudf::column_device_view const d_names,
                             cudf::column_device_view const d_visibilities,
                             cudf::size_type* d_sizes)
{
  auto index = threadIdx.x + blockIdx.x * blockDim.x;
  if (index >= d_names.size()) return;

  auto const visible = cudf::string_view("public", 6);
  auto const redaction = cudf::string_view("X X", 3);

  auto const name = d_names.element<cudf::string_view>(index);
  auto const vis  = d_visibilities.element<cudf::string_view>(index);

  cudf::size_type result = redaction.size_bytes(); // init to redaction size
  if (vis == visible) {
    auto const space_idx    = name.find(' ');
    auto const first        = name.substr(0, space_idx);
    auto const last_initial = name.substr(space_idx + 1, 1);

    result = first.size_bytes() + last_initial.size_bytes() + 1;
  }

  d_sizes[index] = result;
}
然后,通过执行就地exclusive_scan将输出大小转换为偏移量。请注意,offsets矢量是用names.size()+1元素创建的。最后一项是字节总数(所有大小加在一起),而第一项是 0 。这两项都由exclusive_scan调用处理。从offsets列的最后一个条目检索chars列的大小,以构建字符矢量。
// create offsets vector
auto offsets = rmm::device_uvector<cudf::size_type>(names.size() + 1, stream);

// compute output sizes
sizes_kernel<<<blocks, block_size, 0, stream.value()>>>(
  *d_names, *d_visibilities, offsets.data());

thrust::exclusive_scan(rmm::exec_policy(stream), offsets.begin(), offsets.end(), offsets.begin());
redact_kernel逻辑仍然非常相同,只是它接受输出d_offsets矢量来解析每行的输出位置:
优化内核:第 2 部分
__global__ void redact_kernel(cudf::column_device_view const d_names,
                              cudf::column_device_view const d_visibilities,
                              cudf::size_type const* d_offsets,
                              char* d_chars)
{
  auto index = threadIdx.x + blockIdx.x * blockDim.x;
  if (index >= d_names.size()) return;

  auto const visible = cudf::string_view("public", 6);
  auto const redaction = cudf::string_view("X X", 3);

  // resolve output_ptr using the offsets vector
  char* output_ptr   = d_chars + d_offsets[index];

  auto const name = d_names.element<cudf::string_view>(index);
  auto const vis = d_visibilities.element<cudf::string_view>(index);
  if (vis == visible) {
    auto const space_idx    = name.find(' ');
    auto const first        = name.substr(0, space_idx);
    auto const last_initial = name.substr(space_idx + 1, 1);
    auto const output_size  = first.size_bytes() + last_initial.size_bytes() + 1;

    // build output string
    memcpy(output_ptr, last_initial.data(), last_initial.size_bytes());
    output_ptr += last_initial.size_bytes();
    *output_ptr++ = ' ';
    memcpy(output_ptr, first.data(), first.size_bytes());
  } else {
    memcpy(output_ptr, redaction.data(), redaction.size_bytes());
  }
}
从d_offsets列的最后一个条目检索输出d_chars列的大小,以分配字符矢量。内核使用预先计算的偏移量向量启动,并返回填充的字符向量。最后, lib cuDF strings 列工厂创建输出字符串列。
这 cudf::make_strings_column factory 函数构建 strings 列而不复制数据。offsets数据和 chars数据已经采用了正确的预期格式,该工厂只需从每个矢量中移动数据并围绕它创建列结构。完成后,offsets和chars的rmm::device_uvectors为空,它们的数据已移动到输出列中。
cudf::size_type output_size = offsets.back_element(stream);
auto chars = rmm::device_uvector<char>(output_size, stream);

redact_kernel<<<blocks, block_size, 0, stream.value()>>>(
    *d_names, *d_visibilities, offsets.data(), chars.data());


// from pre-assembled offsets and character buffers
auto result = cudf::make_strings_column(names.size(), std::move(offsets), std::move(chars));
在具有 600K 行数据的 A6000 上,此方法需要大约 300 us ( 0.3 ms )的时间,比以前的方法提高了 2 倍多。您可能会注意到sizes_kernel和redact_kernel共享很多相同的逻辑:一次测量输出的大小,然后再次填充输出。
从代码质量的角度来看,将转换重构为由大小和编校内核调用的设备函数是有益的。从性能的角度来看,您可能会惊讶地看到转换的计算成本是原来的两倍。
内存管理和更高效的列创建的好处往往超过两次执行转换的计算成本。
表 2 显示了本文讨论的四种解决方案的计算时间、内核计数和处理的字节数。“内核启动总数”反映了启动的内核总数,包括计算内核和辅助内核。“处理的总字节数”是累积的 DRAM 读写吞吐量,“处理的最小字节数”为测试输入和输出的平均每行 37.9 字节。理想的“内存带宽受限”情况假设 768 GB / s 带宽,即 A6000 的理论峰值吞吐量。
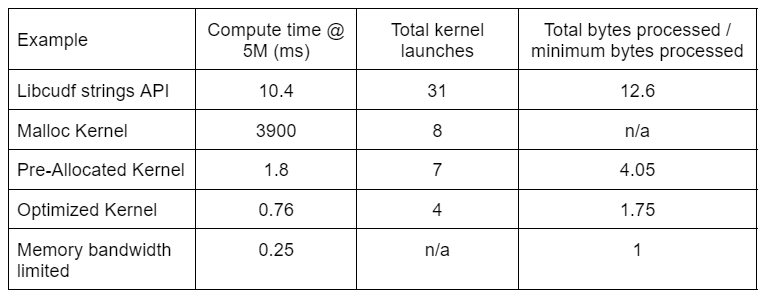
由于内核启动次数减少,处理的总字节数减少,“优化内核”提供了最高的吞吐量。有了高效的自定义内核,内核的总启动次数从 31 次减少到 4 次,处理的总字节数从输入加输出大小的 12.6 倍减少到 1.75 倍。
因此,定制内核的吞吐量比用于编校转换的通用字符串 API 高出 10 倍以上。
峰值性能分析
RAPIDS Memory Manager (RMM) 中的池内存资源是另一个可用于提高性能的工具。上述示例使用默认的“ CUDA 内存资源”分配和释放全局设备内存。然而,分配工作内存所需的时间增加了字符串转换步骤之间的延迟。 RMM 中的“池内存资源”通过预先分配一个大的内存池,并在处理过程中根据需要分配子分配来减少延迟。
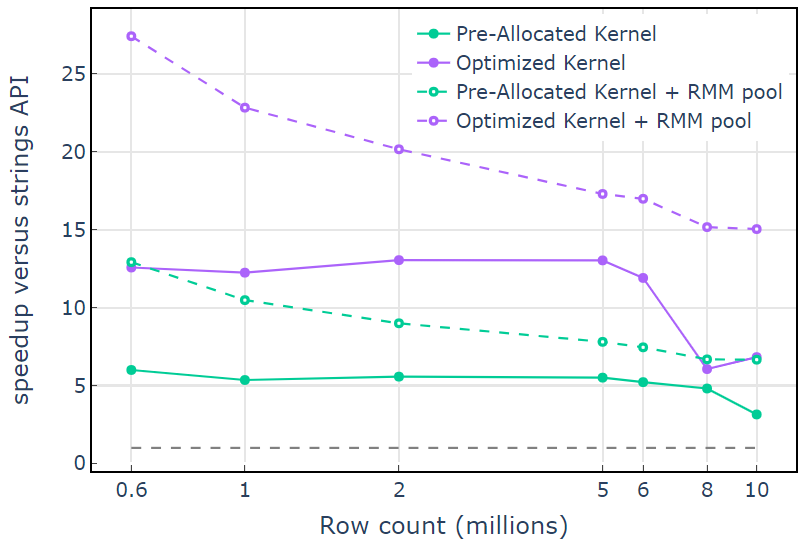
对于 CUDA 内存资源,“ Optimized Kernel ”显示了 10×15 倍的加速,由于分配大小的增加,在较高的行数时开始下降(图 3 )。使用池内存资源可以缓解这种影响,并比 lib cuDF stringsAPI 方法保持 15x-25 倍的速度提升。
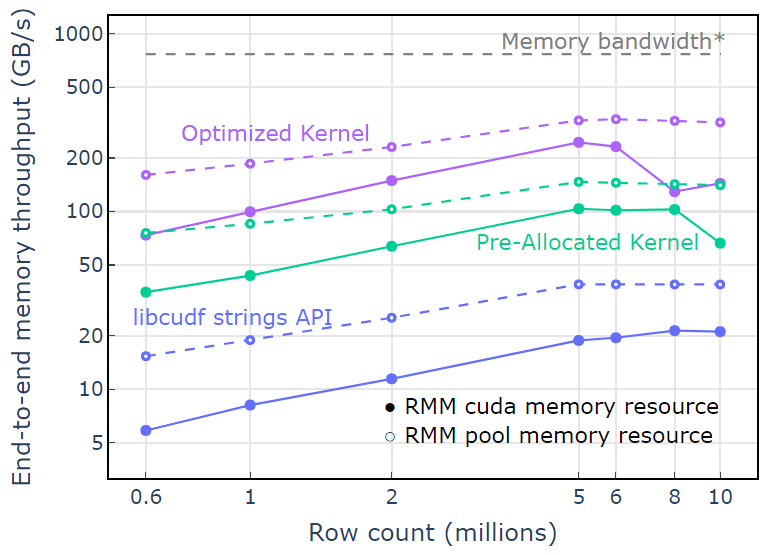
利用池内存资源,两遍算法的端到端内存吞吐量接近理论极限。“优化内核”的吞吐量达到 320-340 GB / s ,使用输入大小加上输出大小和计算时间进行测量(图 4 )。
两遍法首先测量输出元素的大小,分配内存,然后用输出设置内存。给定两遍处理算法,“优化内核”中的实现性能接近内存带宽限制。“端到端内存吞吐量”定义为输入加输出大小( GB )除以计算时间* RTX A6000 内存带宽( 768 GB / s )。
关键要点
本文演示了在 libcudf 中编写高效字符串数据转换的两种方法。 lib cuDF 通用 API 对于开发人员来说是快速而直接的,并且提供了良好的性能。 lib cuDF 还提供了设计用于自定义内核的设备端实用程序,在本例中,解锁性能提高了 10 倍以上。
应用您的知识
要开始使用 RAPIDS cuDF ,请访问 rapidsai/cudf GitHub 回购。如果您尚未尝试使用 cuDF 和 lib cuDF 来处理字符串处理工作负载,我们鼓励您测试最新版本。 Docker containers 是为发行版和夜间构建提供的。 Conda packages 也可用于简化测试和部署。如果您已经在使用 cuDF ,我们鼓励您通过访问 GitHub 上的 rapidsai/cudf/tree/HEAD/cpp/examples/strings 来运行新的字符串转换示例。