训练人工智能模型需要大量的数据。获取大量训练数据可能很困难、耗时且成本高昂。此外,所收集的数据可能无法涵盖各种角落的情况,从而使人工智能模型无法准确预测各种场景。
Synthetic data提供了一种替代真实世界数据的方法,使人工智能研究人员和工程师能够引导人工智能模型训练。除了引导模型训练外,研究人员还可以通过改变许多不同的参数(如位置、颜色、对象大小或照明条件)来快速生成新的数据集,以生成有助于创建通用模型的不同数据
这篇文章向你展示了如何使用一个模型,使用从NVIDIA Omniverse Replicator,一个以编程方式生成物理上精确的 3D 合成数据的 SDKpretrained model使用这些数据,而不是收集真实世界的数据。使用合成数据,可以创建所需的确切场景,甚至可以添加新元素或调整场景,从而进一步迭代对象检测管道
构建数据集
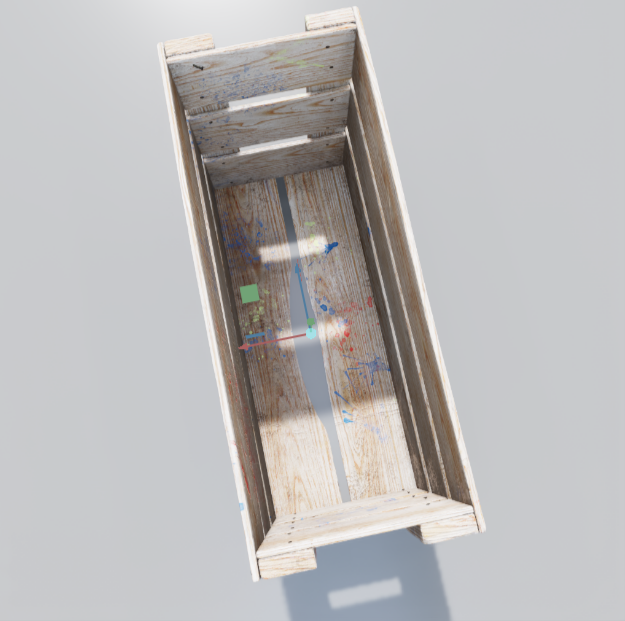
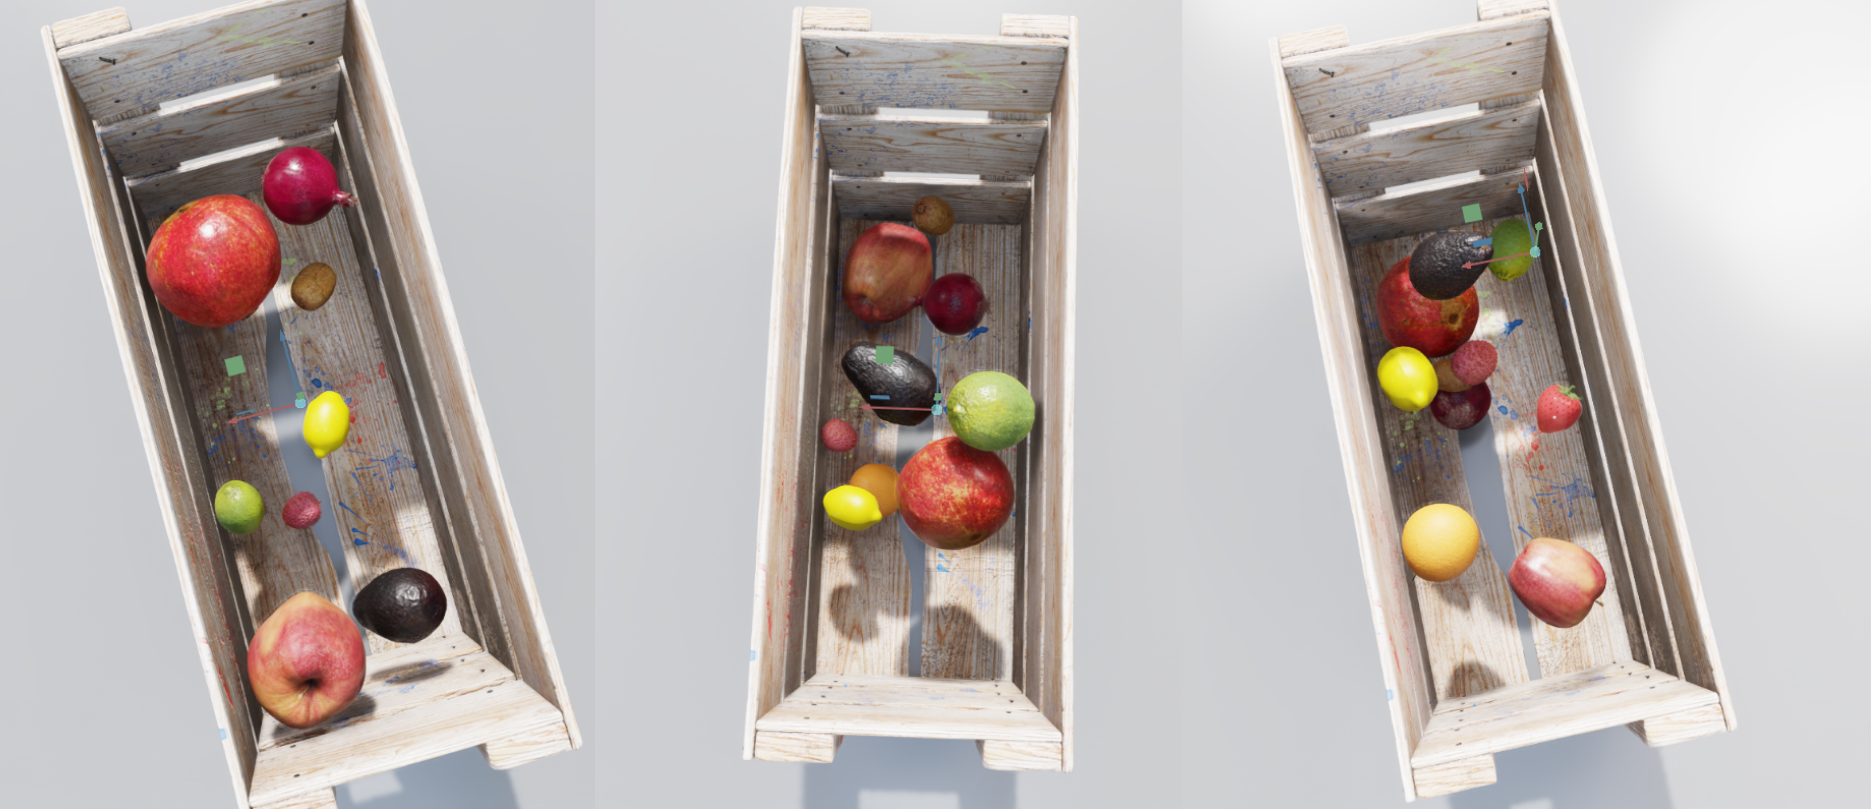
要生成合成数据,首先要在数字世界中创建环境。对于这里给出的示例,环境是一个在所有生成的数据中都是一致的曲面
在本节中,您正在使用NVIDIA Omniverse Code以运行复制器脚本。以下屏幕截图来自 NVIDIA Omniverse 代码 GUI 。完成脚本后,您可以继续在 NVIDIA Omniverse 代码中运行,以查看生成的数据,也可以在本地终端中以无头模式运行。将对这两种方法进行描述。
为此,加载三个通用场景描述( USD )包括在NVIDIA Omniverse使用以下代码创建基本场景:
with rep.new_layer():
    CRATE = 'omniverse://localhost/NVIDIA/Samples/Marbles/assets/standalone/SM_room_crate_3/SM_room_crate_3.usd'
    SURFACE = 'omniverse://localhost/NVIDIA/Assets/Scenes/Templates/Basic/display_riser.usd'
    ENVS = 'omniverse://localhost/NVIDIA/Assets/Scenes/Templates/Interior/ZetCG_ExhibitionHall.usd'
加载这些资产后,使用 NVIDIA Omniverse Replicator API 将它们设置为场景中的静态元素。从装载的 USDs 中创建 NVIDIA Omniverse Replicator 元素,并将水果箱放在地面上的位置和重量。为了让板条箱位于表面顶部,制作两个物理对撞机,这样一个对撞机就不会“穿过”另一个:
env = rep.create.from_usd(ENVS)
    surface = rep.create.from_usd(SURFACE)
    with surface:
        rep.physics.collider()
    crate = rep.create.from_usd(CRATE)
    with crate:
        rep.physics.collider()
        rep.physics.mass(mass=10000)
        rep.modify.pose(
                position=(0, 20, 0),
                rotation=(0, 0, 90)
            )
接下来,加载水果 USD 资产,这一次将它们存储在一个字典中,将它们的类名作为关键字,将资产位置作为值。使用这种方法,您可以稍后对它们进行迭代。
FRUIT_PROPS = {
        'apple': 'omniverse://localhost/NVIDIA/Assets/ArchVis/Residential/Food/Fruit/Apple.usd',
        'avocado': 'omniverse://localhost/NVIDIA/Assets/ArchVis/Residential/Food/Fruit/Avocado01.usd',
        'kiwi': 'omniverse://localhost/NVIDIA/Assets/ArchVis/Residential/Food/Fruit/Kiwi01.usd',
        'lime': 'omniverse://localhost/NVIDIA/Assets/ArchVis/Residential/Food/Fruit/Lime01.usd',
        'lychee': 'omniverse://localhost/NVIDIA/Assets/ArchVis/Residential/Food/Fruit/Lychee01.usd',
        'pomegranate': 'omniverse://localhost/NVIDIA/Assets/ArchVis/Residential/Food/Fruit/Pomegranate01.usd',
        'onion': 'omniverse://localhost/NVIDIA/Assets/ArchVis/Residential/Food/Vegetables/RedOnion.usd',
        'lemon': 'omniverse://localhost/NVIDIA/Assets/ArchVis/Residential/Decor/Tchotchkes/Lemon_01.usd',
        'orange': 'omniverse://localhost/NVIDIA/Assets/ArchVis/Residential/Decor/Tchotchkes/Orange_01.usd'    }
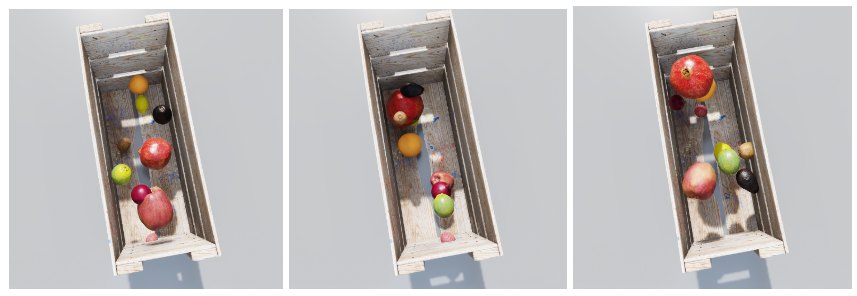
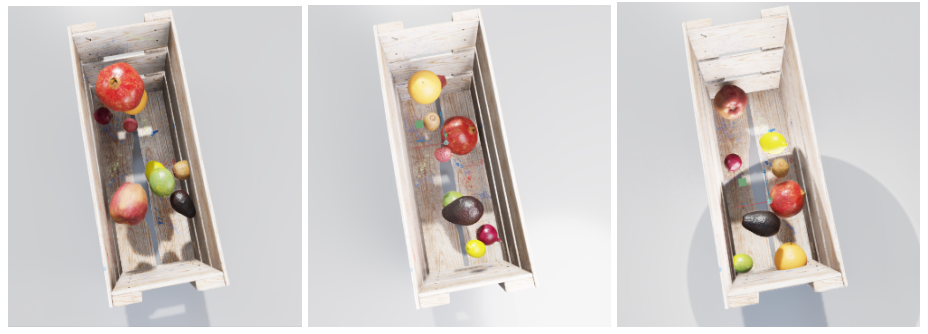
要生成每帧中不同的数据,请随机化每帧中出现的水果、水果在板条箱中出现的位置以及水果总数。这为实际生产线中可能看到的每种水果配置提供了最大的覆盖范围。
def random_props(file_name, class_name, max_number=1, one_in_n_chance=3):
        instances = rep.randomizer.instantiate(file_name, size=max_number, mode='scene_instance')
        print(file_name)
        with instances:
            rep.modify.semantics([('class', class_name)])
            rep.modify.pose(
                position=rep.distribution.uniform((-8, 5, -25), (8, 30, 25)),
                rotation=rep.distribution.uniform((-180,-180, -180), (180, 180, 180)),
                scale = rep.distribution.uniform((0.8), (1.2)),
            )

            rep.modify.visibility(rep.distribution.choice([True],[False]*(one_in_n_chance)))
        return instances.node
为了进一步使数据集多样化,在每一帧中引入一些其他随机化。首先,使用以下代码随机化每帧的光的数量、颜色和数量:
def sphere_lights(num):
        lights = rep.create.light(
            light_type="Sphere",
            temperature=rep.distribution.normal(6500, 500),
            intensity=rep.distribution.normal(30000, 5000),
            position=rep.distribution.uniform((-300, -300, -300), (300, 300, 300)),
            scale=rep.distribution.uniform(50, 100),
            count=num        )
        return lights.node
    rep.randomizer.register(sphere_lights)
摄像机角度是引入场景的另一种变化,以考虑板条箱的不同位置和摄像机高度。下面的代码还确保相机始终面向机箱的位置,即使其位置已调整。
with camera:
            rep.modify.pose(position=rep.distribution.uniform((-10, 105, -20), (5, 120, -5)), look_at=(0,20,0))
最后一步是运行数据生成脚本并记录所需的信息。对于本例,为生成的每一帧中的水果写出基线 RGB 数据、边界框和标签
with rep.trigger.on_frame(num_frames=10):
        for n, f in FRUIT_PROPS.items():
            random_props(f, n)

        rep.randomizer.sphere_lights(5)

    # Initialize and attach writer
    writer = rep.WriterRegistry.get("BasicWriter")
    writer.initialize(output_dir="fruit_data", rgb=True, bounding_box_2d_tight=True)
    writer.attach([render_product])
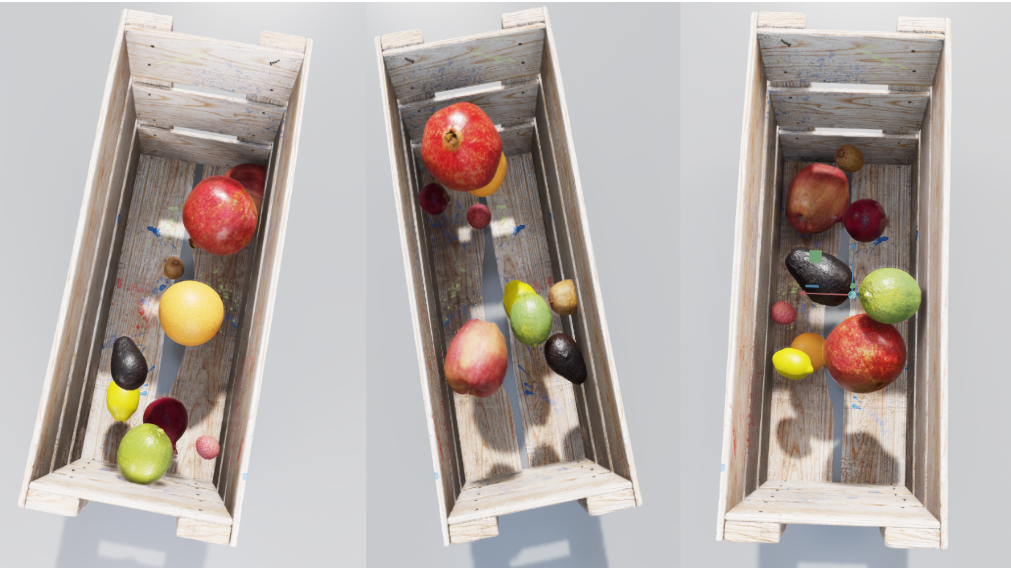
创建 NVIDIA Omniverse Replicator 脚本后,有两种方法可以生成完整的数据集。前面的图像是来自 NVIDIA Omniverse 代码 GUI 的剧照,它使您能够调整场景并立即可视化更改。这个 GUI 使您有机会在每次代码更改时可视化数据。一旦您对脚本感到满意,就可以生成一个包含更多图像的完整数据集
接下来的步骤详细介绍了如何在 NVIDIA Omniverse 代码 GUI 的脚本编辑器中继续运行代码,或者完全在自己的本地终端中运行代码。
要运行无头脚本,请在现有脚本的末尾添加以下行:
rep.orchestrator.run要在 NVIDIA Omniverse 容器内无头运行此代码,请首先找到omni.code.replicator.sh剧本打开 NVIDIA Omniverse 启动器并导航到代码应用程序。单击启动按钮右侧的菜单,查看 NVIDIA Omniverse 代码安装的位置。从该文件夹中,您可以运行以下命令,传入您自己的无头脚本的位置:
./omni.code.replicator.sh --no-window --/omni/replicator/script="FruitBasketOVEReplicatorDemo/data_generation/generate_data_headless.py"
浏览您的数据
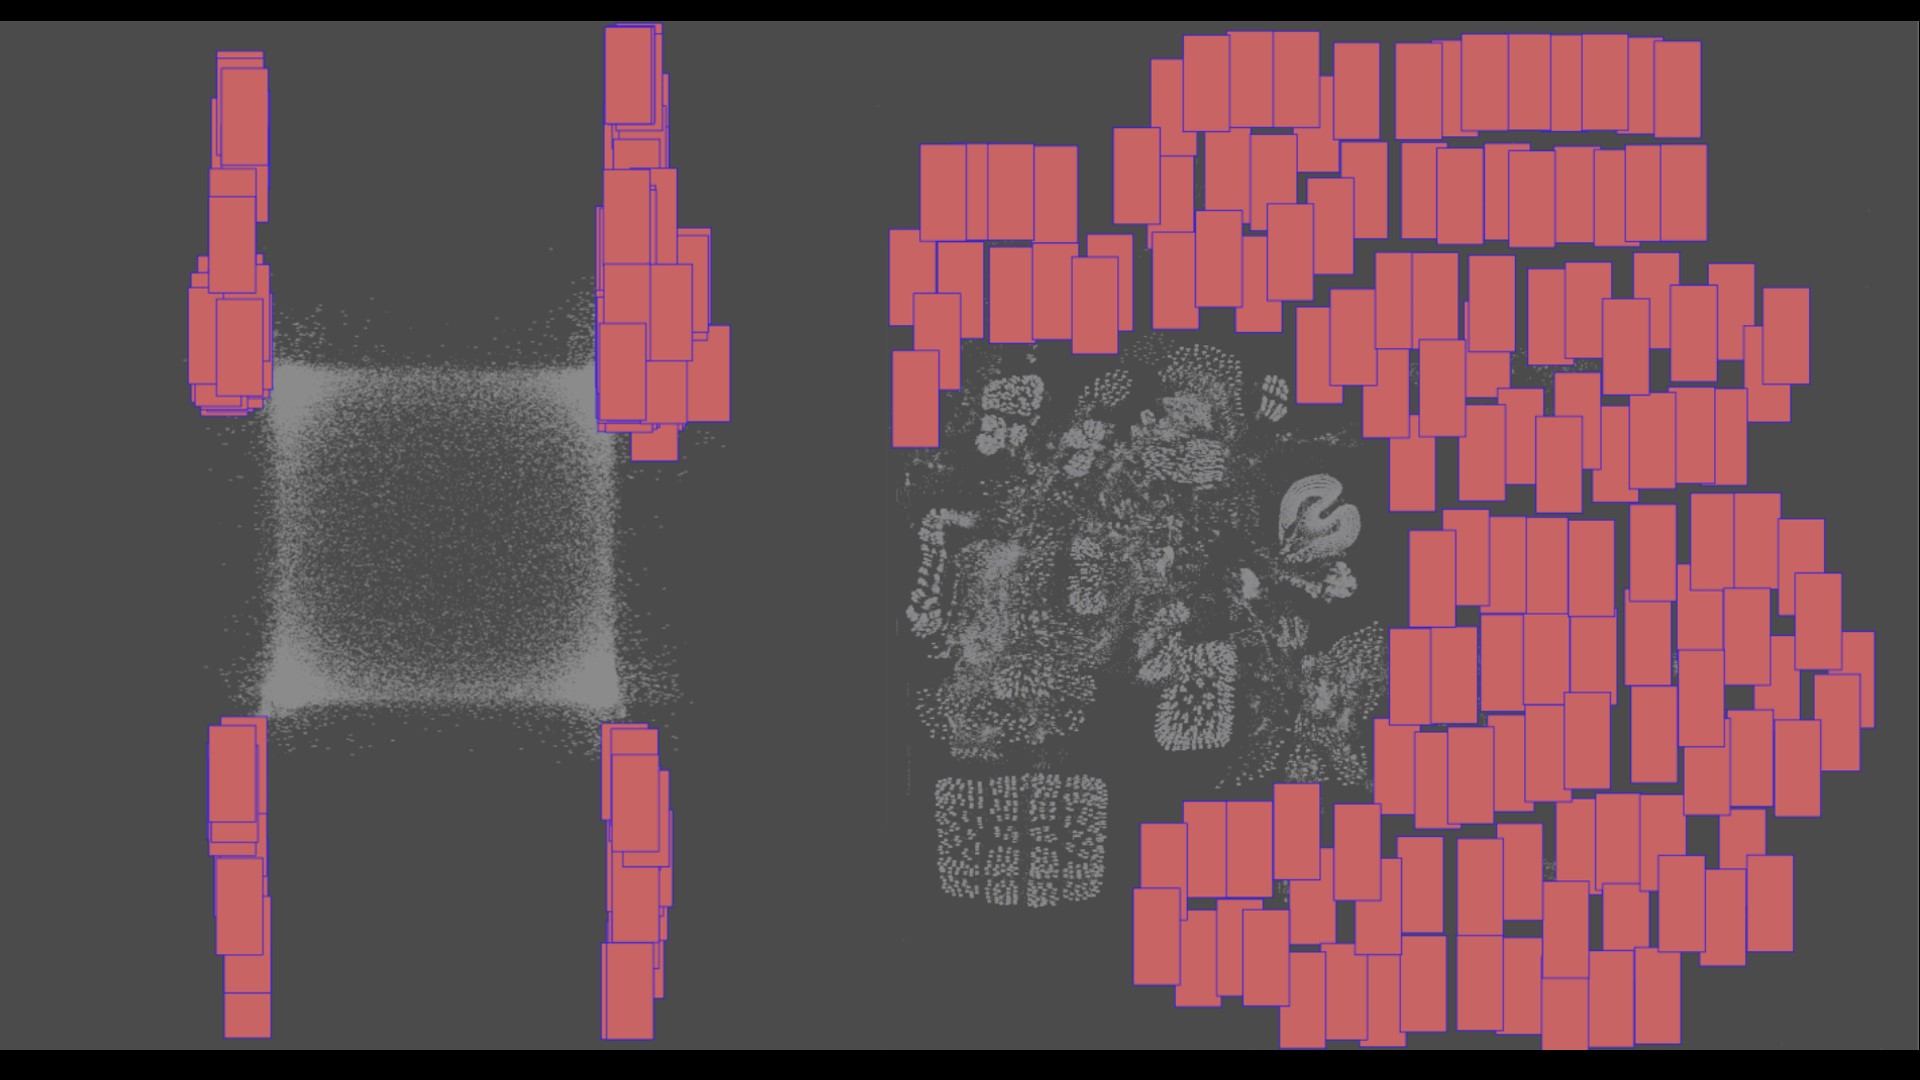
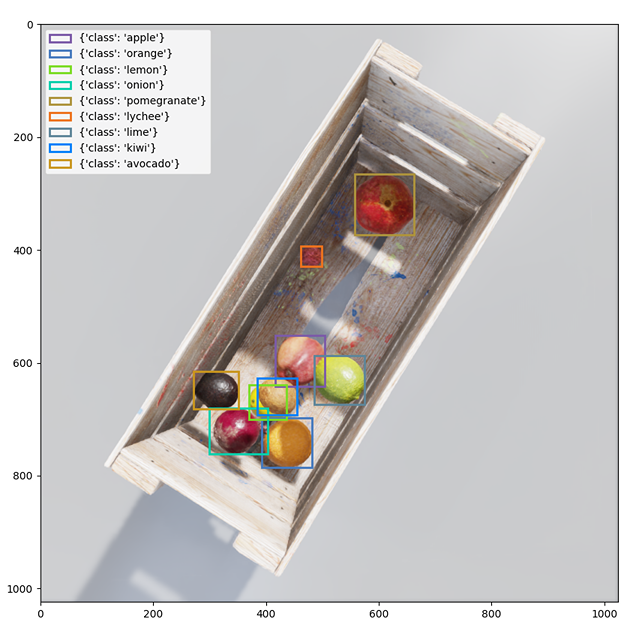
使用 Replicator 脚本创建第一个帧后,可以调整参数以获得所需的输出。为此,您可能需要查看放置在生成图像上的边界框
NVIDIA Omniverse 中的函数用于可视化生成图像上边界框数据的颜色和标签。这些函数获取生成的背景图像的路径、边界框数据、类标签以及使用彩色边界框存储可视化的位置。
def colorize_bbox_2d(rgb_path, data, id_to_labels, file_path):

    rgb_img = Image.open(rgb_path)
    colors = [data_to_colour(bbox["semanticId"]) for bbox in data]
    fig, ax = plt.subplots(figsize=(10, 10))
    ax.imshow(rgb_img)
    for bbox_2d, color, index in zip(data, colors, range(len(data))):
        labels = id_to_labels[str(index)]
        rect = patches.Rectangle(
            xy=(bbox_2d["x_min"], bbox_2d["y_min"]),
            width=bbox_2d["x_max"] - bbox_2d["x_min"],
            height=bbox_2d["y_max"] - bbox_2d["y_min"],
            edgecolor=color,
            linewidth=2,
            label=labels,
            fill=False,
        )
        ax.add_patch(rect)

    plt.legend(loc="upper left")

    plt.savefig(file_path)
要使用上面显示的函数,请使用生成的数据运行以下命令:
bbox2d_loose_file_name = "bounding_box_2d_tight_0.npy"
data = np.load(os.path.join(out_dir, bbox2d_tight_file_name))

bbox2d_tight_labels_file_name = "bounding_box_2d_tight_labels_0.json"
with open(os.path.join(out_dir, bbox2d_tight_labels_file_name), "r") as json_data:
    bbox2d_loose_id_to_labels = json.load(json_data)

colorize_bbox_2d(rgb_path, data, bbox2d_loose_id_to_labels, os.path.join(vis_out_dir, "bbox2d_tight.png"))
训练你的模特
生成数据后,可以启动模型训练工作流。此示例使用PyTorchtorchvision 软件包,用于微调预训练的 Faster R-CNN 模型。然而,合成数据也可以引入其他使用工具的管道,如NVIDIA TAO 工具包或 TensorFlow
训练脚本中的第一步是定义数据集以构建 PyTorch DataLoader 。做一些初步工作,对三种文件类型进行排序,并将边界框信息与正确的水果标签关联起来。这里的关键输出是具有边界框信息、水果标签、框区域和图像 ID 的目标
target = {}
        target["boxes"] = torch.as_tensor(boxes, dtype=torch.float32)
        target["labels"] = torch.as_tensor(labels_out, dtype=torch.int64)
        target["image_id"] = torch.tensor([idx])
        target["area"] = area
一旦您有了数据集,就可以将数据拆分为训练管道的训练、验证和测试部分。然后使用以下代码为训练和验证数据集创建数据加载器:
data_loader = torch.utils.data.DataLoader(
dataset, batch_size=16, shuffle=True, num_workers=4,
collate_fn= collate_fn)
validloader = torch.utils.data.DataLoader(
valid, batch_size=16, shuffle=True, num_workers=4,
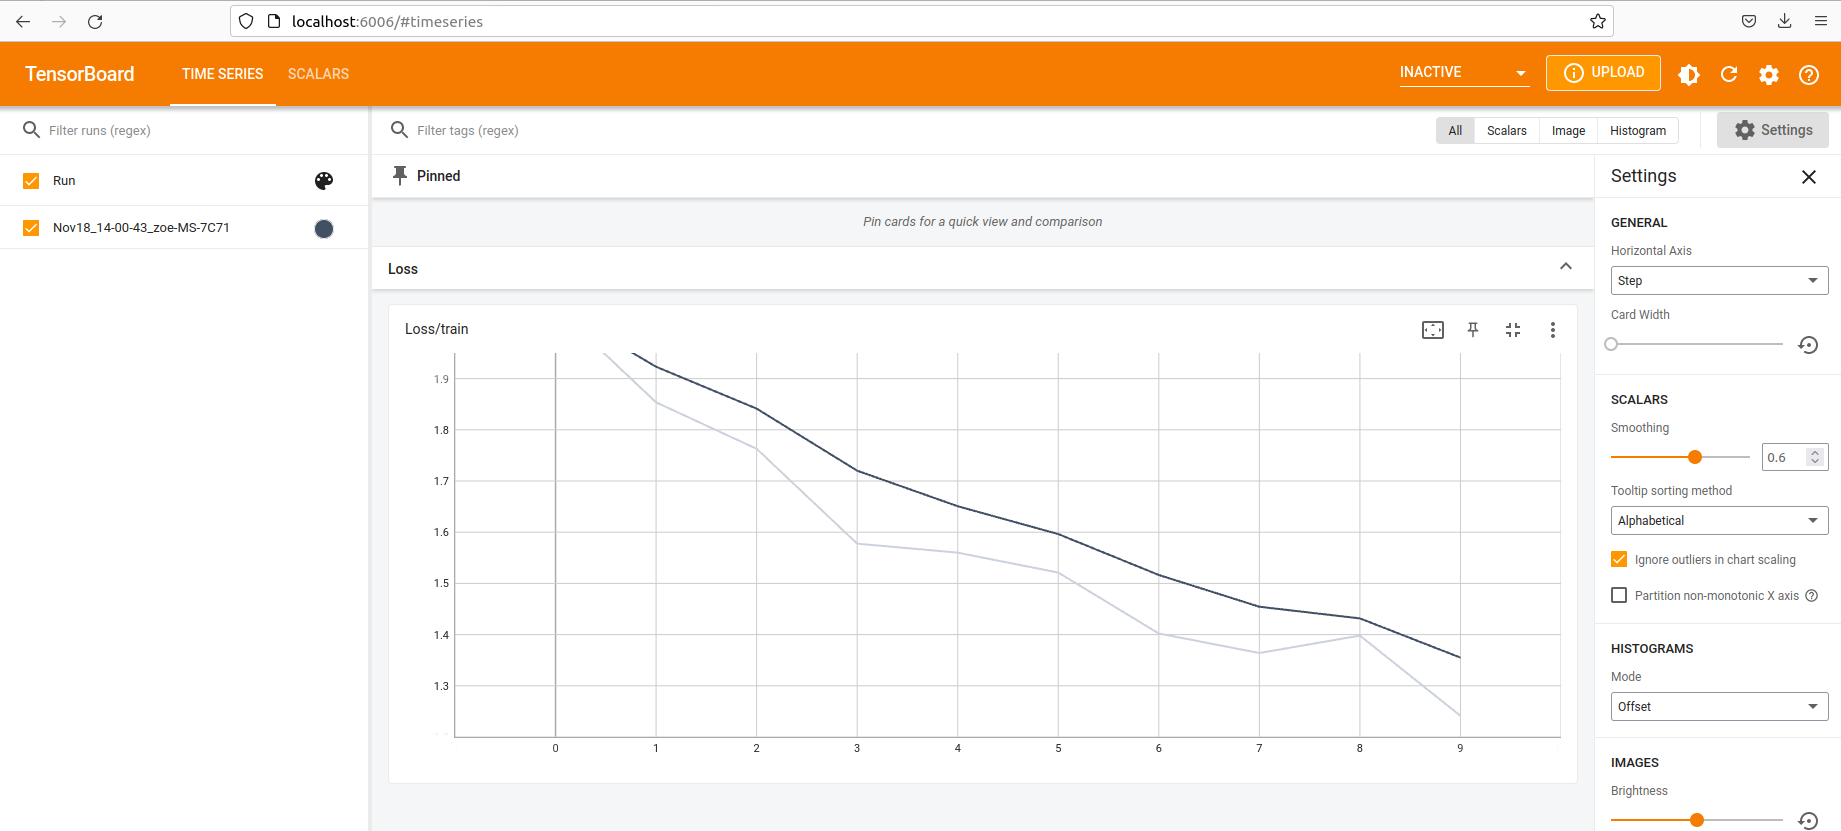
collate_fn= collate_fn) 配置好数据集和数据加载器后,继续训练。跟踪每个历元的损失,并将数据配置为显示在 TensorBoard 中以进行可视化
params = [p for p in model.parameters() if p.requires_grad]
    optimizer = torch.optim.SGD(params, lr=0.001)
    len_dataloader = len(data_loader)
    model.train()
    for epoch in range(num_epochs):
        optimizer.zero_grad()

        i = 0
        for imgs, annotations in data_loader:
            i += 1
            imgs = list(img.to(device) for img in imgs)
            annotations = [{k: v.to(device) for k, v in t.items()} for t in annotations]
            loss_dict = model(imgs, annotations)
            losses = sum(loss for loss in loss_dict.values())
            writer.add_scalar("Loss/train", losses, epoch)

            losses.backward()
            optimizer.step()

            print(f'Iteration: {i}/{len_dataloader}, Loss: {losses}')
当损失充分减少,并且对模型的训练方式感到满意时,请保存模型。最后一步是将模型部署到生产环境中
将您的模型部署到生产中
首先,使用NVIDIA Triton 推理服务器使用以下脚本将模型导出为 ONNX 格式:
torch.onnx.export(model,
                    dummy_input,
                    os.path.join(OUTPUT_DIR, "model.onnx"),
                    opset_version=11,
                    input_names=["input"],
                    output_names=["boxes", "labels", "scores", "masks"]
                    )
接下来,从 NGC 运行 NVIDIA Triton 容器,然后使用以下命令启动服务器:
tritonserver --model-repository=/model_repository --model-control-mode explicit --exit-on-error 0 --repository-poll-secs 3使用 NVIDIA Triton ,您可以“轮询”模型存储库,以查看是否发生了更改。然后,将模型复制到 model _ repository 目录中。
接下来,使用 bash 将模型复制到 NVIDIA Triton 目录中,使用以下代码:
mkdir model_repository/dmcount_onnx/ # create the folder with the model name
mkdir model_repository/dmcount_onnx/1/ # create the folder for the model version
cp model.onnx model_repository/dmcount_onnx/1/ # move the file to the directory
现在是推理的时候了。
完成循环
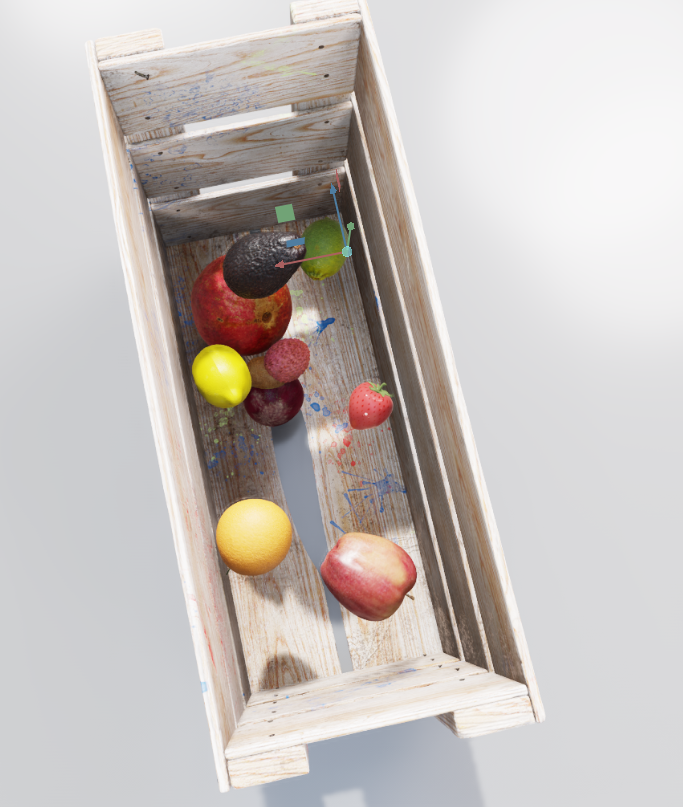
在部署模型之后,您可以选择进一步迭代对象检测管道的第一个完整实现。如果您选择添加到原始数据集,则可以在相对较少的开销下完成添加
例如,要将新水果(草莓)添加到原始选项集,请将新资源加载到原始字典并生成新数据:
'strawberry': 'omniverse://localhost/NVIDIA/Assets/ArchVis/Residential/Food/Berries/strawberry.usd',在训练步骤中,调整标签映射以使草莓添加到数据中:
static_labels = {
            'apple' : 0,
            'avocado' : 1,
            'kiwi' : 2,
            'lime' : 3,
            'lychee' : 4,
            'pomegranate' : 5,
            'onion' : 6,
            'strawberry' : 7,
            'lemon' : 8,
            'orange' : 9,
        }
现在,您可以像以前一样可视化边界框数据,注意到在生成的一些帧中添加了草莓。管道的其他元素保持不变。在生产部署中,草莓显示为注释正确
在使用合成数据时,将新数据引入对象检测管道是简化的,这使得部署到生产中成为一个触手可及的目标。合成数据释放了迭代训练工作流程的全部潜力
当您可以轻松地修改、调整和生成大量数据时,您就不再被培训管道的第一步所束缚,可以专注于微调和将模型推向生产。
总结
本教程展示了如何将合成数据集成到现有模型中。第一步展示了 NVIDIA Omniverse 代码如何为您提供一个用于编写自己的 Replicator 脚本的交互式 GUI 。此脚本可以根据场景和模型所需的数据首选项进行自定义。然后,您可以根据您的确切规范创建预先标记的数据。从那里,您可以将合成数据带到任何您想要的地方。本文中的示例将数据集成到 TorchVision 管道中进行微调
这个过程的最后一步是将经过训练的模型部署到 NVIDIA Triton 中进行推理。当您将合成数据集成到现有工作流中时,此工作流代表了您所拥有的所有选项。 NVIDIA Omniverse Replicator 为您提供了一个工具,可以迭代生成合成数据,以适应您现有的工作流程。
为了开始使用 Omniverse Replicator ,下载 NVIDIA Omniverse并安装NVIDIA Omniverse Code应用程序。要访问代码和其他 Omniverse Replicator 合成数据示例,请访问NVIDIA-Omniverse/synthetic-data-examples在 GitHub 上。
额外资源
想了解更多信息吗?看看这些专家引导的NVIDIA GTC 2023 关于生成合成数据和 Omniverse Replicator 的会话.
有关更多信息和最新消息,请参阅以下资源:
- 参观开始在 Omniverse 上构建对于所有资源,您需要学习如何为平台构建基于 USD 的自定义应用程序和扩展。
- 关注 Omniverse Instagram,Twitter,YouTube和Medium以获得额外的资源和灵感。
- 查看Omniverse 论坛加入我们的Discord 服务器和Twitch与社区聊天。
- 访问NVIDIA OmniverseGitHub repo 用于探索社区构建的代码示例和扩展。