
Video conferencing, audio and video streaming, and telecommunications recently exploded due to pandemic-related closures and work-from-home policies. Businesses, educational institutions, and public-sector agencies are experiencing a skyrocketing demand for virtual collaboration and content creation applications. The crucial part of online communication is the video stream, whether it’s a simple video call or streaming content to a broad audience. At the same time, these streams are the most network bandwidth-intensive part of online communication, often accompanied by noise and artifacts.
To solve these video quality challenges, the NVIDIA Maxine Video Effects SDK offers AI-based visual features that transform noisy, low-resolution video streams into pleasant user experiences. This post demonstrates how you can run these effects with standard webcam input and easily integrate them into video conference and content creation pipelines.
Add details and improve resolution
For poor video quality that arises from the low resolution of the image frames, the Maxine Video Effects SDK provides two state-of-the-art AI-based visual effects: Super Resolution and Upscaler.
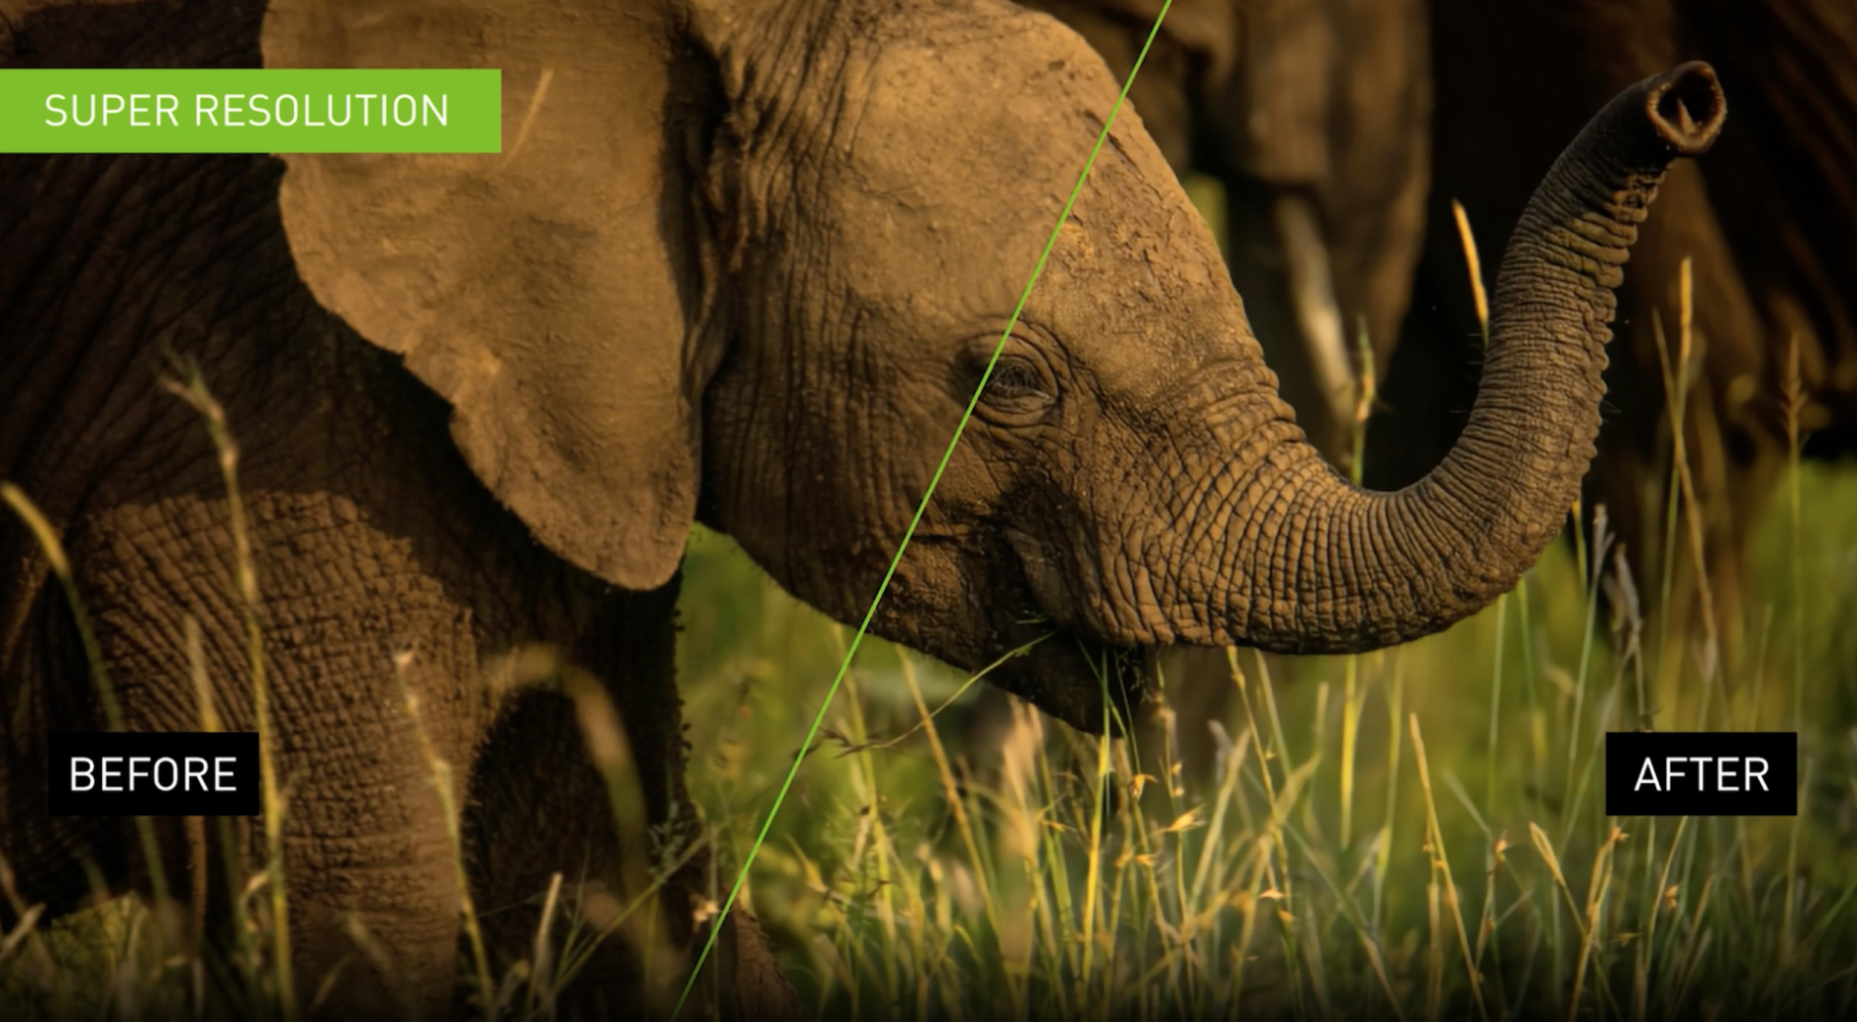
Super Resolution (Figure 1) generates a superior quality image with higher resolution and better textures from the provided input image. It offers holistic enhancements while preserving the content. This visual effect is best used on lossless compression data such as H.264. You can use this feature to scale media by 1.33x, 1.5x, 2x, 3x, and 4x.
To tune up the Super Resolution effect, select its mode:
- 0: Recommended for streams containing encoding artifacts and streams encoded with lossy compression.
- 1: Applies strong visual enhancements and is recommended for streams encoded with lossless compression
Upscaler (Figure 2) is a fast and light-weighted method for increasing the video resolution of an input video while also adding detail to the image. It focuses on the geometric structure of the frame’s content and enhances its details. Besides better image resolution, the Upscaler effect produces crisper and sharper images.

You can set Upscaler’s enhancement parameter within [0,1] range:
- 0: Increases the resolution without image enhancement.
- 1: Maximum image sharpness and crispness visual effect enhancement.
By default, Upscaler’s enhancement parameter is set to 0.4.
Remove webcam video noise and reduce encoding artifacts
The underlying causes of video noise that make or break the end-user experience are numerous. However, the two most common sources of noise are webcam noise and encoding artifacts.
Examples of webcam noise sources include the camera sensor type, exposure, or illumination level. This is especially true in the context of end-user–generated streams, if the environment is not well lit or the camera being used is of poor quality. These types of noises are highly dependent on the type of sensor in the camera.
Encoding artifacts in video streams are a consequence of the bandwidth constraints required to transmit frames. Lossy compression typically involves discarding some of the textural information in an image as well as data encoding. Common examples of lossy compression standards would be JPEG for images and H.264 for videos. When streaming this media, the stream bandwidth per unit of time is called bitrate.
In a streaming environment, the bandwidth available to stream the compressed content is not constant. This variability causes situations where the encoder has fewer bits than needed to compress the frame resulting in compression artifacts. Compression artifacts can take many forms, but one of the most common form is a blocky artifact.
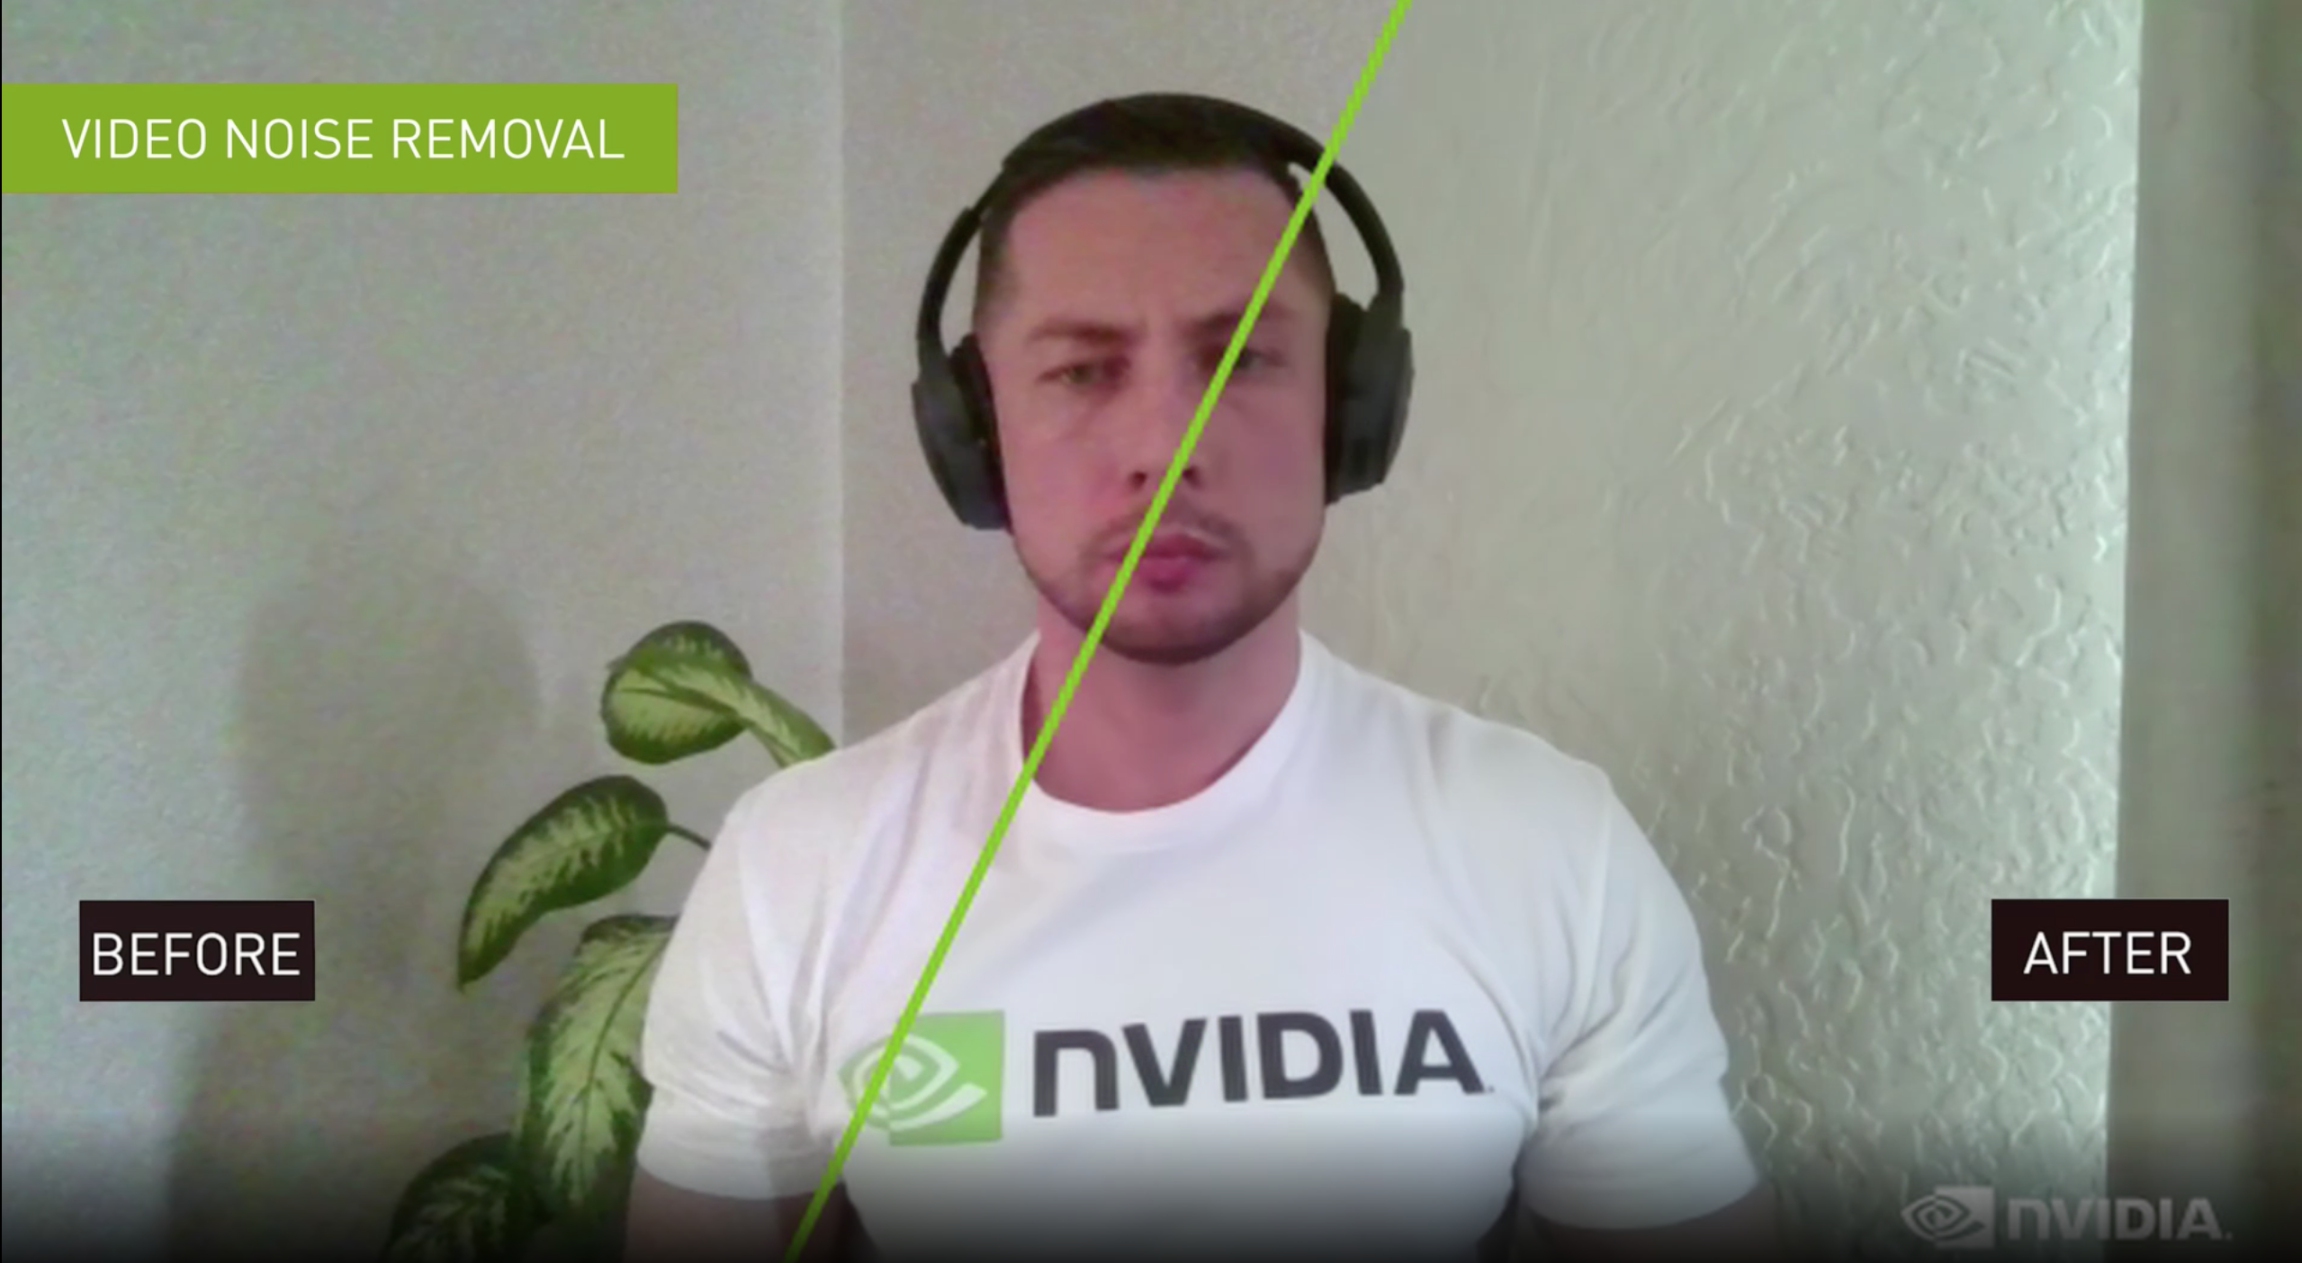
The Video Noise Removal (Figure 3) feature of the Maxine Video Effects SDK enables you to de-noise the webcam streams and preserve details, leading to better end-user experiences.
This feature has two variants with strength values:
- 0: For a weaker noise reduction effect that ensures the preservation of texture quality. This is ideal for media with low noise.
- 1: For a substantial noise reduction effect that may impact texture quality. This variant can easily be chained with Upscaler or Super Resolution to add details, enhance, and increase resolution.
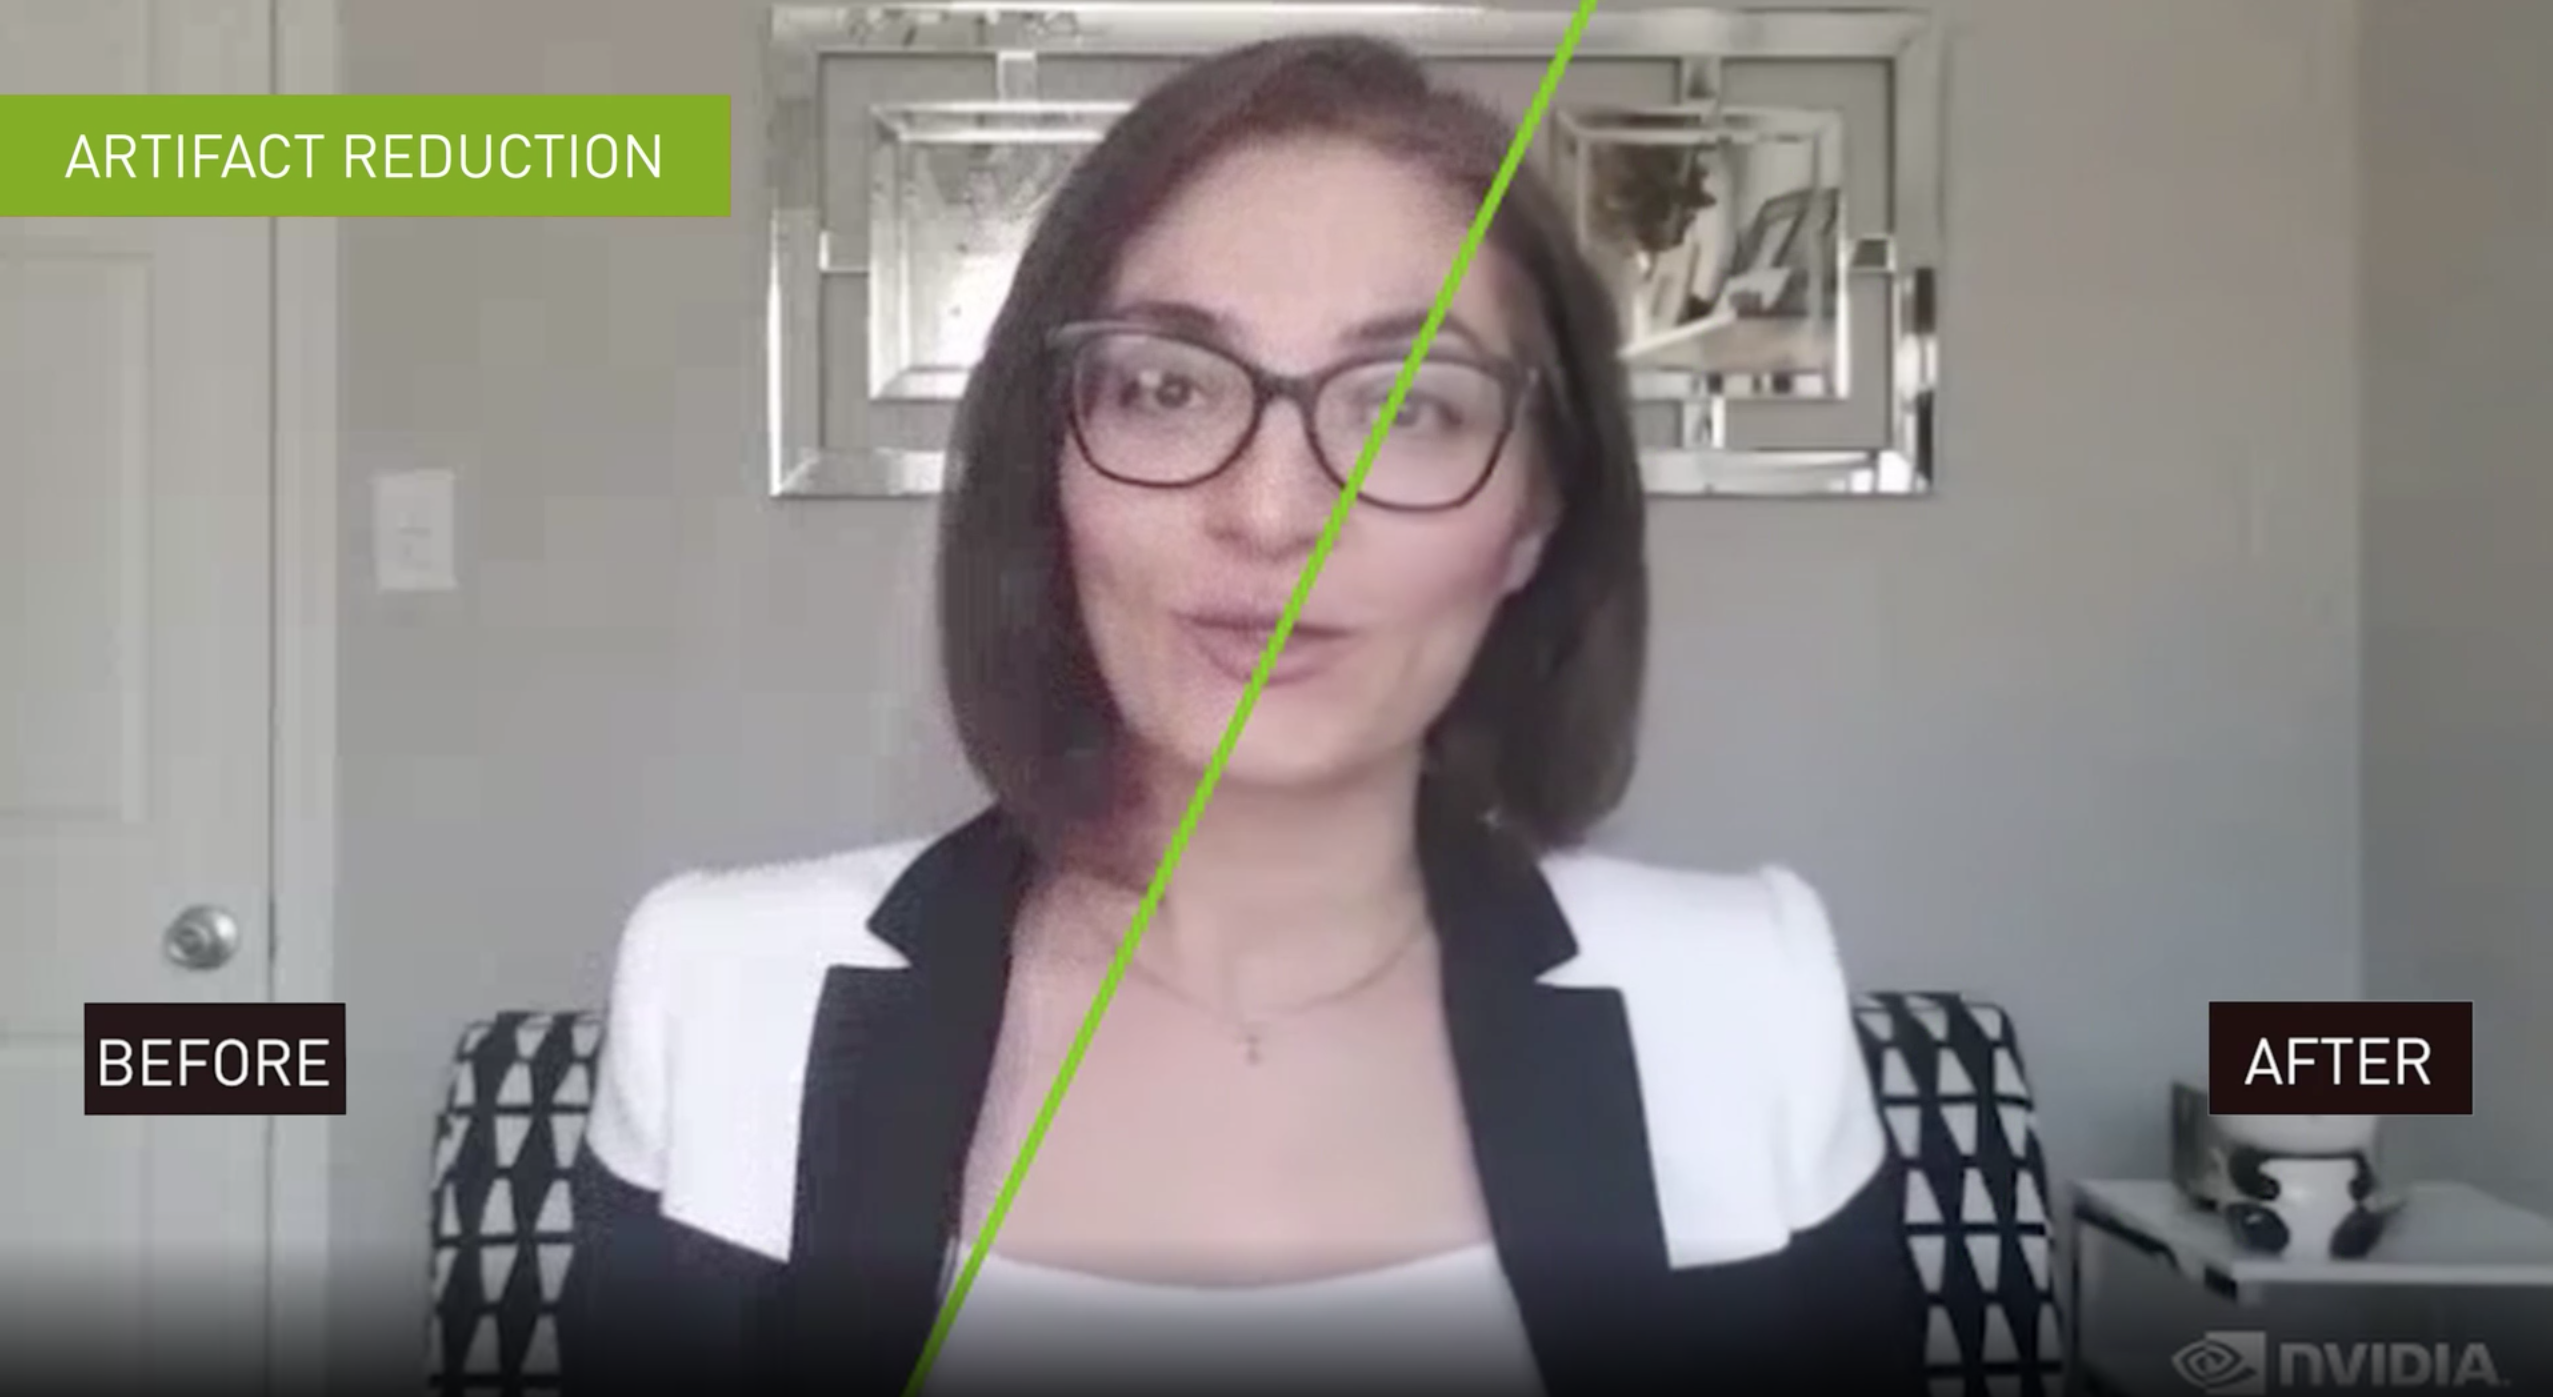
The Maxine Artifact Reduction feature (Figure 4) reduces blocky artifacts encountered when bandwidth drops on a video call. It also reduces ringing and mosquito noises, while preserving the details of the original video.
This AI-based feature is optimized for two modes:
- 0: Preserves low gradient information while reducing artifacts. This mode is more suited for a higher bitrate video.
- 1: Provides a better output stream. This mode should be applied for higher-quality lossless videos with a lower bitrate.
Enable end users to choose virtual backgrounds
To enable end users to join a meeting from an environment that is neither personal nor distracting, the Maxine Video Effects SDK offers the Virtual Background feature.
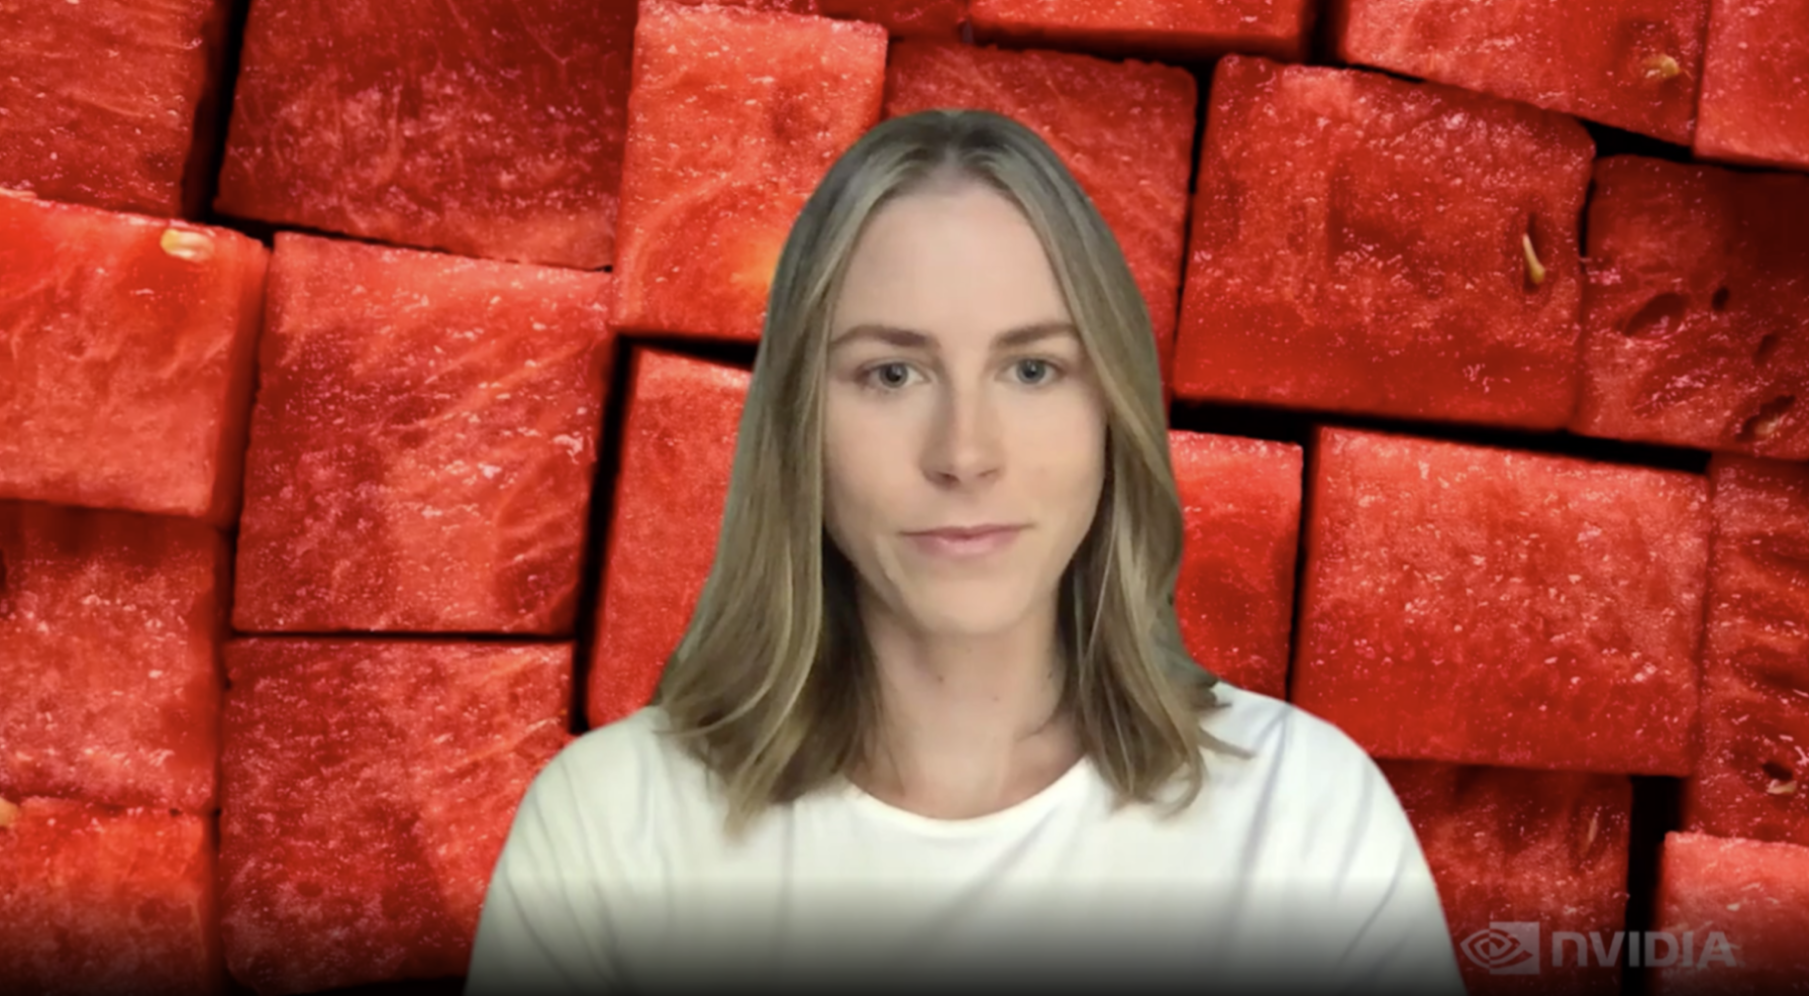
The Virtual Background feature (Figure 5) essentially generates a mask to segment out the foreground, in this case, people from the stream. You can provide any media as a background, whether image or video. You can also implement multiple creative applications, like adding multiple users in the same background. For example, if two commentators are talking about a live event, you can segment both onto the live feed of the event. Another example is segmenting out users and overlaying them on their computer’s live feed. This way, single or multiple users can present at the same time in real time while retaining immersion. All these operations use the parallelism that a GPU provides, increasing the number of streams that can be processed in real time.
The Virtual Background feature runs in two modes:
- Quality mode: For highest segmentation quality
- Performance mode: For the fastest performance
You can also use this feature to generate a blurred background with tunable blur strength.
Chain Video Effects features
For processing precompressed videos or videos with noise, along with providing a higher resolution, we recommend chaining Upscaler with Artifact Reduction or Video Noise Removal, depending on the use case. For more information, see Exploring the API. You could also get an out-of-the-box experience with the UpscalePipeline sample application packaged with the SDK.
Install the Video Effects SDK using containers and on Windows and Linux
NVIDIA offers the Maxine Video Effects SDK through Docker containers, and on both Windows and Linux platforms in the form of SDK packages.
The benefits of using containers are high scalability, and time-and-cost savings due to reduced deployment and adoption time. Using containers with Kubernetes provides a robust and easy-to-scale deployment strategy. In addition, because of the prepackaged nature of containers, you don’t have to worry about specific installations inside the container.
In this post, we focus on how to use the Maxine Video Effects SDK with containers and Windows. Before proceeding with the installation, make sure that you meet all the hardware requirements.
If you have considerable experience with the NVIDIA software stack and want to deploy the Video Effects SDK on a bare-metal Linux system, see the Maxine Getting Started page.
Use the Video Effects SDK in Docker containers
There are four steps to install and take advantage of the high-performance Video Effects SDK and its state-of-the-art AI models on containers:
- Download NVIDIA Drivers
- Download Docker and nvidia-docker for exposing the GPU to containers, as explained in NVIDIA container installation guide
- Log in to the NGC Registry using the NGC API Key
- Pull the Video Effects SDK container
You would need access to NVIDIA Turing, NVIDIA Volta, or NVIDIA Ampere Architecture generation data center GPUs: T4, V100, A100, A10, or A30.
Install the Video Effects SDK on Windows
Installing the SDK on Windows is a straightforward process:
- Download the NVIDIA Graphics Driver for Windows
- Download Microsoft Visual Studio 2017 or later (Make sure to install the build tools.)
- Download the latest Video Effects SDK package from the Getting Started page
You must have an NVIDIA RTX card to benefit from the accelerated throughput and reduced latency of the Maxine Video Effects SDK on Windows. To run this SDK on a data center card like A100, use the Linux package.
Sample applications
The Video Effects SDK comes packaged with five sample applications:
- AigsEffectApp
- BatchEffectApp
- DenoiseEffectApp
- UpscalePipelineApp
- VideoEffectsApp
These applications contain sample code to run all the features in the Video Effects SDK. To experience these features, you can also build the application and use prebuilt Windows bash scripts to run them.
You can build the applications using the build_samples.sh script found in the /VideoFX/share folder for the SDK. If you are using the Docker container, this is the folder of entry.
bash build_samples.sh’
The script builds the sample apps and installs some sample, app-specific dependencies. This step might take a few minutes. After it’s built, you can find at least one bash script per application in the folder where you built the applications. Here’s a closer look at one of the applications:
#!/bin/sh

. ./setup_env.sh

VideoEffectsApp \
        --model_dir=$_VFX_MODELS \
        --in_file=$_VFX_SHARE/samples/input/input1.jpg \
        --out_file=ar_1.png \
        --effect=ArtifactReduction \
        --mode=1 \
        --show

VideoEffectsApp \
        --model_dir=$_VFX_MODELS \
        --in_file=$_VFX_SHARE/samples/input/input1.jpg \
        --out_file=ar_0.png \
        --effect=ArtifactReduction \
        --mode=0 \
        --show

VideoEffectsApp \
        --model_dir=$_VFX_MODELS \
        --in_file=$_VFX_SHARE/samples/input/input2.jpg \
        --out_file=sr_0.png \
        --effect=SuperRes \
        --resolution=2160 \
        --mode=0 \
        --show

VideoEffectsApp \
        --model_dir=$_VFX_MODELS \
        --in_file=$_VFX_SHARE/samples/input/input2.jpg \
        --out_file=sr_1.png \
        --effect=SuperRes \
        --resolution=2160 \
        --mode=1 \
        --show
This is an example of the command line that refers to one of the sample applications, VideoEffectsApp. You can tweak the following arguments to experience different feature capabilities:
--effect: Choose the effect: ArtifactReduction, SuperRes, or Upscale.--mode: Toggle between two modes: 0, 1.--strength: Toggles the Upscaler enhancement multiplier: 0, 1.--resolution: Use to input the target resolution of the selected media. For instance, if you have a 720p media to double, use 1440.
When running these effects locally, you can use the keyboard controls to toggle the effects and experience the effects live with your webcam feed. For more information, see the Sample Applications Reference. If you are interested in chaining these effects, keep reading. Finally, if you are interested in learning more about batching and maximizing throughput, see the BatchEffectApp sample application.
Use the API to chain multiple video effects features
Chaining effects is quite interesting for many applications. This post focuses on how to chain two effects that work well together: Artifact Reduction and Upscaler. Another example would be running Video Noise Removal and Super Resolution or Upscaler for a noisy webcam stream. You can pick and choose the effects that best fit your use case.
Here’s more about the API and its usage. Figure 6 shows the high-level process of using the functions from the Video Effects SDK:
- Creating and configuring the effect
- Configuring CUDA streams, allocating buffers, and loading the model
- Loading the data and running the effects
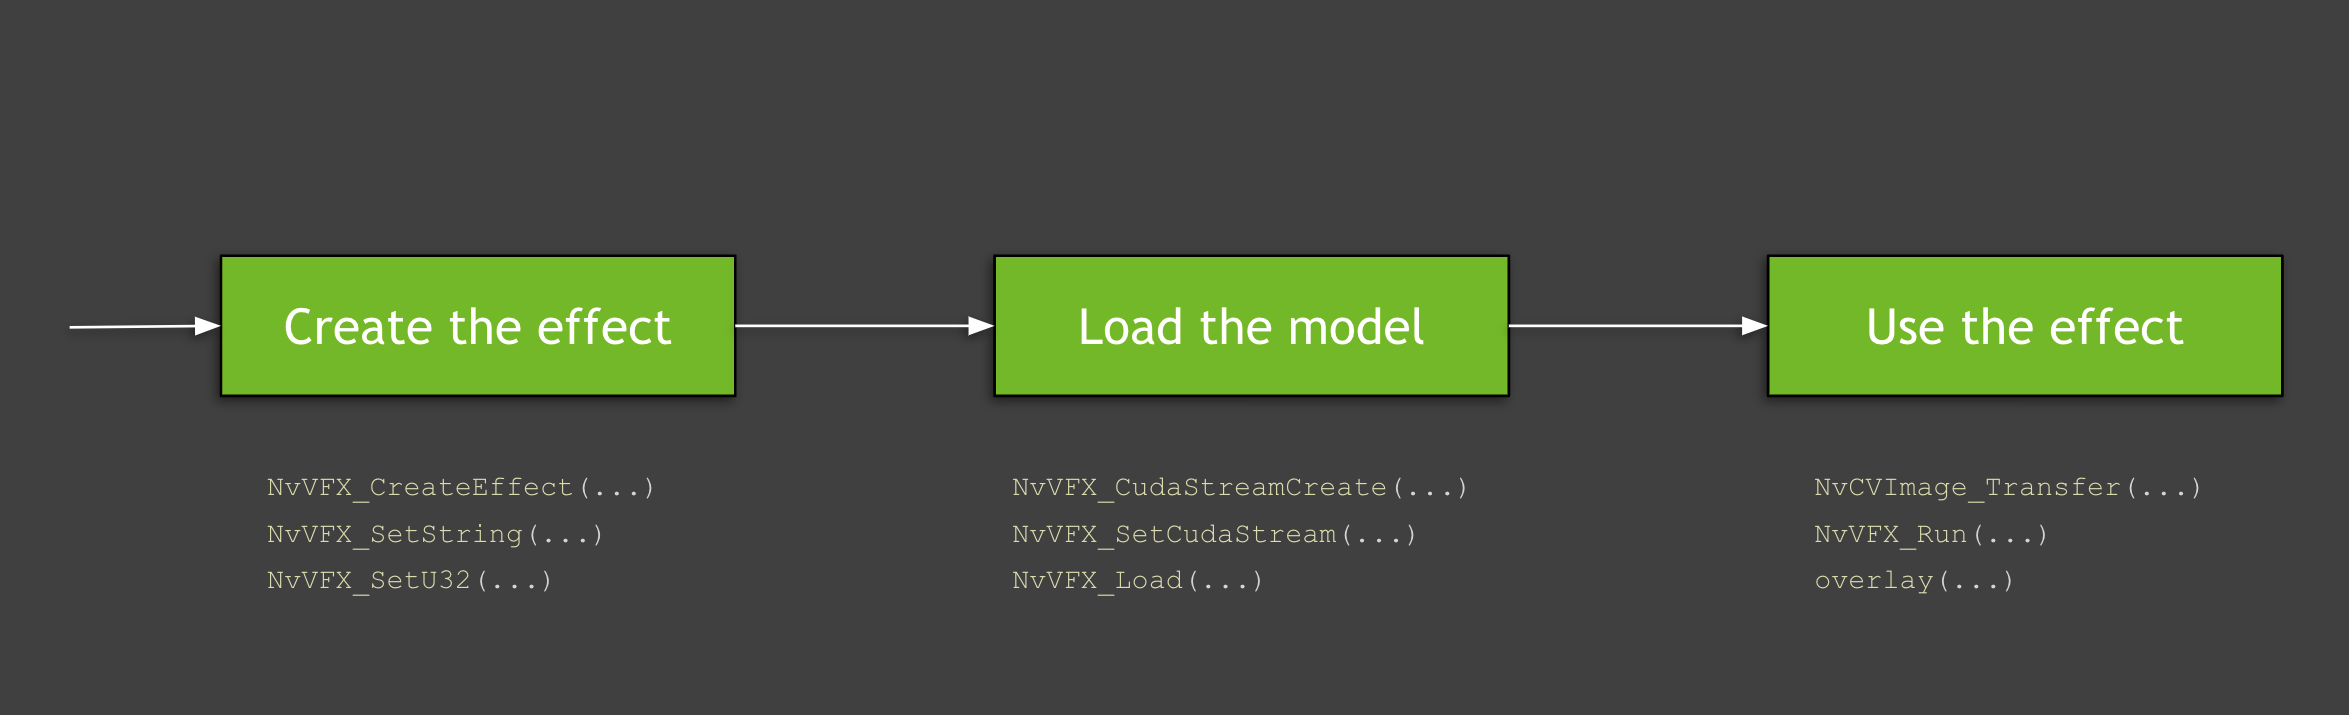
The following video covers this flow, but this process has many granular details, which we discuss later in this post. Also, the video touches on the basics that you must know while working with GPUs and API details for the Maxine virtual background. All code examples in this post are available in the SDK sample applications.
Creating and configuring the effect
The first step is creating the effects to use. In this post, we discuss Artifact Reduction and Upscaler. You can create an instance of the specified type of video effect filter with the NvVFX_CreateEffect function. This function requires an effect selector and returns the effect handle. The effect selector is a string with which you can pick the effect to create.
NvVFX_Handle _arEff;
NvVFX_Handle _upscaleEff;
NvVFX_EffectSelector first;
NvVFX_EffectSelector second;

NvVFX_CreateEffect(first, &_arEff);
NvVFX_CreateEffect(second, &_upscaleEff);
Then, use the NvVFX_SetString function to specify the location of the model for the feature.
NvVFX_SetString(_arEff, NVVFX_MODEL_DIRECTORY, modelDir);
NvVFX_SetString(_upscaleEff, NVVFX_MODEL_DIRECTORY, modelDir);
Most of the Video Effects SDK features have modes. These modes, as discussed previously, are essentially two different variants of the same effect. In this case, Artifact Reduction has two modes that you can set with the NvVFX_SetU32 function. In the case of Upscaler, this is a floating-point that can be set to any number between 0 and 1 using the NvVFX_SetF32 function.
int FLAG_arStrength = 0;
float FLAG_upscaleStrength= 0.2f;

NvVFX_SetU32(_arEff, NVVFX_STRENGTH, FLAG_arStrength);
NvVFX_SetF32(_upscaleEff, NVVFX_STRENGTH, FLAG_upscaleStrength);
Configuring CUDA streams, allocating buffers, and loading the model
As the effects have been created, here’s how to use CUDA and load the models. A CUDA stream is a set of operations executed in the exact sequence in which they were issued. With that in mind, the first step is to create this stream. You can create this stream with the NvVFX_CudaStreamCreate function.
CUstream _stream;
NvVFX_CudaStreamCreate(&_stream);
Now that you have the stream, assign the effects to the stream. You achieve this with the NvVFX_SetCudaStream function.
NvVFX_SetCudaStream(_arEff, NVVFX_CUDA_STREAM, stream));
NvVFX_SetCudaStream(_upscaleEff, NVVFX_CUDA_STREAM, stream);
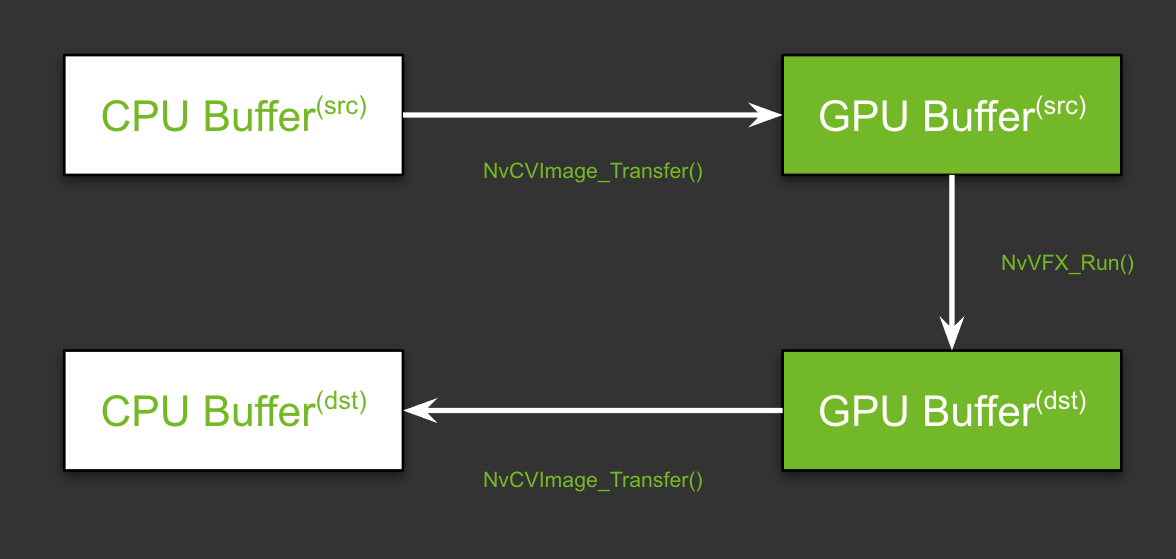
Now that a CUDA stream is in place, here’s how to move data. In this case, you are moving image frames. If you are new to GPUs, you might ask, “Why and where we are moving the data?”
GPUs typically have their own dedicated video RAM (VRAM). This is like the usual RAM that is plugged into the motherboard of a system. The key advantage of having dedicated VRAM is that the data stored in this memory is processed significantly faster than the data on a regular RAM. When we say, “Move the data from CPU memory to GPU memory,” we are referring to the memory transfers between these two types of RAM.

In a typical scenario using a single effect, this transfer would be effortless, requiring two CPU memory buffers and two GPU buffers. In both cases, one would be for the source and the other would be for the processed frame.
As you are chaining the features that require two different image pixel layouts, there is an added layer of complexity. You must have two more buffers on the GPU, one to store the output frame for the first effect and the other to store the input of the second effect. Figure 9 shows the flow. Don’t worry about the function names just yet; we review them in the Run the effects section later in this post.
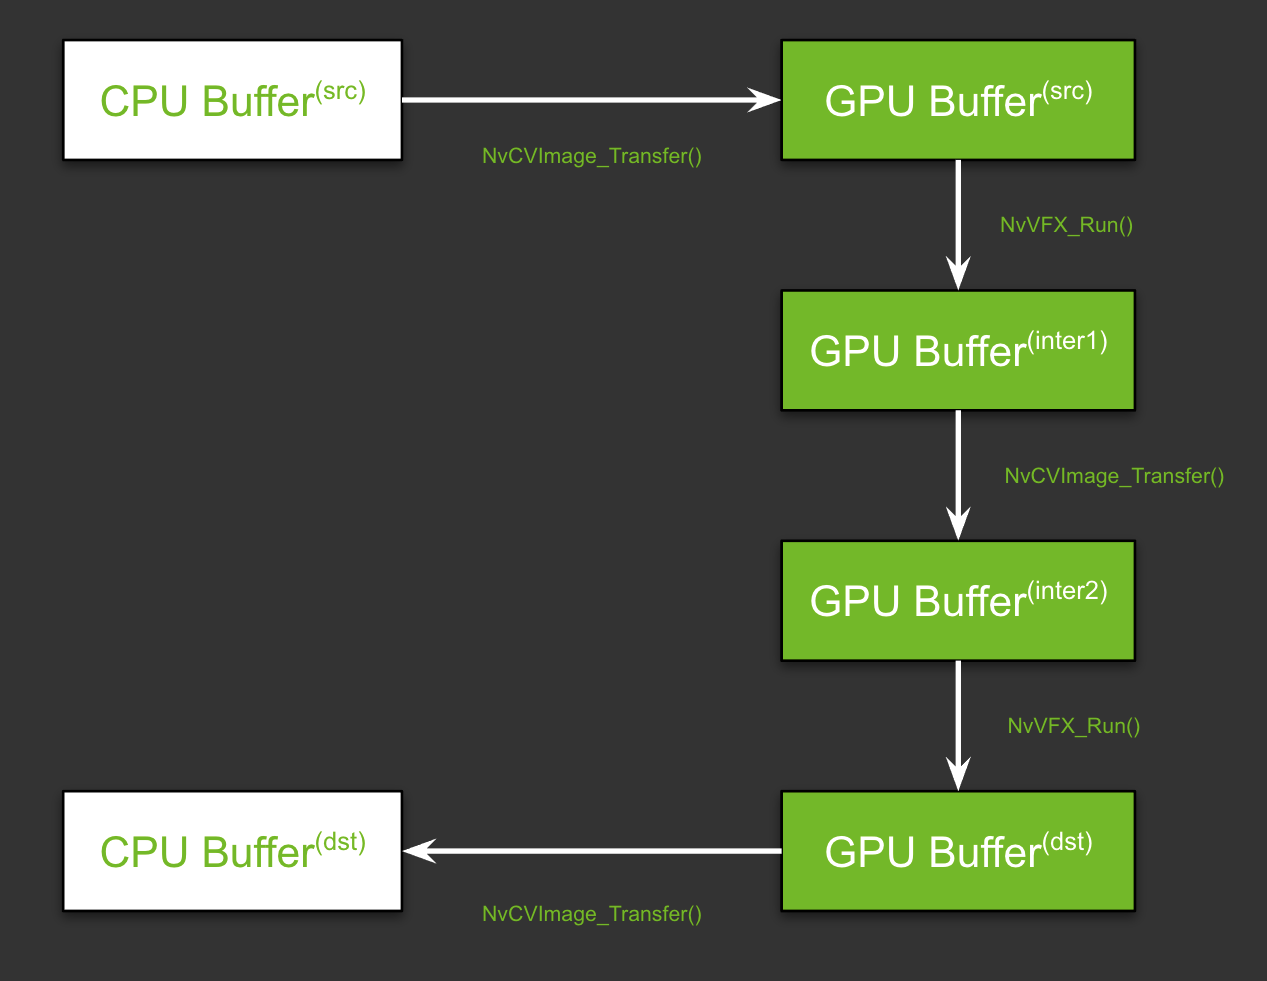
With this high-level understanding in mind, here’s how set up the pipeline. There are two steps in setting up this pipeline: allocating memory and specifying the input and output buffers.
First, allocate memory for the GPU buffers, using the NvCVImage_Alloc function.
NvCVImage _srcGpuBuf;
NvCVImage _interGpuBGRf32pl;
NvCVImage _interGpuRGBAu8;
NvCVImage _dstGpuBuf;

// GPU Source Buffer
NvCVImage_Alloc(&_srcGpuBuf, _srcImg.cols, _srcImg.rows, NVCV_BGR, NVCV_F32, NVCV_PLANAR, NVCV_GPU, 1);

// GPU Intermediate1 Buffer
NvCVImage_Alloc(&_interGpuBGRf32pl, _srcImg.cols, _srcImg.rows, NVCV_BGR, NVCV_F32, NVCV_PLANAR, NVCV_GPU, 1);

// GPU Intermediate2 Buffer
NvCVImage_Alloc(&_interGpuRGBAu8, _srcImg.cols, _srcImg.rows, NVCV_RGBA, NVCV_U8, NVCV_INTERLEAVED, NVCV_GPU, 32);

// GPU Destination Buffer
NvCVImage_Alloc(&_dstGpuBuf, _dstImg.cols, _dstImg.rows, NVCV_RGBA, NVCV_U8, NVCV_INTERLEAVED, NVCV_GPU, 32);
That seems like a complicated function, but on a high level, you are specifying basic parameters for the desired type of buffer for the given type of image frame. For example, is it an RGBA image? Does each component have 8 bits? Are the bits in a planar, chunky, or any other format? For more information about specifics, see Setting the Input and Output Image Buffers.
Second, specify the input and output buffers that you created for each effect, using the NvVFX_SetImage function.
// Setting buffers for
NvVFX_SetImage(_arEff, NVVFX_INPUT_IMAGE,  &_srcGpuBuf);
NvVFX_SetImage(_arEff, NVVFX_OUTPUT_IMAGE, &_interGpuBGRf32pl);

NvVFX_SetImage(_upscaleEff, NVVFX_INPUT_IMAGE, &_interGpuRGBAu8);
NvVFX_SetImage(_upscaleEff, NVVFX_OUTPUT_IMAGE, &_dstGpuBuf);
Lastly, load the models. The NvVFX_Load function does the same. It also validates if the parameters selected for effect are valid.
NvVFX_Load(_arEff);
NvVFX_Load(_upscaleEff);
Run the effects
Now that the pipeline is set up, you can proceed to run the effects. Move the frames from the CPU/GPU source into the corresponding input buffer. The NvCVImage_Transfer function can be used to move the frames, and the NvVFX_Run function is used to run the effect.
// Frame moves from CPU buffer to GPU src buffer
NvCVImage_Transfer(&_srcVFX, &_srcGpuBuf, 1.f/255.f, stream, &_tmpVFX);

// Running Artifact Reduction
NvVFX_Run(_arEff, 0);

// Frame moves from GPU intermediate buffer 1 to buffer 2
NvCVImage_Transfer(&_interGpuBGRf32pl, &_interGpuRGBAu8, 255.f, stream, &_tmpVFX);

// Running Upscaler
NvVFX_Run(_upscaleEff, 0));

// Frame moves from GPU destination buffer to CPU buffer
NvCVImage_Transfer(&_dstGpuBuf, &_dstVFX, 1.f, stream, &_tmpVFX));
On the first pass, it might seem that there are multiple moving parts, but there are only three major steps: creating the effect, setting up CUDA streams along with managing the data flow, and finally running the effects.
All three of the Maxine SDKs—Video Effects SDK, Audio Effects SDK, and Augmented Reality SDK—are designed similarly. You can apply this same concept to the Audio Effects and Augmented Reality SDKs with minor modifications.
Integrate the Video Effects SDK into your applications
As demonstrated in this post, the Maxine Video Effects SDK provides many AI features that enable you to take a noisy low-resolution video and deliver high-quality video to your end users. Furthermore, you can chain multiple effects together and create a video pipeline. To apply these visual effects to your video conferencing, streaming, or telecommunication applications, see Maxine Getting Started page. Let us know what you think or if you have any questions.