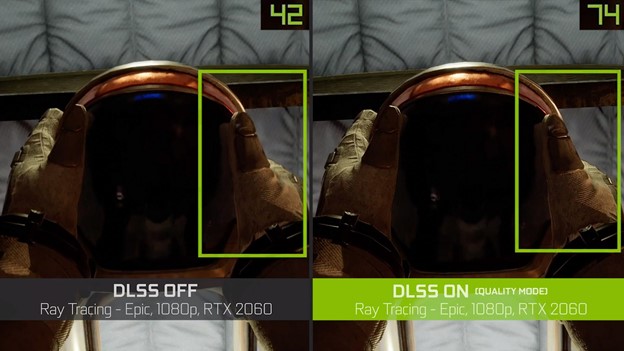
DLSS is a deep learning, super-resolution network that boosts frame rates by rendering fewer pixels and then using AI to construct sharp, higher-resolution images. Dedicated computational units on NVIDIA RTX GPUs called Tensor Cores accelerate the AI calculations, allowing the algorithm to run in real time. DLSS pairs perfectly with computationally intensive rendering algorithms such as real-time ray tracing.
DLSS is now available for mainline UE4 as a plugin, compatible with UE4.26. In this post, we navigate through the various tips and tricks on using DLSS for the best possible outcome.
Script blueprints for better controls
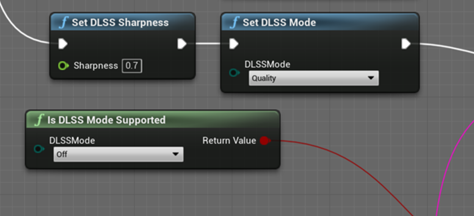
After activating the DLSS plugin, from any BP editor window, right-click and search for DLSS to get a list of various built-in scripts. This is the best way to activate and test for DLSS states. Cvar commands are also available, all of which exist under r.ngx.
Try sharpening to finesse quality
To enhance DLSS image quality, make small adjustments to the DLSS Sharpening slider. To help gain a small edge on frame rate, try increasing the DLSS Sharpening slider and use a lower quality DLSS setting.
DLSS goes well with ray tracing
DLSS is a useful tool to net back lost frame rate to the higher-quality graphics of UE4 ray tracing. It can be a great neutralizer, where the ray-tracing performance with DLSS can be in the ballpark of raster performance without DLSS. When using ray tracing, try using DLSS for more headroom in performance targets.
Higher input resolutions like DLSS Quality mode are preferred with dynamic ray-traced shadows in UE4. This is because the ray-tracing denoiser is sensitive to the input resolution but DLSS Quality mode often provides adequate source pixels. In general, when doing ray-traced shadows, trying one Quality mode setting higher than generally used in raster mode could produce more desirable results.
Try using the cvar r.Shadow.Denoiser.MaxBatchSize command, which defaults to 4, and set it to 1 to improve denoised, ray-traced, shadow quality. Performance is often about the same as the 4 setting but looks better in conjunction with DLSS Quality mode. There is still a net frame-rate gain of at least 20% while keeping quality high.
Keep the defaults (but customization is available)
The default modes of Ultra Performance, Performance, Balanced, and Quality have input resolutions of 33%, 50%, 58%, and 66%, respectively. Try customizing and finessing these numbers in the editor with a slider and plugin preference toggle. The default input resolutions are good enough for most situations.

Be aware of the input-resolution mathematics
Keep in mind that Ultra Performance mode (mode 3) is really meant for high-resolution gaming, 4K or 8K images. While other DLSS input resolutions range from 50-66%, Ultra Performance has an input resolution of 33%. This means that it scales the image up 9x. If there aren’t enough input pixels at the source, it’s not going to look sharp enough in the result. For 4K gaming, the input resolution in Ultra Performance mode is 720p and for 8K gaming, the input is 1440p. This is adequate for the system to generate necessary details.
While it might be tempting to allow this mode for lower resolutions—for example, allowing Ultra Performance for 1440p or 2560×1440, that would be an input resolution of 853×480. We strongly advise against using this as it typically won’t look good. Going from Ultra Performance (33%) to Performance mode (50%) not only looks much better with an input resolution of 1280×720, but it also runs about the same in many cases. For most modern cards and real-time scenes, any performance gained by dropping from 720p to 480p is usually not worth it.
Reflections on smooth reflecting surfaces may look better with little or no denoising
Reflections on smooth surfaces (surfaces with a low roughness) suffer from little noise. The denoiser may make the surfaces look blurrier with DLSS and TAA, by destroying information that would otherwise be obtained from jittering the image.
- If there are blurry RT reflections on smooth surfaces with DLSS, try setting
r.NGX.DLSS.Reflections.TemporalAAto 0. - If the scene contains exclusively or primarily smooth reflecting surfaces, try setting
r.Reflections.Denoiser.TemporalAccumulationto 0 to help get better jittered information for the reflecting surfaces into DLSS.
Be aware of excessively thin or small objects and particles
DLSS uses deep learning to super-sample a low-resolution image into a higher-resolution image. However, depending on the input resolution, an object or particle that is too thin or small may not show up at all in the input image or may show up inconsistently (showing up one frame, then not showing up on the next). This can cause visible artifacts, such as flickering or ghosting.
What is too thin or small depends on the input resolution. It’s a good idea to keep the input resolution in mind when authoring content. Don’t be afraid to do some experimentation.
Summary
We hope you can make good use of these tips on using DLSS for the best possible outcome. If you have questions or suggestions, please comment below.
You can access the NVIDIA DLSS plugin for UE4 here.
