This post is part of a series about generating accurate speech transcription. For part 1, see Speech Recognition: Generating Accurate Transcriptions Using NVIDIA Riva. For part 3, see Speech Recognition: Deploying Models to Production.
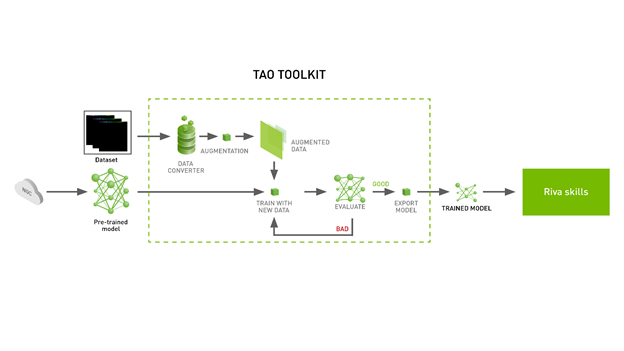
Creating a new AI deep learning model from scratch is an extremely time– and resource-intensive process. A common solution to this problem is to employ transfer learning. To make this process even easier, the NVIDIA TAO Toolkit, which can cut down an engineering time frame of 80 weeks to 8 weeks. The TAO Toolkit supports both computer vision and conversational AI (ASR and NLP) use cases.
In this post, we cover the following topics:
- Installing the TAO Toolkit and get access to pretrained models
- Fine-tuning a pretrained speech transcription model
- Exporting the fine-tuned model to NVIDIA Riva
To follow along, download the Jupyter notebook.
Installing the TAO Toolkit and downloading pretrained models
Before installing the TAO Toolkit, make sure you have the following installed on your system:
- python >= 3.6.9
- docker-ce > 19.03.5
- nvidia-docker2 3.4.0-1
For more information about installing nvidia-docker and docker, see Prerequisites. You can install the TAO Toolkit with pip. We recommend using a virtual environment to avoid version conflicts.
pip3 install nvidia-pyindex
pip3 install nvidia-tao
With installation out of the way, the next step is to get some pretrained models. NVIDIA has made available many AI or machine learning models, not just in the conversational AI space but in a wide range of domains on NGC or NVIDIA GPU Cloud. The NGC Catalog is a curated set of GPU-optimized software for AI, HPC, and visualization.
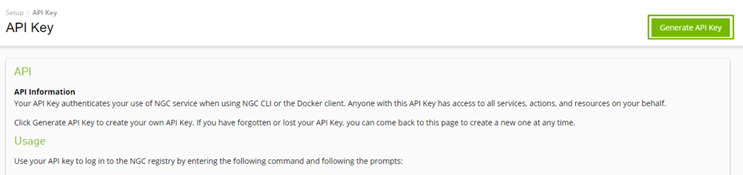
To download resources from NGC, log in to the registry with your NGC API key. You can create and use one for free.
CitriNet is a state-of-the-art automatic speech recognition (ASR) model built by NVIDIA, which enables you to generate speech transcriptions. You can download this model from the Speech to Text English Citrinet model card.
wget https://api.ngc.nvidia.com/v2/models/nvidia/tao/speechtotext_english_citrinet/versions/trainable_v1.7/files/speechtotext_english_citrinet_1024.tlt
To offer a fluid and streamlined experience, the toolkit downloads and runs Docker containers in the background that makes use of the previously mentioned specification files. All the details are hidden with the TAO launcher. You specify your preferred location to mount the Docker container by defining a JSON file: ~/.tao_mounts.json. You can find the mount file in the Jupyter notebook.
{
   "Mounts":[
       {
           "source": "~/tao/data",
           "destination": "/data" # The location in which to store the dataset
       },
       {
           "source": "~/tao/specs",
           "destination": "/specs" # The location in which to store the specification files
       },
       {
           "source": "~/tao/results",
           "destination": "/results" # The location in which to store the results
       },
       {
           "source": "~/.cache",
           "destination": "/root/.cache"
       }
   ],
   "DockerOptions":{
         "shm_size": "16G",
         "ulimits": {
            "memlock": -1,
            "stack": 67108864
     }
   }
}
With this, you have TAO Toolkit installed, have downloaded a pretrained ASR model, and specified the mounting point for the TAO Toolkit launcher. In the next section, we discuss how to use TAO Toolkit to fine-tune this model on a dataset of your choice.
Fine-tuning the model
Fine-tuning a model with TAO Toolkit is a three-step process:
- Download the spec files.
- Preprocess the dataset.
- Fine-tune with hyperparameters.
Figure 3 shows the steps needed to fine-tune the model.
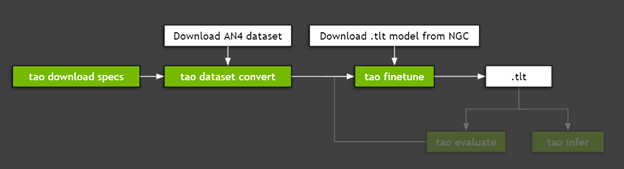
Step 1: Download spec files
NVIDIA TAO Toolkit is a low– or no-code solution to simplify the training or fine-tuning of models, through specification files. These files enable you to customize model-specific parameters, trainer parameters, optimizer, and parameters for the dataset being used. These specifications files can be downloaded to the folder mounted earlier:
tao speech_to_text_citrinet download_specs \
    -r <path to results dir>/speech_to_text_citrinet \
    -o < path to specs dir>/speech_to_text_citrinet
Here are the YAML files that come with the TAO toolkit. For more information, see Downloading Sample Spec Files.
create_tokenizer.yamldataset_convert_an4.yamldataset_convert_en.yamldataset_convert_ru.yamlevaluate.yamlexport.yamlfinetune.yamlinfer_onnx.yamlinfer.yamltrain_citrinet_256.yamltrain_citrinet_bpe.yaml
These specification files are available for customization and use. There is functionality for everything from preprocessing and model evaluation to inference and exporting the model. This enables you through the journey of developing or customizing models without the need to build elaborate code bases. With the spec files downloaded, you can now proceed to preprocessing the data.
Step 2: Preprocess the dataset
For this walkthrough, you use CMU’s AN4 Dataset, a small census dataset that contains recordings of addresses, numbers, and other personal information. This is similar to the type of transcription that is required in the initial steps of conversations happening in customer support conversations. A larger custom dataset with similar content can be used for a real-world application.
You can directly download and unzip the AN4 dataset or use the following command:
wget http://www.speech.cs.cmu.edu/databases/an4/an4_sphere.tar.gz
tar -xvf an4_sphere.tar.gz
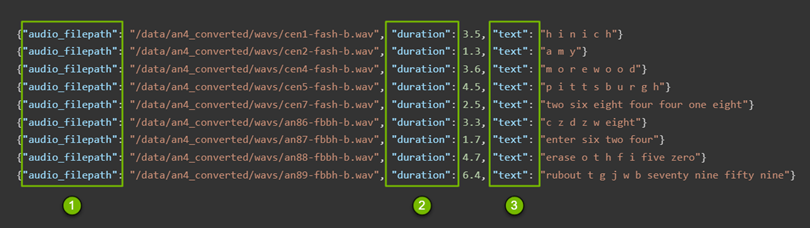
The TAO Toolkit training and fine-tuning modules expect data to be present in a specific format. This preprocessing can be done using the dataset_convert command. We package specification files for AN4 and Mozilla’s common voice dataset along with the TAO launcher. You can find these specification files in the directory that you defined in Step 1.
These manifest files (Figure 3) contain the following information that is used in the later steps:
- Path to audio files
- Duration of each file
- Content of each file in words
tao speech_to_text_citrinet dataset_convert \
    -e <path to specs dir>/speech_to_text_citrinet/dataset_convert_an4.yaml \
    -r  <path to result dir>/citrinet/dataset_convert \
    source_data_dir= </path/to/data/dir>/an4 \
    target_data_dir=</path/to/data/dir>/an4_converted
This command converts the audio files to WAV files and generates a train and test manifest files. For more information, see Preparing the Dataset.
In most cases, you would have been done with preprocessing but the CitriNet model is a special case. It requires further processing in the form of subword tokenization, which creates a subword vocabulary for the text. This is different from Jasper or QuartzNet because only single characters are regarded as elements in the vocabulary in their cases. In CitriNet, the subword can be one or multiple characters. This can be done using the following command:
tao speech_to_text_citrinet create_tokenizer \
-e <path to specs dir>/speech_to_text_citrinet/create_tokenizer.yaml \
-r <path to result dir>/citrinet/create_tokenizer \
manifests=<path to data dir>/an4_converted/train_manifest.json \
output_root=<path to data dir>/an4 \
vocab_size=32
Up to this point, you’ve set up a tool that provides a low-code or no-code solution for a complex problem like transfer learning. You’ve downloaded a pretrained model, processed audio files into the necessary format, and performed tokenization. You did all this with fewer than 10 commands. Now that all the necessary details have been hashed out, you can proceed to fine-tuning the model.
Step 3: Fine-tuning with hyperparameters
As you did in the previous steps, you are interacting with a specification file. For more information, see Creating an Experiment Spec File. You can specify almost everything from training specific parameters like the optimizer, to dataset-specific parameters, to the model configuration itself, if you want to adjust the size of the window size for FFT.
Do you want to change the learning rate and the scheduler, and maybe add a new character in the vocabulary? There’s no need to open your code base and scan through it to make the changes. All these customizations are easily available and shareable across your team. This reduces friction around trying new ideas and sharing the results, as well as the configurations of the models that had better accuracy.
Here’s how to fine-tune the trainer:
trainer:
  max_epochs: 3   # This is low for demo purposes
tlt_checkpoint_interval: 1

change_vocabulary: true
Here’s how to fine-tune the tokenizer:
tokenizer:
  dir: /path/to/subword/vocabulary
  type: "bpe"   # Can be either bpe or wpe
Here’s how to fine-tune the optimizer:
optim:
  name: novograd
  lr: 0.01
  betas: [0.8, 0.5]
  weight_decay: 0.001

  sched:
    name: CosineAnnealing
    warmup_steps: null
    warmup_ratio: null
    min_lr: 0.0
    last_epoch: -1
Here’s how to fine-tune the dataset:
# Fine-tuning settings: validation dataset
validation_ds:
  manifest_filepath: /path/to/manifest/file/
  sample_rate: 16000
  labels: [" ", "a", "b", "c", "d", "e", "f", "g", "h", "i", "j", "k", "l", "m", "n", "o", "p", "q", "r", "s", "t", "u", "v", "w", "x", "y", "z", "'"]
  batch_size: 32
  shuffle: false

finetuning_ds:
  manifest_filepath: ???
  sample_rate: 160000
  labels: [" ", "a", "b", "c", "d", "e", "f", "g", "h", "i", "j", "k", "l", "m", "n", "o", "p", "q", "r", "s", "t", "u", "v", "w", "x", "y", "z", "'"]
  batch_size: 32
  trim_silence: true
  max_duration: 16.7
  shuffle: true
  is_tarred: false
  tarred_audio_filepaths: null
Finally, to proceed, modify the specification file as required and run the following command. This command fine-tunes the downloaded model using the dataset downloaded earlier. For more information, see Fine-Tuning the Model.
tao speech_to_text_citrinet finetune \
     -e $SPECS_DIR/speech_to_text_citrinet/finetune.yaml \
     -g 1 \
     -k <key used to encode the model> \
     -m </path to downloaded model>/speechtotext_english_citrinet_1024.tlt \
     -r $RESULTS_DIR/citrinet/finetune \
     finetuning_ds.manifest_filepath=$DATA_DIR/an4_converted/train_manifest.json \
     validation_ds.manifest_filepath=$DATA_DIR/an4_converted/test_manifest.json \
     trainer.max_epochs=1 \
     finetuning_ds.num_workers=1 \
     validation_ds.num_workers=1 \
     trainer.gpus=1 \
     tokenizer.dir=$DATA_DIR/an4/tokenizer_spe_unigram_v32
After fine-tuning or training your model, it is natural to evaluate the model and assess if further fine-tuning is required. To that end, NVIDIA provides capabilities to evaluate your model and run inference.
Exporting the fine-tuned model to Riva
Deploying a model in a production environment presents its own set of challenges. To that end, you can use NVIDIA Riva, a GPU-accelerated AI speech SDK for developing applications like real-time transcription and virtual assistants.
Riva makes use of other NVIDIA products:
- NVIDIA Triton Inference Server is used to simplify the deployment of models at scale in production.
- NVIDIA TensorRT is used to accelerate the models and provide better inference performance by optimizing the models for NVIDIA GPUs.
If you are interested in using the model fine-tuned in this walkthrough, you can export it to Riva using the following command. For more information, see Model Export.
tao speech_to_text_citrinet export \
     -e <path to spec dir>/speech_to_text_citrinet/export.yaml \
     -g 1 \
     -k <key used to encode the model> \
     -m <path to results dir>/citrinet/train/checkpoints/trained-model.tlt \
     -r <path to results dir>/citrinet/riva \
     export_format=RIVA \
     export_to=asr-model.riva
What’s next?
Citrinet for Speech Transcription isn’t the only model or use case that NVIDIA provides. There are multiple use cases and pretrained models in conversational AI and computer vision. For more information, see the NVIDIA TAO Toolkit product page.
In the next post, we cover how to install NVIDIA Riva to deploy these models in a production environment and using one of the many models in the NGC Catalog. For more information, see Speech Recognition: Deploying Models to Production.