AI is driving the fourth Industrial Revolution with machines that can hear, see, understand, analyze, and then make smart decisions at superhuman levels. However, the effectiveness of AI depends on the quality of the underlying models. So, whether you’re an academic researcher or a data scientist, you want to quickly build models with a variety of parameters and identify the most effective ones for your solutions.
In this post, we walk you through building speech models with PyTorch Lightning on NVIDIA GPU-powered AWS instances.
PyTorch Lightning + Grid.ai: Build models faster, at scale
PyTorch Lightning is a lightweight PyTorch wrapper for high-performance AI research. Organizing PyTorch code with Lightning enables seamless training on multiple GPUs, TPUs, CPUs, and the use of difficult to implement best practices such as checkpointing, logging, sharding, and mixed precision. A PyTorch Lightning container and developer environment is available on the NGC catalog.
Grid enables you to scale training from your laptop to the cloud without having to modify your code. Running on cloud providers such as AWS, Grid supports Lightning as well as all the classic machine learning frameworks such as Sci Kit, TensorFlow, Keras, PyTorch and more. With Grid, you can scale the training of models from the NGC catalog.
NGC: The hub for GPU-optimized AI software
The NGC catalog is the hub for GPU-optimized software including AI/ML containers, pretrained models, and SDKs that can be easily deployed across on-premises, cloud, edge, and hybrid environments. NGC offers NVIDIA TAO Toolkit that enables retraining models with custom data and NVIDIA Triton Inference Server to run predictions on CPU and GPU-powered systems.
The rest of this post walks you through how to leverage models from the NGC catalog and the NVIDIA NeMo framework to train an automatic speech recognition (ASR) model with PyTorch Lightning using the following tutorial based on the ASR with NeMo tutorial.
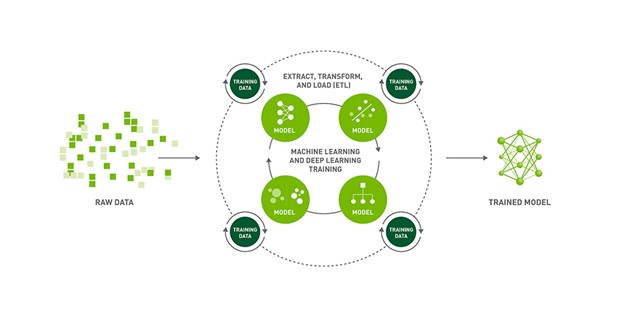
Training NGC models with Grid sessions, PyTorch Lightning, and NVIDIA NeMo
ASR is the task of transcribing spoken language to text and is a critical component of Speech to Text systems. When training ASR models, your goal is to generate text from a given audio input that minimizes the word error rate (WER) metric on human transcribed speech. The NGC catalog contains state-of-the-art pretrained models for ASR.
In the remainder of this post, we show you how to use Grid sessions, NVIDIA NeMo, and PyTorch Lightning to fine-tune these models on the AN4 dataset.
The AN4 dataset, also known as the Alphanumeric dataset, was collected and published by Carnegie Mellon University. It consists of recordings of people spelling out addresses, names, telephone numbers, and so on, one letter or number at a time, as well as their corresponding transcripts.
Step 1: Create a Grid session optimized for Lightning and pretrained NGC models
Grid sessions run on the same hardware that you need to scale while providing you with preconfigured environments to iterate the research phase of the machine learning process faster than before. Sessions are linked to GitHub, loaded with JupyterHub, and can be accessed through SSH and your IDE of choice without having to do any setup yourself.
With sessions, you pay only for the compute that you need to get a baseline operational, and then you can scale your work to the cloud with Grid runs. Grid sessions are optimized for PyTorch Lightning and models hosted on the NGC catalog. They even provide specialized Spot pricing.
For an in-depth walkthrough, see the Grid Session tour (requires a Grid.ai account).
Step 2: Clone the ASR demo repo and open the tutorial notebook
Now that you have a developer environment optimized for PyTorch Lightning, the next step is to clone the NGC-Lightning-Grid-Workshop repo.
You can do this directly from a terminal in your Grid Session with the following command:
git clone https://github.com/aribornstein/NGC-Lightning-Grid-Workshop.git
After you’ve cloned the repo, you can open up the notebook to use to fine-tune the NGC hosted model with NeMo and PyTorch Lightning.
Step 3: Install NeMo ASR dependencies
First, install all the session dependencies. Run tools such as PyTorch Lightning and NeMo and process the AN4 dataset to do this. Run the first cell in the tutorial notebook, which runs the following bash commands to install the dependencies.
## Install dependencies
!pip install wget
!sudo apt-get install sox libsndfile1 ffmpeg -y
!pip install unidecode
!pip install matplotlib>=3.3.2
## Install NeMo
BRANCH = 'main'
!python -m pip install --user git+https://github.com/NVIDIA/NeMo.git@$BRANCH#egg=nemo_toolkit[all]
## Grab the config we'll use in this example
!mkdir configs
!wget -P configs/ https://raw.githubusercontent.com/NVIDIA/NeMo/$BRANCH/examples/asr/conf/config.yaml
Step 4: Convert and visualize the AN4 dataset
The AN4 dataset comes in raw Sof audio files, but most models process on mel spectrograms. Convert the Sof files to the Wav format so that you can use NeMo audio processing.
import librosa
import IPython.display as ipd
import glob
import os
import subprocess
import tarfile
import wget

# Download the dataset. This will take a few moments...
print("******")
if not os.path.exists(data_dir + '/an4_sphere.tar.gz'):
    an4_url = 'http://www.speech.cs.cmu.edu/databases/an4/an4_sphere.tar.gz'
    an4_path = wget.download(an4_url, data_dir)
    print(f"Dataset downloaded at: {an4_path}")
else:
    print("Tarfile already exists.")
    an4_path = data_dir + '/an4_sphere.tar.gz'

if not os.path.exists(data_dir + '/an4/'):
    # Untar and convert .sph to .wav (using sox)
    tar = tarfile.open(an4_path)
    tar.extractall(path=data_dir)

    print("Converting .sph to .wav...")
    sph_list = glob.glob(data_dir + '/an4/**/*.sph', recursive=True)
    for sph_path in sph_list:
        wav_path = sph_path[:-4] + '.wav'
        cmd = ["sox", sph_path, wav_path]
        subprocess.run(cmd)
print("Finished conversion.\n******")
# Load and listen to the audio file
example_file = data_dir + '/an4/wav/an4_clstk/mgah/cen2-mgah-b.wav'
audio, sample_rate = librosa.load(example_file)
ipd.Audio(example_file, rate=sample_rate)
You can then visualize the audio example as images of the audio waveform. Figure 3 shows the activity in the waveform that corresponds to each letter in the audio, as your speaker here enunciates quite clearly!
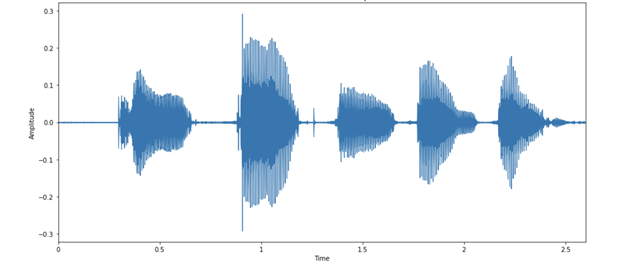
Each spoken letter has a different “shape.” It’s interesting to note that the last two blobs look relatively similar, which is expected because they are both the letter N.
Spectrograms
Modeling audio is easier in the context of frequencies of sound over time. You can get a better representation than this raw sequence of 57,330 values. A spectrogram is a good way of visualizing how the strengths of various frequencies in the audio vary over time. It is obtained by breaking up the signal into smaller, usually overlapping chunks, and performing a short-time Fourier transform (STFT) on each.
Figure 4 shows what the spectrogram of the sample looks like.
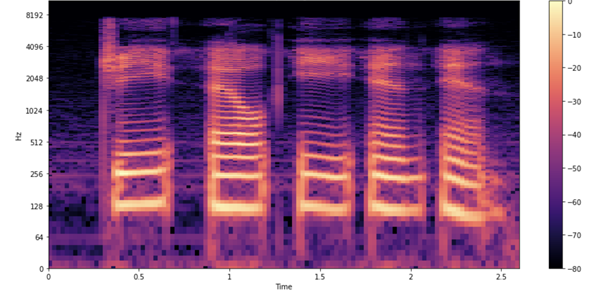
As in the earlier waveform, you see each letter being pronounced. How do you interpret these shapes and colors? Just as in the earlier waveform plot, you see time passing on the x-axis (all 2.6s of audio). However, now the y-axis represents different frequencies (on a log scale), and the color on the plot shows the strength of a frequency at a particular point in time.
Mel spectrograms
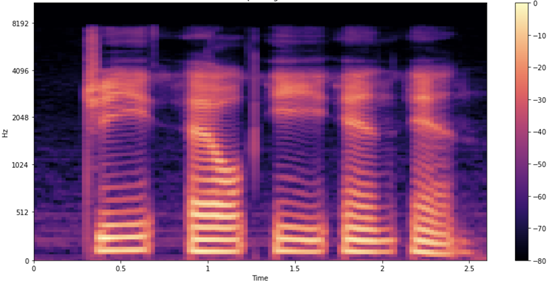
You’re still not done, as you can make one more potentially useful tweak by visualizing the data using the mel spectrogram. Change the frequency scale from linear (or logarithmic) to the mel scale, which better represents the pitches that are perceivable to the human ear. Mel spectrograms are intuitively useful for ASR. Because you are processing and transcribing human speech, mel spectrograms reduce background noise that can affect the model.
Step 5: Load and inference a pretrained QuartzNet model from NGC
Now that you’ve loaded and properly understood the AN4 dataset, look at how to use NGC to load an ASR model to be fine-tuned with PyTorch Lightning. NeMo’s ASR collection comes with many building blocks and even complete models that you can use for training and evaluation. Moreover, several models come with pretrained weights.
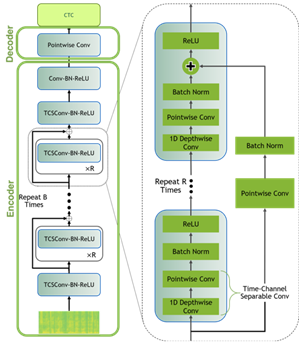
To model the data for this post, you use a Jasper architecture called QuartzNet from the NGC Model Hub. Jasper architecture consists of repeated block structures that uses 1D convolutions to model spectrogram data (Figure 6).
QuartzNet is a better variant of Jasper with a key difference in that it uses time-channel separable 1D convolutions. This enables it to reduce the number of weights dramatically while keeping similar accuracy.
The following command downloads the pretrained QuartzNet15x5 model from the NGC catalog and instantiates it for you.
tgmuartznet = nemo_asr.models.EncDecCTCModel.from_pretrained(model_name="QuartzNet15x5Base-En")
Step 6: Fine-tune the model with Lightning
When you have a model, you can fine-tune it with PyTorch Lightning, as follows.
import pytorch_lightning as pl
from omegaconf import DictConfig
trainer = pl.Trainer(gpus=1, max_epochs=10)
params['model']['train_ds']['manifest_filepath'] = train_manifest
params['model']['validation_ds']['manifest_filepath'] = test_manifest
first_asr_model = nemo_asr.models.EncDecCTCModel(cfg=DictConfig(params['model']), trainer=trainer)

# Start training!!!
trainer.fit(first_asr_model)
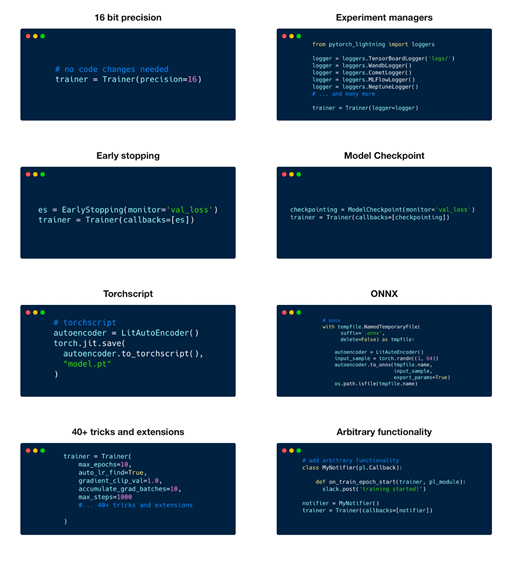
Because you are using this Lightning Trainer, you get some key advantages, such as model checkpointing and logging by default. You can also use 50+ best-practice tactics without needing to modify the model code, including multi-GPU training, model sharding, deep speed, quantization-aware training, early stopping, mixed precision, gradient clipping, and profiling.
Step 7: Inference and deployment
Now that you have a baseline model, inference it.

Step 8: Pause session
Now that you have trained the model, you can pause the session and all the files that you need are persisted.
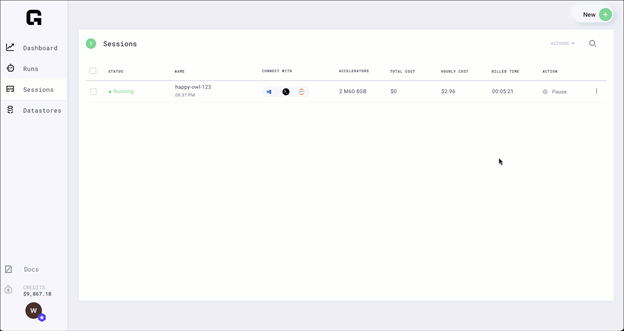
Paused sessions are free of charge and can be resumed as needed.
Conclusion
Now, you should have a better understanding of PyTorch Lightning, NGC, and Grid. You’ve fine-tuned your first NGC NeMo model and optimized it with Grid runs. We are excited to see what you do next with Grid and NGC.


