
This series looks at the development and deployment of machine learning (ML) models. In this post, you deploy ML models on Google Cloud Platform. Part 1 gave an overview of the ML workflow, considering the stages involved in using machine learning and data science to deliver business value. In part 2, you trained an ML model and saved that model so it could be deployed as part of an ML system.
When building an end-to-end pipeline for an ML system, the last step is to deploy your trained model into a production environment. A successful deployment means that the ML model has been moved from the research environment and integrated into the production environment, for example, as a live application.
In this post, you learn three ways to put an ML model into production using Google Cloud Platform (GCP). While there are several other environments you can use, such as AWS, Microsoft Azure, or on-premises hardware, this tutorial uses GCP for deploying a web service.
Getting set up
Sign up for Google Cloud Platform through your Google account. You are prompted to fill in some information, including your credit card details. However, you will not be charged to sign up for the platform. You also receive $300 worth of free credit to spend over the first 90 days.
After the account is created, create a new project and name it something like GCP-deployment-example. Don’t link the project to an organization.
Ensure that you have changed your current project to the newly created project.
Deploying an ML model on Google App Engine
There are some additional modules to add to your code before you can deploy the model on Google App Engine.
The code used in this section can be found in the /kurtispykes/gcp-deployment-example GitHub repo.
The first step is to create the inference logic in a predict.py module:
import joblib
import pandas as pd

model = joblib.load("logistic_regression_v1.pkl")

def make_prediction(inputs):
    """
    Make a prediction using the trained model
    """
    inputs_df = pd.DataFrame(
        inputs,
        columns=["sepal_length_cm", "sepal_width_cm", "petal_length_cm", "petal_width_cm"]
        )
    predictions = model.predict(inputs_df)

    return predictions
The steps in this module include the following:
- Load the persisted model into memory.
- Create a function that takes some inputs as a parameter.
- Within the function, convert the inputs to a Pandas
DataFrameand make a prediction.
Next, the inference logic must be wrapped in a web service. I used Flask to wrap the model. For more information, see main.py:
import numpy as np
from flask import Flask, request
from predict import make_prediction

app = Flask(__name__)

@app.route("/", methods=["GET"])
def index():
    """Basic HTML response."""
    body = (
        "<html>"
        "<body style='padding: 10px;'>"
        "<h1>Welcome to my Flask API</h1>"
        "</body>"
        "</html>"
    )
    return body

@app.route("/predict", methods=["POST"])
def predict():
    data_json = request.get_json()

    sepal_length_cm = data_json["sepal_length_cm"]
    sepal_width_cm = data_json["sepal_width_cm"]
    petal_length_cm = data_json["petal_length_cm"]
    petal_width_cm = data_json["petal_width_cm"]

    data = np.array([[sepal_length_cm, sepal_width_cm, petal_length_cm, petal_width_cm]])
    predictions = make_prediction(data)

    return str(predictions)

if __name__ == "__main__":
    app.run()
In the code example, you created two endpoints:
index: Can be thought of as a homepage/predict: Used to interact with your deployed model.
The last file that you must create is app.yaml, which contains the runtime used to run the application.
runtime: python38
From the Google Cloud console, perform the following steps:
- On the toggle menu, choose App Engine. You may have to select View all products to access App Engine, which is listed with the Serverless products).
- From the App Engine page, choose Create Application.
- Select the region in which to create your application.
- Set the application language as Python and use a Standard environment.
In the top-right corner, select the terminal icon. This activates the cloud shell, which means you do not have to download the cloud SDK.
Before you deploy the application, you must upload all your code. As all the code required to interact with the ML model through a web service is uploaded on GitHub in gcp-deployment-example/app_engine/, you can clone this repository from the cloud shell.
Copy the code URL to your clipboard and navigate back to the cloud shell on GCP. Enter the following command to the shell:
git clone https://github.com/kurtispykes/gcp-deployment-example.git
Navigate into the code repository by entering the following command:
cd gcp-deployment-example/app_engine
Next, initialize the application. Make sure that you choose the project that you recently created.
Now, deploy your application. From the cloud shell, run the following command. If you are prompted to continue, enter Y.
gcloud app deploy
When the deployment is complete, you get a URL to where your service has been deployed. Open the provided URL to verify that the application is functioning correctly. You should see the Welcome to my Flask API message.
Next, test your /predict endpoint.
Use Postman to send a POST request to test successful deployment
You can use Postman to send a POST request to your /predict endpoint. Postman is an API platform for developers to design, build, test, and iterate their APIs.
To get started, choose Sign up for Free. There is a full tutorial, but for the purposes of this post, skip straight to the home page.
From there, choose Workspaces, My Workspace, New, and then HTTP Request.
Next, change the HTTP request from GET to POST and insert the link to the deployed service in the request URL.
After that, navigate to the Body header and choose raw so that you can insert an example instance. Choose send.
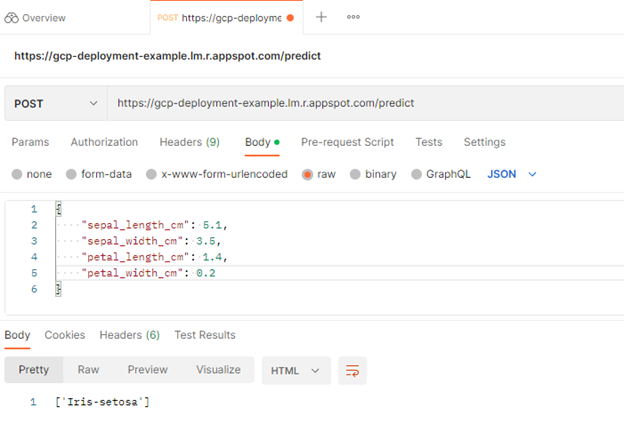
You sent a POST request to your /predict endpoint with some raw data that defines the input to your model. In the response, the model returned [‘Iris-setosa’], which is a positive indication that the model is successfully deployed.
You can also deploy your model using other services available on GCP.
Deploying an ML model on Google Cloud Functions
Cloud Functions are one of the serverless technologies available on GCP. I’ve made a few changes to the code to make deploying to Cloud Functions seamless. The first and most obvious difference is you are no longer importing your serialized model from a local repository. Instead, you are making a call to your model in Google Cloud Storage.
Upload the model to Google Cloud Storage
Within the GCP-deployment-example project, select the toggle menu. Navigate to Cloud Storage and choose Buckets, Create Bucket. This prompts you to provide a name for your bucket and other configurations. I named mine model-data-iris.
After the bucket is created, the next task is to upload the persisted model. Choose Upload Files, navigate to where you stored your model, and select it.
Now, you can use various services in Google Cloud to access this file. To access Cloud Storage, you must import the storage object from google.cloud.
The following code example shows how you can access your model from within Google Cloud Storage. You can also see the full example at gcp-deployment-example/cloud_functions/main.py.
import joblib
import numpy as np
from flask import request
from google.cloud import storage

storage_client = storage.Client()
bucket = storage_client.get_bucket("model-iris-data") # remember to change the bucket name
blob = bucket.blob("logistic_regression_v1.pkl")
blob.download_to_filename("/tmp/logistic_regression_v1.pkl")
model = joblib.load("/tmp/logistic_regression_v1.pkl")

def predict(request):
    data_json = request.get_json()

    sepal_length_cm = data_json["sepal_length_cm"]
    sepal_width_cm = data_json["sepal_width_cm"]
    petal_length_cm = data_json["petal_length_cm"]
    petal_width_cm = data_json["petal_width_cm"]

    data = np.array([[sepal_length_cm, sepal_width_cm, petal_length_cm, petal_width_cm]])
    predictions = model.predict(data)

    return str(predictions)
In the Google Cloud console, on the toggle menu, choose Cloud Functions. To see the menu, you may have to select View all products and expand the Serverless category.
Next, choose Create Function. If this is your first time creating a Cloud Function, you are asked to enable APIs. Choose Enable to proceed.
You are also asked to make the following configuration settings:
- Function name = Predict.
- Trigger type = HTTP.
- Allow unauthenticated invocations = Enabled.
There are other configurations in the runtime, build, connections, and security settings section, but the defaults are okay for this example, so choose Next.
On the next page, you are asked to set your runtime and define where the source code is coming from. In the Runtime section, select the version of Python that you are using. I’m using Python 3.8. Ensure that Inline Editor is selected in the source code header.
Copy and paste the following code example that your Cloud Function uses as an entry point into the main.py file.
{
  "sepal_length_cm" : 5.1,
  "sepal_width_cm" : 3.5,
  "petal_length_cm" : 1.4,
  "petal_width_cm" : 0.2
}
Use the inline editor to update the requirements.txt:
flask >= 2.2.2, <2.3.0
numpy >= 1.23.3, <1.24.0
scitkit-learn >=1.1.2, <1.2.0
google-cloud-storage >=2.5.0, <2.6.0
Be sure to change the Entry point value to the name of your endpoint. In this case, it is predict.
When all the changes have been made, choose Deploy. The deployment may take a few minutes to install your dependencies and start your application. When it is finished, you see a green tick icon beside the function name for a successfully deployed model.
Now you can test whether the application is working by on the Testing tab. Use the following example code for testing:
{
  "sepal_length_cm" : 5.1,
  "sepal_width_cm" : 3.5,
  "petal_length_cm" : 1.4,
  "petal_width_cm" : 0.2
}
If you used the same inputs as earlier, you got the same response.
You have now learned to deploy an ML model using Google Cloud Functions. With this deployment, you do not have to concern yourself with server management. Your Cloud Function only executes when a request is received, and Google manages the server.
Deploying an ML model on Google AI Cloud
The two prior deployments required you to write varying degrees of code. On Google AI Cloud, you can provide your trained model and they manage everything for you.
On the cloud console, from the toggle menu, navigate to AI Platform. On the Models tab, choose Create Model.
You may notice a warning message informing you about Vertex AI, which is another managed AI service that brings AutoML and AI Platform together. This discussion is beyond the scope of this post.
On the next screen, you are prompted to select a region. When you’ve selected your region, choose Create Model. Give the model a name, adjust the region accordingly, and choose Create.
Go to the region where your model was created, and you should see the model. Select the model and choose Create a Version.
Next, you must link your model to the model stored in Cloud Storage. There are several important things to note about this section:
- The latest model framework version for
scikit-learnon the AI platform is version 1.0.1, so you must use this version to build your model. - The model must be stored as either
model.pklormodel.joblib.
To abide by the requirements of the GCP AI platform, I created a new script using the required model version, serialized the model as model.pkl, and uploaded it to Google Cloud storage. For more information, see the updated code in the /kurtispykes/gcp-deployment-example GitHub repo.
- Model name:
logistic_regression_model - Check the box for Use regional endpoint.
- Region: europe-west2
- In the models section, ensure that only the europe-west2 region is selected.
Choose Save for the model version to be created. It may take a few minutes for the model version to be created.
Test the model by selecting the model version and navigating to the Test & Use header. Enter your input data and choose Test.
Summary
Congratulations! You now know three different ways to deploy an ML model using the Google Cloud Platform (GCP).
To cement the knowledge that you have gained from this tutorial, I encourage you to create your own applications using the three deployments. Also, think about what option would be best suited for a specific use case.
Connect with me on any of the following platforms:
Looking for help or guidance on anything from data ingestion to deploying machine learning? Join the Data Processing forum.
