
This post is the fourth in a series about optimizing end-to-end AI.
As explained in the previous post in the End-to-End AI for NVIDIA-Based PCs series, there are multiple execution providers (EPs) in ONNX Runtime that enable the use of hardware-specific features or optimizations for a given deployment scenario. This post covers the CUDA EP and TensorRT EP using the highly optimized NVIDIA inference libraries and the respective hardware features like Tensor Cores.
Besides optimal performance on NVIDIA hardware, this enables the use of the same EP across multiple operating systems and even across data center, PC, and embedded (NVIDIA Jetson) hardware. As these EPs are NVIDIA-specific, this is the fastest route to new hardware features like FP8 precision or the transformer engine in the NVIDIA Ada Lovelace architecture.
Difference between CUDA EP and TensorRT EP?
You might be asking, why are there even two NVIDIA EPs in ONNX Runtime? While they both use the same backend (CUDA) to communicate with the GPU driver, they have different ways of building and executing an ONNX graph.
CUDA EP
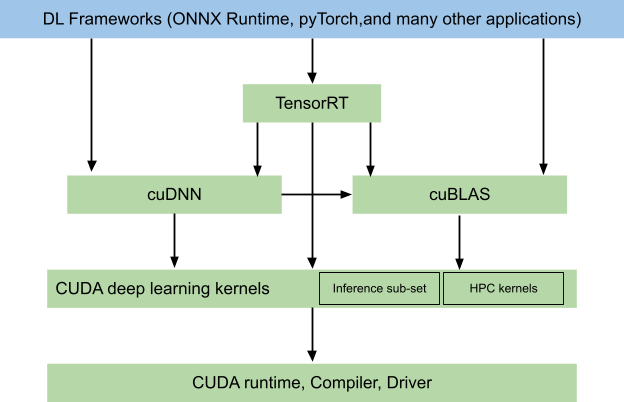
The CUDA EP uses the cuDNN inference library, which is based on granular operation blocks for neural networks. Such building blocks could resemble a convolution, or a fused operator; for example, a convolution+activation+normalization.
The benefit of having fused operators is to have less global memory traffic that typically is a bottleneck on inexpensive operations like an activation function. Such operation blocks can either be selected by an exhaustive search or heuristics that picks a kernel depending on the GPU.
The exhaustive search is only done during the first inference on the deployed device, therefore making the first inference slower than the following ones. This leads to always using the most performant implementation for a specific block.
TensorRT EP
The TensorRT EP can also fuse such operation blocks. At the same time, it evaluates the whole graph and collects all possible paths to execute the graph.
By optimizing the whole graph and possibly reordering operations, there is greater potential for optimization. The evaluated possible execution paths are then profiled and the most performant is selected and saved as a so-called engine.
These engines represent not only a graph’s list of operations but also its weights and all information that is needed for execution. Optimizing and profiling on a graph level like this can take multiple minutes for large ONNX models. The exhaustive cuDNN search only evaluates small network building blocks, making its search much faster.
cuDNN only evaluates its own kernels while NVIDIA TensorRT strategies span multiple libraries including cuDNN. Another important factor is the workspace memory that TensorRT can allocate for intermediate buffers inside the network.
When it comes to execution, TensorRT can usually deliver faster execution due to having a guarantee to pick the best execution path for the whole graph and not just subportions. This obviously comes at the cost of such high engine creation times and therefore some deployment considerations.
In TensorRT 8.5 and later, the cuDNN and cuBLAS kernels are optional additions to reduce the deployment size of the TensorRT library. Currently, ONNX Runtime uses TensorRT 8.4 and has no exposed option to enable or disable specific libraries.
Deployment considerations
For deploying the CUDA EP, you only have to ship the respective libraries and an ONNX file. To trade between setup time and inference performance, you can choose between heuristics and exhaustive kernel search by using the cudnn_conv_algo_search attribute.
For the TensorRT EP, there are more considerations. It makes sense not only to ship the ONNX file but also the generated engine for this ONNX file to omit building the model on user hardware.
As the build process takes time, a user build should not be done on first inference but rather during application installation or at the first start of the application with a respective prompt.
For caching a generated engine for later use, the following settings are particularly important. Be aware that such a generated engine is not only specific to the ONNX file but also to the GPU architecture (compute capability).
trt_options.trt_engine_cache_enable = 1;
trt_options.trt_engine_cache_path = "/path/to/cache"
Luckily, both providers are based on CUDA and are quite interchangeable, as you can see in the sample app provided with this post. The decision can easily be changed later.
Sample application
The sample application that is provided for this post can be found on the NVIDIA/ProViz-AI-Samples GitHub repo. It demonstrates a simple photo processing pipeline with an AI super resolution model. It does not have a user interface. Instead, it is instead a command-line–only tool to process a folder of images.
Besides running inference, it also demonstrates how to integrate pre– and post-processing into such a pipeline. The pre– and post-processing are simple in the sample but can easily be expanded by other CUDA-accelerated libraries like NPP, CV-CUDA, or OpenCV. In this case, it is a data format conversion from NCHW to NHWC as a custom CUDA kernel.
The key aspects of the sample are using separate streams for copying data to and from the GPU and for processing. As the GPU is capable of copying data across the PCI bus simultaneously to compute, this hides the introduced copy latency and enables you to load the next image while the GPU is busy.
For consecutive images, only the first image has an upload latency and only the last image has a download latency. The rest are hidden by pipelining (Figure 2). We annotated the app with NVTX ranges for easy performance analysis.
Currently, the displayed asynchronous execution of CUDA work is not possible with ONNX Runtime if the feature branch is not compiled beforehand. The README on the sample explains how to use custom binaries instead of precompiled binaries.
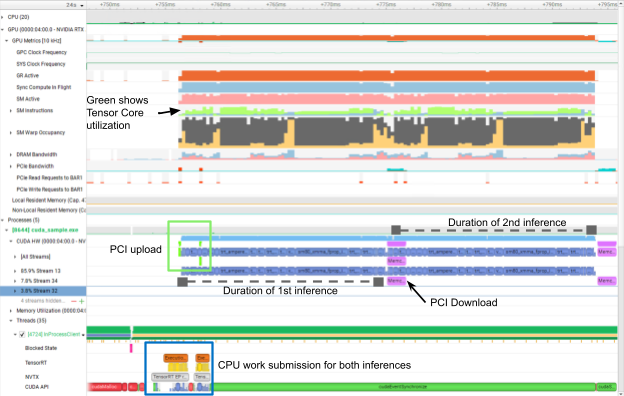
In Figure 2, the second PCI upload and the first PCI download are hidden behind CUDA kernel execution (blue). That way, there is no gap between both inferences. Also, you can see annotated with two NVTX ranges in the CPU section how little time it spends on the CPU, freeing resources for other work.
Here are another few setup decisions to highlight:
- CUDA graphs
- TensorRT workspace size
- NHWC format
- FP16 and FP8
CUDA graphs
CUDA graphs reduce the CPU launch overhead of all kernels inside a network. While the first launch has an overhead to capture the CUDA graph, all following inferences profit from it.
The amount of performance gain is heavily dependent on the network that is being used. For video processing workloads where multiple frames are being processed, it is worth experimenting with CUDA graphs.
While using CUDA graphs is in general possible on both EPs, it is only exposed as a native session creation argument on CUDA through enable_cuda_graph.
TensorRT workspace size
TensorRT workspace size is a parameter that is often unclear but is an important argument for TensorRT. As TensorRT can rearrange operations in the graph to optimize, it may need more memory to store intermediate results.
This value is controlled by the workspace size and tells the engine builder how many bytes TensorRT can allocate besides engine weights and inputs. It makes sense to experiment with this parameter and trade off speed with inference size.
A similar parameter is available for CUDA EP cudnn_conv_use_max_workspace but serves a slightly different meaning as this only refers to intermediate buffers or padding on convolution tensors and not new intermediate buffers.
NHWC format
Inputs in NHWC format are well-suited to the Tensor Cores on NVIDIA GPUs. As ONNX does only support NCHW format, you must use a trick to enable NHWC as the input tensor. Set the input dimensions to be in NHWC and insert a Transpose operation right after the input to be removed by CUDA or TensorRT EP (Figure 3).
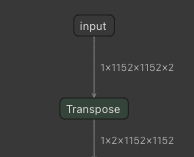
In Figure 3, adding a Transpose layer from NHWC to NCHW enables NHWC tensors as an input although ONNX only supports NCHW.
FP16 and FP8
Operation precisions like FP16 and FP8 are especially important for the best performance on GPUs. In the TensorRT EP, they must be enabled explicitly using the following attributes during session creation:
OrtTensorRTProviderOptions trt_options{};
trt_options.trt_fp16_enable = 1;
trt_options.trt_int8_enable = 1;
For more information, see ONNX Runtime Performance Tuning.
Conclusion
After reading this post, you should be equipped with the knowledge of how to efficiently deploy your ONNX models through ONNX Runtime using NVIDIA backends. This post gave guidance on how to build an optimal pipeline around this.
While the sample does not show an actual deployment of TensorRT, it can save the generated engine for later use. As shown, you can template the whole pipeline to quickly interchange TensorRT and CUDA EPs.
If you have any further questions about these topics, reach out on NVIDIA Developer Forums or join NVIDIA Developer Discord. For bugs or questions on the sample code, file a GitHub issue at NVIDIA/ProViz-AI-Samples.
To read the first post in this series, see End-to-End AI for NVIDIA-Based PCs: An Introduction to Optimization.
For more information and to access NVIDIA technologies, see NVIDIA AI for Accelerating Creative Applications.
