The NVIDIA DRIVE PX AI car computer enables OEMs, tier 1 suppliers, startups and research institutions to accelerate the self-driving car systems development. The NVIDIA DriveWorks companion Software Development Kit (SDK) for DRIVE PX includes a number of open-source reference samples, development tools and library modules targeting autonomous driving applications.
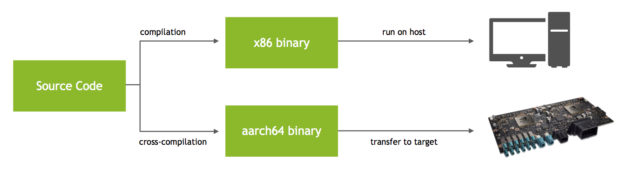
After properly configuring your development environment, you can customize these samples or develop your own applications on your linux host machine, executing them either on the host or on DRIVE PX. Figure 1 shows the common compilation and execution flow.
I’ll show you how to configure NVIDIA Nsight Eclipse Edition to enable the entire host- and cross-compilation process. Nsight Eclipse provides a full-featured integrated development environment (IDE) powered by the Eclipse platform. The all-in-one integrated environment allows you to edit, build, debug and profile CUDA C/C++ applications. You’ll learn to import, compile, run, and debug a DriveWorks project on both a host machine and remotely on a DRIVE PX 2. This takes place directly from within the Nsight IDE, exploiting the original sample makefiles.
Preliminary Steps
Nsight Eclipse supports a rich set of commercial and free plugins and ships with the CUDA Toolkit for Linux and Mac. We assume you recently ran NVIDIA DriveInstall on your host machine. NVIDIA DriveInstall automatically installs the following items on both host and target systems:
• NVIDIA DRIVE™ SDK,
• CUDA Toolkit,
• cuDNN,
• DriveWorks,
• Library dependencies of the above.
You should first make a copy of the original DriveWorks sample folder to avoid overwriting the original source code. You only need to import the DriveNet sample from DriveWorks; you won’t need the other samples.
Make sure that the DriveNet sample runs correctly before proceeding. Do this by executing the following code in a terminal window both on your host and on the DRIVE PX 2. Host execution and host compilation of samples from DriveWorks will only work on an x86 PC with an NVIDIA GPU. Compiling on a PC requires a Maxwell-based GPU at a minimum but a Pascal-based GPU (GeForce GTX 9xx) is recommended. You can only cross-compile your samples for the DRIVE PX 2 without a Maxwell, Pascal, or later NVIDIA GPU on your PC.
cd /usr/local/driveworks/bin
./sample_drivenet
In addition, make sure “manual” host compilation and DRIVE PX 2 cross-compilation run successfully. On your host, execute the following:
cd /usr/local/driveworks
sudo cp -r samples samples-original
cd samples-original
sudo mkdir build-host
cd build-host
sudo cmake ..
sudo make -j
Now cross-compile for your DRIVE PX 2. Look for the DriveSDK folder in your host and note its complete path. Substitute your DriveSDK path for “<DRIVE_SDK_PATH>” in the following snippet.
sudo mkdir build-target
cd build-target
sudo cmake -DCMAKE_BUILD_TYPE=Release -DCMAKE_TOOLCHAIN_FILE=/usr/local/driveworks/samples-original/cmake/Toolchain-V4L.cmake -DVIBRANTE_PDK:STRING=/drive-t186ref-linux ..
sudo make -j
Assuming the above operations ran properly, configure Nsight Eclipse to automate them. First, make a copy of the existing DriveWorks source code folder on your host. In a host terminal window, type:
cd /usr/local/driveworks
sudo cp -r samples samples-nsight
Keep only these folders from the samples-nsight/src folder: framework, dnn, drivenet.
Plugin Modifications
Now let’s run Nsight! You need to open Nsight Eclipse as “root” since the sample working directory is in “/usr”.
sudo /usr/local/cuda/bin/nsight
In this tutorial, you’ll use the “cmake4eclipse” plugin, which will help help you configure the CMake building process. The plugin also derives the includes automatically from the DriveWorks CMake configuration file.
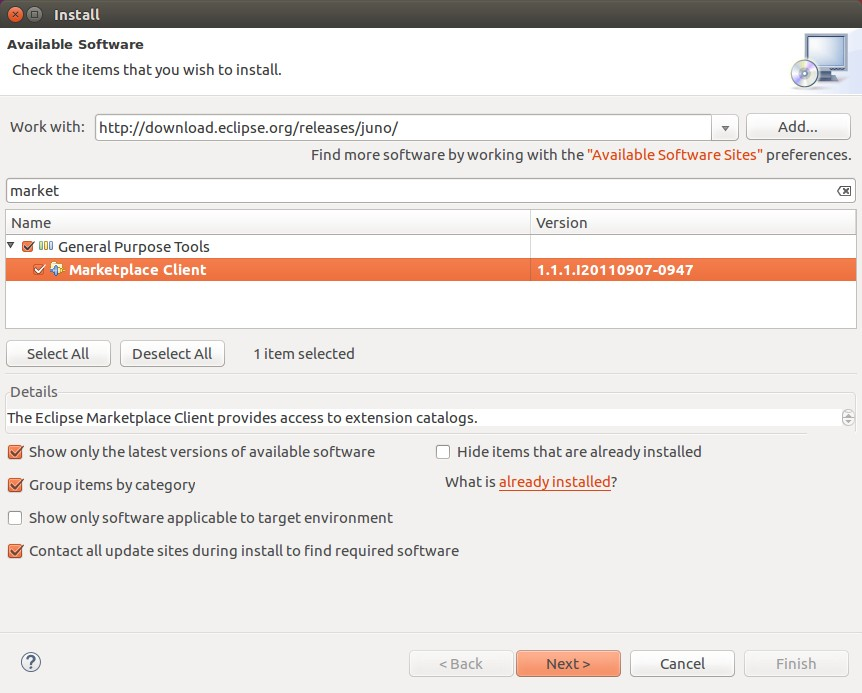
Select “Help > Install New Software…” from the Nsight Eclipse main menu then select “http://download.eclipse.org/releases/juno/” from the “Work with” dropdown list. Type “market” in the search field and click on “Marketplace Client” shown in Figure 2. After this, select “Next>” and follow prompts to complete the installation.
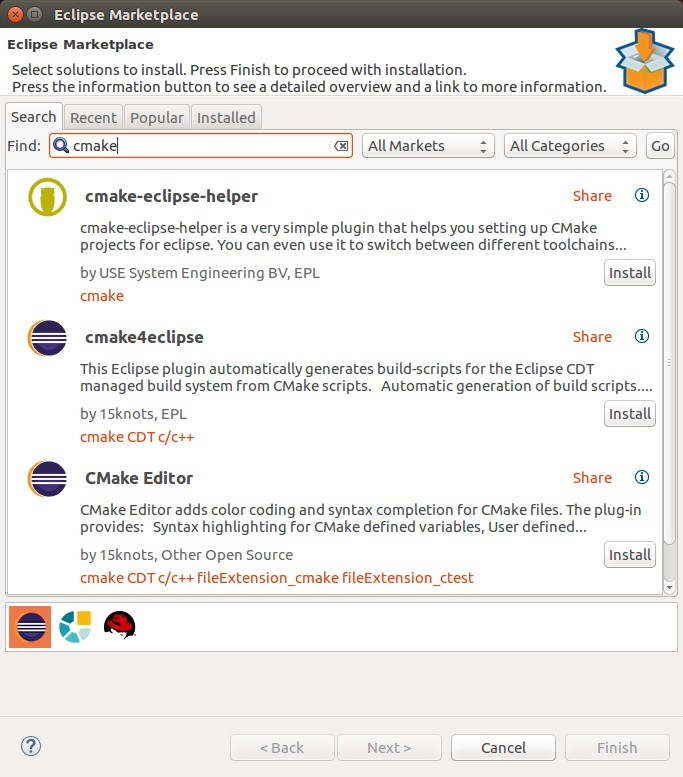
Now let’s install the cmake4eclipse plugin from the marketplace. In the Nsight main menu, Select “Help > Eclipse Marketplace…” in the Nsight main menu and type “cmake” in the search window. Now install the cmake4eclipse plugin by clicking on “Install”, shown in Figure 3. Follow the prompts to complete the installation. Optionally, you can install the CMake Editor plugin as well for syntax highlighting.
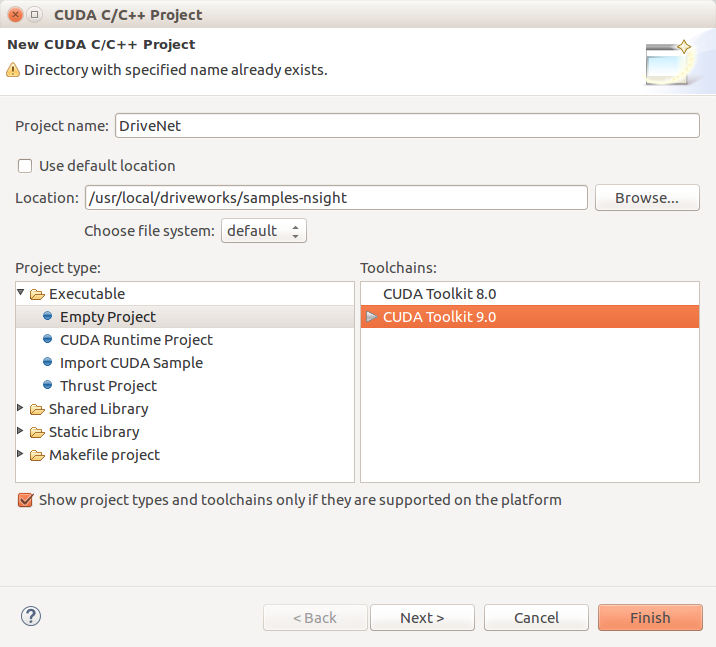
Once you’ve installed the plugin, create a new CUDA C/C++ project: “File > New > CUDA C/C++ project”. Write “DriveNet” as “Project name”, uncheck “Use default location” and browse to “/usr/local/driveworks/samples-nsight”.
Select “Empty Project” as “project type”, and “CUDA Toolkit 9.0” as “Toolchain”. After clicking “Next”, leave the remaining options as default as you can see in Figure 4.
Do not specify a “Target System” for now. You will create two distinct configurations for Host and Target.
Host Environment Configuration
Now let’s work through the steps for setting up the host environment configuraton:
- Right click on “DriveNet” and select “Properties” from the Project Explorer window.
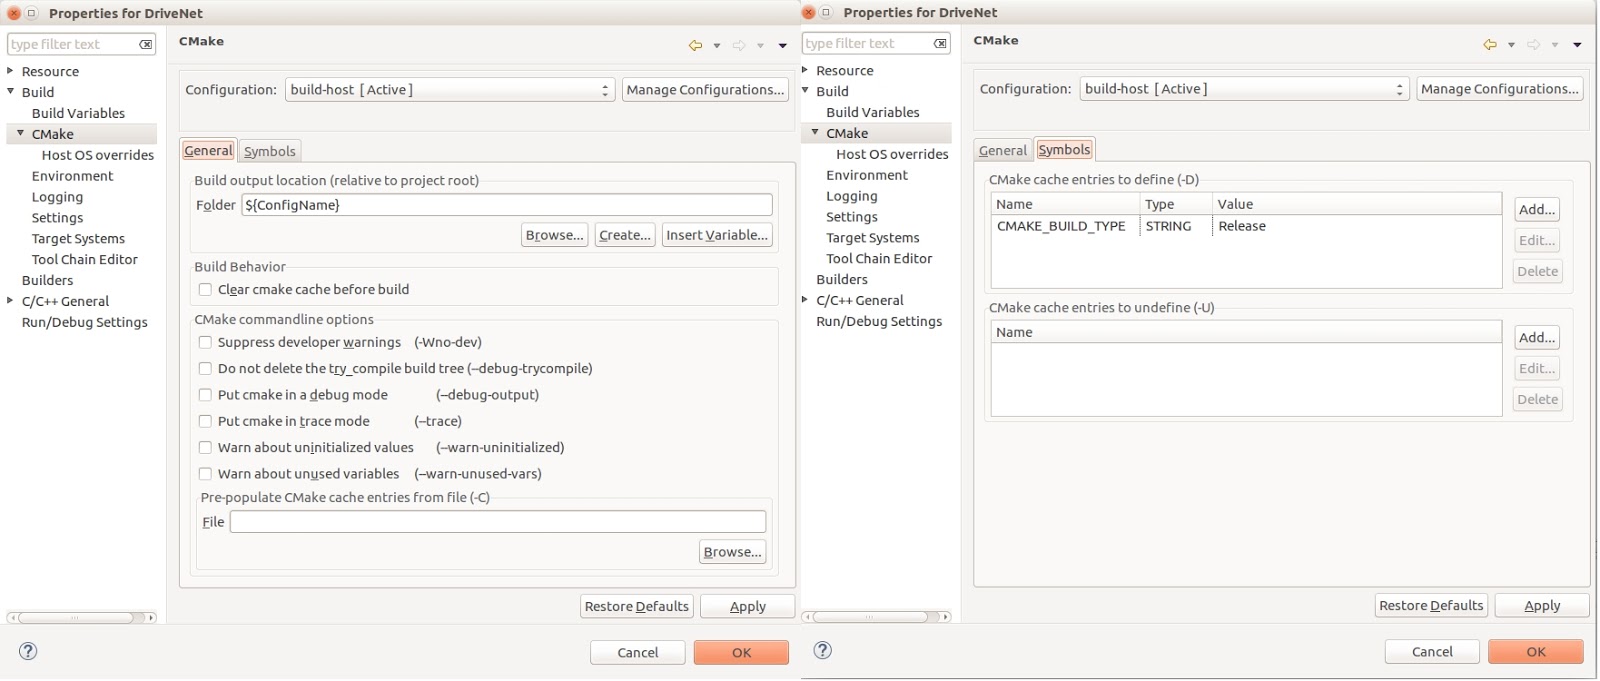
- Now go to the “Build > CMake” tab and click on “Manage configurations…”.
- Create a new configuration for the host by typing build-host as “Name” in the new window that pops up, then selecting “Release: CUDA Toolkit 9.0” as “Default configuration”.
- Click “OK” and “Set Active.”
- Now return to the “Properties for DriveNet” window and modify the “Folder” field so that it only contains ‘${ConfigName}’.
- Switch to the “Symbols” tab, click on the “Add button, and type CMAKE_BUILD_TYPE as “Variable name”, STRING as “Type”, and Release as “Value” in the “CMake cache entries to define” field.
- Click “OK” and then “Apply” to confirm.
Use Figure 5 as a reference if you’re a little confused. This creates a Release-type configuration for the host machine. Later, you will create a Debug-type configuration for the target instead.
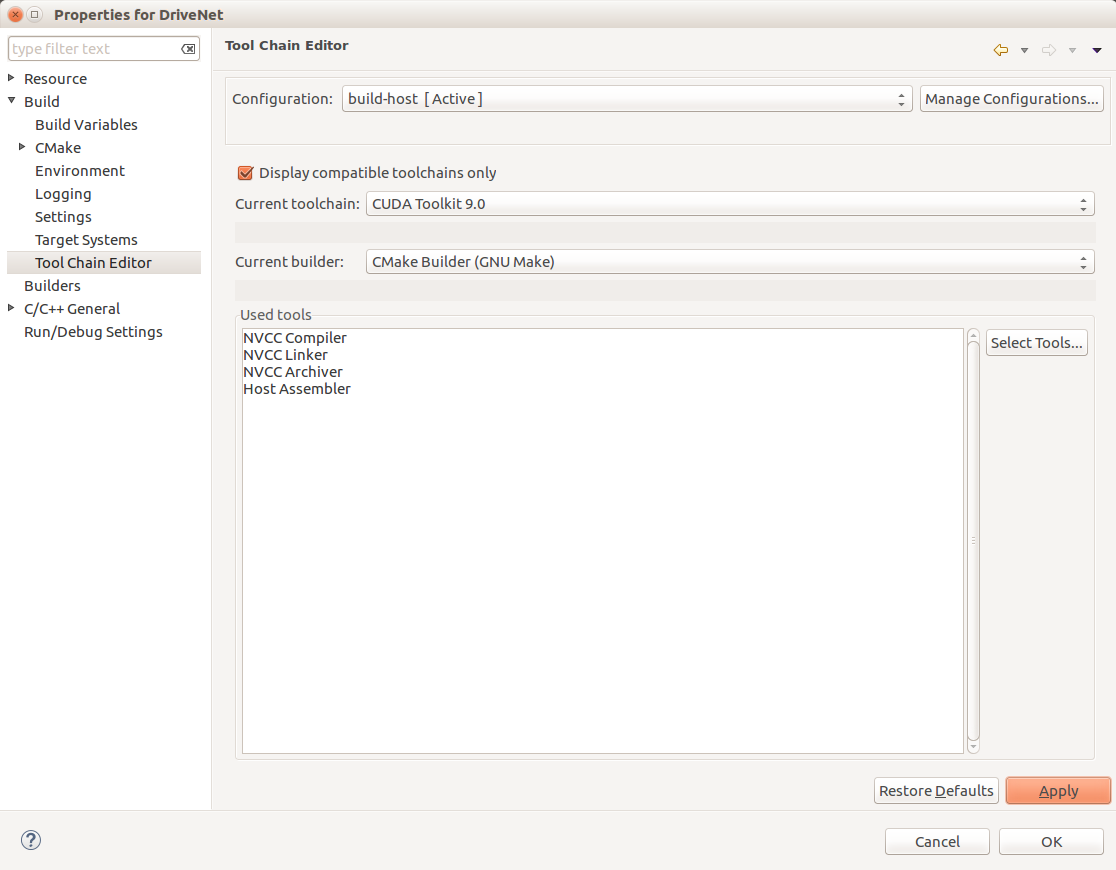
In the “Tool Chain Editor” tab in the left-hand side, select “Cmake Builder (GNU Make)” as “Current builder” (as shown in Figure 6), so that the cmake4eclipse plugin will be used whenever you build the project within Nsight.
Finally, go to “C/C++ General > Preprocessor Include Paths, Macros etc.”, find the “Providers” tab, select the “CMAKE_EXPORT_COMPILE_COMMANDS Parser” line and move it up to the top of the list by clicking on “Move Up”, following Figure 7. The preprocessor include paths will now be derived automatically from the CMake configuration files.

Click “Apply” and then “OK” to confirm. Edit the CMakeLists.txt file to only build the DriveNet sample: substitute the line
set(SAMPLES framework; …
with:
set(SAMPLES framework;dnn;drivenet)
You are now ready to build the project. Click on “Build” with the “Project > Build Project” command.
The DriveNet sample source file can be found in “src > drivenet > drivenet > main.cpp.” The sample_drivenet executable is in “build-host > src > drivenet > drivenet > sample_drivenet”. Right click on it and select “Run as > Local C/C++ application” to launch it on your host machine.
Target Environment Configuration
It’s time to add a second environment for a DRIVE PX 2 target device, where your application ultimately resides. The target configuration bears similarities to the host one you just set but requires a few more settings. Let’s walk through the process:
- Select the “DriveNet” project again in the left column, right-click on it and open the “Properties” window.
- Select “CMake” from the “Build” tab, then click on “Manage Configurations…”.
- Create a new configuration calling it `build-target`, and select “Debug: CUDA Toolkit 9.0” as “Default configuration”.
- Since I’ll be demonstrating how to run the Nsight Eclipse debugger on this sample, I specified “Debug: CUDA Toolkit 9.0” for this configuration. If you are not interested in debugging, select “Release: CUDA Toolkit 9.0 instead”.
- Copy the steps related to the host configuration shown in Figure 6, but this time add a few more entries in the “Symbols” tab:
- “Variable name”: CMAKE_BUILD_TYPE, “Type”: “STRING”, “Value”: Debug
- “Variable name”: CMAKE_TOOLCHAIN_FILE, “Type”: “FILEPATH”, “Value”: /usr/local/driveworks/samples-nsight/cmake/Toolchain-V4L.cmake
- “Variable name”: VIBRANTE_PDK, “Type”: “PATH”, “Value”: <DRIVE_SDK_PATH>
Make sure to substitute “<DRIVE_SDK_PATH>” with the path for the “drive-t186ref-linux” in the “DriveSDK” folder on your host. Check Figure 8 to make sure you completed this step correctly.

Repeat the steps regarding the “Tool Chain Editor” (from Figure 7) and the “Preprocessor Include Paths, Macros etc.” (from Figure 8) as done for the Host configuration, selecting “build-target [Active]” instead. Click “Apply” for every tab and then “OK” to go ahead.
You can now cross-compile the project by following the same steps you used for building the host version. Build the project by first selecting “build-target” with “Project > Build Configurations > Set Active”, and then clicking on “Build” with the “Project > Build Project” command. You will find the executable in “build-target > src > drivenet > drivenet.”
Run The Sample on DRIVE PX from Nsight Eclipse
You can configure Nsight Eclipse to execute the DriveNet sample remotely on the Drive PX assuming the DRIVE PX resides on the local network. First find your “<target IP address>” by typing ifconfig on a terminal window in the DRIVE PX.
Configure Nsight Eclipse to automatically transfer the updated cross-compiled version of the sample to the DRIVE PX every time you launch it. Do this by creating a new folder and set its ownership to the nvidia user on the DRIVE PX.
$ ssh nvidia@
$ cd /usr/local/driveworks
$ sudo mkdir bin-nsight
$ sudo chown –R nvidia:nvidia bin-nsight
$ exit
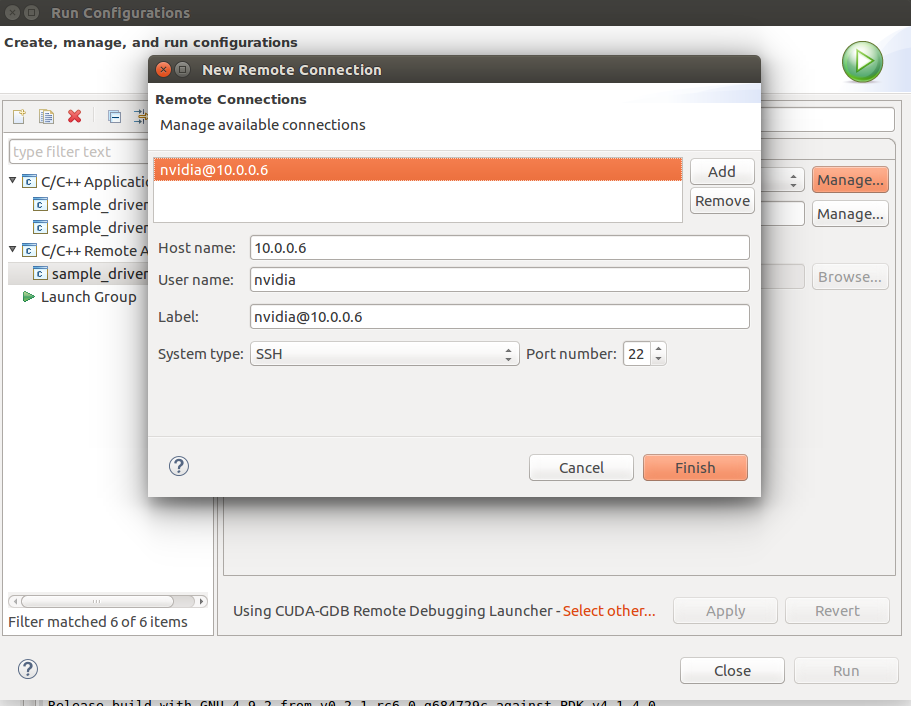
Back in Eclipse, click on the “Run > Run configurations” top menu. Add a new configuration below “C/C++ Remote Application”, and type sample_drivenet_remote as “Name”. Next to “Remote connection,” select “Manage” and type the <target IP address> as “Host name,” nvidia as “User name” and nvidia@<target IP address> as “Label”, shown in Figure 9. Then click on “Finish”.
Next to “Remote toolkit”, click on “Manage” and in the following section click on “Detect” to identify the Toolkit path: /usr/local/cuda-9.0/bin should be found. If not, you need to manually select the CUDA toolkit path on the target.
To complete the configuration, check “Upload local executable” and type the complete remote path for the executable: it should be /usr/local/driveworks/bin-nsight/sample_drivenet. This way, Nsight Eclipse will automatically send the updated DriveNet sample to the target before running it.
In the “Local” tab, make sure to select the “DriveNet” project and select sample_drivenet as the C/C++ Application to run using the “Search Project…” button. In the “Environment” tab, click on “New” and type DISPLAY as “Name” and :0 as “Value.” Optionally, you can add CUDA_VISIBLE_DEVICES as “Name” and 1 as “Value” if you want to run the sample on the iGPU rather than the dGPU on the DRIVE PX 2. Click on “Run” to launch the application on the target.
Debug Sample Running on DRIVE PX 2
You’ve now specified a remote target system configuration for the DRIVE PX 2. This makes the configuration available to debug the sample in the “Run > Debug configurations” menu. Before going on, spend some time looking at the many debug features available in this window.
Nsight automatically downloads shared libraries from the remote target for the debugging process by default. This considerably increases the debugging execution time, however. You should instead point Nsight Eclipse directly to the target libraries already available in the host system. Switch to the “Debugger > Shared Libraries” tab and uncheck “Download shared libraries from remote target”. Then add the following paths by clicking on “Add…:”
- /usr/local/driveworks/targets/aarch64-linux/lib
- /usr/local/cuda/targets/aarch64-linux/lib
- <DRIVE_SDK_PATH>/drive-t186ref-linux/targetfs/usr/lib
- <DRIVE_SDK_PATH>/drive-t186ref-linux/targetfs/lib/aarch64-linux-gnu
- <DRIVE_SDK_PATH>/drive-t186ref-linux/targetfs/usr/lib/aarch64-linux-gnu
Replace <DRIVE_SDK_PATH> with the path for the Drive SDK on your host and launch the debugger from this window. This switches Nsight to the debugger perspective and break at the first CPU instruction in the code. Find the CUDA view (cube icon) in the top-right pane and select “break on application kernel launches”. This causes the debugger to automatically break on any CUDA kernel started on the GPU.
You can now resume the application, which runs until the first breakpoint is hit in the CUDA kernel. From there, you can browse the CPU and GPU call stacks in the top-left pane, as Figure 11 shows. In the top-right pane, you can also inspect variables, registers, and the GPU kernel execution configuration (the number of CUDA thread blocks and the number of threads per block). Finally, the disassembly view makes it easy to see how register values are updated while executing the code.
Set a breakpoint inside a particular bit of kernel code on the GPU to debu it by double-clicking on the corresponding line number in the code. (Keep in mind, however, that single-stepping a thread causes the other threads in the same warp to step as well.)
When you are finished debugging, click on the red stop button to quit the application.

Profiling on DRIVE PX 2
Now that you’ve debugged the sample, you can profile your application from Nsight while it is running on the DRIVE PX 2. The initial remote target system configuration is once again available for remote profiling. However, remember to change the CMake build type to Release in the “Make Target” configuration.
“Release” will be the default setting if the -DCMAKE_BUILD_TYPE variable is not specified as you can see in Figure 4. Click on “Run > Profile configurations” to begin profiling and select the correct element under the “C/C++ Remote Application” list. Remember to specify an execution timeout — for instance, 60 seconds — in the “Profiler” tab on the right, which kills the application automatically after the specified time.
After that, click on “Profile”. The Nsight profiler perspective should open automatically. Wait while Nsight runs the application to create an execution timeline including all the CUDA Runtime and kernel calls executed on the GPU, shown in Figure 12. Once finished, the “Properties” tab displays details of any event you select from this timeline. These events can also be viewed in text form in the “Details” tab in the lower pane.
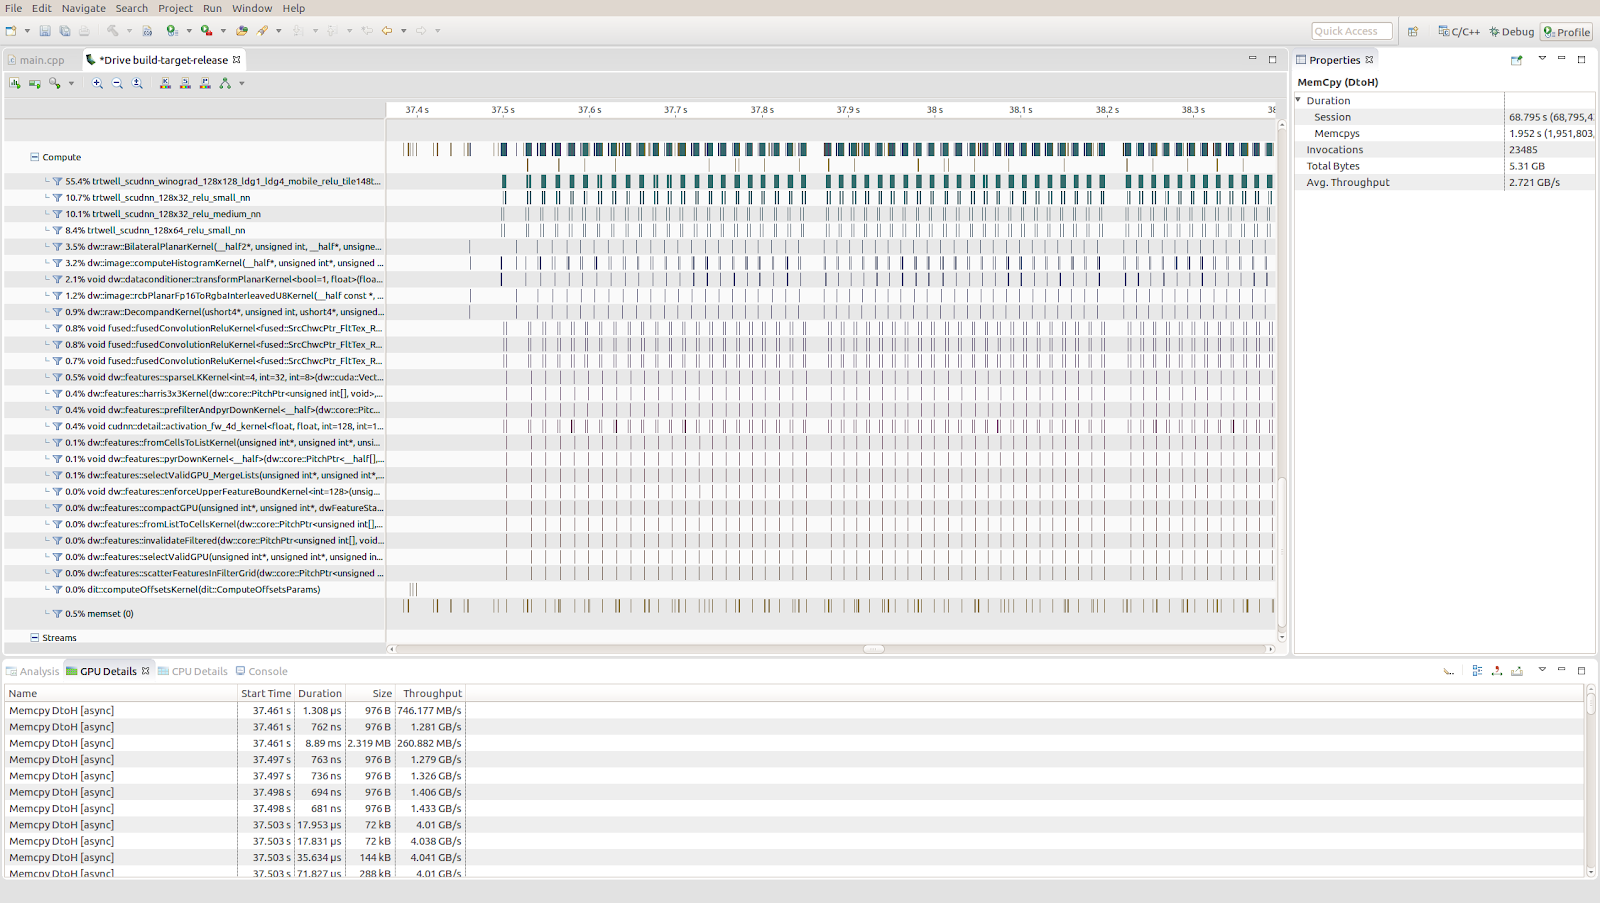
Check the Analysis tab below the timeline view to further analyze performance. This enables you to easily identify bottlenecks by running more advanced profiling sessions on your code. You can refer to the “Guided Performance Analysis with the Visual Profiler” blog post for additional instructions.
Get Started with Nsight and DRIVE PX 2
If you want to learn more about the Drive PX platform, visit the Drive PX product page, where you can find additional material on NVIDIA’s Drive software. You can learn more about further Nsight Eclipse features. Be sure to get Nsight today to start developing your own CUDA and Drive PX applications!