Sign up for the latest Speech AI news from NVIDIA.
Virtual assistants have become part of our daily lives. We ask virtual assistants almost anything that we wonder about. In addition to providing convenience to our daily lives, virtual assistants are of tremendous help when it comes to enterprise applications. For example, we use online virtual agents to help navigate complex technical issues, file insurance claims, or book hotel reservations. We also use fully automated calls to help scale customer relationship management. All of these applications require an enterprise to deploy a production-grade, robust, voice-based virtual assistant to scale to hundreds of millions of end users.
Because of their naturalness, voice interfaces have grown to be the key enabler to facilitate the high quality, human/machine interface. However, voice-based virtual assistants remain a significant technical challenge to many developers, especially when deployed at scale.
To successfully deploy a production-grade, voice-based virtual assistant, you must make sure that the following aspects are fully supported:
- High quality—Quality is directly related to the end-user experience. Make sure that the voice interface can understand various languages, dialects, and jargon and do so in an accurate and robust manner. In addition, a typical intelligent conversation can take multiple turns and can be highly contextual. A virtual assistant must be able to navigate the complex dynamics of the conversations and be able to identify the correct intent, domain, or context to drive the conversation towards a successful outcome.
- High performance and scalability—Apart from the stringent quality requirements, a virtual assistant must be able to respond with the accurate answer in almost real time. An added 200-ms latency can cause any human to perceptively experience the delay and hamper the end-user experience. When a virtual assistant is deployed to a scale of hundreds of millions of concurrent users, the latency tends to increase as part of the performance trade-off. Controlling latency at a significant scale is an additional engineering challenge.
The goal of this post is to walk you through a sample application of two production-grade, enterprise-ready, virtual assistant solutions: NVIDIA Riva and Rasa. We show that you can easily build your first voice-based virtual applications that are ready to deploy and scale. In addition, we demonstrate the performance of Riva to showcase its production-grade capabilities.
The virtual assistant system includes the following components:
- Dialog management (DM)
- Automatic speech recognition (ASR)
- Natural language processing (NLP) or natural language understanding (NLU)
- Text to speech (TTS)
The NLU and DM components come from Rasa, whereas Riva provides the TTS and ASR functionality.
Rasa overview
Rasa is an open-source, machine learning framework for building text and voice-based AI assistants. At the most basic level, an assistant must be able to do two things:
- Understand what the user is saying.
- Respond accordingly.
A Rasa assistant uses machine learning to accomplish both. Rasa allows you to build robust assistants that learn from real user conversations to handle mission-critical tasks at scale.
For this virtual assistant, you use the Rasa NLU and DM capabilities. For more information, see the Rasa documentation.
Riva overview
Riva is the NVIDIA AI speech SDK for building conversational AI applications. Riva provides ASR and TTS functionality that you can use to provide voice interfaces to virtual assistants. The Riva SDK runs on NVIDIA GPUs, providing the fastest inference time at high throughput levels.
For this virtual assistant, the ASR solution must have low latency and high accuracy, while being able to support high throughput. The TTS must have low latency and support customizable voice fonts. Riva provides both and is perfect for building a voice-based virtual assistant. For more information about Riva performance, see NVIDIA Riva Speech Skills.
Architecture overview
Here’s how the four components interact to create a voice-based virtual assistant. Figure 1 shows the architecture for the virtual assistant.
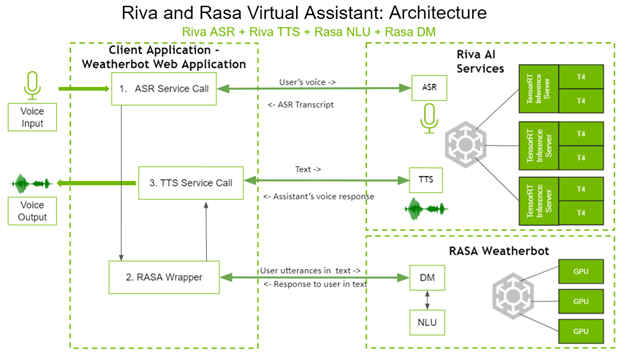
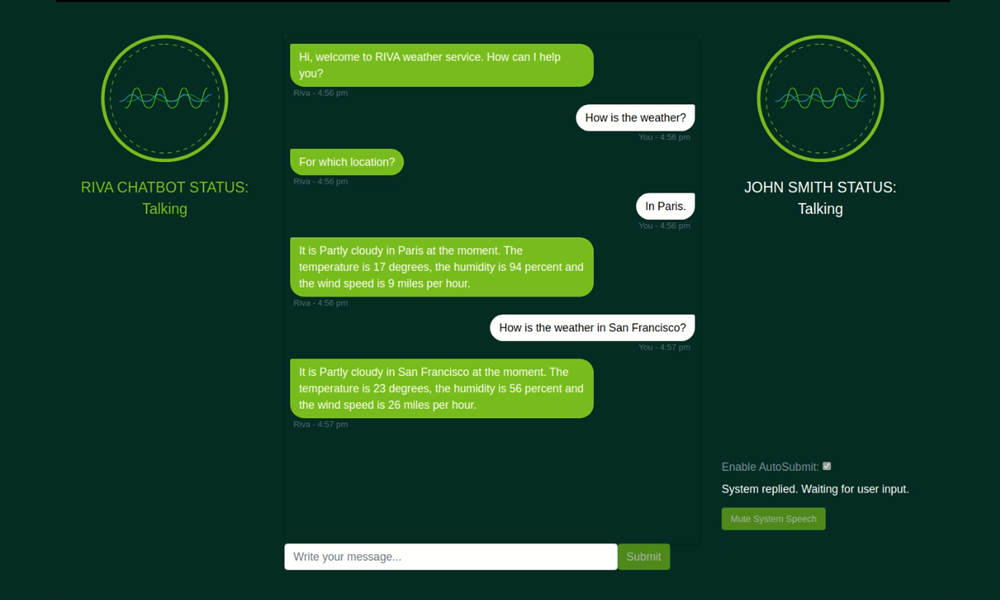
On the left side, the client application is a weatherbot web application. The user directly interacts with the client application by voice and receives answers through the speakers.
The question spoken by the user gets transcribed by a call to the Riva ASR service. This transcribed text goes to the Rasa wrapper, which in turn makes API calls to the Rasa DM and Rasa NLU to decide the appropriate next action. Rasa DM also handles fulfillment when needed, depending on the next action chosen. The textual response from the Rasa server is sent to the Riva TTS server using a gRPC call, which returns the corresponding audio, spoken back to the user.
As you can see, both the Riva AI services and Rasa are deployed on systems with GPUs for better performance.
Building a virtual assistant
In this post, we walk you through building a virtual assistant for the weather domain. The focus of this post is not building a chatbot with Rasa NLU and DM, but showing the integration of Rasa NLU and Rasa DM with Riva ASR and TTS to build a voice-based virtual assistant.
The virtual assistant needs a user interface so you create a simple website using Python’s Flask framework.
For more information about this solution, along with the code, see the Virtual Assistant (with Rasa) section in the Riva documentation.
Prerequisites
For the virtual assistant to work, you must have the Riva server up and running. To have the Riva AI Services up and running and reachable through gRPC endpoints, follow the instructions in the Riva Quick Start Guide.
Integrating Riva ASR into Rasa assistant
In this section, you integrate Riva ASR with the Rasa assistant, as present in the asr.py file.
Riva ASR can be used either in streaming or batch mode. In streaming mode, a continuous stream of audio is captured and recognized, producing a stream of transcribed text. In batch mode, an audio clip of set length is transcribed to text. For this use case, use Riva ASR in streaming mode.
Code overview
import grpc
import riva.modules.client.src.riva_proto.audio_pb2 as ri
import riva.modules.client.src.riva_proto.riva_asr_pb2 as risr
import riva.modules.client.src.riva_proto.riva_asr_pb2_grpc as risr_srv
Start by importing the necessary Riva client dependencies:
class ASRPipe(object):
    def __init__(self):
        . . . .
        self.chunk = int(self.sampling_rate / 10) # 100ms
        self._buff = queue.Queue()
        self._transcript = queue.Queue()
        self.closed = False
Create the ASRPipe class to handle the Riva ASR operation. In the __init__ method, you create the _buff and _transcript queues for the audio stream and transcribed text stream, respectively.
    def start(self):
        . . . .
        self.channel = grpc.insecure_channel(riva_config["RIVA_SPEECH_API_URL"])
        self.asr_client = risr_srv.RivaSpeechRecognitionStub(self.channel)
Call the start function to establish a gRPC channel to the Riva server.
    def fill_buffer(self, in_data):
        """Continuously collect data from the audio stream, into the
           buffer."""
        self._buff.put(in_data)
ASR in the virtual assistant is a background process, as you always need the website to be listening for user audio. The audio from the audio stream is continuously added to the audio buffer _buff by calling the fill_buffer function.
    def main_asr(self):
        . . . .
        config = risr.RecognitionConfig(
            encoding=ri.AudioEncoding.LINEAR_PCM,
            sample_rate_hertz=self.sampling_rate,
            language_code=self.language_code,
            max_alternatives=1,
            enable_automatic_punctuation=self.enable_automatic_punctuation
        )
        streaming_config = risr.StreamingRecognitionConfig(
            config=config,
            interim_results=self.stream_interim_results)
        if self.verbose:
            print("[Riva ASR] Starting Background ASR process")
        self.request_generator = self.build_request_generator()
        requests = (risr.StreamingRecognizeRequest(audio_content=content)
                    for content in self.request_generator)
        def build_generator(cfg, gen):
            yield risr.StreamingRecognizeRequest(streaming_config=cfg)
            for x in gen:
                yield x
            yield cfg
        if self.verbose:
            print("[Riva ASR] StreamingRecognize Start")
        responses = self.asr_client.StreamingRecognize(build_generator(
                         streaming_config, requests))
        # Now, put the transcription responses to use.
        self.listen_print_loop(responses)
After you have the audio, use the main_asr function to generate the transcript.
In the main_asr function, set config parameters needed for a Riva ASR call, like the language, number of channels, audio encoding, sample rate, and so on. The main_asr function then defines the build_generator function: a generator to iteratively call the Riva ASR StreamingRecognizeRequest function with the audio clip and ASR configuration. Finally, main_asr calls the Riva ASR StreamingRecognize function. The function returns a stream of text transcripts, with flags to indicate the intermediate and final transcripts, which is then returned to the caller.
Integrating Riva TTS into the Rasa assistant
In this section, you integrate Riva TTS with the Rasa assistant, as present in the tts.py and tts_stream.py files.
As in ASR, TTS can also be used in either streaming or batch mode. With batch mode in tts.py, you take the text as input and generate an audio clip. With streaming mode in tts_stream.py, you take the text as input and generate a stream of audio.
Code overview
import grpc
import riva.modules.client.src.riva_proto.audio_pb2 as ri
import riva.modules.client.src.riva_proto.riva_tts_pb2 as rtts
import riva.modules.client.src.riva_proto.riva_tts_pb2_grpc as rtts_srv
from riva.tts.tts_processing.main_pronunciation import RunPronunciation
Start by importing the necessary Riva client dependencies.
class TTSPipe(object):
    def __init__(self):
        . . . .
        self._buff = queue.Queue()
        self._flusher = bytes(np.zeros(dtype=np.int16,
                              shape=(self.sample_rate, 1))) # Silence audio
        self.pronounce = RunPronunciation(pronounce_dict_path)
Create the TTSPipe class to handle the Riva TTS operation. In its __init__ method, you create the _buff queue to hold the input text.
    def start(self):
        . . . .
        self.channel = grpc.insecure_channel(
                            riva_config["Riva_SPEECH_API_URL"])
        self.tts_client = rtts_srv.RivaSpeechSynthesisStub(self.channel)
Call the start function to establish a gRPC channel to the Riva server.
    def fill_buffer(self, in_data):
        """To collect text responses and fill TTS buffer."""
        if len(in_data):
            self._buff.put(in_data)
The text to be converted to audio is added to the buffer _buff by calling the fill_buffer method.
    def get_speech(self):
        . . . .
        while not self.closed:
            if not self._buff.empty():  # Enter if queue/buffer is not empty.
                try:
                    text = self._buff.get(block=False, timeout=0)
                    req = rtts.SynthesizeSpeechRequest()
                    req.text = self.pronounce.get_text(text)
                    req.language_code = self.language_code
                    req.encoding = self.audio_encoding
                    req.sample_rate_hz = self.sample_rate
                    req.voice_name = self.voice_name
                    duration = 0
                    self.current_tts_duration = 0
                    responses = self.tts_client.SynthesizeOnline(req)
                    for resp in responses:
                        datalen = len(resp.audio) // 4
                        data32 = np.ndarray(buffer=resp.audio,
                                    dtype=np.float32, shape=(datalen, 1))
                        data16 = np.int16(data32 * 23173.26)
                        speech = bytes(data16.data)
                        duration += len(data16)*2/(self.sample_rate*1*16/8)
                        self.current_tts_duration += duration
                        yield speech
                except Exception as e:
                    print('[Riva TTS] ERROR:', e)
       . . . .
The get_speech method is used to perform TTS.
In the get_speech method, set config parameters needed for a Riva TTS call, like the language, audio encoding, sample rate, and voice name. The get_speech method then calls the Riva TTS SynthesizeOnline method with the text as input and returns a stream of generated audio. Loop over this response and yield the audio output in chunks of a configurable duration, resulting in streaming audio output.
Putting it all together
Now, you work on making calls to the Rasa servers for NLU and DM with the rasa.py file.
class RASAPipe(object):
    def __init__(self, user_conversation_index):
        . . . .
        self.user_conversation_index = user_conversation_index
Create the RASAPipe class to handle all calls to the Rasa servers for NLU and DM.
    def request_rasa_for_question(self, message):
        rasa_requestdata = {"message": message,
                            "sender": self.user_conversation_index}
        x = requests.post(self.messages_url, json = rasa_requestdata)
        rasa_response = x.json()
        processed_rasa_response = self.process_rasa_response(rasa_response)
        return processed_rasa_response
The primary function of this class is the request_rasa_for_question method, which takes the user input as text, calls Rasa with this text and the sender ID on the exposed Rasa API, gets the response from Rasa, and then returns this response back to the caller.
Next, create the inference pipeline, as covered in the chatbot.py file.
class ChatBot(object):
    def __init__(self, user_conversation_index, verbose=False):
        self.id = user_conversation_index
        self.asr = ASRPipe()
        self.rasa = RASAPipe(user_conversation_index)
        self.tts = TTSPipe()
        self.thread_asr = None
        self.pause_asr_flag = False
        self.enableTTS = False
In chatbot.py, you have the ChatBot class. There is one ChatBot instance per conversation, which is responsible for handling all the ASR, TTS, and Rasa operations for that conversation. When an instance of the ChatBot class gets created, you create instances of the ASR, Rasa, and TTS classes during its initialization.
    def server_asr(self):
        self.asr.main_asr()
    def start_asr(self, sio):
        self.thread_asr = sio.start_background_task(self.server_asr)
The start_asr method is called first and is responsible for starting the ASR operation as a background process in a separate, dedicated thread.
    def asr_fill_buffer(self, audio_in):
        if not self.pause_asr_flag:
            self.asr.fill_buffer(audio_in)
    def get_asr_transcript(self):
        return self.asr.get_transcript()
Then, the asr_fill_buffer function calls the ASRPipe instance fill_buffer function to add the input audio stream from the user to the ASR buffer. When Riva ASR starts streaming transcribed text back, the get_asr_transcript function gets called, returning the transcribed text to the caller.
    def rasa_tts_pipeline(self, text):
        response_text = self.rasa.request_rasa_for_question(text)
        if len(response_text) and self.enableTTS == True:
            self.tts_fill_buffer(response_text)
        return response_text
With the transcribed text, call the rasa_tts_pipeline method, responsible for pipelining the Rasa and Riva TTS functionality. The method starts by calling the RASAPipe instance request_rasa_for_question method. This sends the user input text to Rasa, where Rasa NLP and Rasa DM determine the appropriate action and return a reply as a text message. This text message is then passed to the tts_fill_buffer and returned to the caller.
    def tts_fill_buffer(self, response_text):
        if self.enableTTS:
            self.tts.fill_buffer(response_text)
    def get_tts_speech(self):
        return self.tts.get_speech()
The tts_fill_buffer, called earlier, in turn calls the TTSPipe instance fill_buffer method, filling the TTS buffer with input text. The get_tts_speech method is called when TTS is ready with the audio stream and this audio is streamed back to the caller.
As you can see, you have pipelined the Rasa and TTS functionality into one simple method, rasa_tts_pipeline.
Starting the virtual assistant
Before starting the virtual assistant servers, you must properly configure the API endpoints by following the instructions in the Network Configuration section.
To start the voice-based virtual assistant, follow the instructions in Running the Demo section.
While following the above steps, you initialize individual containers for the Rasa action server and Rasa server. This process is long and cumbersome. For more information about a simpler method, refer to Docker Compose Installation for Rasa.
Improving accuracy
You can improve the accuracy of the above voice-based virtual assistant in two key ways.
Rasa Conversation-driven development and Rasa X
Conversation-driven development (CDD) is the process of listening to your users and using those insights to improve your AI assistant. Developing great AI assistants is challenging because users will say things you can’t anticipate. However, the opportunity is that, in every conversation, users are telling you exactly what they want. By practicing CDD at every stage of conversational AI development, you empower your assistant to learn from real user language and behavior.
Rasa X is a tool to practice CDD. Here’s each of the steps within CDD with Rasa X:
- Share: Give your prototype to users to test as early as possible. In addition to connecting with external channels, you can share your prototype with users by sending them a link from Rasa X. This gets your assistant into the hands of test users as soon as possible, even before you connect it to an external channel.
- Review: Take time to read through the conversations that people have with your assistant. It’s helpful at every stage of a project, from prototype to production. All conversations, from within Rasa X and from any channels you have connected, show up in your conversation screen.
- Annotate: Improve your NLU model based on messages from real conversations. Whenever you get new messages, a badge in the sidebar indicates that you have new data to process. You can mark messages as correct, fix incorrect responses, and add data that reflects what real users say to your assistant.
- Test: Professional teams don’t ship applications without tests. You can save real conversations as tests in Rasa X, so that successful conversations can become tests right away. After you’ve deployed Rasa X to a server, set up a continuous integration (CI) pipeline to automate your testing. Integrated version control in Rasa X can trigger tests in a CI pipeline that automatically run whenever you push changes.
- Track: Identify successful and unsuccessful conversations to measure how your assistant is doing. To automate this process, use the Rasa X API to automatically tag certain actions based on your use case. For instance, tag indicators such as users signing up for your service or asking to route to a human agent.
- Fix: Following each of the steps allows you to see how your assistant is doing well and where it’s making mistakes so you can fix them and iteratively improve your assistant over time.
CDD is not a linear process. You will find yourself jumping back and forth between each of these actions. It’s a collaborative process between product, design, and development that reveals what users are asking for. Over time, it ensures that your assistant is adapting to what users want, rather than expecting users to adapt their behavior so the assistant doesn’t break. For more information, see the Rasa X Installation Guide.
NVIDIA TAO Toolkit
In many cases, you must train, adapt, and optimize models for your specific use cases. The most significant way to customize models while boosting accuracy is to use transfer learning on the pretrained Riva models with your custom data and the NVIDIA TAO Toolkit.
NVIDIA TAO Toolkit is an AI model-adaptation framework that enables you to fine-tune pretrained models with your custom data without the need for large training data sets or deep AI expertise. The TAO Toolkit supports a variety of models required for the conversational AI pipeline, from speech recognition and natural language understanding to text-to-speech.
The most important differentiator of the TAO Toolkit is that it abstracts away the complexity of AI/DL frameworks with the help of predefined Python scripts. Users execute all the operations inside dedicated, pre-built Docker containers. The scripts are organized in a clear hierarchy, following domains and domain-specific tasks associated with the supported models. For each model, the toolkit organizes the order of operations that users should follow, from data preparation, training, and fine-tuning of models to export for inference.
For more information, see the TAO Toolkit documentation.
Conclusion
In this post, you built a voice-based virtual assistant and learned what it takes to integrate Riva ASR and TTS with Rasa NLP and DM. You also learned about the NVIDIA Riva SDK and how Riva ASR and TTS work.
There are more sample notebooks and applications in the Riva documentation, and we encourage you to try them out. Join the Riva forum to connect with the Riva community. Learn more about Rasa and join the Rasa forum to see what others are building!
