
The medical imaging industry is undergoing a dramatic transformation driven by two technology trends: Artificial Intelligence and software-defined solutions are redefining the medical imaging workflow.
Artificial Intelligence, specifically deep learning, demonstrates great potential within radiology for disease detection, localization, and classification. It has already shown it can augment humans by increasing their efficiency and effectiveness by prioritizing the most severe or time sensitive cases. These efficiencies save hospital systems time and money, focusing valuable resources on saving lives.
Deep learning research in the field of medical imaging is booming, however, most of this research today happens in isolation and with limited datasets. This leads to overly simplified and unscalable models which only have high accuracy for a certain demographic and set of imaging devices. At the same time, smaller hospitals lack the opportunity to provide higher quality of care for their local population due to a lack of technical expertise, resources, and the sheer data volumes required for deep learning.
Even when creating effective deep learning algorithms, the challenges of integration and scalability in deploying these intelligent algorithms into clinical workflows seem daunting.
The Clara Platform addresses these challenges by lowering the bar to adopting AI in a clinical workflows. The Clara Train SDK provides transfer learning and AI-assisted annotation capabilities, enabling faster data annotation and adaptation of a neural network from source domain to a target domain. Once a quality-assured neural network becomes available, the Clara Deploy SDK covered in this post provides the framework and tools required to develop an application workflow capable of integrating into existing hospital infrastructure.
The Clara Deploy SDK provides an industry-standard, container-based development and deployment framework for building AI-accelerated medical imaging workflows. The SDK uses Kubernetes under the hood, providing developers and data scientists with the ability to define a multi-staged container based pipeline. This modular architecture, shown in figure 1, allows developers to use the offerings of the platform out-of-the-box with minimal customization or create new workflows with bring-your-own algorithms.

CORE CAPABILITIES
- Data Ingestion. Includes a containerized DICOM Adapter interface to communicate with hospital PACS and other imaging systems (both to receive and transmit data)
- Pipeline Manager and Core Services. Provides container based orchestration, resource management & services for TensorRT based inference and Rendered Image Streaming.
- Sample Deployment Workflows. Includes capabilities to define and configure container based workflows using sample workflow with user defined data or modified with user-defined-AI algorithms.
- Visualization Capabilities. Enables the ability to monitor progress and view final results
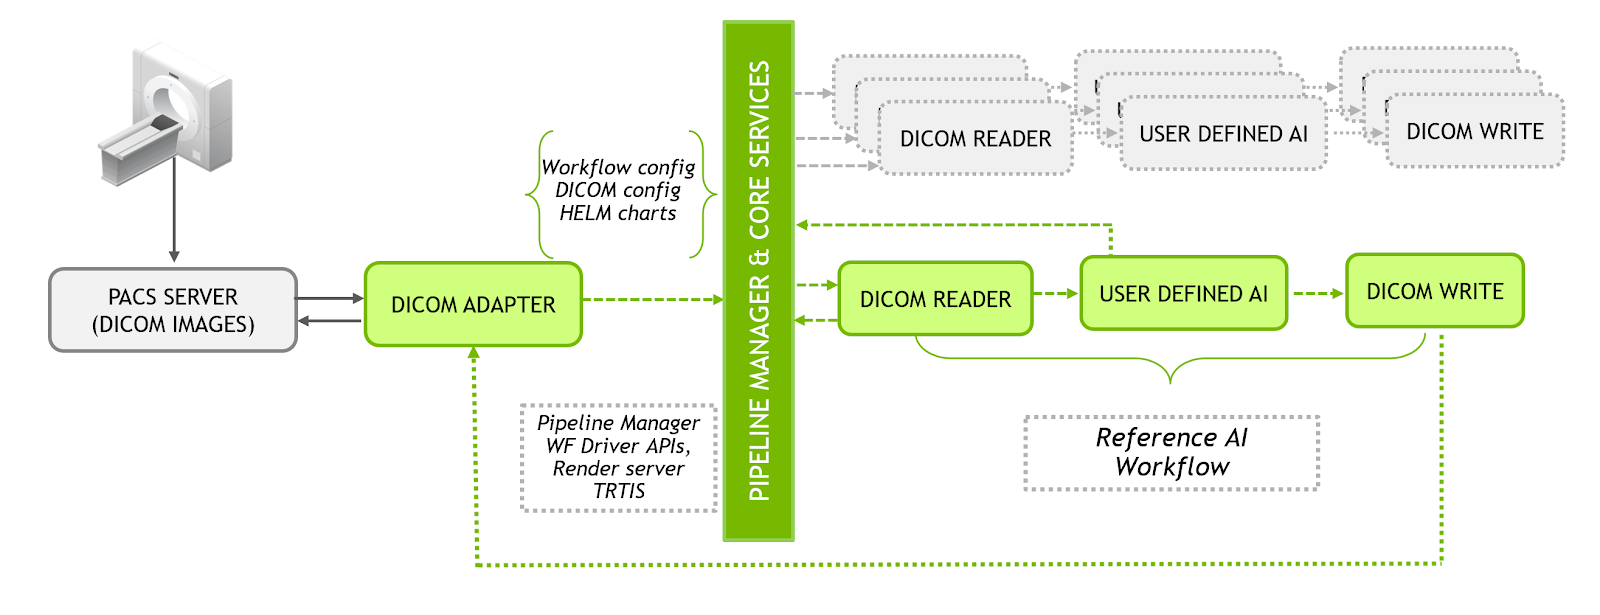
The diagram shows how the different pieces of Clara Deploy framework come together to deliver end-end capabilities for data scientists and developers to build applications that integrate with the hospital ecosystem and scale.
Clara DICOM Adapter Container
The DICOM Adapter is the imaging data interface to Clara Deploy. It implements the necessary DICOM services for interoperability between Clara Deploy and other medical devices and software, allowing it to receive and send DICOM objects using standard DICOM protocols.
- DICOM Adapter provides the ability to receive DICOM data from a PACS or other imaging system
- Places the DICOM data into a payload suitable for an AI workflow trigger through Clara Core container. This requires setting up the right DICOM and workflow configuration files.
- Finally, send results back to a PACS or other imaging system, when appropriate
The Clara Deploy SDK provides configuration files that simplify DICOM Adapter deployment by specifying DICOM Configuration and Workflow parameters. These abstracted configuration files are essential for defining the Clara Deploy workflows. They include parameters required for communicating to the Pipeline Manager to which DICOM study attaches, including specific reference or user-defined workflows. Clara Deploy includes tools that convert the user defined workflow configuration into necessary formats required for Kubernetes Helm.
Pipeline Management and Core Services
Clara Deploy SDK defines the following services as core services:
- The Clara Core container. Manages the workflow and spins up and down the necessary containers needed by the workflow. The user-defined AI containers and all containers in a workflow access the capabilities of the core through the Clara Workflow Driver, described below.
- The Clara Workflow Driver (WFD). This is a library to include as part of your workflow stage’s worker process, and is an essential piece of workflow orchestration. The communication to this module is abstracted via Workflow Driver Client APIs, described below. Workflow Driver migrates research code into multi-stage production development environments.
- Workflow Driver Client API. Provides integration for containers required as part of a workflow. The API delivers the signaling towards Clara Core and between containers, passing the work forward within a workflow from container to container. The API also supports “publishing a study” which in turn invokes TensorRT Inference Server.
- NVIDIA TensorRT Inference Server. A platform for high-performance deep learning inference. Clara Deploy leverages TensorRT Inference server (TRTIS) as a core service to ensure optimized inferencing across defined workflows.
- Clara Render Server (RS). Provides visualization of medical data. The Render Server supports different rendering algorithms and a platform to allow developers to create their own renderers and plug them into the Render Server. The input to the Render Server consists of 3D volume data or 2D image data along with the parameters which determine how to render the data. The output of the Render Server can be an encoded video stream or single images, thus enabling streaming of output on a remote client.
Reference AI Workflows
Clara Deploy SDK includes sample workflows, developers can leverage these workflows with their local DICOM data or use these as examples to define new workflows.
- DICOM Read. The DICOM Reader converts DICOM files into the specific file type that the rest of the workflow needs. The Clara Reference workflow uses MHD files. The DICOM Read container that ships with Clara Reference Workflow converts DICOM series into a single MHD file. DICOM files associat with a DICOM series by the Series Instance UID header.
- AI Reference container. This container provides an example implementation of multi-organ segmentation on abdominal CT. It requires TensorRT Inference server and is an example to show how data scientists/developers can use this AI capability as is with their domain specific DICOM data or use this workflow as an example to define new workflows with bring-your-own AI container. It is required when developing a new workflow to make the associated containers compatible with the workflow driver & update the config files accordingly.
- DICOM Write. The Dicom Writer container is the last container in a workflow. It reads MHD files from the previous container(s) and outputs DICOM files. One or more DICOM files is created for each MHD file.
- Default workflows. We provide a set of default workflows with this release. The details of the default workflows are present in
clara-reference-workflows/README.md
Visualization Capabilities
Dashboard Container. NVIDIA Clara Deploy supports viewing system status through a web-based dashboard that makes it easy for administrators to see how the system is performing. Clara also supports rendering of specific kinds of study data as 3D visualizations through the same web-based interface. While workflow jobs do not have direct access to the visualization services, they can publish study data to the provided Render Server.
Defining and Creating Workflows in the CLARA Deploy Framework
Let’s look at an example walk-through of defining and creating a sample workflow.
Command line tool
Clara Deploy SDK includes a command line tool, clara-wf [ ]. Developers can use this tool to define a workflow, helm chart creation/update for a new or existing containers, and testing workflows locally.
./clara-wf [command] [arguments...]

Command List
  list_stages     | list   | ls
  create_stage    | create | cs  [stage name]
  delete_stage    | delete | ds  [stage name]
  publish_chart   | publish      [workflow id] [workflow name] [output folder path]
  test_workflow   | test         [workflow id] [job id]
    default args: 613e3fce-0d96-495a-a760-f43e68deefd8 00000000-0000-0000-0000-000000000000
  install_trtis
  uninstall_trtis
  set_ngc_api_key | setkey
Workflow definition
- workflow ID. Workflow id is created manually and configured with
dicom-serverconfig file. - name. User defined workflow name. This name is used in
dicom-serverconfiguration. - stages. Containers used in the workflow. Sequence of the containers under “stages” defines the sequence in which containers are used in the workflow.
- waitlocks. Dependency of each stage on other stages. Lock files are automatically generated based on stage name.
- ioFolders. Input of each stage in the workflow. Last entry is the output of the last stage of the workflow. The result in the last entry is send to a DICOM destination.
- args. Command line arguments supported for this workflow and defined in the helm chart for the container. Arguments and its value is written within double quotes and it is picked up for execution at runtime.
Creating container helm chart
Let’s now take a look at how Helm charts for user defined containers can be created.
- Ensure container is updated with clara driver callbacks
- Navigate to
clara-reference-workflowsfolder - Execute:
./clara-wf cs [container-name]- e.g
./clara-wf cs ai-vnet
- e.g
- Executing step 3 will generate [container-name] specific fields in clara-reference-workflow/charts/clara-workflow/values.yaml file
- Open clara-reference-workflow/charts/clara-workflow/values.yaml
- Locate container specific fields under “stages:” section. Verify the key value pairs are same as defined by the user container, otherwise update it manually.
- Container specific arguments can be passed via workflow definition
Example container helm chart
Here, the user adds ai-vnet container as a stage via clara-wf CLI. The following is generated for ai-vnet container in clara-reference-workflow/charts/clara-workflow/values.yaml.
stages:
    ##BEGIN_ai-vnet##
        ai-vnet:
            image:
                repository: ai-vnet
                tag: latest
        mount:
            in:
                name: "input"
            out:
                name: "output"
        stageName: "ai-vnet"
        appDir: "/app"
        inputLock: "/app/locks/input.lock"
        inputs: "input"
        logName: "/app/logs/ai-vnet.log"
        outputs: "output"
        lockDir: "/app/locks"
        lockName: "ai-vnet.lock"
        timeout: "300"
    ##END_ai-vnet##
Workflow creation steps. Let’s assume the developer wants to create a workflow with dicom-reader container, user-ai container, and dicom-writer container. The name of the workflow is user-workflow. The dicom-reader and dicom-writer containers are provided by Clara Deploy SDK; user-ai container is a user-created ai container.
- The
user-aicontainer must be updated with clara workflow driver callbacks. By default, thedicom-readeranddicom-writercontainers update with clara workflow driver callbacks. For additional details refer to section 6.2 of Clara Deploy SDK Documentation. - Ensure container-specific helm details get generated for each container and is present under
stage:inclara-reference-workflow/charts/clara-workflow/values.yaml. Verify the correctness of each container specific key-value details. - Generate the workflow ID. Executing
cat /proc/sys/kernel/random/uuidon the command prompt results in an ID that can be used for a new workflow. - Update
clara-reference-workflow/charts/clara-workflow/values.yamlwith the newly created workflow. This is done under theworkflowskey - Add the
workflow ID, name (user-workflow), stages in the workflow, waitLocks for each stage, ioFolders for each stage, and any desired arguments to be passed for the container(s). Optionally the config details below can be used.
New workflow with ID 7b413e24-d018-4689-8c41-73272f6649d4 is created.
- Workflow name is
user-workflow. - Workflow uses
dicom-reader,user-aianddicom-writercontainers - Sequencing of containers is
dicom-reader->user-ai->dicom-writer - Workflow starts with
dicom-reader, output ofdicom-readerfeeds touser-aiand the output ofuser-ai feeds intodicom-writer - The
user-aicontainer waits ondicom-reader.lockfile anddicom-writerwaits onuser-ai.lockfile. - ioFolders specify the input folder of each container. The last entry inputs to
dicom serverto read the result.
 ```bash
 7b413e24-d018-4689-8c41-73272f6649d4
 name: "user-workflow"
 stages: ["dicom-reader", "user-ai", "dicom-writer"]
 waitLocks: ["", "dicom-reader.lock", "user-ai.lock"]
 ioFolders: ["dicom-reader/input", "dicom-reader/output", "user-ai/output", "dicom-writer/output"]
 args: ["", "", ""]
 ```
Note: The random workflow ID can be used only for one workflow, for any other new workflow a new ID must be created.
- Locate the dicom data to be used in the workflow and send it to dicom server. The dicom server must be configured in
clara-platform/files/dicom-server-config.yamlfile. - Update dicom config settings. First, navigate to
clara-platform/filesfolder and opendicom-server-config.yaml. Either use an existingAE-TITLEor include theAE-TITLEto be used under theae-titles:key. Last, include the new workflow under theworkflows:key. Add the new workflow with following details: name, clara-ae-title, destination name, and workflow ID. Optional config details below can be used.
name: user-workflow
     clara-ae-title: CT_AI
     destination-name: DCM4CHEE
     workflow: 7b413e24-d018-4689-8c41-73272f6649d4
- Execute new workflow locally. First, navigate to the clara-references-workflows folder. Then execute
./clara-wf test [workflow-ID]. In the case of the example here, this would look like, For the example case:
./clara-wf test 7b413e24-d018-4689-8c41-73272f6649d4
Obtaining the Clara Deploy SDK
The Clara Deploy SDK open beta has been released at GTC’2019.You can download the SDK here We would like to hear your feedback and to engage on the latest developments please join the Clara Deploy SDK Forum.