AI workflows are complex. Building an AI application is no trivial task, as it takes various stakeholders with domain expertise to develop and deploy the application at scale. Data scientists and developers need easy access to software building blocks, such as models and containers, that are not only secure and highly performant, but which have the necessary underlying architecture to build their AI models. After an application is built, DevOps and IT managers need tools that can help them deploy and manage these applications seamlessly across various devices, located on-premises, on the cloud, or at the edge.
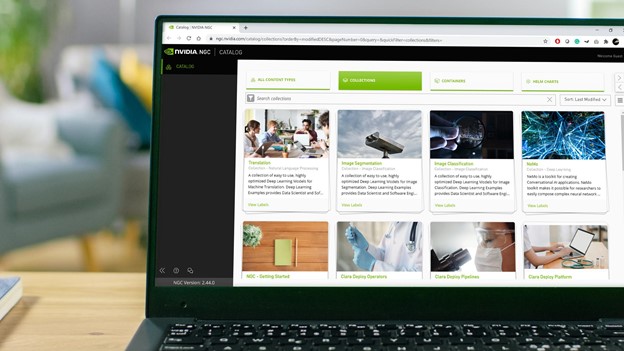
NVIDIA built the NGC Catalog to simplify and accelerate AI workflows by providing easy access to GPU-optimized software, such as the containers, pretrained models, application frameworks, and Helm charts needed to build your AI applications.
In this post, we show how you can use the NGC catalog and its core underlying features, such as collections, the NGC Private Registry, and AI building blocks to build and deploy a mask-detection application, as an example that shows the development-to-deployment pipeline
Streamlining the user journey
With the launch of NGC Collections, NVIDIA simplified the overall user experience and brought together the relevant containers, models, code, and Helm charts that you need, in one place, without you having to locate and coordinate various individual building blocks across the catalog.
You can find NGC Collections for task-specific workloads, like automatic speech recognition or image classification, and industry SDKs, like NVIDIA Clara or Transfer Learning Toolkits (TLT). If you’re looking to build an application for object detection, then search for that collection in the catalog and you’ll find all the related assets in one place.
Prerequisites
To get started, here’s a checklist to complete before building the application:
- Configure a GPU instance:
- Install and configure the Docker runtime.
- Install and configure the NGC CLI.
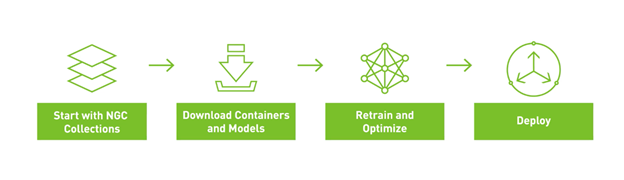
Figure 1 shows the overall workflow for re-creating the entire example. You start with NGC Collections, download the relevant models and containers, retrain, optimize the model for inference, and then deploy it for inference using Helm charts.
Fetch and start the TLT container
As we described earlier, NGC Collections make building AI extremely seamless. We curate all the deep learning software applications, associated models, and code samples into one easy-to-use place so you can find everything that you need quickly and easily.
In the TLT collection, there’s a detailed overview that walks you through what TLT is, how it works, and where to get started. The Entities tab also lists all the NGC content that helps you work with TLT: containers, models, Helm charts, and other resources.
The first step is to fetch the TLT container from NGC onto the GPU instance. For more information about installing and configuring Docker, see Orientation and setup. For more information about the TLT container itself, from the TLT collection’s Entities tab, select the Transfer Learning Toolkits For Streaming Video Analytics container.
The container page has all the information including dependencies and documentation to get started. In the top-level metadata area, there’s a code block with the exact Docker command that you need to pull this container to your GPU instance.
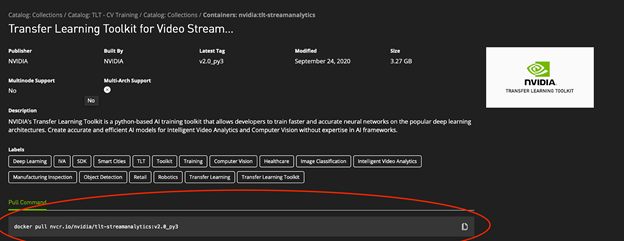
Copy and paste the Docker command into your terminal session to get the latest version of the GPU-optimized TLT container to your machine:
$ docker pull nvcr.io/nvidia/tlt-streamanalytics:v2.0_py3The overview page for the container also has the commands needed to start the container in an interactive terminal session. Http requests are forwarded from port 80:8888 for the Jupyter notebook. A local directory is mounted on the GPU instance with access to the dataset for transfer learning:
$ docker run --gpus all -it -v "/path/to/dir/on/host":"/path/to/dir/in/docker" \-p 80:8888 nvcr.io/nvidia/tlt-streamanalytics:v2.0_py3 /bin/bash
The TLT container comes preinstalled with the NGC CLI to simplify working with models and code from the catalog. You can use this CLI to grab the example notebook that accompanies this post. It gives with all the instructions and code needed using the following command:
$ ngc registry resource download-version "nvidia/gtcfallngcdemo:1.0.0"Start the Jupyter notebook and access the notebook from your web browser:
$ jupyter notebook --ip 0.0.0.0 --port 8888 --allow-rootGet the dataset preprocessing scripts from GitHub
Because TLT requires the datasets to be in the KITTI format, you must convert some of the raw data by grabbing the helper scripts from the example. The example is available on the TLT GitHub page. Run the following command:
!git clone https://github.com/NVIDIA-AI-IOT/face-mask-detection.gitThis downloads the helper scripts onto the machine. The next step is to install the dependencies:
#Fixes the fact that pip doesn't work in Ubuntu right now...!curl https://bootstrap.pypa.io/get-pip.py -o get-pip.py!python3 get-pip.py --force-reinstall# Install dependencies!cd face-mask-detection && python3 -m pip install -r requirements.txt
Download the datasets
The face mask detection demo uses four different datasets:
- Faces with a mask:
- Kaggle Mask Dataset
- MAFA – MAsked FAces: Pass Code: 4fz6
- Faces without a mask:
The downloaded datasets must be in a specific data tree structure for the example to work. If you’ve downloaded the required datasets to your machine in the required structure, modify the following command to copy them to your GPU cluster:
scp -r <downloaded_data> </home/workspace>Prepare the dataset
To use the datasets with TLT, they must be converted to KITTI format. The GitHub repository that you downloaded earlier provides helper scripts that convert each of the four datasets.
Here’s the template command to execute:
python3 data2kitti.py --kaggle-dataset-path <kaggle dataset absolute directory path> \--mafa-dataset-path <mafa dataset absolute directory path> \--fddb-dataset-path < FDDB dataset absolute directory path> \--widerface-dataset-path <widerface dataset absolute directory path> \--kitti-base-path < Out directory for storing KITTI formatted annotations > \--category-limit < Category Limit for Masked and No-Mask Faces > \--tlt-input-dims_width < tlt input width > \--tlt-input-dims_height <tlt input height > \--train < for generating training dataset >
Set up those absolute paths. If you followed the structure from the SCP command earlier, you shouldn’t have to change anything in the next command. The TLT_INPUT_DIMS properties are model-dependent. The example uses the default values for DetectNet-V2. For more information, see Object Detection with DetectNetv2. Search for the model architecture that you need and update the values accordingly.
DetectNet_v2
- Input size: C * W * H (where C = 1 or 3, W > =960, H >=544 and W, H are multiples of 16)
- Image format: JPG, JPEG, PNG
- Label format: KITTI detection
To convert the datasets to KITTI format, use the following commands:
!python3 /workspace/face-mask-detection/data2kitti.py --kaggle-dataset-path $KAGGLE_DATASET_PATH \--mafa-dataset-path $MAFA_DATASET_PATH \--fddb-dataset-path $FDDB_DATASET_PATH \--widerface-dataset-path $WIDERFACE_DATASET_PATH \--kitti-base-path $KITTI_BASE_PATH \--category-limit $CATEGORY_LIMIT \--tlt-input-dims_width $TLT_INPUT_DIMS_WIDTH\--tlt-input-dims_height $TLT_INPUT_DIMS_HEIGHT \--train
Prepare TF records form KITTI format datasets
With the data processed, you must generate the TFRecords, which is the final step before you start working the training process. The following commands update the TFRecords spec file to take in the KITTI format dataset and create TFRecords using tlt-dataset-convert.
First, you must move the template spec files downloaded from GitHub to the /Spec directory:
!mkdir detectnet_v2!mkdir $SPECS_DIR!mv face-mask-detection/tlt_specs/* $SPECS_DIR!ls $SPECS_DIR
Next, edit the $SPECS_DIR/detectnet_v2_tfrecords_kitti_trainval.txt file to point to the converted images. This command updates that specs file to match the face mask detection use case:
%env KITTI_CONFIG=kitti_config {\root_directory_path: "/workspace/converted_datasets/train/"\image_dir_name: "images"\label_dir_name: "labels"\image_extension: ".jpg"\partition_mode: "random"\num_partitions: 2\val_split: 20\num_shards: 10 }
In this step, use the TLT dataset conversion function to generate the TFRecord files needed to retrain the model:
!tlt-dataset-convert -d $SPECS_DIR/detectnet_v2_tfrecords_kitti_trainval.txt \-o $DATA_DOWNLOAD_DIR/tfrecords/kitti_trainval/
Download the pretrained model
You’re nearly there! To retrain using TLT, in the NGC catalog, grab the latest Object Detection model or DetectNet model.
It’s worth noting that for DetectNet_v2, the input is expected to be 0-1 normalized with input channels in RGB order. Therefore, for optimum results, download models with *_detectnet_v2 in their name. All other models expect input preprocessing with mean subtraction and input channels in RGB order, so using them as pretrained weights may result in suboptimal performance.
The NGC CLI can be used to list all the DetectNet models in the catalog:
!ngc registry model list nvidia/tlt_pretrained_detectnet_v2:*Make a directory to store the pretrained model:
!mkdir -p $USER_EXPERIMENT_DIR/pretrained_resnet18/Now download the model from the NGC catalog:
!ngc registry model download-version nvidia/tlt_pretrained_detectnet_v2:resnet18 \--dest $USER_EXPERIMENT_DIR/pretrained_resnet18
Using TLT to train-prune-train the face mask detector
Training the face mask detector is a three-stage process:
- Use transfer learning to retrain the pretrained model from the NGC catalog using the prepared custom dataset.
- Prune that model to remove unnecessary weights.
- Retrain the pruned model to ensure accuracy.
Provide the training specs file
Supplying a training spec file to TLT is essential to start the retraining process. You can see that the specs file contains the following information:
TFRecordsfor the training datasets- To use the newly generated
TFRecords, update thedataset_configparameter in the spec file. - Update the fold number to use for evaluation. In case of random data split, please use fold 0 only.
- To use the newly generated
- For a sequence-wise split, you may use any fold generated from the dataset convert tool.
- Pretrained models
- Augmentation parameters for on-the-fly data augmentation
- Other training (hyper-)parameters such as batch size, number of epochs, learning rate, and so on.
Update the detectnet_v2_train_resnet18_kitti.txt training spec file to point to the model weights downloaded from the NGC catalog:
workspace/detectnet_v2/specs/detectnet_v2_train_resnet18_kitti.txt| Property | Value |
tfrecords_path | /workspace/data/tfrecords/kitti_trainval/* |
image_directory_path | /workspace/converted_datasets/train |
pretrained_model_file | /workspace/detectnet_v2/pretrained_resnet18/tlt_pretrained_detectnet_v2_vresnet18/resnet18.hdf5 |
detectnet_v2_train_resnet18_kitti.txt file. Run TLT Training
It’s now time to train the model by providing the following information to TLT to start the experiment:
- Training specification file (viewed earlier)
- Output directory location for the retrained models
- The model’s key specified earlier
- The network type used for training
The training may take hours to complete. A single-GPU was used for this example, but you can significantly accelerate the training time by using multi-GPU or cluster-based systems.
!tlt-train detectnet_v2 -e $SPECS_DIR/detectnet_v2_train_resnet18_kitti.txt \-r $USER_EXPERIMENT_DIR/experiment_dir_unpruned \-k $KEY \-n resnet18_detector
Evaluate the trained model
After the transfer learning has completed, you can use TLT to evaluate the model’s performance against the test data.
-e—The experiment details from the specification file.-m—The retrained model.-k—The model’s key specified earlier.
!tlt-train detectnet_v2 -e $SPECS_DIR/detectnet_v2_train_resnet18_kitti.txt \-r$USER_EXPERIMENT_DIR/experiment_dir_unpruned \-k $KEY \-n resnet18_detector
Prune the trained model
Pruning the model is an important step as it optimizes the model and removes unnecessary weights required for low-latency inference, which is essential for the streaming video use case. The parameters are as follows:
-m—The pretrained model to prune.-eq—Equalization criterion, applicable for ResNet and MobileNet models.-pth—Threshold for pruning. 0.01 is a great starting point for detectnet_v2 models.-k—A key for saving/loading the model.-o—Output directory for the pruned model.
The following code prunes the model:
!tlt-prune -m $USER_EXPERIMENT_DIR/experiment_dir_unpruned/weights/resnet18_detector.tlt \-o $USER_EXPERIMENT_DIR/experiment_dir_pruned/resnet18_nopool_bn_detectnet_v2_pruned.tlt \-eq union \-pth 0.8 \-k $KEY
Retrain the pruned model
You have to retrain the pruned network to bring back any accuracy lost during the pruning phase. First, update the experiment file and set load_graph to true in the model_config file. Then, update the specification for retraining, which uses the pruned model as the pretrained weights.
If the model shows some decrease in mAP, it could be that the originally trained model was pruned a little too much. Try reducing the pruning threshold in the previous step, thereby reducing the pruning ratio, and use the new model to retrain.
Now, change the following parameters by editing the detectnet_v2_retrain_resnet18_kitti.txt file:
workspace/detectnet_v2/specs/detectnet_v2_retrain_resnet18_kitti.txt| Property | Value |
tfrecords_path | /workspace/data/tfrecords/kitti_trainval/* |
image_directory_path | /workspace/converted_datasets/train |
pretrained_model_file | /workspace/detectnet_v2/experiment_dir_pruned/resnet18_nopool_bn_detectnet_v2_pruned.tlt |
detectnet_v2_retrain_resnet18_kitti.txt.You can use TLT to retrain the pruned model as follows:
# Retraining using the pruned model as pretrained weights

!tlt-train detectnet_v2 -e $SPECS_DIR/detectnet_v2_retrain_resnet18_kitti.txt \
                        -r $USER_EXPERIMENT_DIR/experiment_dir_retrain \
                        -k $KEY \
                        -n resnet18_detector_pruned
Evaluate the pruned model
You can evaluate the pruned and retrained model, using tlt-evaluate and view the performance of the face detector:
!tlt-evaluate detectnet_v2 -e $SPECS_DIR/detectnet_v2_retrain_resnet18_kitti.txt \
                           -m $USER_EXPERIMENT_DIR/experiment_dir_retrain/weights/resnet18_detector_pruned.tlt \
                           -k $KEY
Export the TLT model for inference
The final step is to export the TLT model for inference with DeepStream, which enables the use of the mask-detector application in the field. Use the tlt-export utility to export the weights:
!mkdir -p $USER_EXPERIMENT_DIR/experiment_dir_final_pruned

# Removing a preexisting copy of the etlt if there is one.
import os
output_file=os.path.join(os.environ['USER_EXPERIMENT_DIR'],

"experiment_dir_final/resnet18_detector_pruned.etlt")
if os.path.exists(output_file):
     os.system("rm {}".format(output_file))
!tlt-export detectnet_v2 \
     -m
$USER_EXPERIMENT_DIR/experiment_dir_retrain/weights/resnet18_detector_pruned.tlt \
     -o
$USER_EXPERIMENT_DIR/experiment_dir_final_pruned/resnet18_detector_pruned.etlt \
     -k $KEY
Prepare the DeepStream configuration files
To effectively use the model with NVIDIA DeepStream application for inference, update the configuration files to match the newly trained model. Update the following parameters:
/workspace/face-mask-detection/ds_configs/config_infer_primary_masknet_gpu.txttlt-encoded-model—Relative path for your model when deployed in the DeepStream container. If you’re following this notebook,./resnet18_detector_pruned.etltis the answer.labelfile-path—Relative path to the labels file for your notebook../labels.txtinput-dims—These should match the input-dims values set previously: 960×544.model-engine—Same path as the model file but with the.enginenetwork-mode—Network mode for your deployment. As you’re using a livestream, this needs to be2.
You don’t need to make any changes to the labels file, as you are using the same classes as the example from GitHub.
mask—Positive class, where the subject is wearing a mask.no-mask—Negative class, where the subject in the video is not wearing a mask.default—Default for the DetectNet model.
You also must get a DeepStream configuration that is available in the DeepStream container itself, but because you are deploying with Helm, you must create your own. Grab the example from GitHub and modify it for your use case.
There are two properties required for the configuration:
- RTSP Stream Location—URL of the video feed.
- DeepStream Inference Config—Path to the updated model’s inference configuration.
As this configuration was updated previously, no further action is required.
!wget https://raw.githubusercontent.com/ChrisParsonsDev/ngc-gtc-content/master/demo-assets/dsconfig.txtYou have now used TLT to retrain a DetectNet model to identify people wearing face masks in streaming video. The final phase is to deploy the application using a Helm chart.
Publishing the model to an NGC private registry
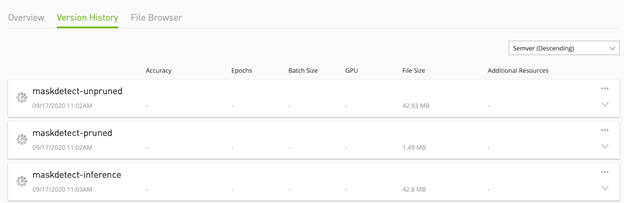
You can upload the final model to the NGC private registry, so that other members of your team can take advantage of the model for their use cases. However, this is not a requirement as you can also deploy the model from your own internal repository. After this is completed, you should see the model listed in the NGC Private Registry UI (Figure 3).
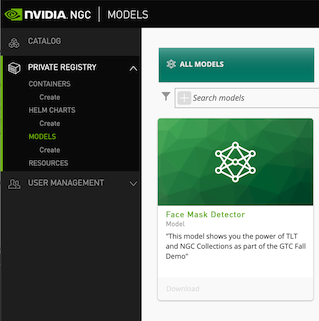
Figure 4 shows the model versions in NGC.
Package the app with Helm
NGC has a full Helm registry, which you can use to manage your Helm charts, as well as a Helm Catalog. You can modify the DeepStream chart available in the NGC catalog to create a packaged deployment pattern for the mask detector.
Download and install Helm and plugins
The first step is to download and install Helm in your environment. This allows you to download and publish charts to the NGC Private Registry. You must install the following components:
- Helm—The orchestration tool.
- Helm Push Plugin—Used to publish charts to NGC.
To install Helm, use the following commands:
!curl -fsSL -o get_helm.sh https://raw.githubusercontent.com/helm/helm/master/scripts/get-helm-3!chmod 700 get_helm.sh!./get_helm.sh
To install the push plugin, use the following command:
!helm plugin install https://github.com/chartmuseum/helm-push.gitLog in to the NGC Helm registry
The NGC documentation provides step-by-step instructions for configuring your Helm environment. You can use the NGC CLI API key set earlier to authenticate with the Helm services well. You must add two Helm repositories: the public catalog, so you can grab the starter DeepStream chart and the NGC Private Registry, so you can share and modify the chart to use the face detector model.
Log in to the NGC Catalog and private registry:
!helm repo add ngc-catalog https://helm.ngc.nvidia.com/nvidia
# Edit the repo name/url to match your private registry
!helm repo add ngc-privatereg https://helm.ngc.nvidia.com/ngcvideos --username=\$oauthtoken --password=$NGC_KEY
Download the DeepStream Helm chart
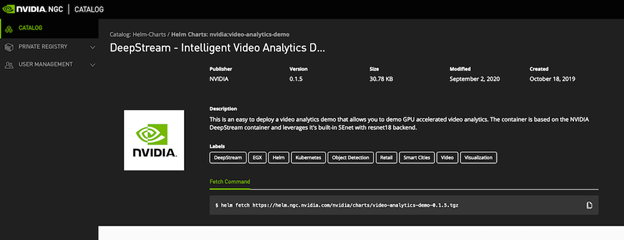
Download the DeepStream chart from NGC and modify it for the mask-detection use case. Use the Helm CLI to check if it’s available in the NGC Catalog:
!helm search repo video-analytics-demoNow, fetch the chart from the NGC Catalog and pull it to your local environment. The NGC UI makes this workflow easy. Like pulling models and containers, use the helm fetch command right in the user interface (Figure 5).
Modify the chart to use the model
After you’ve downloaded the chart from the NGC Catalog, you must modify it to work with the mask-detector model.
- Rename the chart for the private registry.
- Unzip the chart.
- Edit the chart to point to the model.
- Package the chart.
Edit the following properties under the ngcModel heading in the values.yaml file to point the chart to the face detector model:
getModel—NGC CLI command to download the model from our private registry.name—Name of the model.filename—Name of the model file.modelConfig—Config file for the model.
Edit the camera details to point to your own video stream:
camera1—Link to thertspstream for the camera.
You can add other cameras by adding new rows such as camera2 && camera3, and so on.
In the example, update the values.yaml file with the following properties:
| Property | Value |
getModel | wget --content-disposition https://api.ngc.nvidia.com/v2/models/ngcvideos/facemaskdetector/versions/maskdetect-inference/zip -O facemaskdetector_maskdetect-inference.zip |
name | facemaskdetector |
filename | resnet18_detector_unpruned.etlt |
modelConfig | /opt/nvidia/deepstream/deepstream5.0/samples/configs/tlt_pretrained_models/config_infer_primary_detectnet_v2.txt |
camera1 | rtsp://admin:password@IPAddress/Streaming/Channels/101 |
You can see what the completed values.yaml file looks like by executing the code example.
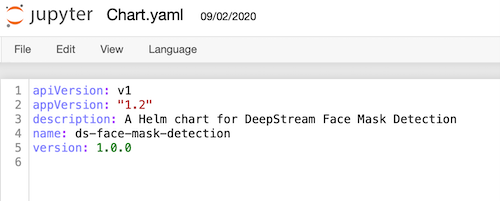
Next, update the chart.yaml file to update the name description and version number for the modified chart:
name—The name of the packaged chart.description—Short description of the chart.version—SemVer version of the chart.
The updated values should read as follows:
| Property | Value |
name | ds-face-mask-detection |
description | A Helm chart for DeepStream face mask detection. |
Version | 1.0.0 |
Publish the chart to an NGC private registry
Now that you have edited the chart values, package the Helm chart and publish it to your private registry. The first step is to package the chart with the helm package command:
!helm package video-analytics-demoThe following command pushes that chart to the private registry:
!helm push ds-face-mask-detection-1.0.0.tgz ngc-privateregYou can deploy this using the NVIDIA Fleet Command hybrid-cloud platform or by running the helm install command. After the application is deployed and attached to the RTSP camera stream, it can detect if people are wearing face masks in real time.
Summary
In this post, we showed how you can use NGC Collections to build a face-detection application from start to finish by using all the building blocks, such as containers, pretrained models, and Helm charts. You can also use other collections in the NGC catalog to custom-build your AI application for your use case.
For more information about getting started with your own mask-detection application, see the NGC GTC Fall 2020 Notebook.ipynb notebook.
